——
#DonLucElectronics #DonLuc #DFRobot #SHT40 #FireBeetle2ESP32E #EEPROM #RTC #SD #Display #Adafruit #ESP32 #IoT #Arduino #Project #Fritzing #Programming #Electronics #Microcontrollers #Consultant
——
——
——
——
Adafruit SHARP Memory Display Breakout – 1.3″ 168×144 Monochrome
The 1.3″ 168×144 SHARP Memory LCD display is a cross between an eInk (e-Paper) display and an LCD. It has the ultra-low power usage of eInk and the fast-refresh rates of an LCD. This model has a gray background, and pixels show up as black-on-gray for a nice e-Reader type display. It does not have a backlight, but it is daylight readable. For dark/night reading you may need to illuminate the LCD area with external LEDs.
The bare display is 3 Volt powered and 3 Volt logic, so we placed it on a fully assembled & tested breakout board with a 3 Volt regulator and level shifting circuitry. Now you can use it safely with 3 Volt or 5 Volt power and logic. There are four mounting holes so you can easily attach it to a box.
The display is “Write Only” which means that it only needs 3 pins to send data. However, the downside of a write-only display is that the entire 168×144 bits must be buffered by the microcontroller driver. That means you cannot use this with an ATmega328 or ATmega32u4. You must use a high-RAM chip such as ATSAMD21, Teensy 3, ESP8266, ESP32, etc. On those chips, this display works great and looks wonderful.
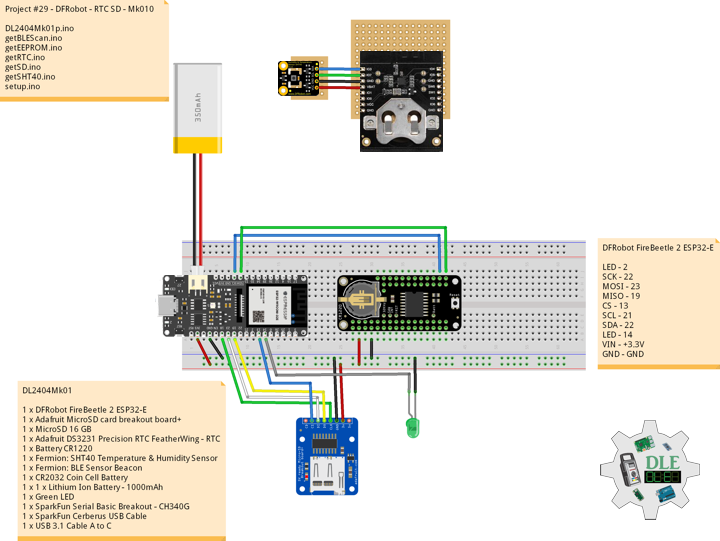
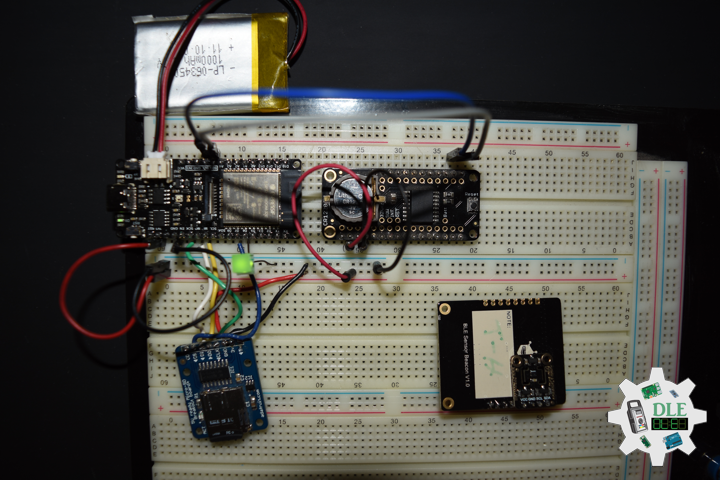
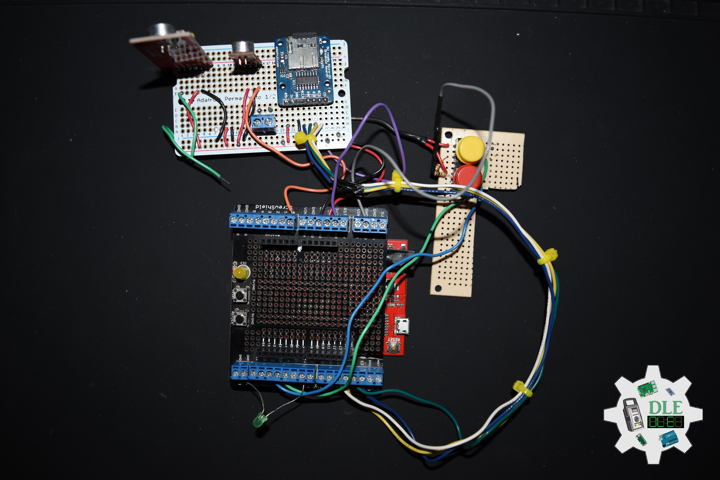
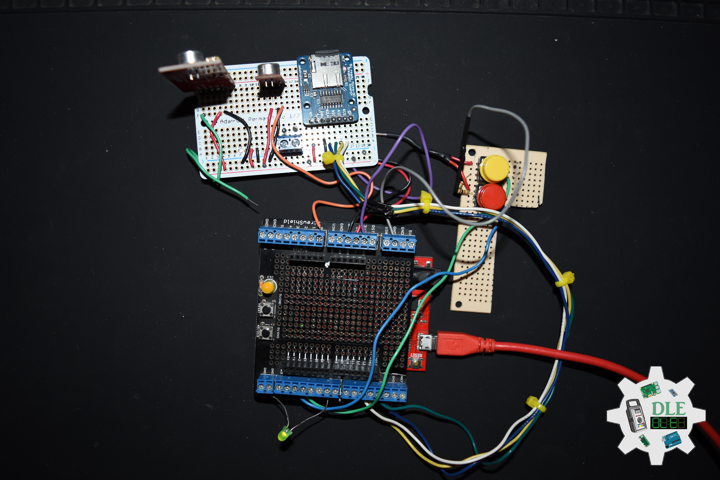
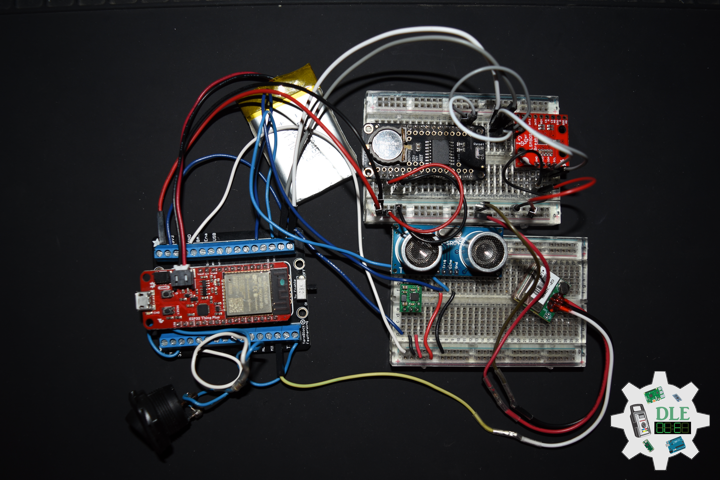
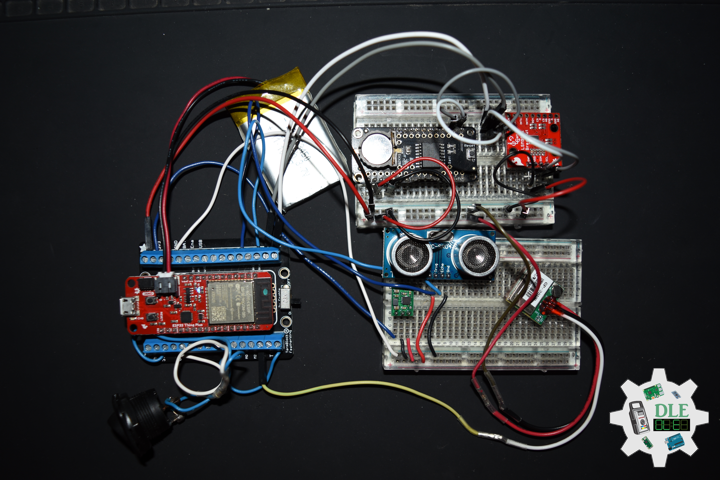
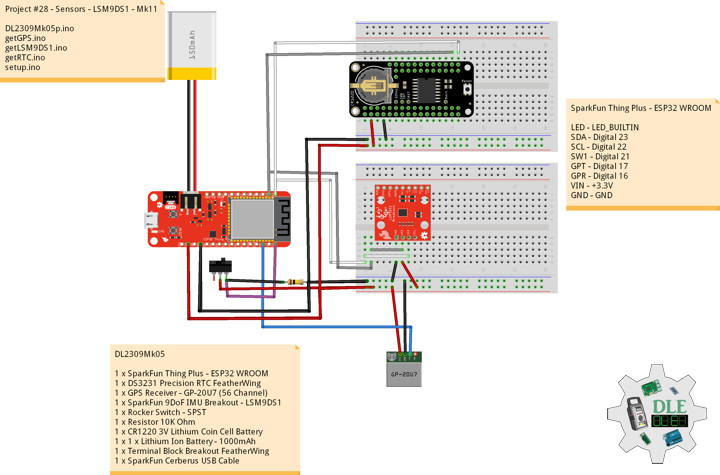
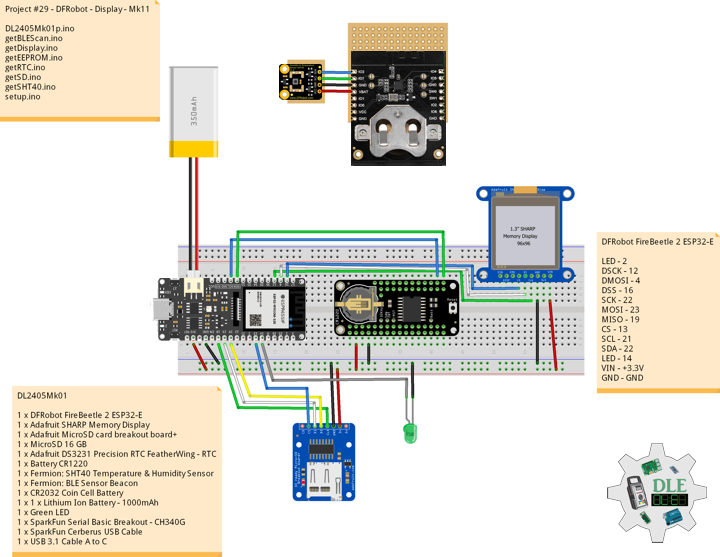
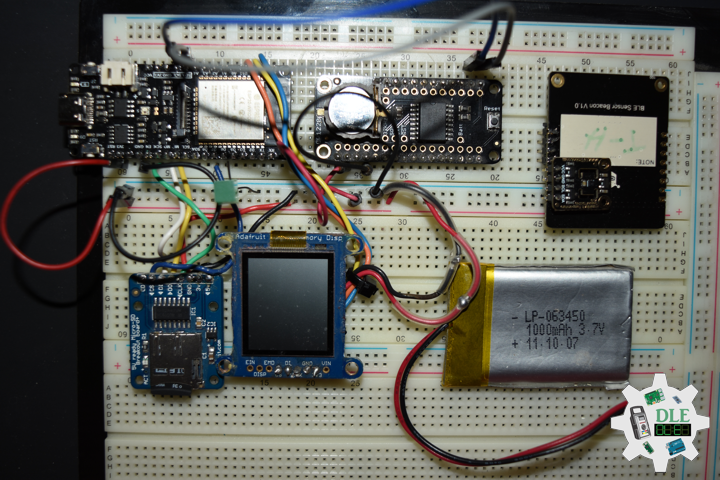
DL2405Mk01
1 x DFRobot FireBeetle 2 ESP32-E
1 x Adafruit SHARP Memory Display
1 x Adafruit MicroSD card breakout board+
1 x MicroSD 16 GB
1 x Adafruit DS3231 Precision RTC FeatherWing – RTC
1 x Battery CR1220
1 x Fermion: SHT40 Temperature & Humidity Sensor
1 x Fermion: BLE Sensor Beacon
1 x CR2032 Coin Cell Battery
1 x 1 x Lithium Ion Battery – 1000mAh
1 x Green LED
1 x SparkFun Serial Basic Breakout – CH340G
1 x SparkFun Cerberus USB Cable
1 x USB 3.1 Cable A to C
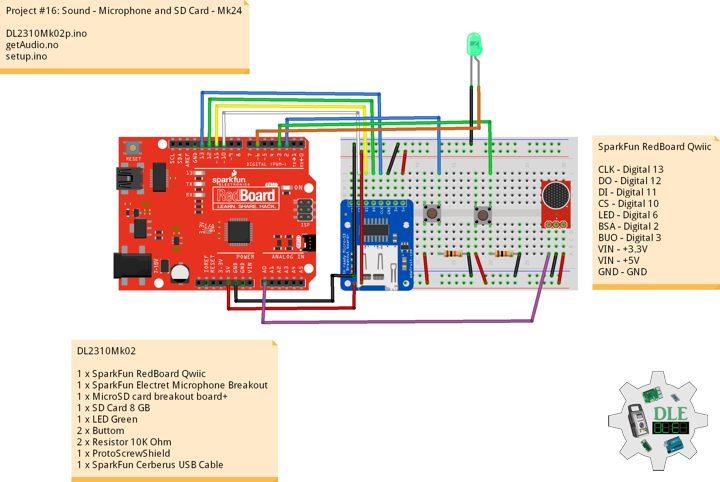
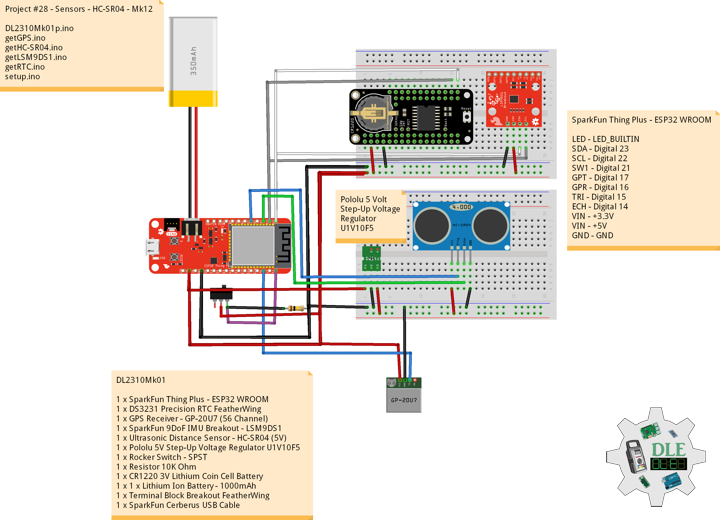
DFRobot FireBeetle 2 ESP32-E
LED – 2
DSCK – 12
DMOSI – 4
DSS – 16
SCK – 22
MOSI – 23
MISO – 19
CS – 13
SCL – 21
SDA – 22
LED – 14
VIN – +3.3V
GND – GND
——
DL2405Mk01p.ino
/****** Don Luc Electronics © ******
Software Version Information
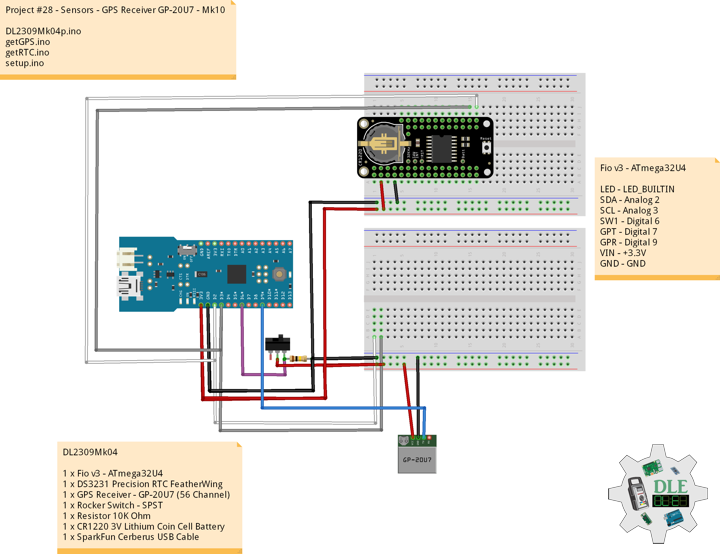
Project #29 - DFRobot - Display - Mk11
29-11
DL2404Mk01p.ino
1 x DFRobot FireBeetle 2 ESP32-E
1 x Adafruit SHARP Memory Display
1 x Adafruit MicroSD card breakout board+
1 x MicroSD 16 GB
1 x Adafruit DS3231 Precision RTC FeatherWing - RTC
1 x Battery CR1220
1 x Fermion: SHT40 Temperature & Humidity Sensor
1 x Fermion: BLE Sensor Beacon
1 x CR2032 Coin Cell Battery
1 x 1 x Lithium Ion Battery - 1000mAh
1 x Green LED
1 x SparkFun Serial Basic Breakout - CH340G
1 x SparkFun Cerberus USB Cable
1 x USB 3.1 Cable A to C
*/
// Include the Library Code
// EEPROM Library to Read and Write EEPROM
// with Unique ID for Unit
#include "EEPROM.h"
// Wire
#include <Wire.h>
// Arduino
#include <Arduino.h>
// BLE Device
#include <BLEDevice.h>
// BLE Utils
#include <BLEUtils.h>
// BLEScan
#include <BLEScan.h>
// BLE Advertised Device
#include <BLEAdvertisedDevice.h>
// BLE Eddystone URL
#include <BLEEddystoneURL.h>
// BLE Eddystone TLM
#include <BLEEddystoneTLM.h>
// BLE Beacon
#include <BLEBeacon.h>
// DS3231 RTC Date and Time
#include <RTClib.h>
// SD Card
#include "FS.h"
#include "SD.h"
#include "SPI.h"
// SHARP Memory Display
#include <Adafruit_SharpMem.h>
#include <Adafruit_GFX.h>
// ENDIAN_CHANGE
#define ENDIAN_CHANGE_U16(x) ((((x)&0xFF00) >> 8) + (((x)&0xFF) << 8))
// DS3231 RTC Date and Time
RTC_DS3231 rtc;
String sDate;
String sTime;
// MicroSD Card
const int chipSelect = 13;
String zzzzzz = "";
// SHARP Memory Display
#define SHARP_SCK 12
#define SHARP_MOSI 4
#define SHARP_SS 16
// Set the size of the display here, e.g. 144x168!
Adafruit_SharpMem display(SHARP_SCK, SHARP_MOSI, SHARP_SS, 144, 168);
// The currently-available SHARP Memory Display (144x168 pixels)
// requires > 4K of microcontroller RAM; it WILL NOT WORK on Arduino Uno
// or other <4K "classic" devices.
#define BLACK 0
#define WHITE 1
// LED Green
int iLEDGreen = 2;
// Define LED
int iLED = 14;
// Fermion: SHT40 Temperature & Humidity Sensor
// Temperature
float TemperatureData;
float Temperature;
// Humidity
float HumidityData;
float Humidity;
// In seconds
int scanTime = 5;
// BLE Scan
BLEScan *pBLEScan;
// My Advertised Device Callbacks
class MyAdvertisedDeviceCallbacks : public BLEAdvertisedDeviceCallbacks
{
// onResult
void onResult(BLEAdvertisedDevice advertisedDevice)
{
// Advertised Device
if (advertisedDevice.haveName())
{
// Name: Fermion: Sensor Beacon
if(String(advertisedDevice.getName().c_str()) == "SHT40"){
// strManufacturerData
std::string strManufacturerData = advertisedDevice.getManufacturerData();
uint8_t cManufacturerData[100];
strManufacturerData.copy((char *)cManufacturerData, strManufacturerData.length(), 0);
// strManufacturerData.length
for (int i = 0; i < strManufacturerData.length(); i++)
{
// cManufacturerData[i]
cManufacturerData[i];
}
// TemperatureData
TemperatureData = int(cManufacturerData[2]<<8 | cManufacturerData[3]);
// HumidityData
HumidityData = int(cManufacturerData[5]<<8 | cManufacturerData[6]);
}
}
}
};
// EEPROM Unique ID Information
#define EEPROM_SIZE 64
String uid = "";
// Software Version Information
String sver = "29-11";
void loop() {
// DS3231 RTC Date and Time
isRTC();
// ScanResults
isBLEScanResults();
// Fermion: SHT40 Temperature & Humidity Sensor
isSHT40();
// Delay 3 Second
delay(3000);
// Display Date, Time, Temperature, Humidity
isDisplayDTTH();
// MicroSD Card
isSD();
// iLED HIGH
digitalWrite(iLED, HIGH );
// Delay 1 Second
delay(1000);
}
getBLEScan.ino
// getBLEScan
// Setup BLE Scan
void isSetupBLEScan(){

  // BLE Device
  BLEDevice::init("");
  // Create new scan
  pBLEScan = BLEDevice::getScan();
  // Set Advertised Device Callbacks
  pBLEScan->setAdvertisedDeviceCallbacks(new MyAdvertisedDeviceCallbacks());
  // Active scan uses more power, but get results faster
  pBLEScan->setActiveScan(true);
  // Set Interval
  pBLEScan->setInterval(100);
  // Less or equal setInterval value
  pBLEScan->setWindow(99);

}
// BLE Scan Results
void isBLEScanResults(){

  // Put your main code here, to run repeatedly:
  BLEScanResults foundDevices = pBLEScan->start(scanTime, false);
  // Delete results fromBLEScan buffer to release memory
  pBLEScan->clearResults();

}
getDisplay.ino
// SHARP Memory Display
// SHARP Memory Display - UID
void isDisplayUID() {
// Text Display
// Clear Display
display.clearDisplay();
display.setRotation(4);
display.setTextSize(3);
display.setTextColor(BLACK);
// Don Luc Electronics
display.setCursor(0,10);
display.println( "Don Luc" );
display.setTextSize(2);
display.setCursor(0,40);
display.println( "Electronics" );
// Version
//display.setTextSize(3);
display.setCursor(0,70);
display.println( "Version" );
//display.setTextSize(2);
display.setCursor(0,95);
display.println( sver );
// EEPROM
display.setCursor(0,120);
display.println( "EEPROM" );
display.setCursor(0,140);
display.println( uid );
// Refresh
display.refresh();
delay( 100 );
}
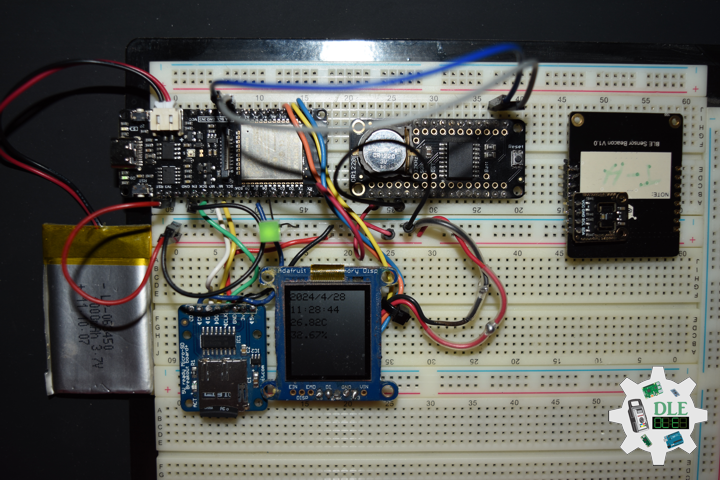
// Display Date, Time, Temperature, Humidity
void isDisplayDTTH() {
// Text Display Date
// Clear Display
display.clearDisplay();
display.setRotation(4);
display.setTextSize(2);
display.setTextColor(BLACK);
// Date
display.setCursor(0,5);
display.println( sDate );
// Time
display.setCursor(0,30);
display.println( sTime );
// Temperature
display.setCursor(0,55);
display.print( Temperature );
display.println( "C" );
// Humidity
display.setCursor(0,80);
display.print( Humidity );
display.println( "%" );
// Refresh
display.refresh();
delay( 100 );
}
getEEPROM.ino
// EEPROM
// isUID EEPROM Unique ID
void isUID()
{

  // Is Unit ID
  uid = "";
  for (int x = 0; x < 7; x++)
  {
    uid = uid + char(EEPROM.read(x));
  }

}
getRTC.ino
// DS3231 RTC Date and Time
// Setup DS3231 RTC
void isSetupRTC() {

  if (! rtc.begin()) {
    while (1);
  }

  if (rtc.lostPower()) {
    // Following line sets the RTC to the date & time this sketch was compiled
    rtc.adjust(DateTime(F(__DATE__), F(__TIME__)));
    // This line sets the RTC with an explicit date & time, for example to set
    // January 21, 2014 at 3am you would call:
    // rtc.adjust(DateTime(2014, 1, 21, 3, 0, 0));
  }

}
// DS3231 RTC Date and Time
void isRTC(){

    // Date and Time
    sDate = "";
    sTime = "";
    // Date Time
    DateTime now = rtc.now();

    // sData
    sDate += String(now.year(), DEC);
    sDate += "/";
    sDate += String(now.month(), DEC);
    sDate += "/";
    sDate += String(now.day(), DEC);

    // sTime
    sTime += String(now.hour(), DEC);
    sTime += ":";
    sTime += String(now.minute(), DEC);
    sTime += ":";
    sTime += String(now.second(), DEC);

}
getSD.ino
// MicroSD Card
// MicroSD Setup
void setupSD() {

    // MicroSD Card
    pinMode( chipSelect , OUTPUT );
    if(!SD.begin( chipSelect )){
        ;
        return;
    }

    uint8_t cardType = SD.cardType();

    // CARD NONE
    if(cardType == CARD_NONE){
        ;
        return;
    }

    // SD Card Type
    if(cardType == CARD_MMC){
        ;
    } else if(cardType == CARD_SD){
        ;
    } else if(cardType == CARD_SDHC){
        ;
    } else {
        ;
    }

    // Size
    uint64_t cardSize = SD.cardSize() / (1024 * 1024);

}
// MicroSD Card
void isSD() {

  zzzzzz = "";

  // DFR|EEPROM Unique ID|Version|Date|Time|Temperature|Humidity|*\r
  zzzzzz = "DFR|" + uid + "|" + sver + "|" + sDate + "|" + sTime + "|"
  + String(Temperature) + "C|" + String(Humidity) + "%|*\r";

  // msg + 1
  char msg[zzzzzz.length() + 1];

  zzzzzz.toCharArray(msg, zzzzzz.length() + 1);

  // Append File
  appendFile(SD, "/dfrdata.txt", msg );

}
// List Dir
void listDir(fs::FS &fs, const char * dirname, uint8_t levels){

    // List Dir
    dirname;

    File root = fs.open(dirname);

    if(!root){
        return;
    }

    if(!root.isDirectory()){
        return;
    }

    File file = root.openNextFile();

    while(file){
        if(file.isDirectory()){
            file.name();
            if(levels){
                listDir(fs, file.name(), levels -1);
            }
        } else {
            file.name();
            file.size();
        }
        file = root.openNextFile();
    }

}
// Write File
void writeFile(fs::FS &fs, const char * path, const char * message){

    // Write File
    path;

    File file = fs.open(path, FILE_WRITE);

    if(!file){
        return;
    }

    if(file.print(message)){
        ;
    } else {
        ;
    }

    file.close();

}
// Append File
void appendFile(fs::FS &fs, const char * path, const char * message){

    // Append File
    path;

    File file = fs.open(path, FILE_APPEND);

    if(!file){
        return;
    }

    if(file.print(message)){
        ;
    } else {
        ;
    }

    file.close();

}
getSHT40.ino
// Fermion: SHT40 Temperature & Humidity Sensor
// SHT40 Temperature & Humidity
void isSHT40(){

  // Fermion: SHT40 Temperature & Humidity Sensor
  // Temperature
  Temperature = (175 * TemperatureData/65535) - 45;
  // Humidity
  Humidity = (125 * HumidityData/65535) - 6;

}
setup.ino
// Setup
void setup()
{

  // Give display time to power on
  delay(100);

  // EEPROM Size
  EEPROM.begin(EEPROM_SIZE);

  // EEPROM Unique ID
  isUID();

  // Give display
  delay(100);

  // Set up I2C bus
  Wire.begin();

  // Give display
  delay(100);

  // Setup BLE Scan
  isSetupBLEScan();

  // Setup DS3231 RTC
  isSetupRTC();

  //MicroSD Card
  setupSD();

  // SHARP Display Start & Clear the Display
  display.begin();
  // Clear Display
  display.clearDisplay();

  // Initialize digital pin iLED as an output
  pinMode(iLED, OUTPUT);

  // Outputting high, the LED turns on
  digitalWrite(iLED, HIGH);

  // Initialize the LED Green
  pinMode(iLEDGreen, OUTPUT);

  // iLEDGreen HIGH
  digitalWrite(iLEDGreen, HIGH );

  // Don Luc Electronics
  // Version
  // EEPROM
  isDisplayUID();

  // Delay 5 Second
  delay( 5000 );

}
——
People can contact us: https://www.donluc.com/?page_id=1927
Teacher, Instructor, E-Mentor, R&D and Consulting
- Programming Language
- Single-Board Microcontrollers (PIC, Arduino, Raspberry Pi, Arm, Silicon Labs, Espressif, Etc…)
- IoT
- Wireless (Radio Frequency, Bluetooth, WiFi, Etc…)
- Robotics
- Automation
- Camera and Video Capture Receiver Stationary, Wheel/Tank and Underwater Vehicle
- Unmanned Vehicles Terrestrial and Marine
- Machine Learning
- Artificial Intelligence (AI)
- RTOS
- Sensors, eHealth Sensors, Biosensor, and Biometric
- Research & Development (R & D)
- Consulting
Follow Us
Luc Paquin – Curriculum Vitae – 2024
https://www.donluc.com/luc/
Web: https://www.donluc.com/
Facebook: https://www.facebook.com/neosteam.labs.9/
YouTube: https://www.youtube.com/@thesass2063
Twitter: https://twitter.com/labs_steam
Pinterest: https://www.pinterest.com/NeoSteamLabs/
Instagram: https://www.instagram.com/neosteamlabs/
LinkedIn: https://www.linkedin.com/in/jlucpaquin/
Don Luc