——
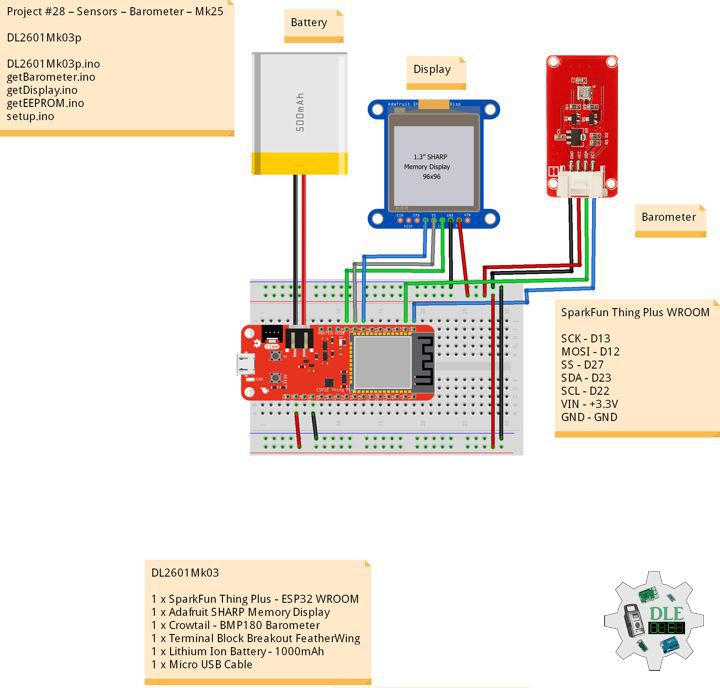
#DonLucElectronics #DonLuc #DFRobot #RTC #SD #ASM #SHTC3 #FireBeetle2ESP32C6 #Display #EEPROM #ESP32 #IoT #SparkFun #Adafruit #Arduino #Project #Fritzing #Programming #Electronics #Microcontrollers #Consultant
——
——
——
——
Real-Time Clock
A Real-Time Clock (RTC) is an electronic device, most often in the form of an integrated circuit, that measures the passage of time. Although the term often refers to the devices in personal computers, servers and embedded systems, RTCs are present in almost any electronic device which needs to keep accurate time of day.
Although keeping time can be done without an RTC, using one has benefits:
- Reliably maintains and provides current time through disruptive system states such as hangs, sleep, reboots, or if given sufficient backup power, full shutdown and hardware reassembly, without the need to have its time set again.
- Low power consumption, important when running from alternate power.
- Frees the main system for time-critical tasks.
- Sometimes more accurate than other methods.
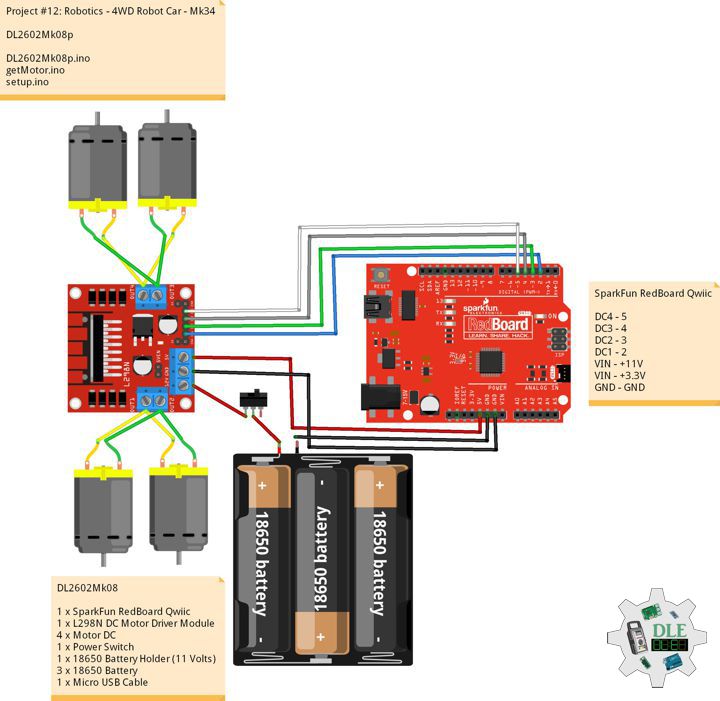
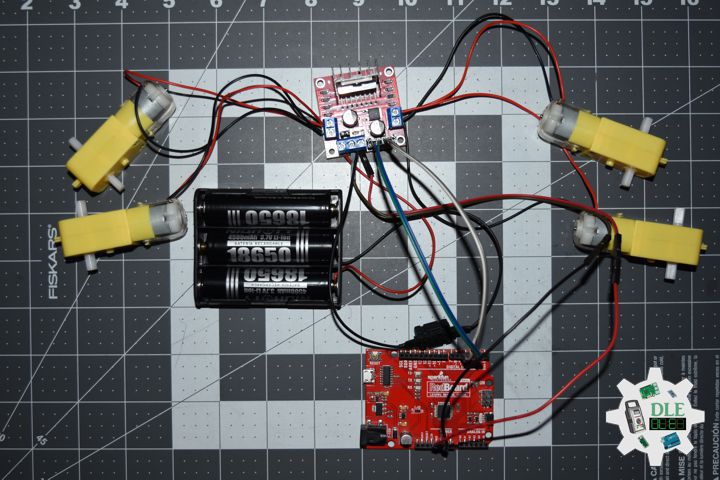
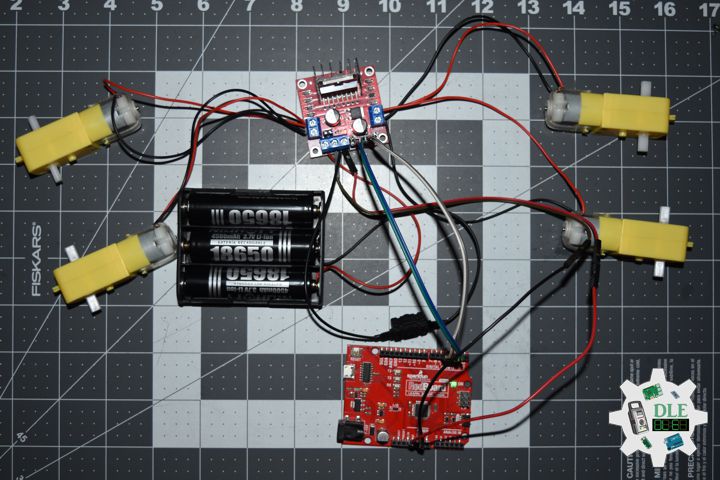
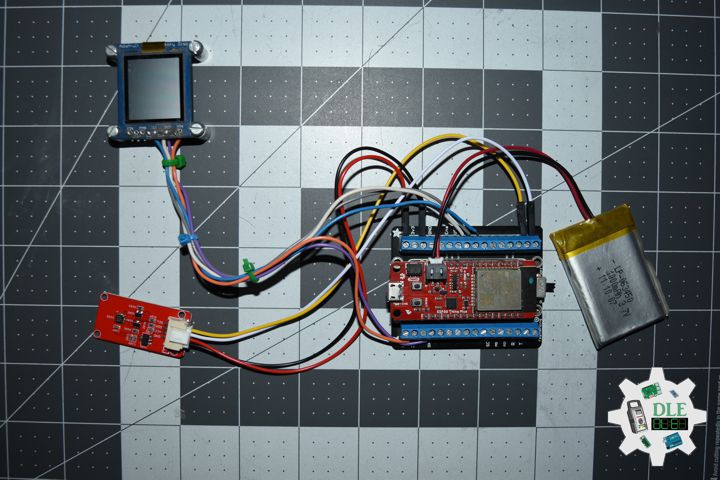
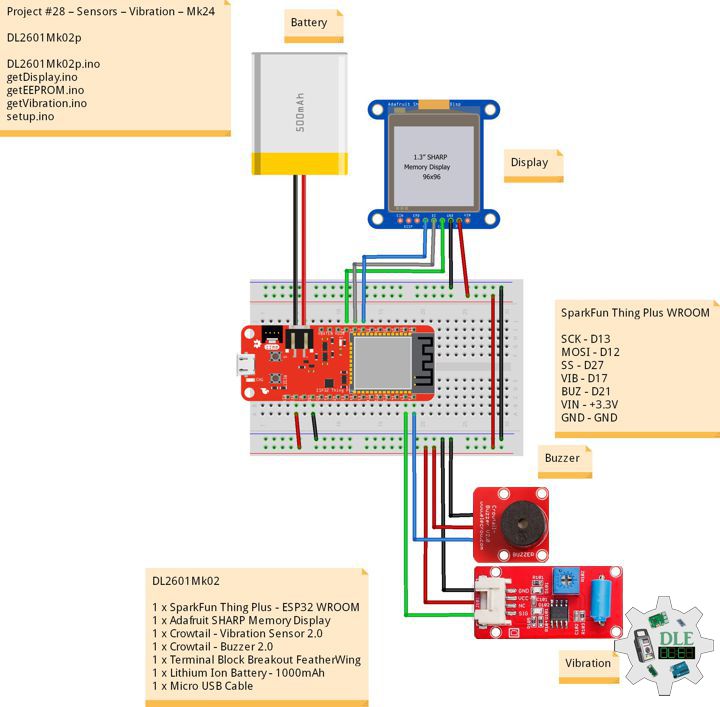
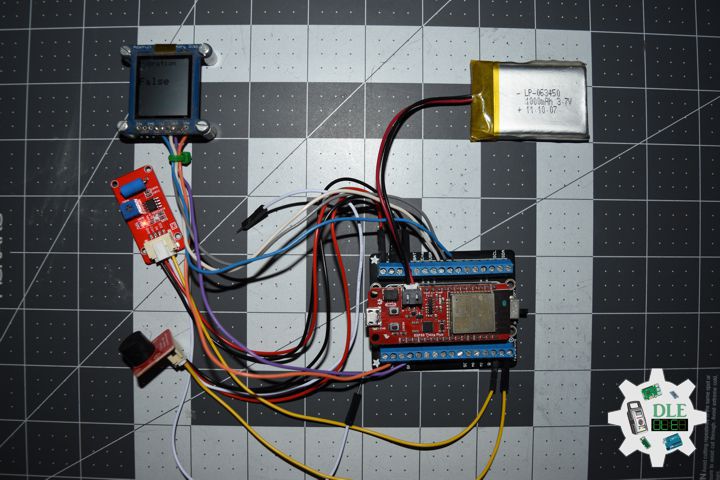
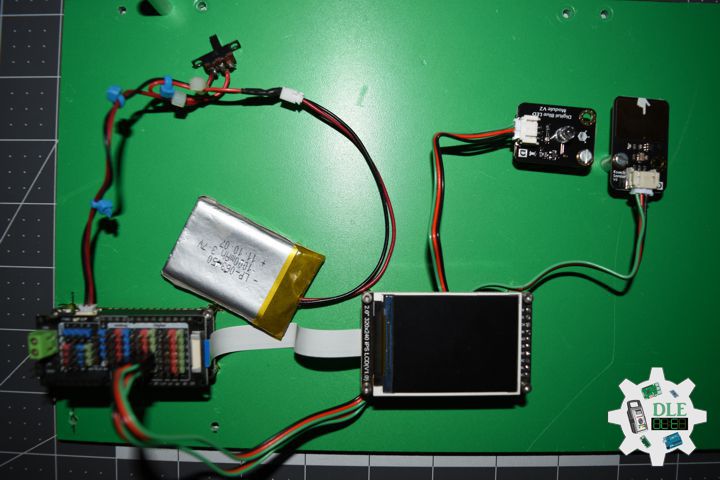
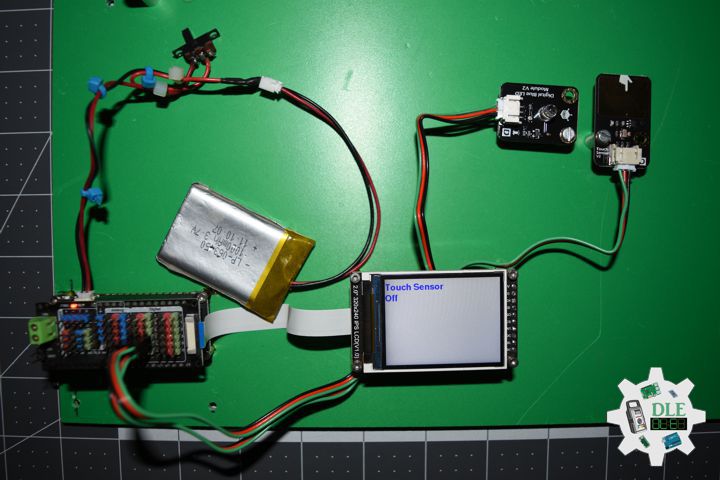
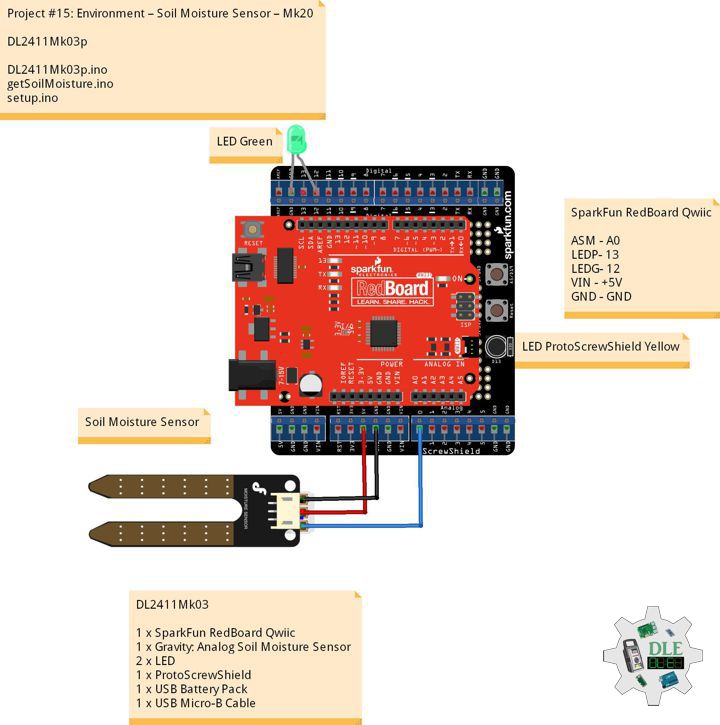
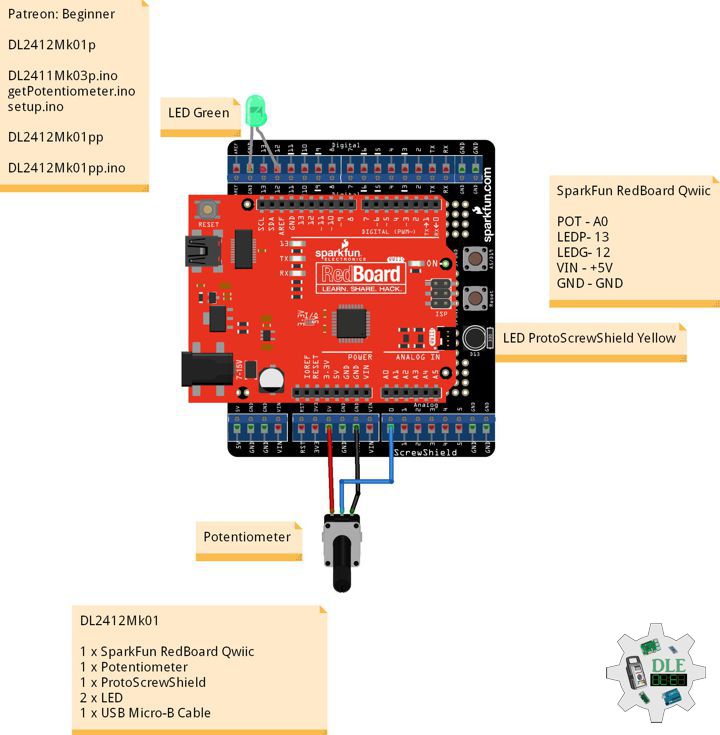
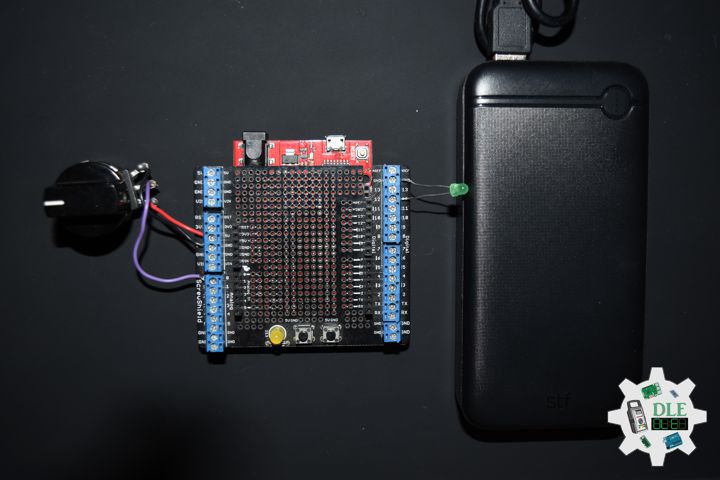
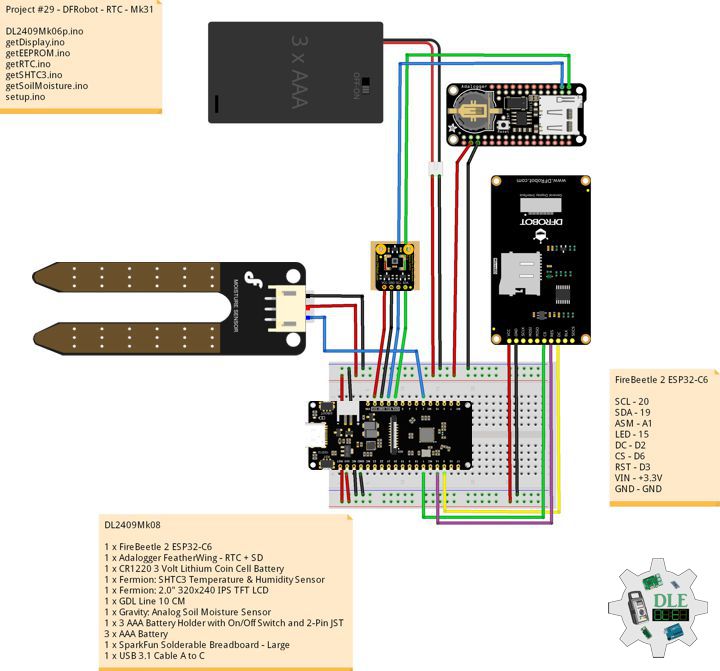
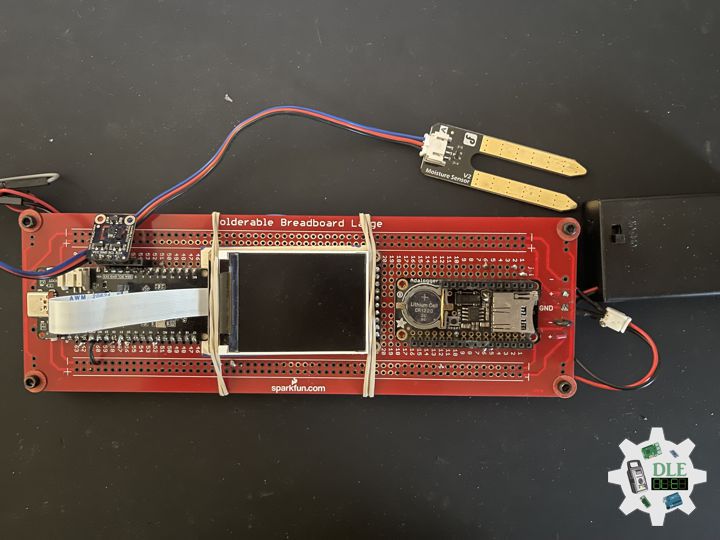
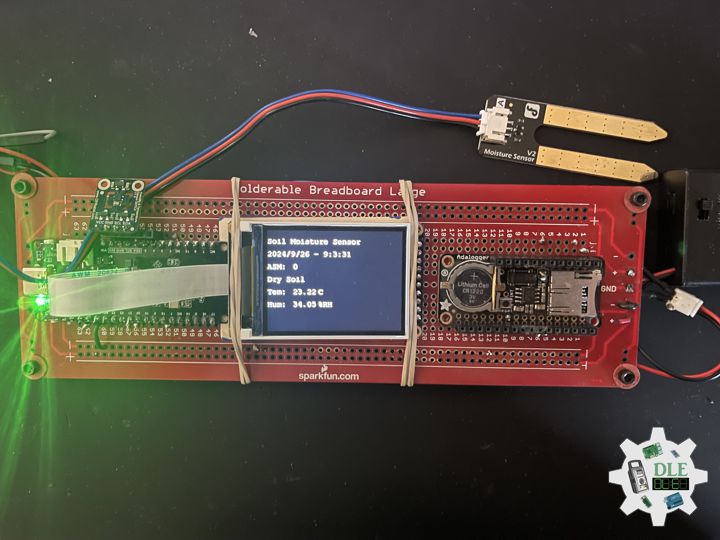
DL2409Mk08
1 x FireBeetle 2 ESP32-C6
1 x Adalogger FeatherWing – RTC + SD
1 x CR1220 3 Volt Lithium Coin Cell Battery
1 x Fermion: SHTC3 Temperature & Humidity Sensor
1 x Fermion: 2.0″ 320×240 IPS TFT LCD
1 x GDL Line 10 CM
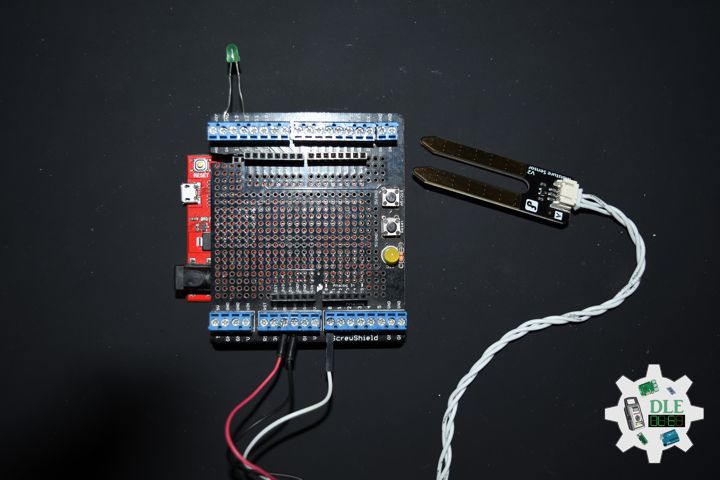
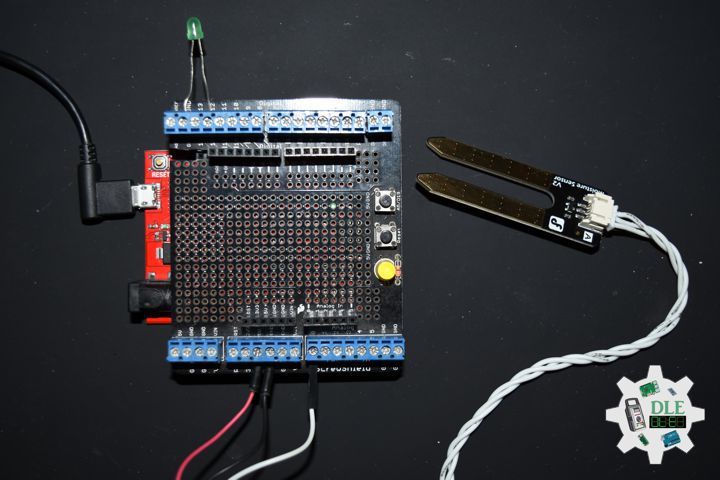
1 x Gravity: Analog Soil Moisture Sensor
1 x 3 AAA Battery Holder with On/Off Switch and 2-Pin JST
3 x AAA Battery
1 x SparkFun Solderable Breadboard – Large
1 x USB 3.1 Cable A to C
FireBeetle 2 ESP32-C6
SCL – 20
SDA – 19
ASM – A1
LED – 15
DC – D2
CS – D6
RST – D3
VIN – +3.3V
GND – GND
DL2409Mk08p
DL2409Mk08p.ino
/****** Don Luc Electronics © ******
Software Version Information
Project #29 - DFRobot - RTC - Mk31
29-31
DL2409Mk08p.ino
DL2409Mk08
1 x FireBeetle 2 ESP32-C6
1 x Adalogger FeatherWing - RTC + SD
1 x CR1220 3 Volt Lithium Coin Cell Battery
1 x Fermion: SHTC3 Temperature & Humidity Sensor
1 x Fermion: 2.0" 320x240 IPS TFT LCD
1 x GDL Line 10 CM
1 x Gravity: Analog Soil Moisture Sensor
1 x 3 AAA Battery Holder with On/Off Switch and 2-Pin JST
3 x AAA Battery
1 x SparkFun Solderable Breadboard - Large
1 x USB 3.1 Cable A to C
*/
// Include the Library Code
// EEPROM Library to Read and Write EEPROM
// with Unique ID for Unit
#include "EEPROM.h"
// Arduino
#include <Arduino.h>
// Wire
#include <Wire.h>
// DFRobot Display GDL API
#include <DFRobot_GDL.h>
// Fermion: SHTC3 Temperature & Humidity Sensor
#include"DFRobot_SHTC3.h"
// Date and Time Functions PCF8523 RTC
#include <RTClib.h>
// Date and Time PCF8523 RTC
RTC_PCF8523 rtc;
String dateRTC = "";
String timeRTC = "";
// Fermion: SHTC3 Temperature & Humidity Sensor
DFRobot_SHTC3 SHTC3;
uint32_t id = 0;
float temperature;
float humidity;
// Defined ESP32
#define TFT_DC D2
#define TFT_CS D6
#define TFT_RST D3
/*dc=*/ /*cs=*/ /*rst=*/
// DFRobot Display 240x320
DFRobot_ST7789_240x320_HW_SPI screen(TFT_DC, TFT_CS, TFT_RST);
// Gravity: Analog Soil Moisture Sensor
int iSoilMoisture = A1;
int iSoilMoistureVal = 0;
int zz = 0;
// Change Your Threshold Here
int Threshold = 300;
String SM = "";
// LED Green
int iLEDGreen = 15;
// EEPROM Unique ID Information
#define EEPROM_SIZE 64
String uid = "";
// Software Version Information
String sver = "29-31";
void loop() {
// Date and Time PCF8523 RTC
isRTC();
// SHTC3 Temperature and Humidity Sensor
isSHTC3();
// Gravity: Analog Soil Moisture Sensor
isSoilMoisture();
// DFRobot Display 240x320 - ASM - Temperature and Humidity - Date and Time
isDisplayTH();
// Delay 5 Second
delay( 5000 );
}
getDisplay.ino
// DFRobot Display 240x320
// DFRobot Display 240x320 - UID
void isDisplayUID() {
// DFRobot Display 240x320
// Text Display
// Text Wrap
screen.setTextWrap(false);
// Rotation
screen.setRotation(3);
// Fill Screen => black
screen.fillScreen(0x0000);
// Text Color => white
screen.setTextColor(0xffff);
// Font => Free Mono 9pt
screen.setFont(&FreeMono9pt7b);
// TextSize => 1.5
screen.setTextSize(1.5);
// DFRobot Display
screen.setCursor(0, 30);
screen.println("DFRobot Display");
// Don Luc Electronics
screen.setCursor(0, 60);
screen.println("Don Luc Electronics");
// Version
screen.setCursor(0, 90);
screen.println("Version");
screen.setCursor(0, 120);
screen.println( sver );
// EEPROM
screen.setCursor(0, 150);
screen.println("EEPROM");
screen.setCursor(0, 180);
screen.println( uid );
}
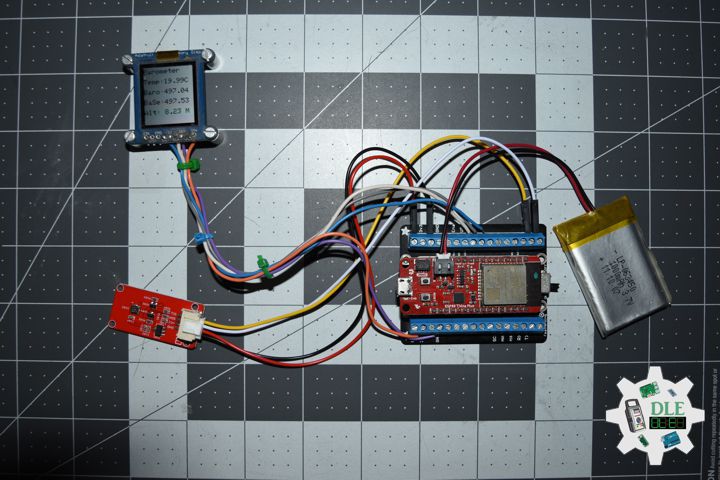
// DFRobot Display 240x320 - ASM - Temperature and Humidity
void isDisplayTH() {
// DFRobot Display 240x320
// Text Display
// Text Wrap
screen.setTextWrap(false);
// Rotation
screen.setRotation(3);
// Fill Screen => black
screen.fillScreen(0x0000);
// Text Color => white
screen.setTextColor(0xffff);
// Font => Free Mono 9pt
screen.setFont(&FreeMono9pt7b);
// TextSize => 1.5
screen.setTextSize(1.5);
// Soil Moisture Sensor
screen.setCursor(0, 30);
screen.println("Soil Moisture Sensor");
// Date and Time
screen.setCursor(0, 60);
screen.println( dateRTC + " - " + timeRTC );
// Gravity: Analog Soil Moisture Sensor
screen.setCursor(0, 90);
screen.println( "ASM: " );
screen.setCursor(60, 90);
screen.println( iSoilMoistureVal );
screen.setCursor(0, 120);
screen.println( SM );
// SHTC3 Temperature
screen.setCursor(0, 150);
screen.println( "Tem: " );
screen.setCursor(60, 150);
screen.println( temperature );
screen.setCursor(120, 150);
screen.println( "C" );
// SHTC3 Humidity
screen.setCursor(0, 180);
screen.println( "Hum: " );
screen.setCursor(60, 180);
screen.println( humidity );
screen.setCursor(120, 180);
screen.println( "%RH" );
}
getEEPROM.ino
// EEPROM
// isUID EEPROM Unique ID
void isUID()
{

  // Is Unit ID
  uid = "";
  for (int x = 0; x < 7; x++)
  {
    uid = uid + char(EEPROM.read(x));
  }

}
getRTC.ino
// Date and Time PCF8523 RTC
// Setup Date and Time PCF8523 RTC
void isSetupRTC() {

  // Date and Time PCF8523 RTC
  if (! rtc.begin()) {
    while (1);
  }
  if (! rtc.initialized()) {

    // Following line sets the RTC to the date & time this sketch was compiled
    rtc.adjust(DateTime(F(__DATE__), F(__TIME__)));
    // This line sets the RTC with an explicit date & time, for example to set
    // January 21, 2014 at 3am you would call:
    // rtc.adjust(DateTime(2024, 9, 26, 9, 1, 0));

  }

  // When the RTC was stopped and stays connected to the battery, it has
  // to be restarted by clearing the STOP bit. Let's do this to ensure
  // the RTC is running.
  rtc.start();

   // The PCF8523 can be calibrated for:
  //  - Aging adjustment
  //  - Temperature compensation
  //  - Accuracy tuning
  // The offset mode to use, once every two hours or once every minute.
  // The offset Offset value from -64 to +63.
  // See the Application Note for calculation of offset values.
  // https://www.nxp.com/docs/en/application-note/AN11247.pdf
  // The deviation in parts per million can be calculated over
  // a period of observation. Both the drift (which can be negative)
  // and the observation period must be in seconds. For accuracy
  // the variation should be observed over about 1 week.
  // Note: any previous calibration should cancelled prior to
  // any new observation period.
  // Seconds plus or minus over oservation period - set to
  // 0 to cancel previous calibration.
  float drift = 43;
  // total obsevation period in seconds (86400 = seconds in 1 day:
  // 7 days = (7 * 86400) seconds )
  float period_sec = (7 * 86400);
  // Deviation in parts per million (μs)
  float deviation_ppm = (drift / period_sec * 1000000);
  // Use with offset mode PCF8523_TwoHours
  float drift_unit = 4.34;
  //For corrections every min the drift_unit is 4.069 ppm
  // (use with offset mode PCF8523_OneMinute)
  // float drift_unit = 4.069;
  int offset = round(deviation_ppm / drift_unit);

}
// Date and Time PCF8523 RTC
void isRTC () {

  // Date and Time
  DateTime now = rtc.now();
  // Date
  dateRTC = now.year(), DEC;
  dateRTC = dateRTC + "/";
  dateRTC = dateRTC + now.month(), DEC;
  dateRTC = dateRTC + "/";
  dateRTC = dateRTC + now.day(), DEC;
  // Time
  timeRTC = now.hour(), DEC;
  timeRTC = timeRTC + ":";
  timeRTC = timeRTC + now.minute(), DEC;
  timeRTC = timeRTC + ":";
  timeRTC = timeRTC + now.second(), DEC;

}
getSHTC3.ino
// SHTC3 Temperature and Humidity Sensor
// SHTC3
void isSHTC3(){

  // SHTC3 Temperature and Humidity Sensor
  /**
   *    Mode  For configuring sensor working mode
   *    SHTC3:
           PRECISION_HIGH_CLKSTRETCH_ON Clock Stretching Enabled
   *       PRECISION_HIGH_CLKSTRETCH_OFF Clock Stretching Disabled
   *       PRECISION_LOW_CLKSTRETCH_ON Clock Stretching Enabled & Low Power
   *       PRECISION_LOW_CLKSTRETCH_OFF Clock Stretching Disabled & Low Power
   */
  temperature = SHTC3.getTemperature(PRECISION_HIGH_CLKSTRETCH_ON);
  /**
   *    Mode  For configuring sensor working mode
   *    SHTC3
   *       PRECISION_HIGH_CLKSTRETCH_ON Clock Stretching Enabled
   *       PRECISION_HIGH_CLKSTRETCH_OFF Clock Stretching Disabled
   *       PRECISION_LOW_CLKSTRETCH_ON Clock Stretching Enabled & Low Power
   *       PRECISION_LOW_CLKSTRETCH_OFF Clock Stretching Disabled & Low Power
   */
  humidity = SHTC3.getHumidity(PRECISION_HIGH_CLKSTRETCH_OFF);

}
getSoilMoisture.ino
// Gravity: Analog Soil Moisture Sensor
// Soil Moisture
void isSoilMoisture(){

  // Connect Soil Moisture Sensor to Analog 0
  zz = analogRead( iSoilMoisture );

  // iSoilMoistureVal => 0~900 Soil Moisture
  iSoilMoistureVal = map( zz, 0, 4095, 0, 900);

  // Threshold
  if (iSoilMoistureVal > Threshold)

    // 300~950 - Humid Soil
    SM = "Humid Soil";

  else {

    // 0-300 Dry Soil
    SM = "Dry Soil";

  }

}
setup.ino
// Setup
void setup()
{

  // Give display time to power on
  delay(100);

  // EEPROM Size
  EEPROM.begin(EEPROM_SIZE);

  // EEPROM Unique ID
  isUID();

  // Delay
  delay( 100 );

  // Wire
  Wire.begin();

  // Delay
  delay( 100 );

  // DFRobot Display 240x320
  screen.begin();

  // Delay
  delay(100);

  // Fermion: SHTC3 Temperature & Humidity Sensor
  SHTC3.begin();
  /*SHTC3 is set to sleep mode by default. Please wake it up before use.
  Use SHTC3.sleep() to let SHTC3 enter sleep mode; SHTC3
  stops working in sleep mode*/
  SHTC3.wakeup();

  // Delay
  delay(100);

  // Setup Date and Time PCF8523 RTC
  isSetupRTC();

  // Date and Time PCF8523 RTC
  isRTC();

  // Delay
  delay(100);

  // Initialize the LED Green
  pinMode(iLEDGreen, OUTPUT);

  // iLEDGreen HIGH
  digitalWrite(iLEDGreen, HIGH );

  // DFRobot Display 240x320 - UID
  // Don Luc Electronics
  // Version
  // EEPROM
  isDisplayUID();

  // Delay 5 Second
  delay( 5000 );

}
——
People can contact us: https://www.donluc.com/?page_id=1927
Electronics, IoT, Teacher, Instructor, R&D and Consulting
- Programming Language
- Single-Board Microcontrollers (PIC, Arduino, Raspberry Pi, Arm, Silicon Labs, Espressif, Etc…)
- IoT
- Wireless (Radio Frequency, Bluetooth, WiFi, Etc…)
- Robotics
- Automation
- Camera and Video Capture Receiver Stationary, Wheel/Tank and Underwater Vehicle
- Unmanned Vehicles Terrestrial and Marine
- Machine Learning
- Artificial Intelligence (AI)
- RTOS
- Sensors, eHealth Sensors, Biosensor, and Biometric
- Research & Development (R & D)
- Consulting
Follow Us
Luc Paquin – Curriculum Vitae – 2024
https://www.donluc.com/luc/
Web: https://www.donluc.com/
Facebook: https://www.facebook.com/neosteam.labs.9/
YouTube: https://www.youtube.com/@thesass2063
Twitter: https://twitter.com/labs_steam
Pinterest: https://www.pinterest.com/NeoSteamLabs/
Instagram: https://www.instagram.com/neosteamlabs/
DFRobot Luc.Paquin: https://edu.dfrobot.com/dashboard/makelogs
Hackster.io: https://www.hackster.io/neosteam-labs
ELECROW: https://www.elecrow.com/share/sharepj/center/no/760816d385ebb1edc0732fd873bfbf13
TikTok: www.tiktok.com/@luc.paquin8
LinkedIn: https://www.linkedin.com/in/jlucpaquin/
Don Luc