——
#DonLucElectronics #DonLuc #DFRobot #BLESensorBeacon #AmbientLight #SoilMoisture #SHT40 #FireBeetle2ESP32E #EEPROM #RTC #SD #Display #Adafruit #ESP32 #IoT #Arduino #Project #Fritzing #Programming #Electronics #Microcontrollers #Consultant
——

——
——
——
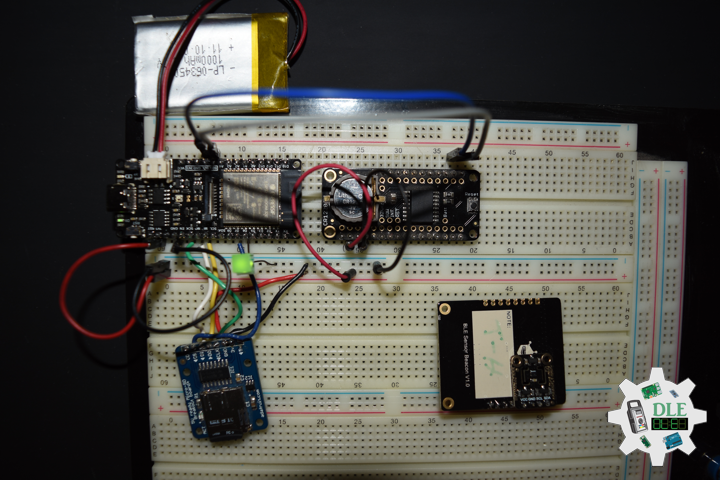
Fermion: BLE Sensor Beacon
Fermion: BLE Sensor Beacon, a wireless beacon that broadcasts sensor data via Bluetooth, with built-in 11-bit ADC acquisition and I2C write/read functionality, can be connected to digital or analogue sensors for data acquisition and broadcasting. Sensor data broadcasted by the beacon can be accessed within the beacon’s broadcast range using mobile phones, ESP32 and other devices that support BLE reception.
Fermion: BLE sensor beacons integrate low-power Bluetooth 5.3 technology with self-configurable data formats, such as iBeacon, Eddystone, user-defined, and more. The data format of the beacon broadcast, the content of the broadcast, the broadcast interval and so on can be configured through the graphical interface, without the need for any code programming to complete a Bluetooth beacon. After the configuration is completed, the device power supply is running as a Bluetooth beacon, which will automatically collect sensor data and broadcast to the outside world according to the configuration information. It is suitable for IoT sensor nodes, such as smart farms, offices, factories, warehouses and other scenarios in the data collection node.
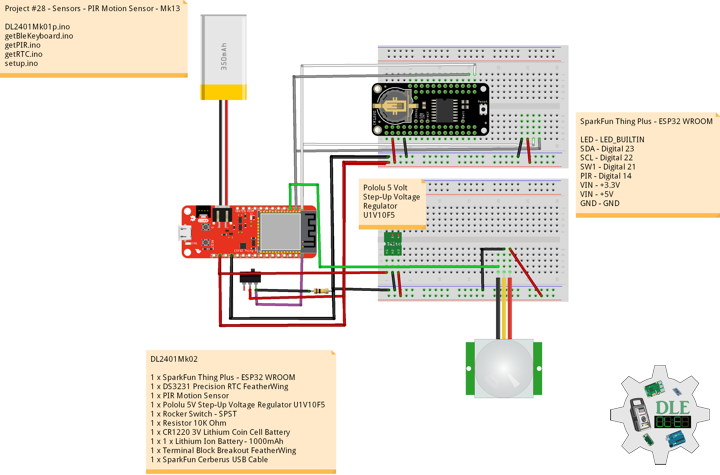
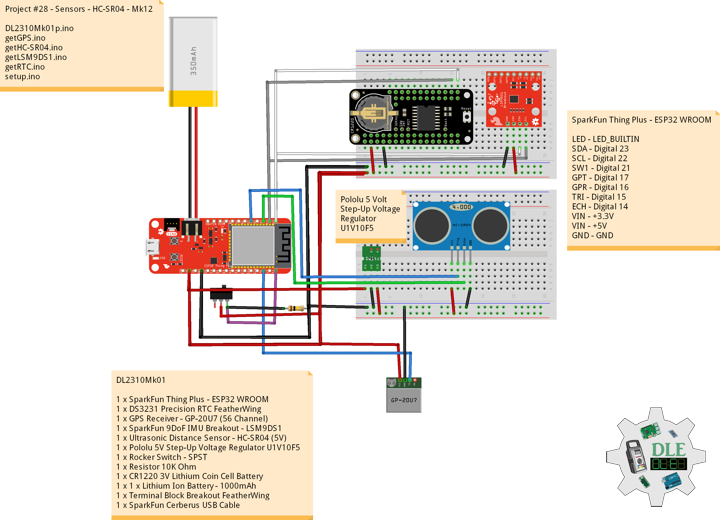
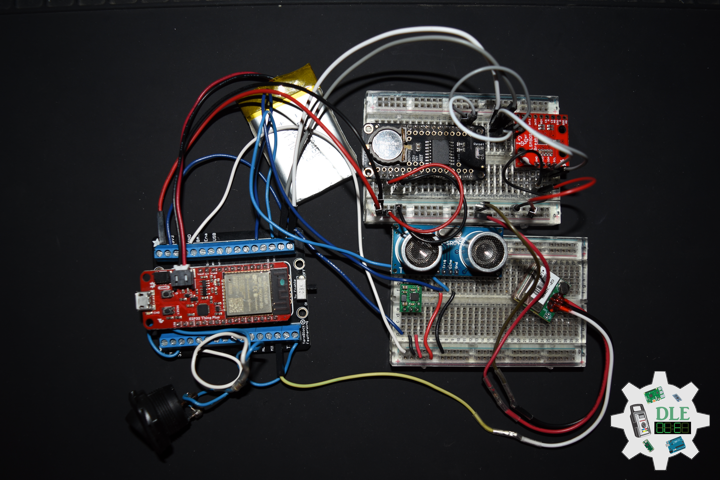
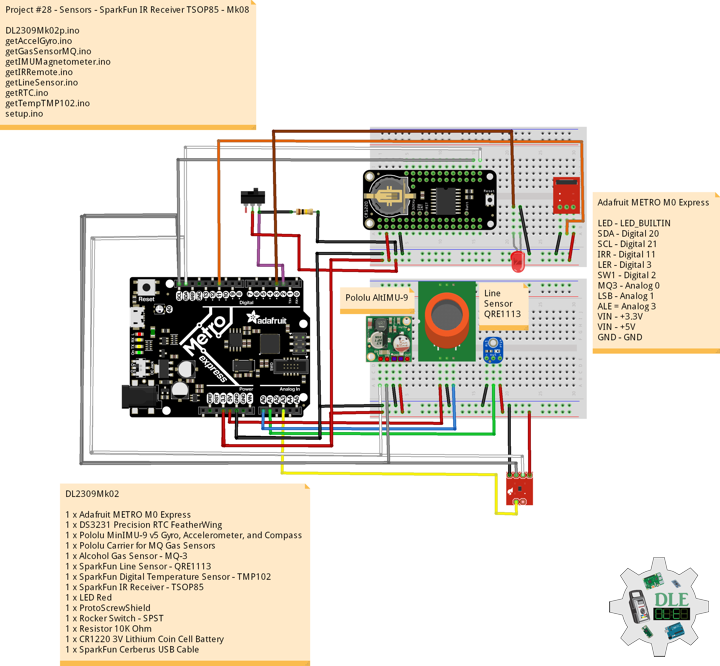
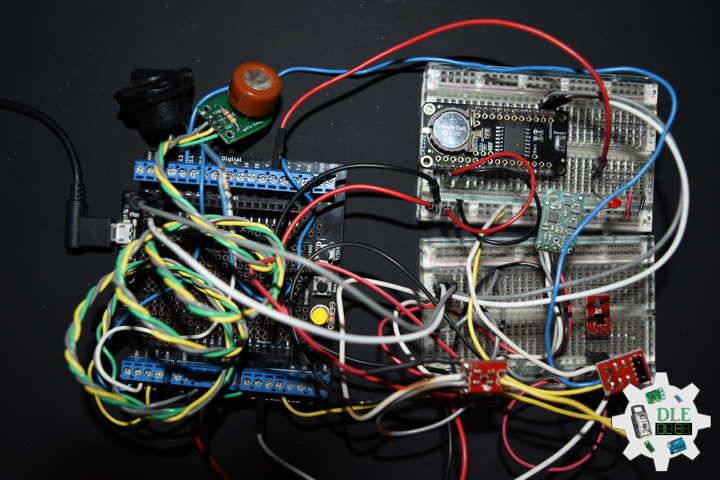
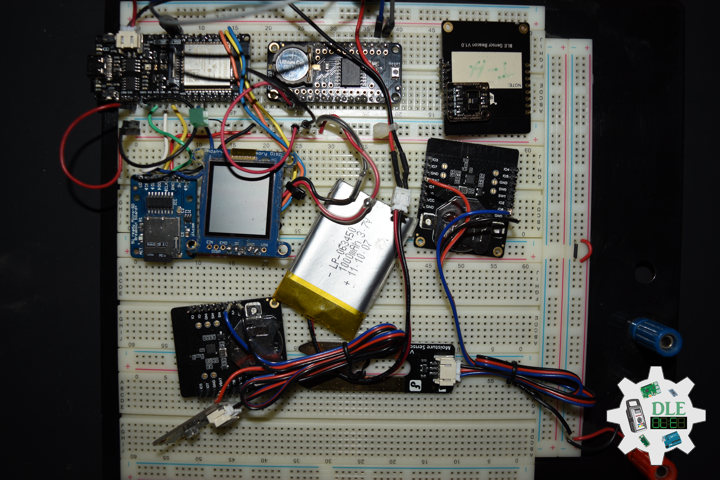
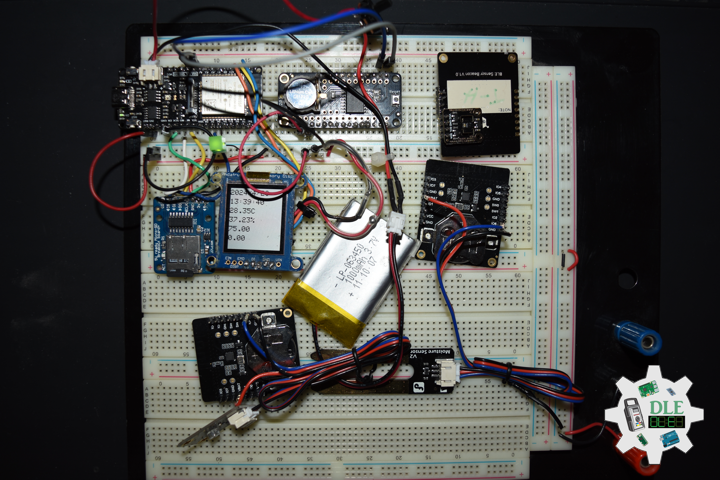
DL2405Mk02
1 x DFRobot FireBeetle 2 ESP32-E
1 x Adafruit SHARP Memory Display
1 x Adafruit MicroSD card breakout board+
1 x MicroSD 16 GB
1 x Adafruit DS3231 Precision RTC FeatherWing – RTC
1 x Battery CR1220
1 x Gravity: Analog Soil Moisture Sensor
1 x Gravity: Analog Ambient Light Sensor
1 x Fermion: SHT40 Temperature & Humidity Sensor
3 x Fermion: BLE Sensor Beacon
3 x CR2032 Coin Cell Battery
1 x 1 x Lithium Ion Battery – 1000mAh
1 x Green LED
1 x Slide Switch
1 x SparkFun Serial Basic Breakout – CH340G
1 x SparkFun Cerberus USB Cable
1 x USB 3.1 Cable A to C
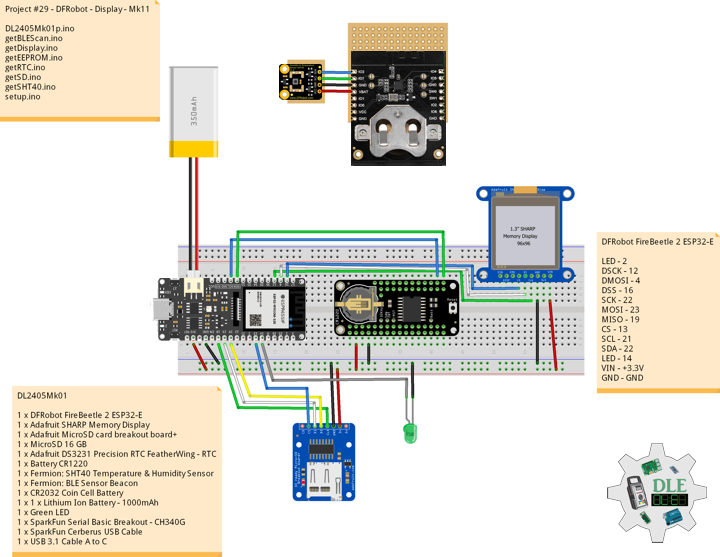
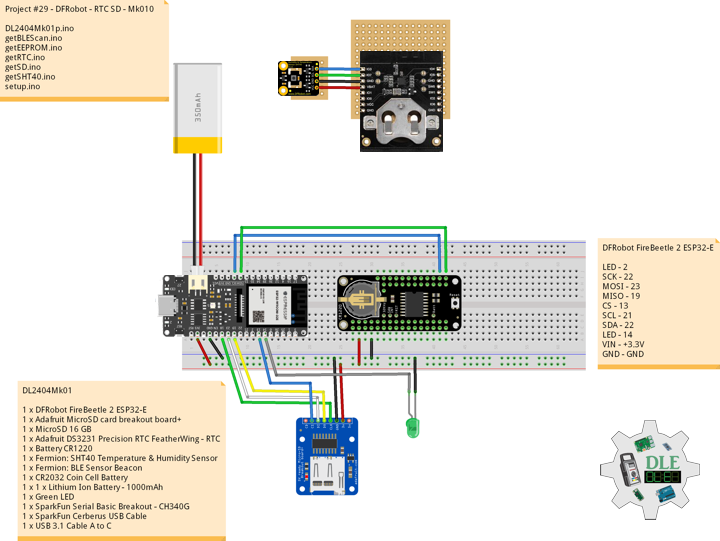
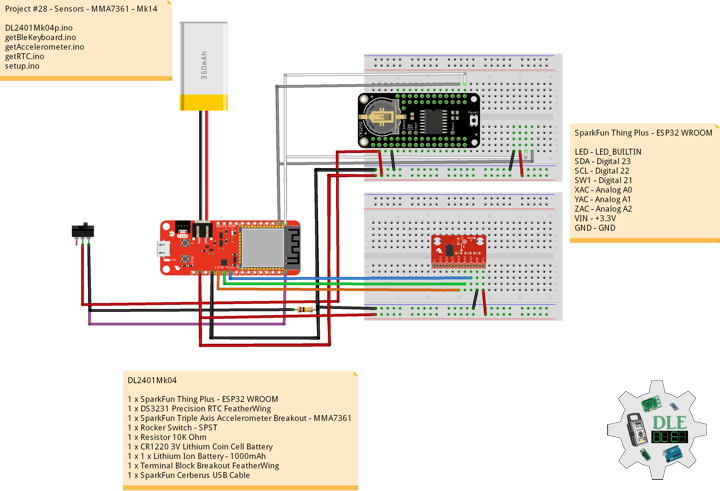
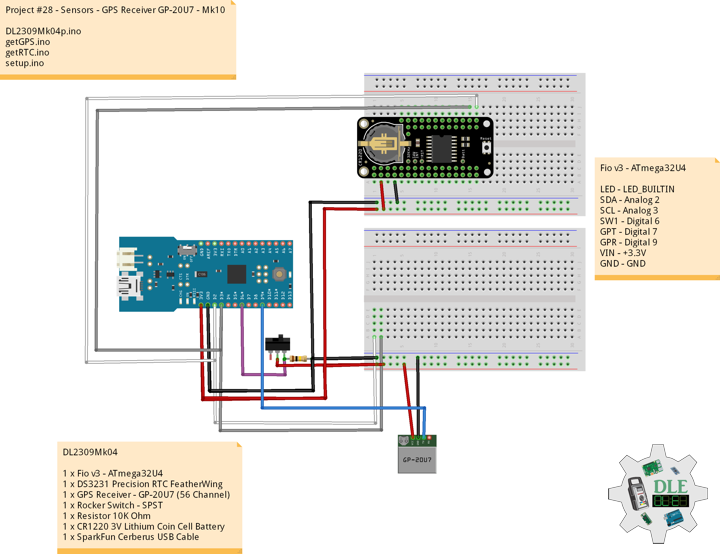
DFRobot FireBeetle 2 ESP32-E
LED – 2
DSCK – 12
DMOSI – 4
DSS – 16
SCK – 22
MOSI – 23
MISO – 19
CS – 13
SCL – 21
SDA – 22
LED – 14
VIN – +3.3V
GND – GND
——
DL2405Mk02p.ino
/****** Don Luc Electronics © ******
Software Version Information
Project #29 - DFRobot - BLE Sensor Beacon - Mk12
29-12
DL2404Mk02p.ino
1 x DFRobot FireBeetle 2 ESP32-E
1 x Adafruit SHARP Memory Display
1 x Adafruit MicroSD card breakout board+
1 x MicroSD 16 GB
1 x Adafruit DS3231 Precision RTC FeatherWing - RTC
1 x Battery CR1220
1 x Gravity: Analog Soil Moisture Sensor
1 x Gravity: Analog Ambient Light Sensor
1 x Fermion: SHT40 Temperature & Humidity Sensor
3 x Fermion: BLE Sensor Beacon
3 x CR2032 Coin Cell Battery
1 x 1 x Lithium Ion Battery - 1000mAh
1 x Green LED
1 x SparkFun Serial Basic Breakout - CH340G
1 x SparkFun Cerberus USB Cable
1 x USB 3.1 Cable A to C
*/

// Include the Library Code
// EEPROM Library to Read and Write EEPROM
// with Unique ID for Unit
#include "EEPROM.h"
// Wire
#include <Wire.h>
// Arduino
#include <Arduino.h>
// BLE Device
#include <BLEDevice.h>
// BLE Utils
#include <BLEUtils.h>
// BLEScan
#include <BLEScan.h>
// BLE Advertised Device
#include <BLEAdvertisedDevice.h>
// BLE Eddystone URL
#include <BLEEddystoneURL.h>
// BLE Eddystone TLM
#include <BLEEddystoneTLM.h>
// BLE Beacon
#include <BLEBeacon.h>
// DS3231 RTC Date and Time
#include <RTClib.h>
// SD Card
#include "FS.h"
#include "SD.h"
#include "SPI.h"
// SHARP Memory Display
#include <Adafruit_SharpMem.h>
#include <Adafruit_GFX.h>

// ENDIAN_CHANGE
#define ENDIAN_CHANGE_U16(x) ((((x)&0xFF00) >> 8) + (((x)&0xFF) << 8))

// DS3231 RTC Date and Time
RTC_DS3231 rtc;
String sDate;
String sTime;

// MicroSD Card
const int chipSelect = 13;
String zzzzzz = "";

// SHARP Memory Display
#define SHARP_SCK  12
#define SHARP_MOSI 4
#define SHARP_SS   16
// Set the size of the display here, e.g. 144x168!
Adafruit_SharpMem display(SHARP_SCK, SHARP_MOSI, SHARP_SS, 144, 168);
// The currently-available SHARP Memory Display (144x168 pixels)
// requires > 4K of microcontroller RAM; it WILL NOT WORK on Arduino Uno
// or other <4K "classic" devices.
#define BLACK 0
#define WHITE 1

// LED Green
int iLEDGreen = 2;

// Define LED
int iLED = 14;

// Fermion: SHT40 Temperature & Humidity Sensor
// Temperature
float TemperatureData;
float Temperature;
// Humidity
float HumidityData;
float Humidity;
// Gravity: Analog Ambient Light Sensor
float Sensor_Data;
// SData => 1~6000 Lux
float SData;
// Gravity: Analog Soil Moisture Sensor
float SensorSM;
float SDataSM;
// In seconds
int scanTime = 5;
// BLE Scan
BLEScan *pBLEScan;

// My Advertised Device Callbacks
class MyAdvertisedDeviceCallbacks : public BLEAdvertisedDeviceCallbacks
{

    // onResult
    void onResult(BLEAdvertisedDevice advertisedDevice)
    {
      // Advertised Device
      if (advertisedDevice.haveName())
      {
        // Name: Fermion: Sensor Beacon
        if(String(advertisedDevice.getName().c_str()) == "SHT40"){

          // strManufacturerData
          std::string strManufacturerData = advertisedDevice.getManufacturerData();
          uint8_t cManufacturerData[100];
          strManufacturerData.copy((char *)cManufacturerData, strManufacturerData.length(), 0);

          // strManufacturerData.length
          for (int i = 0; i < strManufacturerData.length(); i++)
          {

             // cManufacturerData[i]
             cManufacturerData[i];

          }

          // TemperatureData
          TemperatureData = int(cManufacturerData[2]<<8 | cManufacturerData[3]);
          // HumidityData
          HumidityData = int(cManufacturerData[5]<<8 | cManufacturerData[6]);

        }
        // Name: Fermion: Sensor Beacon
        if(String(advertisedDevice.getName().c_str()) == "Fermion: Sensor Beacon"){

          // strManufacturerData
          std::string strManufacturerData = advertisedDevice.getManufacturerData();
          uint8_t cManufacturerData[100];
          strManufacturerData.copy((char *)cManufacturerData, strManufacturerData.length(), 0);

          // strManufacturerData.length
          for (int i = 0; i < strManufacturerData.length(); i++)
          {

             // cManufacturerData[i]
             cManufacturerData[i];

          }

          // Sensor_Data
          Sensor_Data = int(cManufacturerData[2]<<8 | cManufacturerData[3]);

        }
        // Name: Fermion: Sensor Beacon
        if(String(advertisedDevice.getName().c_str()) == "Soil Moisture"){

          // strManufacturerData
          std::string strManufacturerData = advertisedDevice.getManufacturerData();
          uint8_t cManufacturerData[100];
          strManufacturerData.copy((char *)cManufacturerData, strManufacturerData.length(), 0);

          // strManufacturerData.length
          for (int i = 0; i < strManufacturerData.length(); i++)
          {

             // cManufacturerData[i]
             cManufacturerData[i];

          }

          // SensorSM
          SensorSM = int(cManufacturerData[2]<<8 | cManufacturerData[3]);

        }
      }
    }
};

// EEPROM Unique ID Information
#define EEPROM_SIZE 64
String uid = "";

// Software Version Information
String sver = "29-12";

void loop() {

  // DS3231 RTC Date and Time
  isRTC();

  // ScanResults
  isBLEScanResults();

  // Fermion: SHT40 Temperature & Humidity Sensor
  isSHT40();

  // Gravity: Analog Ambient Light Sensor
  isAmbientLight();

  // Soil Moisture
  isSoilMoisture();

  // Delay 4 Second
  delay(4000);

  // Display Date, Time, Temperature, Humidity
  isDisplayDTTH();

  // MicroSD Card
  isSD();

  // iLED HIGH
  digitalWrite(iLED, HIGH );

  // Delay 1 Second
  delay(1000);

}
getAmbientLight.ino
// Gravity: Analog Ambient Light Sensor
// Ambient Light
void isAmbientLight(){

  // Analog Ambient Light Sensor
  // SData => 1~6000 Lux
  SData = map(Sensor_Data, 1, 3000, 1, 6000);

}
getBLEScan.ino
// getBLEScan
// Setup BLE Scan
void isSetupBLEScan(){

  // BLE Device
  BLEDevice::init("");
  // Create new scan
  pBLEScan = BLEDevice::getScan();
  // Set Advertised Device Callbacks
  pBLEScan->setAdvertisedDeviceCallbacks(new MyAdvertisedDeviceCallbacks());
  // Active scan uses more power, but get results faster
  pBLEScan->setActiveScan(true);
  // Set Interval
  pBLEScan->setInterval(100);
  // Less or equal setInterval value
  pBLEScan->setWindow(99);

}
// BLE Scan Results
void isBLEScanResults(){

  // Put your main code here, to run repeatedly:
  BLEScanResults foundDevices = pBLEScan->start(scanTime, false);
  // Delete results fromBLEScan buffer to release memory
  pBLEScan->clearResults();

}
getDisplay.ino
// SHARP Memory Display
// SHARP Memory Display - UID
void isDisplayUID() {

    // Text Display
    // Clear Display
    display.clearDisplay();
    display.setRotation(4);
    display.setTextSize(3);
    display.setTextColor(BLACK);
    // Don Luc Electronics
    display.setCursor(0,10);
    display.println( "Don Luc" );
    display.setTextSize(2);
    display.setCursor(0,40);
    display.println( "Electronics" );
    // Version
    //display.setTextSize(3);
    display.setCursor(0,70);
    display.println( "Version" );
    //display.setTextSize(2);
    display.setCursor(0,95);
    display.println( sver );
    // EEPROM
    display.setCursor(0,120);
    display.println( "EEPROM" );
    display.setCursor(0,140);
    display.println( uid );
    // Refresh
    display.refresh();
    delay( 100 );

}
// Display Date, Time, Temperature, Humidity, Ambient Light, Soil Moisture
void isDisplayDTTH() {

    // Text Display Date
    // Clear Display
    display.clearDisplay();
    display.setRotation(4);
    display.setTextSize(2);
    display.setTextColor(BLACK);
    // Date
    display.setCursor(0,5);
    display.println( sDate );
    // Time
    display.setCursor(0,30);
    display.println( sTime );
    // Temperature
    display.setCursor(0,55);
    display.print( Temperature );
    display.println( "C" );
    // Humidity
    display.setCursor(0,80);
    display.print( Humidity );
    display.println( "%" );
    // Lux
    display.setCursor(0,105);
    display.println( SData );
    // Soil Moisture
    display.setCursor(0,130);
    display.println( SDataSM );
    // Refresh
    display.refresh();
    delay( 100 );

}
getEEPROM.ino
// EEPROM
// isUID EEPROM Unique ID
void isUID()
{

  // Is Unit ID
  uid = "";
  for (int x = 0; x < 7; x++)
  {
    uid = uid + char(EEPROM.read(x));
  }

}
getRTC.ino
// DS3231 RTC Date and Time
// Setup DS3231 RTC
void isSetupRTC() {

  if (! rtc.begin()) {
    while (1);
  }

  if (rtc.lostPower()) {
    // Following line sets the RTC to the date & time this sketch was compiled
    rtc.adjust(DateTime(F(__DATE__), F(__TIME__)));
    // This line sets the RTC with an explicit date & time, for example to set
    // January 21, 2014 at 3am you would call:
    // rtc.adjust(DateTime(2014, 1, 21, 3, 0, 0));
  }

}
// DS3231 RTC Date and Time
void isRTC(){

    // Date and Time
    sDate = "";
    sTime = "";
    // Date Time
    DateTime now = rtc.now();

    // sData
    sDate += String(now.year(), DEC);
    sDate += "/";
    sDate += String(now.month(), DEC);
    sDate += "/";
    sDate += String(now.day(), DEC);

    // sTime
    sTime += String(now.hour(), DEC);
    sTime += ":";
    sTime += String(now.minute(), DEC);
    sTime += ":";
    sTime += String(now.second(), DEC);

}
getSD.ino
// MicroSD Card
// MicroSD Setup
void setupSD() {

    // MicroSD Card
    pinMode( chipSelect , OUTPUT );
    if(!SD.begin( chipSelect )){
        ;
        return;
    }

    uint8_t cardType = SD.cardType();

    // CARD NONE
    if(cardType == CARD_NONE){
        ;
        return;
    }

    // SD Card Type
    if(cardType == CARD_MMC){
        ;
    } else if(cardType == CARD_SD){
        ;
    } else if(cardType == CARD_SDHC){
        ;
    } else {
        ;
    }

    // Size
    uint64_t cardSize = SD.cardSize() / (1024 * 1024);

}
// MicroSD Card
void isSD() {

  zzzzzz = "";

  // DFR|EEPROM Unique ID|Version|Date|Time|Temperature|Humidity|Lux|
  // Soil Moisture|*\r
  zzzzzz = "DFR|" + uid + "|" + sver + "|" + sDate + "|" + sTime + "|"
  + String(Temperature) + "C|" + String(Humidity) + "%|"
  + String(SData) + "|" + String(SDataSM) + "|*\r";

  // msg + 1
  char msg[zzzzzz.length() + 1];

  zzzzzz.toCharArray(msg, zzzzzz.length() + 1);

  // Append File
  appendFile(SD, "/dfrdata.txt", msg );

}
// List Dir
void listDir(fs::FS &fs, const char * dirname, uint8_t levels){

    // List Dir
    dirname;

    File root = fs.open(dirname);

    if(!root){
        return;
    }

    if(!root.isDirectory()){
        return;
    }

    File file = root.openNextFile();

    while(file){
        if(file.isDirectory()){
            file.name();
            if(levels){
                listDir(fs, file.name(), levels -1);
            }
        } else {
            file.name();
            file.size();
        }
        file = root.openNextFile();
    }

}
// Write File
void writeFile(fs::FS &fs, const char * path, const char * message){

    // Write File
    path;

    File file = fs.open(path, FILE_WRITE);

    if(!file){
        return;
    }

    if(file.print(message)){
        ;
    } else {
        ;
    }

    file.close();

}
// Append File
void appendFile(fs::FS &fs, const char * path, const char * message){

    // Append File
    path;

    File file = fs.open(path, FILE_APPEND);

    if(!file){
        return;
    }

    if(file.print(message)){
        ;
    } else {
        ;
    }

    file.close();

}
getSHT40.ino
// Fermion: SHT40 Temperature & Humidity Sensor
// SHT40 Temperature & Humidity
void isSHT40(){

  // Fermion: SHT40 Temperature & Humidity Sensor
  // Temperature
  Temperature = (175 * TemperatureData/65535) - 45;
  // Humidity
  Humidity = (125 * HumidityData/65535) - 6;

}
getSoilMoisture.ino
// Gravity: Analog Soil Moisture Sensor
// Soil Moisture
void isSoilMoisture(){

  // SDataSM => 0~900 Soil Moisture
  SDataSM = map( SensorSM, 1, 3000, 0, 900);

}
setup.ino
// Setup
void setup()
{

  // Give display time to power on
  delay(100);

  // EEPROM Size
  EEPROM.begin(EEPROM_SIZE);

  // EEPROM Unique ID
  isUID();

  // Give display
  delay(100);

  // Set up I2C bus
  Wire.begin();

  // Give display
  delay(100);

  // Setup BLE Scan
  isSetupBLEScan();

  // Setup DS3231 RTC
  isSetupRTC();

  //MicroSD Card
  setupSD();

  // SHARP Display Start & Clear the Display
  display.begin();
  // Clear Display
  display.clearDisplay();

  // Initialize digital pin iLED as an output
  pinMode(iLED, OUTPUT);

  // Outputting high, the LED turns on
  digitalWrite(iLED, HIGH);

  // Initialize the LED Green
  pinMode(iLEDGreen, OUTPUT);

  // iLEDGreen HIGH
  digitalWrite(iLEDGreen, HIGH );

  // Don Luc Electronics
  // Version
  // EEPROM
  isDisplayUID();

  // Delay 5 Second
  delay( 5000 );

}
——
People can contact us: https://www.donluc.com/?page_id=1927
Teacher, Instructor, E-Mentor, R&D and Consulting
- Programming Language
- Single-Board Microcontrollers (PIC, Arduino, Raspberry Pi, Arm, Silicon Labs, Espressif, Etc…)
- IoT
- Wireless (Radio Frequency, Bluetooth, WiFi, Etc…)
- Robotics
- Automation
- Camera and Video Capture Receiver Stationary, Wheel/Tank and Underwater Vehicle
- Unmanned Vehicles Terrestrial and Marine
- Machine Learning
- Artificial Intelligence (AI)
- RTOS
- Sensors, eHealth Sensors, Biosensor, and Biometric
- Research & Development (R & D)
- Consulting
Follow Us
Luc Paquin – Curriculum Vitae – 2024
https://www.donluc.com/luc/
Web: https://www.donluc.com/
Facebook: https://www.facebook.com/neosteam.labs.9/
YouTube: https://www.youtube.com/@thesass2063
Twitter: https://twitter.com/labs_steam
Pinterest: https://www.pinterest.com/NeoSteamLabs/
Instagram: https://www.instagram.com/neosteamlabs/
LinkedIn: https://www.linkedin.com/in/jlucpaquin/
Don Luc