——
#DonLucElectronics #DonLuc #DCMotor #Robotics #FireBeetle2ESP32E #ESP32 #Display #IoT #Project #Fritzing #Programming #Electronics #Microcontrollers #Consultant
——
——
——
——
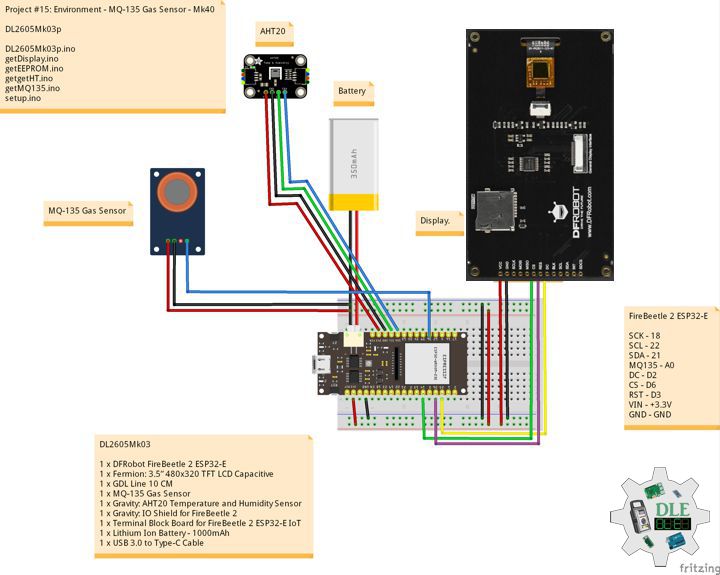
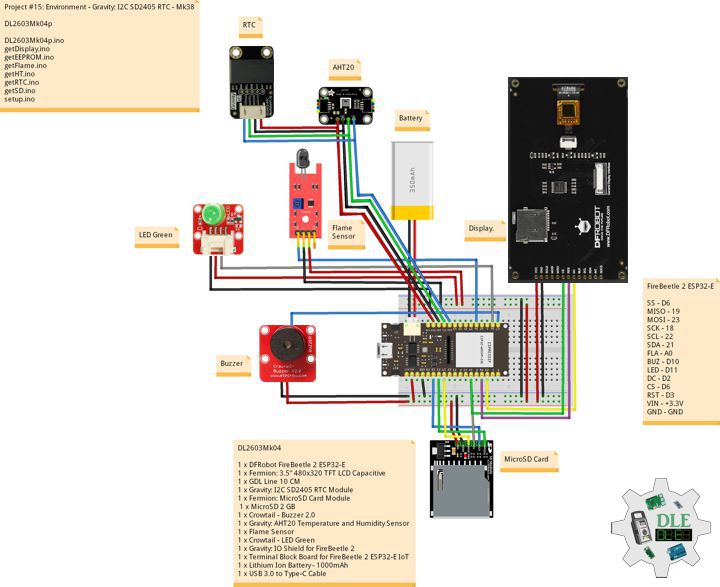
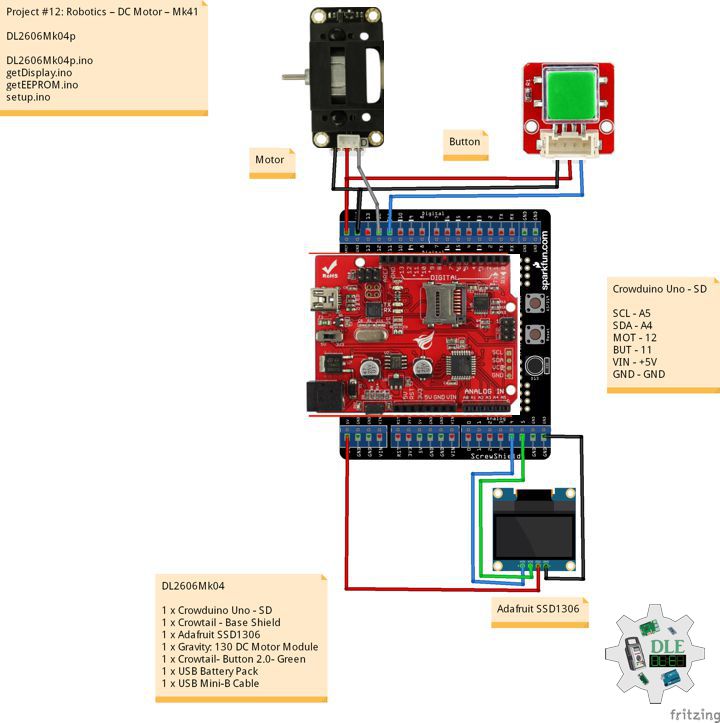
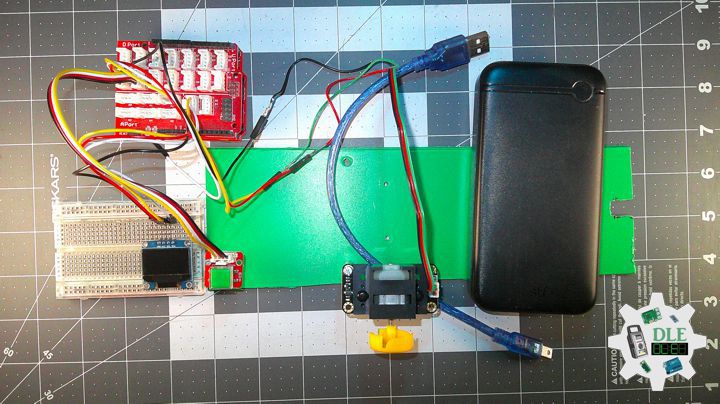
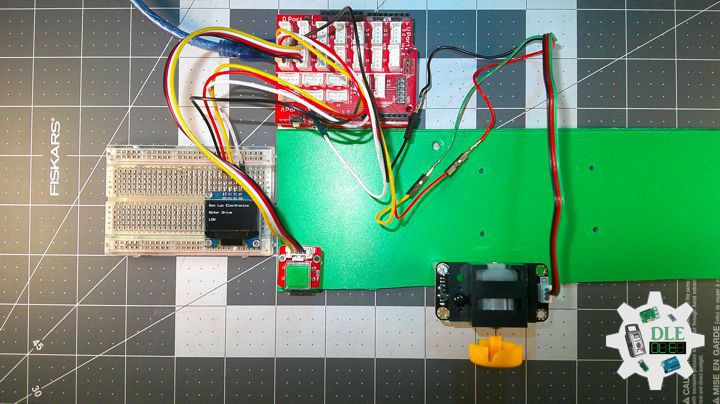
Gravity: 130 DC Motor Module
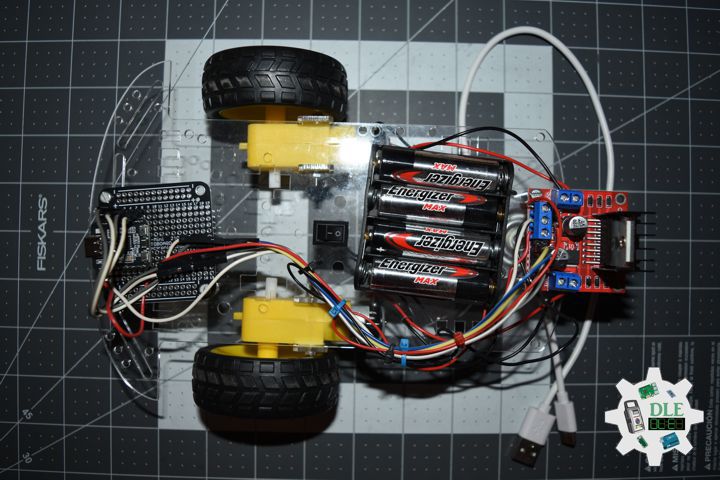
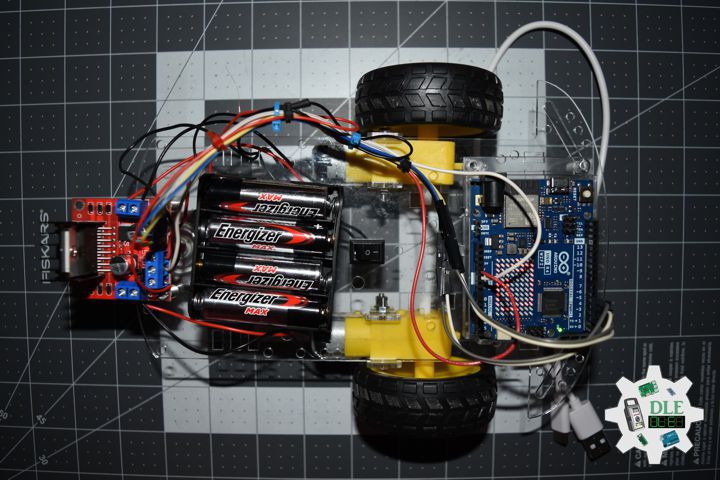
Gravity: 130 DC Motor Module combines a classic 130-size brushed motor with an onboard transistor control circuit, creating a compact actuator solution for rapid prototyping and embedded motion projects. The integrated switching stage allows direct digital control from popular development platforms such as Arduino without requiring a separate motor driver board. A standardized Gravity pin connector simplifies wiring and improves reliability during experimentation. This small DC motor unit supports PWM-based speed control, making the module suitable for robotics mechanisms, airflow experiments, and interactive hardware builds where quick installation and stable power switching are important.
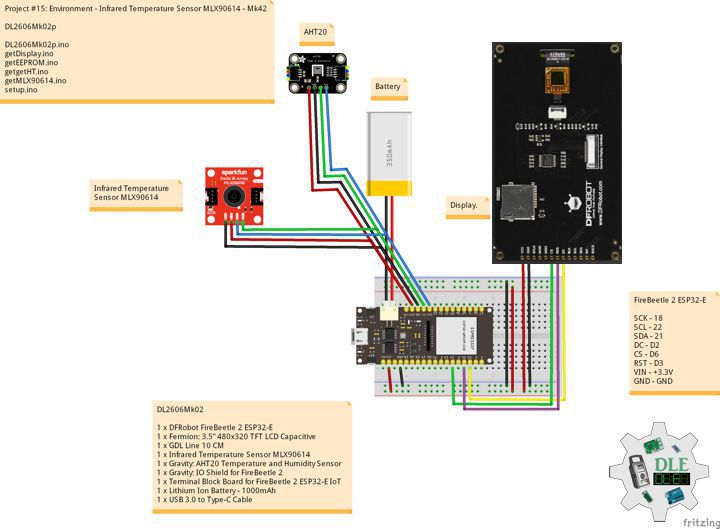
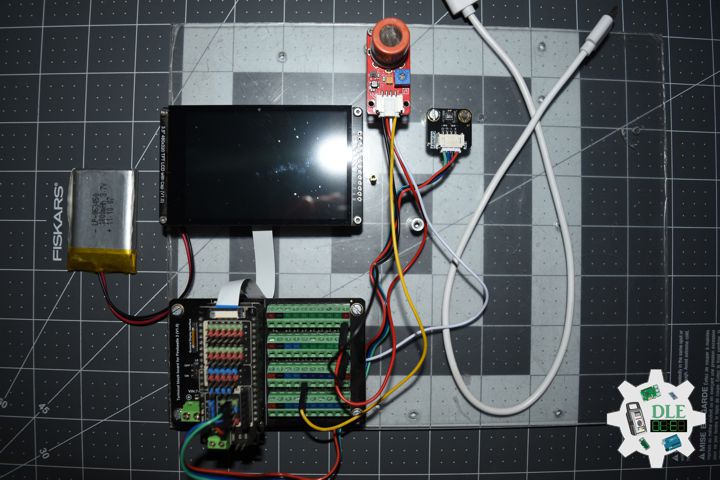
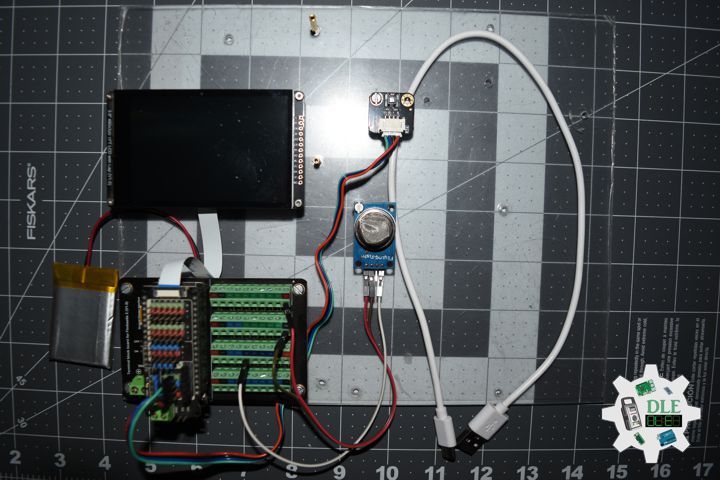
DL2606Mk04
1 x Crowduino Uno – SD
1 x Crowtail – Base Shield
1 x Adafruit SSD1306
1 x Gravity: 130 DC Motor Module
1 x Crowtail- Button 2.0- Green
1 x USB Battery Pack
1 x USB Mini-B Cable
DL2606Mk04p
DL2606Mk04p.ino
/****** Don Luc Electronics © ******
Software Version Information
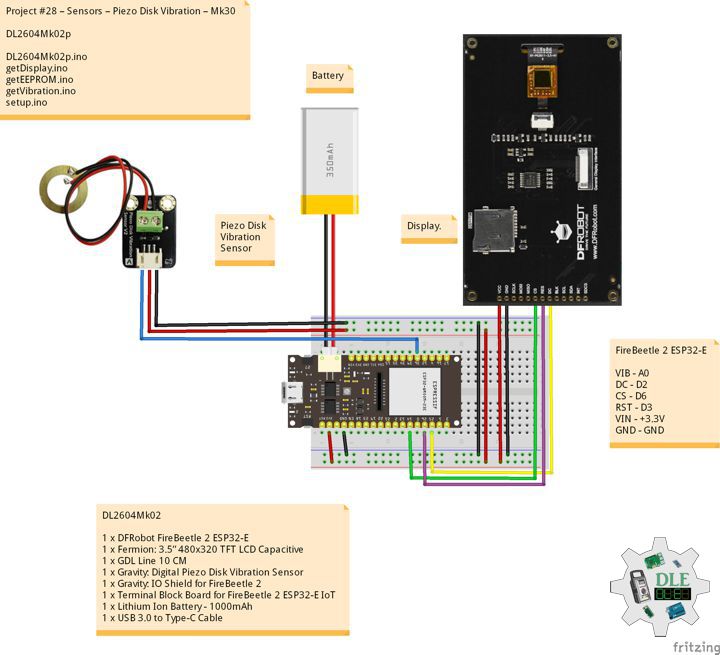
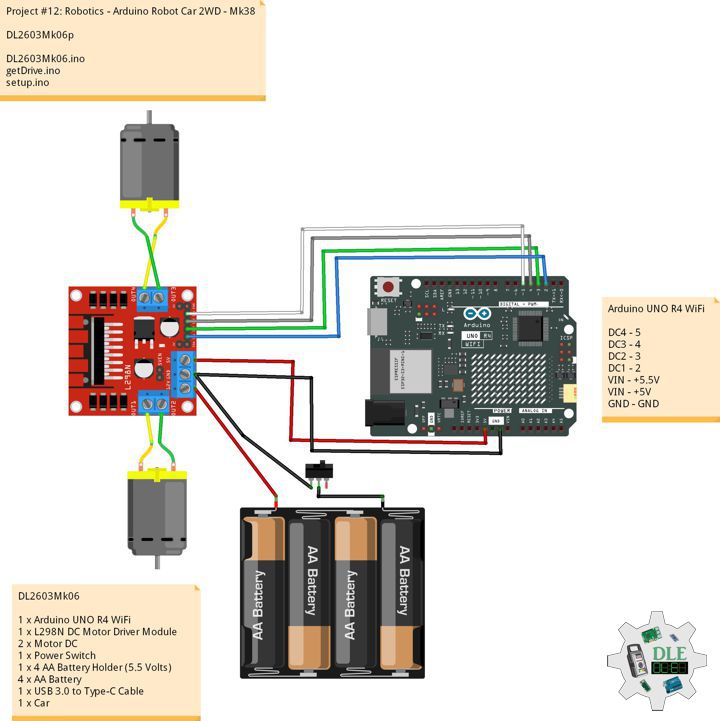
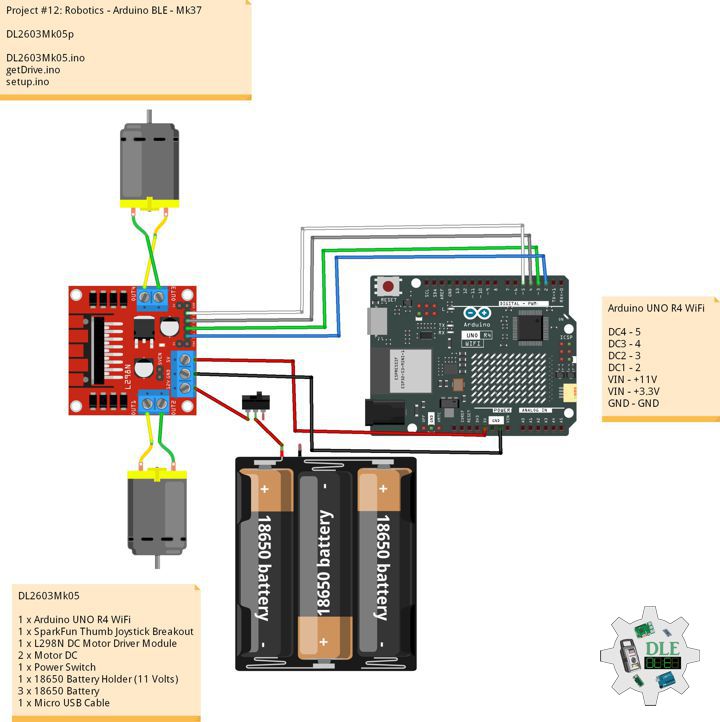
Project #12: Robotics – DC Motor – Mk41
12-41
DL2606Mk04p.ino
DL2606k04
1 x Crowduino Uno - SD
1 x Crowtail - Base Shield
1 x Adafruit SSD1306
1 x Gravity: 130 DC Motor Module
1 x Crowtail- Button 2.0- Green
1 x USB Battery Pack
1 x USB Mini-B Cable
*/
// Include the Library Code
// EEPROM Library to Read and Write EEPROM with Unique ID for Unit
#include "EEPROM.h"
// Wire
#include <Wire.h>
// Adafruit SSD1306
#include <Adafruit_SSD1306.h>
// Adafruit SSD1306
#define SCREEN_WIDTH 128
#define SCREEN_HEIGHT 64
#define OLED_RESET -1
Adafruit_SSD1306 display(SCREEN_WIDTH, SCREEN_HEIGHT, &Wire, OLED_RESET);
// Motor drive pin 12
int motorPin = 12;
// Define motor speed
int motorSpeed;
String sOne = "";
// iButton
int iButton = 11;
// Button State
int iButtonState = 0;
// Software Version Information
// EEPROM Unique ID Information
String uid = "";
// Software Version Information
String sver = "12-41";
void loop() {
// Read the input pin:
iButtonState = digitalRead(iButton);
if (iButtonState == HIGH) {
// PWM speed control
motorSpeed = 255;
analogWrite(motorPin, motorSpeed);
sOne = "HIGH";
}
else {
// PWM speed control
motorSpeed = 0;
analogWrite(motorPin, motorSpeed);
sOne = "LOW";
}
// isDisplay Motor
isDisplayMotor();
}
getDisplay.ino
// Adafruit SSD1306
// isDisplayUID
void isDisplayUID(){
// Intentar ambas direcciones
if(!display.begin(SSD1306_SWITCHCAPVCC, 0x3C)) {
//Serial.println("Error con 0x3C, probando 0x3D...");
if(!display.begin(SSD1306_SWITCHCAPVCC, 0x3D)) {
//Serial.println("Error OLED en ambas direcciones");
return;
}
}
// Clear Display
display.clearDisplay();
display.setTextSize(1);
display.setTextColor(SSD1306_WHITE);
// Don Luc Electronics
display.setCursor(0,0);
display.println("Don Luc Electronics");
// Motor Drive
display.setCursor(0,10);
display.print("Motor Drive");
// Version
display.setCursor(0,20);
display.print("Version");
display.setCursor(0,30);
display.print( sver );
// EEPROM
display.setCursor(0,40);
display.print("EEPROM");
display.setCursor(0,50);
display.print( uid );
// Display
display.display();
}
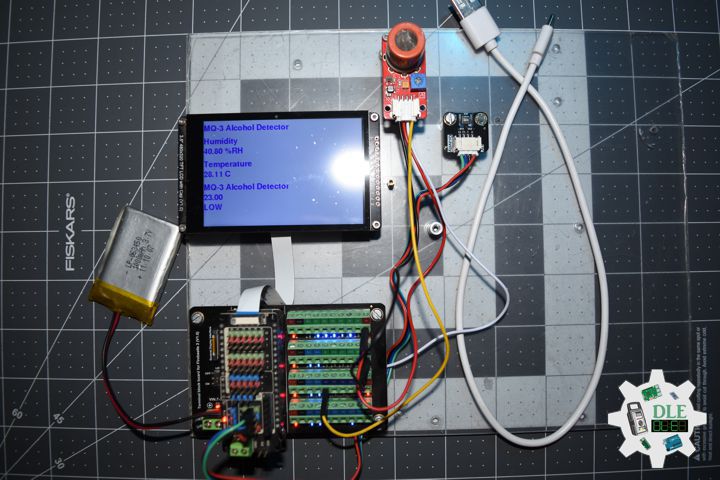
// isDisplay Motor
void isDisplayMotor(){
// Clear Display
display.clearDisplay();
display.setTextSize(1);
display.setTextColor(SSD1306_WHITE);
// Don Luc Electronics
display.setCursor(0,0);
display.println("Don Luc Electronics");
// Motor Drive
display.setCursor(0,20);
display.print("Motor Drive");
// HIGH or LOW
display.setCursor(0,40);
display.print( sOne );
// Display
display.display();
}
getEEPROM.ino
// isUID EEPROM Unique ID
void isUID()
{

  // Is Unit ID
  uid = "";
  for (int x = 0; x < 7; x++)
  {
    uid = uid + char(EEPROM.read(x));
  }

}
setup.ino
// Setup
void setup()
{

  // Delay
  delay( 100 );

  // EEPROM Unique ID
  isUID();

  // Delay
  delay( 100 );

  // iButton
  pinMode(iButton, INPUT);

  // Delay
  delay( 100 );

  // DFRobot Display 320x480 - UID
  // Don Luc Electronics
  // Version
  // EEPROM
  isDisplayUID();

  // Wait for the sensor to heat up for 20 seconds
  delay( 5000 );

}
——
People can contact us: https://www.donluc.com/?page_id=1927
Consultant, R&D, Electronics, IoT, Teacher and Instructor
- Programming Language
- Single-Board Microcontrollers (PIC, Arduino, Raspberry Pi, Arm, Silicon Labs, Espressif, Etc…)
- IoT
- Wireless (Radio Frequency, Bluetooth, WiFi, Etc…)
- Robotics
- Automation
- Camera and Video Capture Receiver Stationary, Wheel/Tank , Underwater and UAV Vehicle
- Unmanned Vehicles Terrestrial, Marine and UAV
- Machine Learning
- Artificial Intelligence (AI)
- RTOS
- Sensors, eHealth Sensors, Biosensor, and Biometric
- Research & Development (R & D)
- Consulting
Follow Us
Luc Paquin – Curriculum Vitae – 2026
https://www.donluc.com/luc/LucPaquinCVEng2026Mk01.pdf
https://www.donluc.com/luc/
Web: https://www.donluc.com/
Web: https://www.jlpconsultants.com/
Facebook: https://www.facebook.com/neosteam.labs.9/
YouTube: https://www.youtube.com/@thesass2063
DFRobot: https://learn.dfrobot.com/user-10186.html
TikTok: https://www.tiktok.com/@luc.paquin8
Hackster: https://www.hackster.io/luc-paquin
LinkedIn: https://www.linkedin.com/in/jlucpaquin/
Don Luc