——
#DonLucElectronics #DonLuc #Sensors #AlcoholGasSensor #MinIMU9 #Pololu #Adafruit #SparkFun #Arduino #Project #Fritzing #Programming #Electronics #Microcontrollers #Consultant
——
——
——
——
Pololu Carrier for MQ Gas Sensors
This carrier board is designed to work with any of the MQ-series gas sensors, simplifying the interface from 6 to 3 pins—ground, power and analog voltage output—that are broken out with a 0.1″ spacing, making the board compatible with 0.1″ headers and standard breadboards and perfboards. This board has two mounting holes and provides convenient pads for mounting the gas sensor’s required sensitivity-setting resistor.
Alcohol Gas Sensor – MQ-3
This alcohol sensor is suitable for detecting alcohol concentration on your breath, just like your common breathalyzer. It has a high sensitivity and fast response time. Sensor provides an analog resistive output based on alcohol concentration.
How does this relate to the breath? It turns out that there is a standard conversion from breath alcohol content to BAC that is employed by commercial breathalyzers. Our formula for calculating BAC from the alcohol measured in the breath is:
% BAC = Breath mg/L * 0.21
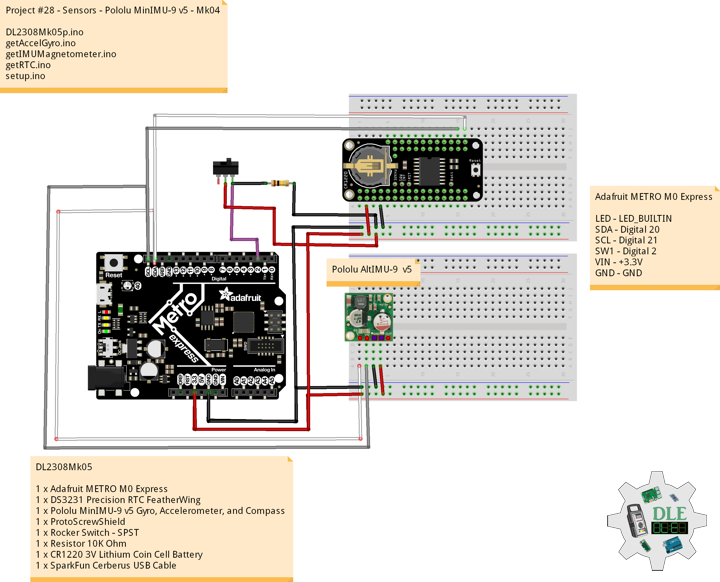
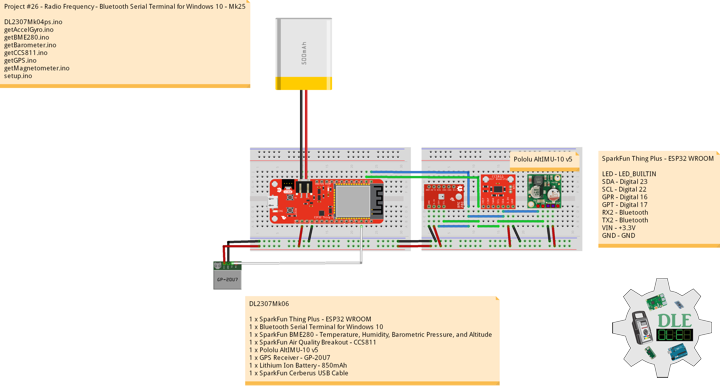
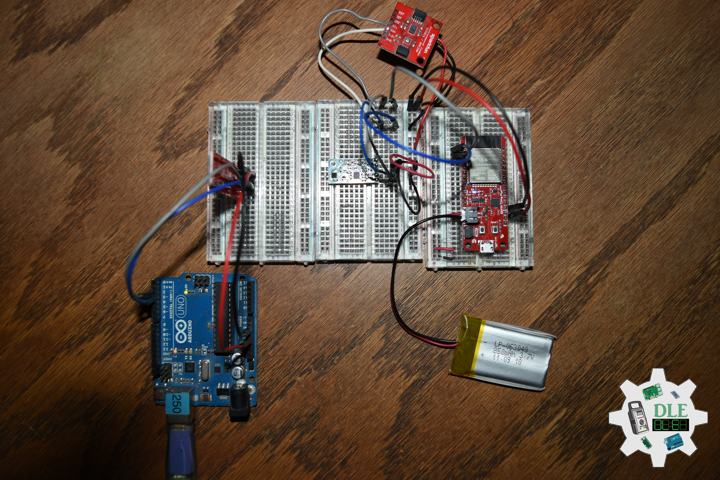
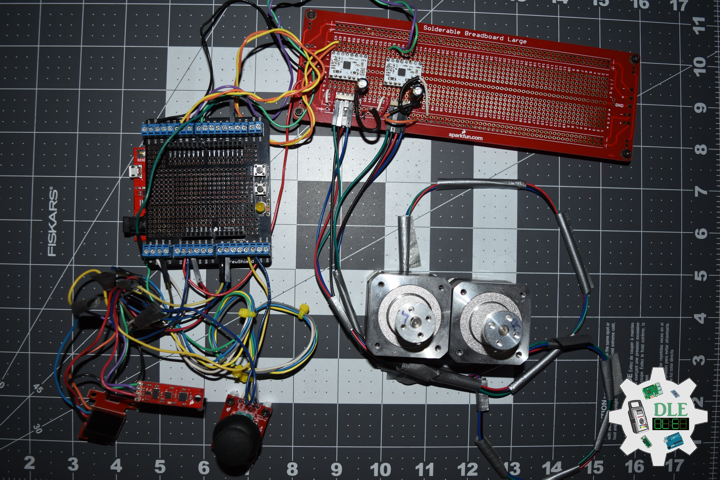
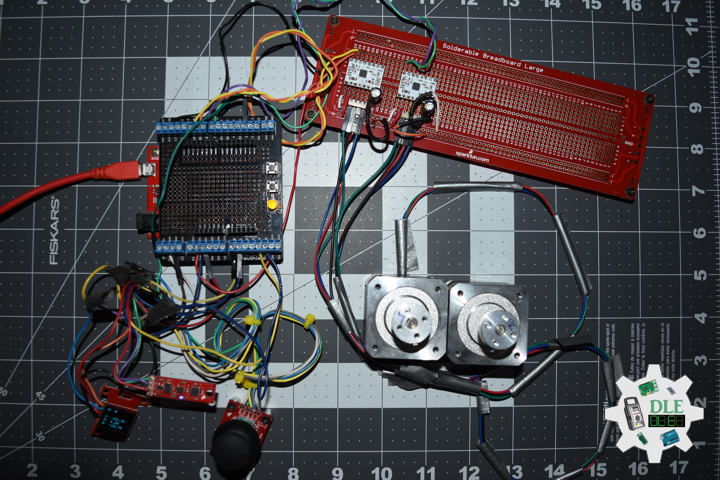
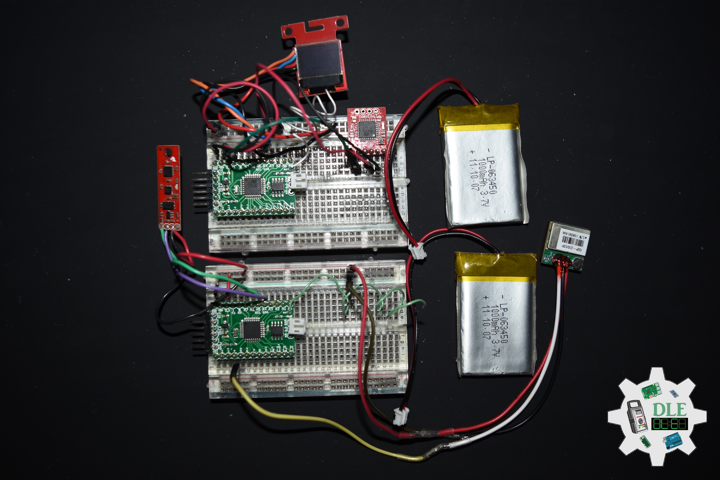
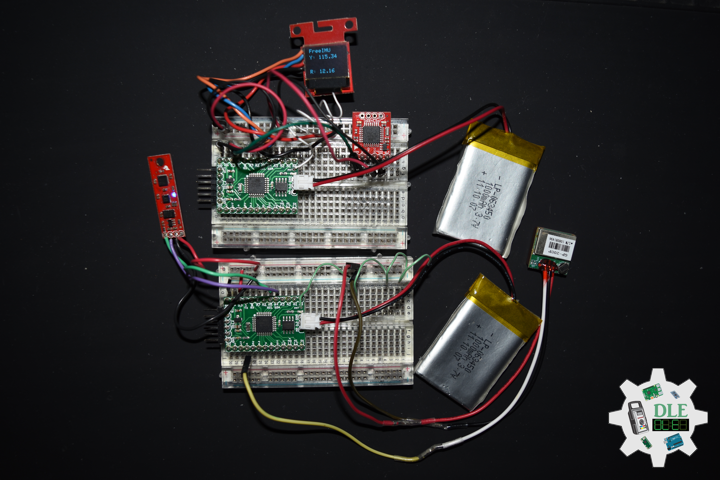
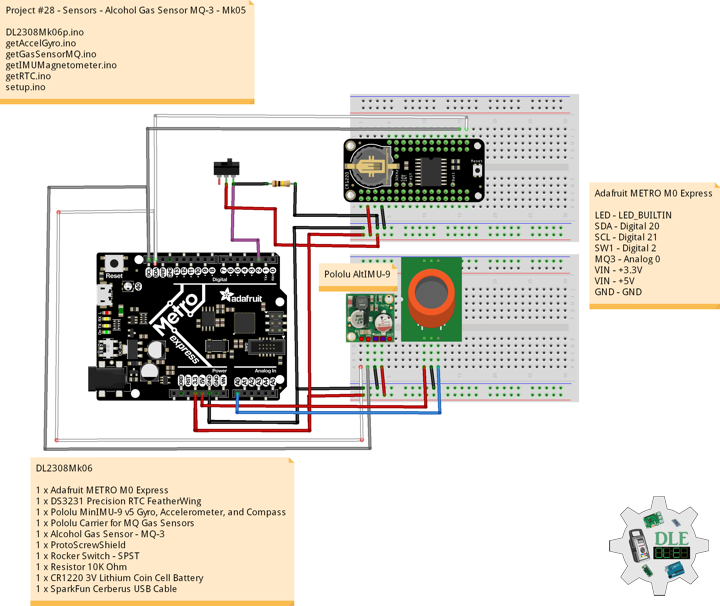
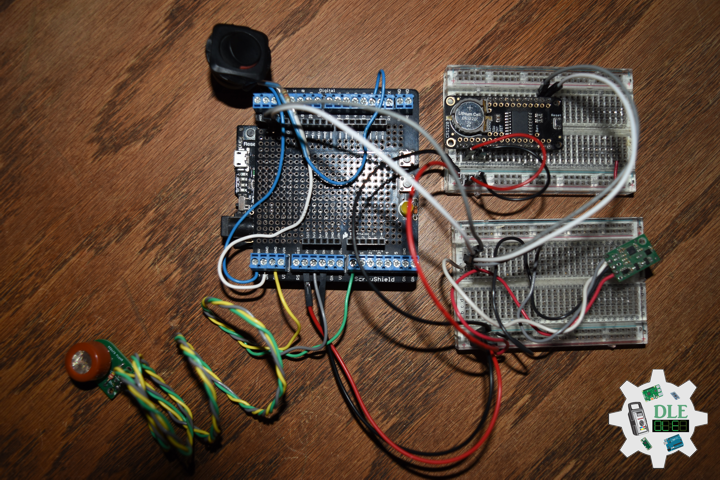
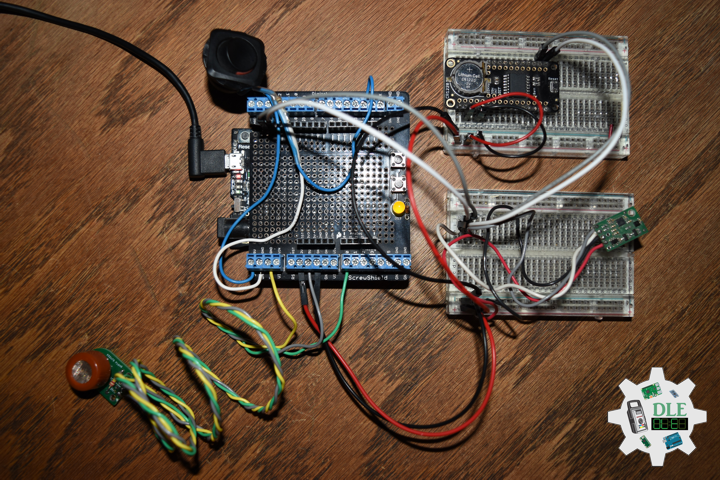
DL2308Mk06
1 x Adafruit METRO M0 Express
1 x DS3231 Precision RTC FeatherWing
1 x Pololu MinIMU-9 v5 Gyro, Accelerometer, and Compass
1 x Pololu Carrier for MQ Gas Sensors
1 x Alcohol Gas Sensor – MQ-3
1 x ProtoScrewShield
1 x Rocker Switch – SPST
2 x Resistor 10K Ohm
1 x CR1220 3V Lithium Coin Cell Battery
1 x SparkFun Cerberus USB Cable
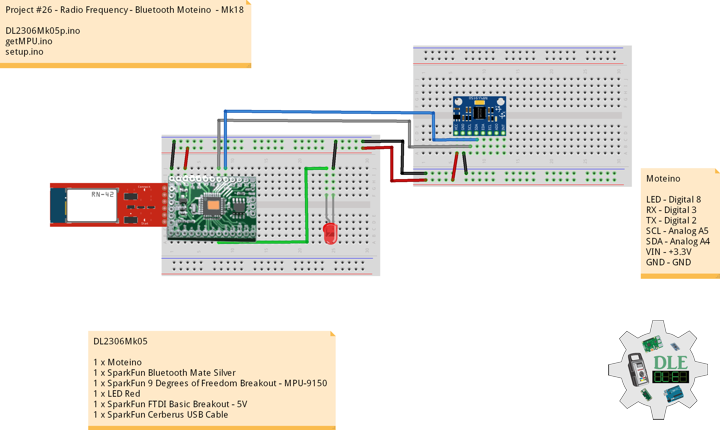
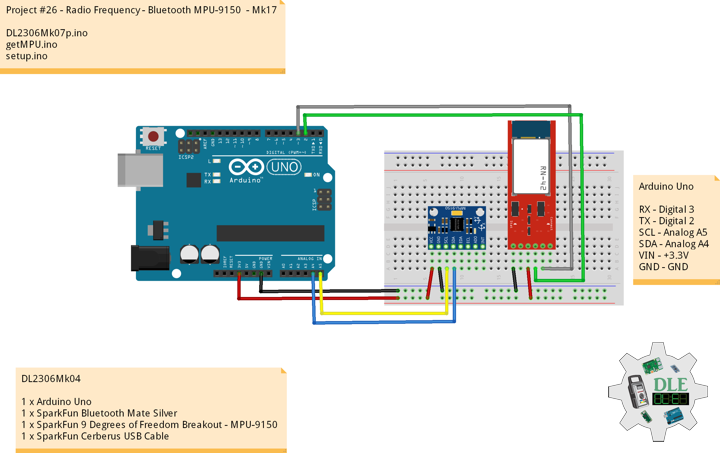
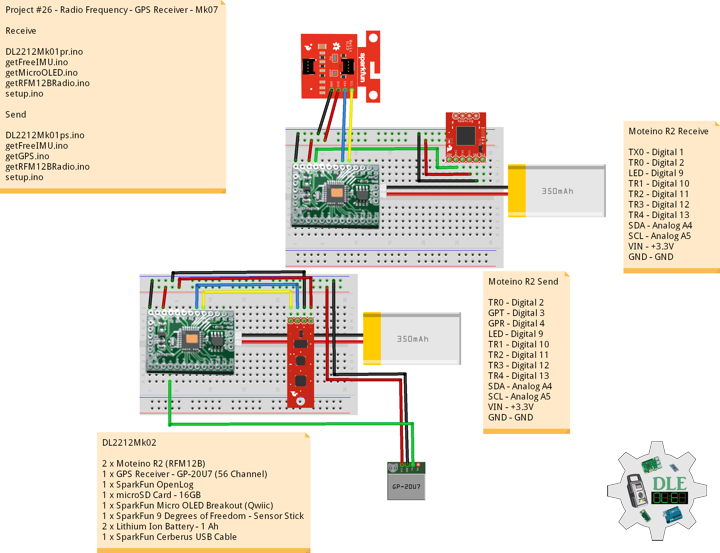
Adafruit METRO M0 Express
LED – LED_BUILTIN
SDA – Digital 20
SCL – Digital 21
SW1 – Digital 2
MQ3 – Analog 0
VIN – +3.3V
VIN – +5V
GND – GND
——
DL2308Mk06p.ino
/****** Don Luc Electronics © ******
Software Version Information
Project #28 - Sensors - Alcohol Gas Sensor MQ-3 - Mk05
28-05
DL2308Mk06p.ino
1 x Adafruit METRO M0 Express
1 x DS3231 Precision RTC FeatherWing
1 x Pololu MinIMU-9 v5 Gyro, Accelerometer, and Compass
1 x Pololu Carrier for MQ Gas Sensors
1 x Alcohol Gas Sensor - MQ-3
1 x ProtoScrewShield
1 x Rocker Switch - SPST
2 x Resistor 10K Ohm
1 x CR1220 3V Lithium Coin Cell Battery
1 x SparkFun Cerberus USB Cable
*/

// Include the Library Code
// DS3231 Precision RTC
#include <RTClib.h>
// Two Wire Interface (TWI/I2C)
#include <Wire.h>
// Keyboard
#include <Keyboard.h>
// Includes and variables for IMU integration
// STMicroelectronics LSM6DS33 Gyroscope and Accelerometer
#include <LSM6.h>
// STMicroelectronics LIS3MDL Magnetometer
#include <LIS3MDL.h>

// Keyboard
String sKeyboard = "";

// DS3231 Precision RTC
RTC_DS3231 rtc;
String dateRTC = "";
String timeRTC = "";

// Pololu 9DoF IMU
// STMicroelectronics LSM6DS33 Gyroscope and Accelerometer
LSM6 imu;
// Accelerometer and Gyroscopes
// Accelerometer
int imuAX;
int imuAY;
int imuAZ;
// Gyroscopes
int imuGX;
int imuGY;
int imuGZ;
// STMicroelectronics LIS3MDL Magnetometer
LIS3MDL mag;
// Magnetometer
int magX;
int magY;
int magZ;

// Gas Sensors MQ
// Alcohol Gas Sensor - MQ-3
int iMQ3 = A0;
int iMQ3Raw = 0;
int iMQ3ppm = 0;

// The number of the button pin
int iButton = 2;
// Variable for reading the button status
int buttonState = 0;

// Software Version Information
String sver = "28-05";

void loop() {

  // Date and Time RTC
  isRTC ();

  // Pololu Accelerometer and Gyroscopes
  isIMU();

  // Pololu Magnetometer
  isMag();

  // Gas Sensors MQ
  isGasSensor();

  // Read the state of the button value:
  buttonState = digitalRead(iButton);

  // Check if the button is pressed. If it is, the buttonState is HIGH:
  if (buttonState == HIGH) {

     Keyboard.println(sKeyboard);

  }

  // Delay 1 Second
  delay(1000);

}
getAccelGyro.ino
// Accelerometer and Gyroscopes
// Setup IMU
void setupIMU() {

  // Setup IMU
  imu.init();
  // Default
  imu.enableDefault();

}
// Accelerometer and Gyroscopes
void isIMU() {

  // Accelerometer and Gyroscopes
  imu.read();
  // Accelerometer x, y, z
  imuAX = imu.a.x;
  imuAY = imu.a.y;
  imuAZ = imu.a.z;
  // Gyroscopes x, y, z
  imuGX = imu.g.x;
  imuGY = imu.g.y;
  imuGZ = imu.g.z;

  sKeyboard = sKeyboard + String(imuAX) + "|" + String(imuAY) + "|" + String(imuAZ) + "|";
  sKeyboard = sKeyboard + String(imuGX) + "|" + String(imuGY) + "|" + String(imuGZ) + "|";

}
getGasSensorMQ.ino
// Gas Sensors MQ
// Gas Sensor
void isGasSensor() {

  // Read in analog value from each gas sensors
  // Alcohol Gas Sensor - MQ-3
  iMQ3ppm = isMQ3( iMQ3Raw );

  sKeyboard = sKeyboard + String(iMQ3ppm) + "|*";

}
// Alcohol Gas Sensor - MQ-3
int isMQ3(double rawValue) {

  double RvRo = rawValue;
  // % BAC = breath mg/L * 0.21
  double bac = RvRo * 0.21;
  return bac;

}
getIMUMagnetometer.ino
// IMU Magnetometer
// Setup Magnetometer
void setupMag() {

  // Setup Magnetometer
  mag.init();
  // Default
  mag.enableDefault();

}
// Magnetometer
void isMag() {

  // Magnetometer
  mag.read();
  // Magnetometer x, y, z
  magX = mag.m.x;
  magY = mag.m.y;
  magZ = mag.m.z;

  sKeyboard = sKeyboard + String(magX) + "|" + String(magY) + "|"
  + String(magZ) + "|";

}
getRTC.ino
// Date & Time
// DS3231 Precision RTC
void setupRTC() {

  // DS3231 Precision RTC
  if (! rtc.begin()) {
    //Serial.println("Couldn't find RTC");
    //Serial.flush();
    while (1) delay(10);
  }

  if (rtc.lostPower()) {
    //Serial.println("RTC lost power, let's set the time!");
    // When time needs to be set on a new device, or after a power loss, the
    // following line sets the RTC to the date & time this sketch was compiled
    rtc.adjust(DateTime(F(__DATE__), F(__TIME__)));
    // This line sets the RTC with an explicit date & time, for example to set
    // January 21, 2014 at 3am you would call:
    //rtc.adjust(DateTime(2023, 8, 10, 11, 0, 0));
  }

}
// Date and Time RTC
void isRTC () {

  // Date and Time
  dateRTC = "";
  timeRTC = "";
  DateTime now = rtc.now();

  // Date
  dateRTC = now.year(), DEC;
  dateRTC = dateRTC + "/";
  dateRTC = dateRTC + now.month(), DEC;
  dateRTC = dateRTC + "/";
  dateRTC = dateRTC + now.day(), DEC;

  // Time
  timeRTC = now.hour(), DEC;
  timeRTC = timeRTC + ":";
  timeRTC = timeRTC + now.minute(), DEC;
  timeRTC = timeRTC + ":";
  timeRTC = timeRTC + now.second(), DEC;

  sKeyboard = "SEN|" + sver + "|" + String(dateRTC) + "|" +
  String(timeRTC) + "|";

}
setup.ino
// Setup
void setup()
{

  // Give display time to power on
  delay(100);

  // Wire - Inialize I2C Hardware
  Wire.begin();

  // Give display time to power on
  delay(100);

  // Date & Time RTC
  // DS3231 Precision RTC
  setupRTC();

  // Initialize control over the keyboard:
  Keyboard.begin();

  // Pololu Setup IMU
  setupIMU();

  // Pololu Setup Magnetometer
  setupMag();

  // Initialize the button pin as an input
  pinMode(iButton, INPUT);

  // Initialize digital pin LED_BUILTIN as an output
  pinMode(LED_BUILTIN, OUTPUT);
  // Turn the LED on HIGH
  digitalWrite(LED_BUILTIN, HIGH);

  // Delay 5 Second
  delay( 5000 );

}
——
People can contact us: https://www.donluc.com/?page_id=1927
Technology Experience
- Programming Language
- Single-Board Microcontrollers (PIC, Arduino, Raspberry Pi,Espressif, etc…)
- IoT
- Wireless (Radio Frequency, Bluetooth, WiFi, Etc…)
- Robotics
- Camera and Video Capture Receiver Stationary, Wheel/Tank and Underwater Vehicle
- Unmanned Vehicles Terrestrial and Marine
- Machine Learning
- RTOS
- Research & Development (R & D)
Instructor, E-Mentor, STEAM, and Arts-Based Training
- Programming Language
- IoT
- PIC Microcontrollers
- Arduino
- Raspberry Pi
- Espressif
- Robotics
Follow Us
Luc Paquin – Curriculum Vitae – 2023
https://www.donluc.com/luc/
Web: https://www.donluc.com/
Facebook: https://www.facebook.com/neosteam.labs.9/
YouTube: https://www.youtube.com/@thesass2063
Twitter: https://twitter.com/labs_steam
Pinterest: https://www.pinterest.com/NeoSteamLabs/
Instagram: https://www.instagram.com/neosteamlabs/
Don Luc