——
#DonLucElectronics #DonLuc #Servo #Moteino #Transceiver #RadioFrequency #Pololu #Arduino #Project #Fritzing #Programming #Electronics #Microcontrollers #Consultant
——
——
——

——
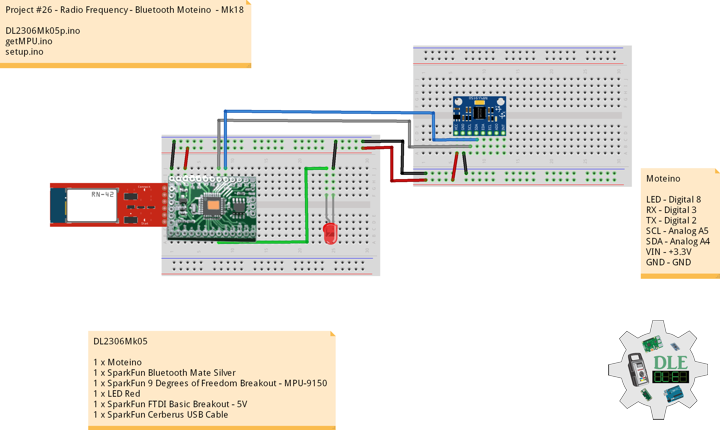
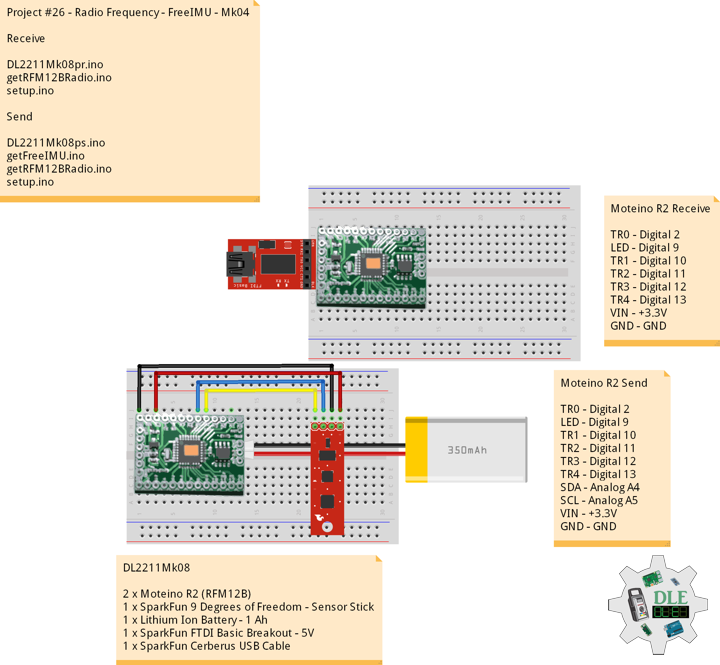
Moteino
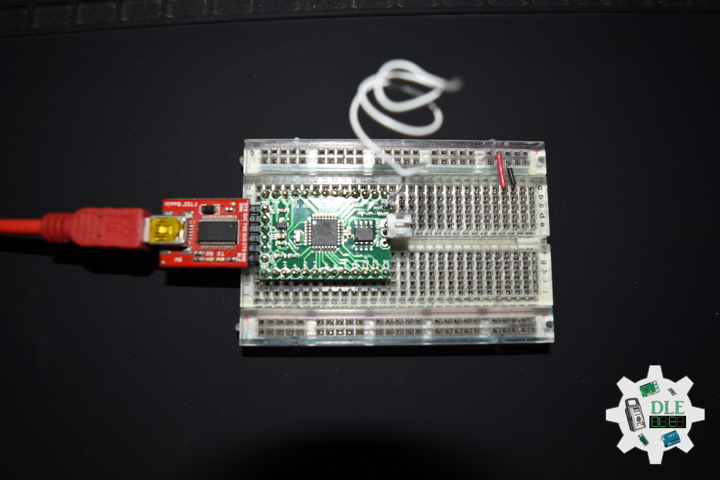
Moteino began as a low power wireless Arduino compatible development platform based on the popular ATmega328p chip used in the Arduino UNO. There are now several Moteino development boards including MoteinoMEGA based on the Atmega1284P and MoteinoM0 based on the SAMD21G18 Cortex M0+. For programming you will need an external FTDI-Adapter to load sketches, the advantages being lower cost, smaller size.
Servo Motor
A servo motor is a rotary actuator or linear actuator that allows for precise control of angular or linear position, velocity and acceleration. It consists of a suitable motor coupled to a sensor for position feedback. It also requires a relatively sophisticated controller, often a dedicated module designed specifically for use with servo motors.
Servo motors have been around for a long time and are utilized in many applications. They are small in size but pack a big punch and are very energy-efficient. These features allow them to be used to operate remote-controlled or radio-controlled toy cars, robots and airplanes. Servo motors are also used in industrial applications, robotics, in-line manufacturing, pharmaceutics and food services.
Pololu Adjustable Boost Regulator 2.5-9.5 Volt
This powerful, adjustable boost regulator can generate an output voltage as high as 9.5 Volt from an input voltage as low as 1.5 Volt, all in a compact. A trimmer potentiometer lets you set the boost regulator’s output voltage to a value between 2.5 and 9.5 Volt.
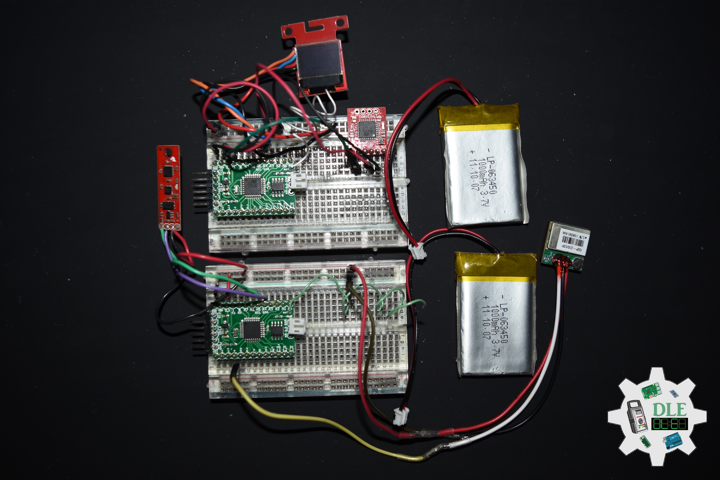
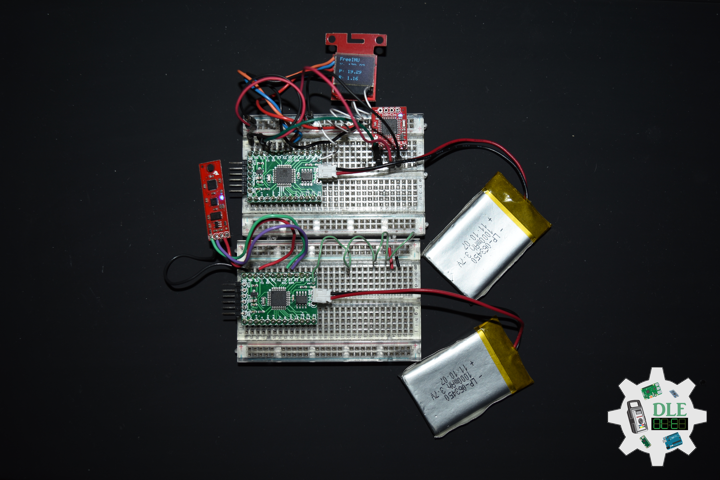
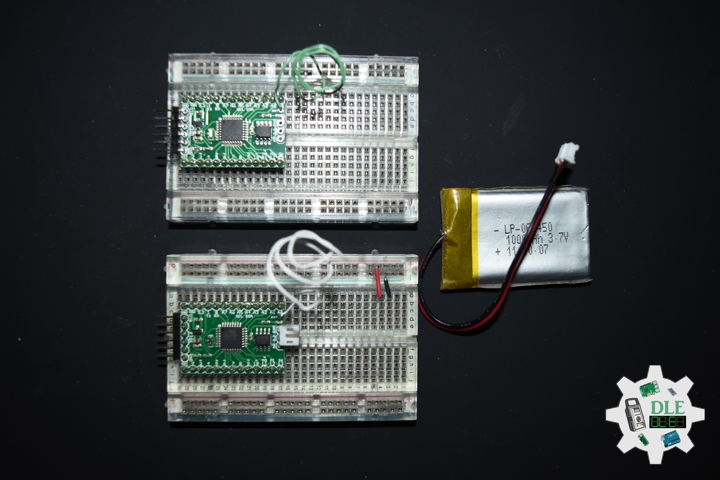
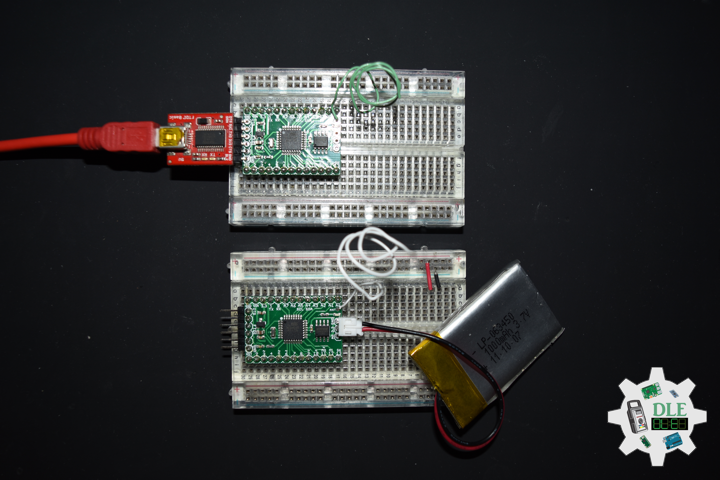
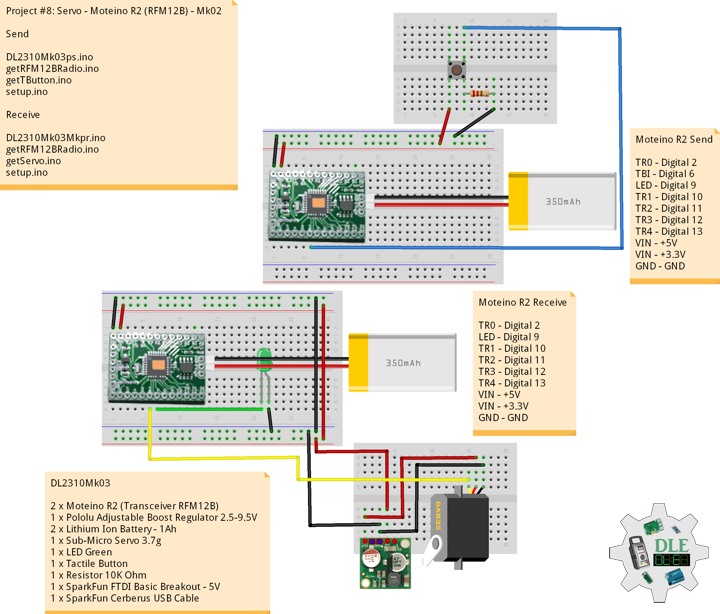
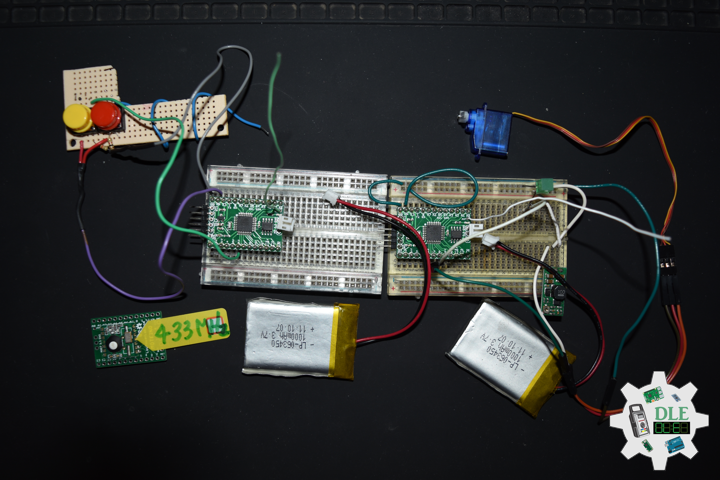
DL2310Mk03
2 x Moteino R2 (Transceiver RFM12B)
1 x Pololu Adjustable Boost Regulator 2.5-9.5V
2 x Lithium Ion Battery – 1Ah
1 x Sub-Micro Servo 3.7g
1 x LED Green
1 x Tactile Button
1 x Resistor 10K Ohm
1 x SparkFun FTDI Basic Breakout – 5V
1 x SparkFun Cerberus USB Cable
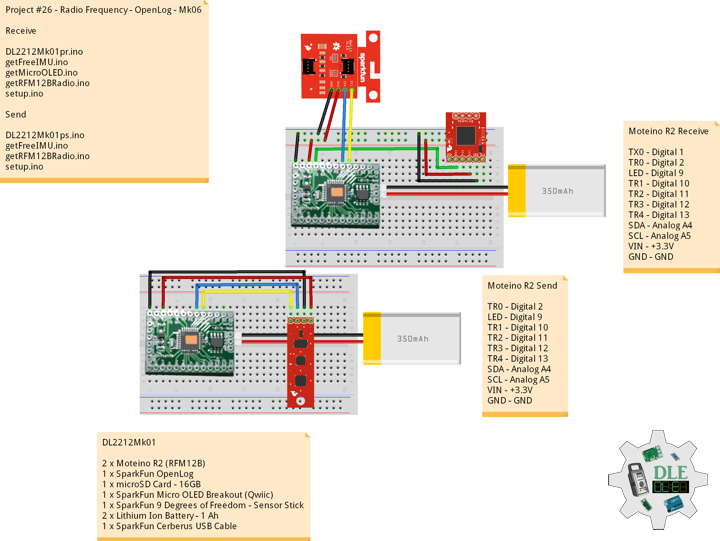
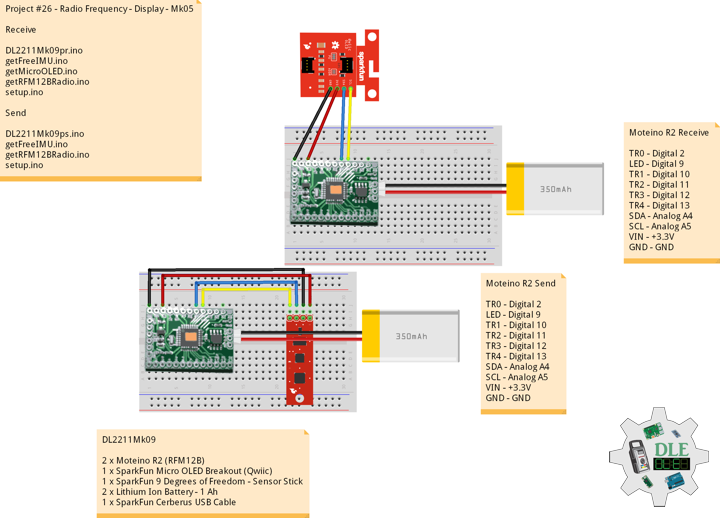
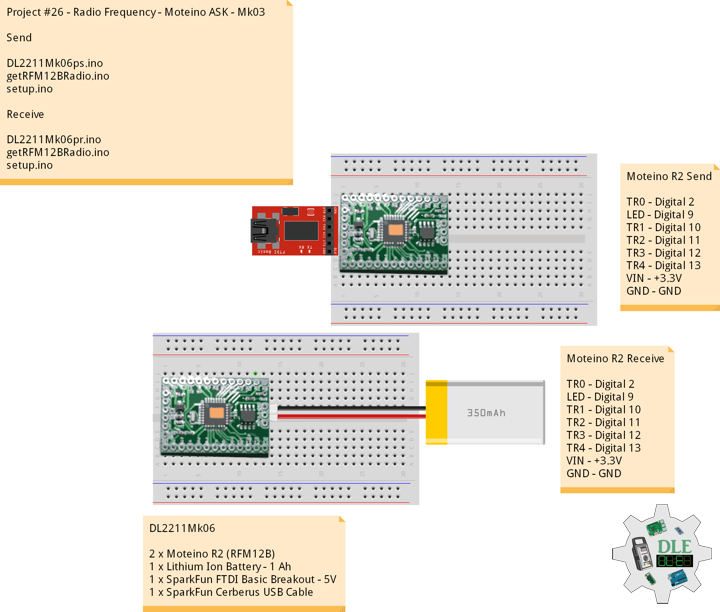
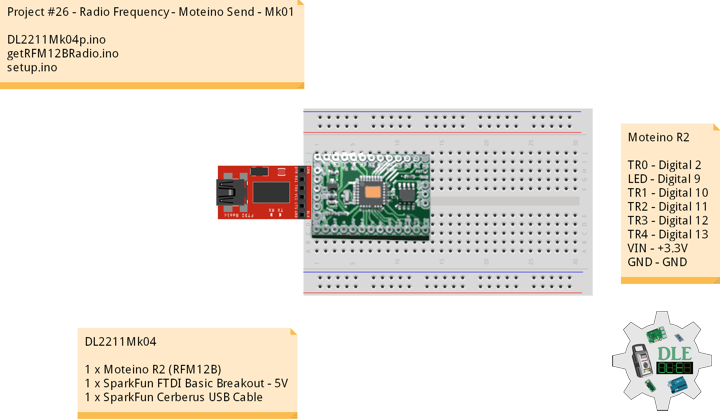
Moteino R2 (Send)
TR0 – Digital 2
TBI – Digital 6
LED – Digital 9
TR1 – Digital 10
TR2 – Digital 11
TR3 – Digital 12
TR4 – Digital 13
VIN – +5V
VIN – +3.3V
GND – GND
——
DL2310Mk03ps.ino
/* ***** Don Luc Electronics © *****
Software Version Information
Project #8: Servo - Radio Frequency - Mk02
6-02
Send
DL2310Mk03ps.ino
2 x Moteino R2 (Transceiver RFM12B)
1 x Pololu Adjustable Boost Regulator 2.5-9.5V
2 x Lithium Ion Battery - 1Ah
1 x Sub-Micro Servo 3.7g
1 x LED Green
1 x Tactile Button
1 x Resistor 10K Ohm
1 x SparkFun FTDI Basic Breakout - 5V
1 x SparkFun Cerberus USB Cable
*/

// Include the Library Code
// RFM12B Radio
#include <RFM12B.h>
// Sleep
#include <avr/sleep.h>

// You will need to initialize the radio by telling it what ID
// it has and what network it's on
// The NodeID takes values from 1-127, 0 is reserved for sending
// broadcast messages (send to all nodes)
// The Network ID takes values from 0-255
// By default the SPI-SS line used is D10 on Atmega328.
// You can change it by calling .SetCS(pin) where pin can be {8,9,10}
// Network ID used for this unit
#define NODEID        2
// The network ID we are on
#define NETWORKID    99
// The node ID we're sending to
#define GATEWAYID     1
// # of ms to wait for an ack
#define ACK_TIME     50
// Serial
#define SERIAL_BAUD  115200

// Encryption is OPTIONAL
// to enable encryption you will need to:
// - provide a 16-byte encryption KEY (same on all nodes that talk encrypted)
// - to call .Encrypt(KEY) to start encrypting
// - to stop encrypting call .Encrypt(NULL)
uint8_t KEY[] = "ABCDABCDABCDABCD";

// Wait this many ms between sending packets
int interPacketDelay = 50;
// Input
char input = 0;

// Need an instance of the RFM12B Radio Module
RFM12B radio;
// Send Size
byte sendSize = 0;
// Payload
char payload[100];
// Request ACK
bool requestACK = false;

// LED
int iLED = 9;

// The number of the Tactile Button pin
int iTButton = 6;
// Variable for reading the button status
int TButtonState = 0;
// The previous reading from the input pin
int lastTButtonState = LOW;
// The following variables are unsigned longs
// because the time, measured in
// milliseconds, will quickly become a bigger
// number than can be stored in an int.
// The last time the output pin was toggled
unsigned long lastDebounceTime = 0;
// The debounce time; increase if the output flickers
unsigned long debounceDelay = 50;

// String
String zzzzzz = "";
int iSER = 0;

// Software Version Information
String sver = "8-02";

void loop()
{

  // Tactile Button
  isTButton();

  // is RFM12B Radio
  isRFM12BRadio();

  // Inter Packet Delay
  delay(interPacketDelay);

}
getRFM12BRadio.ino
// RFM12B Radio
void isSetupRFM12BRadio(){

  // RFM12B Radio
  radio.Initialize(NODEID, RF12_433MHZ, NETWORKID);
  // Encryption
  radio.Encrypt(KEY);
  // Sleep right away to save power
  radio.Sleep();
  // Transmitting
  Serial.println("Transmitting...\n\n");

}
// is RFM12 BRadio
void isRFM12BRadio(){

  // zzzzzz ""
  zzzzzz = "";

  // zzzzz = "<SER|" + iSER + "|*";
  zzzzzz = "<SER|";
  zzzzzz = zzzzzz + iSER;
  zzzzzz = zzzzzz + "|*";

  // sendSize Length
  sendSize = zzzzzz.length();

  // sendSize
  payload[sendSize];

  // sendSize, charAt
  for(byte i = 0; i < sendSize+1; i++){

    payload[i] = zzzzzz.charAt(i);

  }

  // payload
  Serial.print(payload);

  // Request ACK
  requestACK = sendSize;

  // Wakeup
  radio.Wakeup();

  // Turn the LED on HIGH
  digitalWrite( iLED , HIGH);

  // Send
  radio.Send(GATEWAYID, payload, sendSize, requestACK);

  // Request ACK
  if (requestACK)
  {

    Serial.print(" - waiting for ACK...");
    if (waitForAck()){

      Serial.print("Ok!");

    }
    else Serial.print("nothing...");

  }

  // Turn the LED on LOW
  digitalWrite( iLED , LOW);

  // Sleep
  radio.Sleep();

  // Serial
  Serial.println();

}
// Wait a few milliseconds for proper ACK, return true if received
static bool waitForAck(){

  // Now
  long now = millis();

  // ACK
  while (millis() - now <= ACK_TIME){


    if (radio.ACKReceived(GATEWAYID)){

      return true;

    }

  }

  return false;

}
getTButton.ino
// Tactile Button
void isTButton(){

  // Read the state of the Button value:
  int reading = digitalRead(iTButton);

  // Check to see if you just pressed the TButton
  // (i.e. the input went from LOW to HIGH), and you've waited long enough
  // since the last press to ignore any noise:

  // If the TButton changed, due to noise or pressing:
  if (reading != lastTButtonState) {

    // Reset the debouncing timer
    lastDebounceTime = millis();

  }

  if ((millis() - lastDebounceTime) > debounceDelay) {

    // Whatever the reading is at, it's been there for
    // longer than the debounce
    // delay, so take it as the actual current state:

    // if the button state has changed:
    if (reading != TButtonState) {

      TButtonState = reading;

      // Check if the TButton is pressed. If it is, the TButtonState is HIGH:
      if (TButtonState == HIGH) {

        iSER = 1;

      } else {

        iSER = 0;

      }


    }
  }

  // Save the reading. Next time through the loop,
  // it'll be the lastTButtonState:
  lastTButtonState = reading;

}
setup.ino
// Setup
void setup(){

  // Serial
  Serial.begin(SERIAL_BAUD);

  // LED
  pinMode( iLED , OUTPUT);

  // Initialize the Button pin as an input
  pinMode(iTButton, INPUT);

  // Setup RFM12B Radio
  isSetupRFM12BRadio();

}
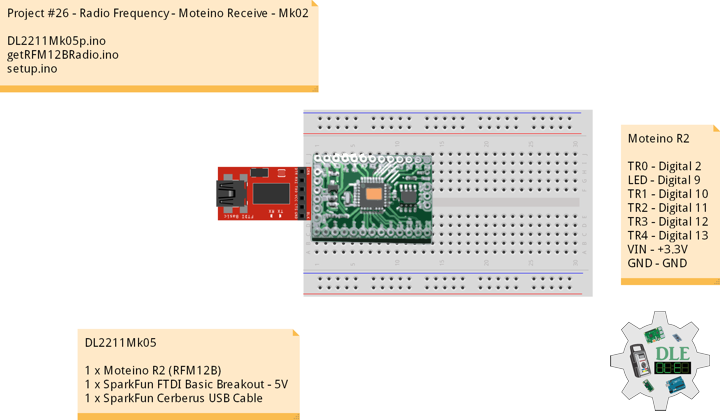
Moteino R2 (Receive)
TR0 – Digital 2
LED – Digital 9
TR1 – Digital 10
TR2 – Digital 11
TR3 – Digital 12
TR4 – Digital 13
VIN – +5V
VIN – +3.3V
GND – GND
—
DL2310Mk03Mkpr.ino
/* ***** Don Luc Electronics © *****
Software Version Information
Project #8: Servo - Radio Frequency - Mk02
6-02
Receive
DL2310Mk03pr.ino
2 x Moteino R2 (RFM12B)
1 x Pololu Adjustable Boost Regulator 2.5-9.5V
2 x Lithium Ion Battery - 1Ah
1 x Sub-Micro Servo 3.7g
1 x LED Green
1 x Tactile Button
1 x Resistor 10K Ohm
1 x SparkFun FTDI Basic Breakout - 5V
1 x SparkFun Cerberus USB Cable
*/

// Include the Library Code
// RFM12B Radio
#include <RFM12B.h>
// Servo
#include <Servo.h>

// You will need to initialize the radio by telling it what ID
// it has and what network it's on
// The NodeID takes values from 1-127, 0 is reserved for sending
// broadcast messages (send to all nodes)
// The Network ID takes values from 0-255
// By default the SPI-SS line used is D10 on Atmega328.
// You can change it by calling .SetCS(pin) where pin can be {8,9,10}
// Network ID used for this unit
#define NODEID        1
// The network ID we are on
#define NETWORKID    99
// Serial
#define SERIAL_BAUD  115200

// Encryption is OPTIONAL
// to enable encryption you will need to:
// - provide a 16-byte encryption KEY (same on all nodes that talk encrypted)
// - to call .Encrypt(KEY) to start encrypting
// - to stop encrypting call .Encrypt(NULL)
uint8_t KEY[] = "ABCDABCDABCDABCD";

// Need an instance of the RFM12B Radio Module
RFM12B radio;

// Message
String msg = "";

// Servo
int iSER = 0;
String sSER = "";
int firstClosingBracket = 0;

// LED
int iLED = 9;
int iLEDG = 7;

// Servo control
Servo serv;
const int pinServo = 6;

// Software Version Information
String sver = "8-02";

void loop() {

  // is RFM12B Radio
  isRFM12BRadio();

}
getRFM12BRadio.ino
// RFM12B Radio
void isSetupRFM12BRadio()
{

  // RFM12B Radio
  radio.Initialize(NODEID, RF12_433MHZ, NETWORKID);
  // Encryption
  radio.Encrypt(KEY);
  // Transmitting
  Serial.println("Listening...");

}
// is RFM12 BRadio
void isRFM12BRadio()
{

  // Receive
  if (radio.ReceiveComplete())
  {

    // CRC Pass
    if (radio.CRCPass())
    {

      // Serial
      Serial.print('[');
      Serial.print(radio.GetSender());
      Serial.print("] ");

      // Message
      msg = "";

      // Can also use radio.GetDataLen() if you don't like pointers
      for (byte i = 0; i < *radio.DataLen; i++)
      {

        Serial.print((char)radio.Data[i]);
        msg = msg + (char)radio.Data[i];

      }

      // Turn the LED on HIGH
      digitalWrite( iLED , HIGH);

      // Servo
      isServo();

      // ACK Requested
      if (radio.ACKRequested())
      {

        // Send ACK
        radio.SendACK();
        Serial.print(" - ACK Sent");

      }

      // Turn the LED on LOW
      digitalWrite( iLED , LOW);

    }
    else
    {

      // BAD-CRC
      Serial.print("BAD-CRC");

    }

    // Serial
    Serial.println();

  }

}
getServo.ino
// Servo
void isServo(){

  // Message
  //Serial.println( msg );
  // msg = "<SER|0|*";
  firstClosingBracket = 0;
  // "<SER|"
  firstClosingBracket = msg.indexOf('|');
  //Serial.println( msg );
  msg.remove(0, 5);
  //Serial.println( msg );
  // Servo
  firstClosingBracket = msg.indexOf('|');
  sSER = msg;
  sSER.remove(firstClosingBracket);
  //Serial.println( sSER );
  iSER = sSER.toInt();
  //Serial.println( iSER );
  int x = iSER;

  if (x == 1) {

    digitalWrite(iLEDG, HIGH);
    // Set servo to unlock
    serv.write( 0 );
    delay(15);

  } else {

    digitalWrite(iLEDG, LOW);
    // Set servo to lock
    serv.write( 90 );
    delay(15);

  }

}
setup.ino
// Setup
void setup()
{

  // Serial
  Serial.begin(SERIAL_BAUD);

  // LED
  pinMode( iLED , OUTPUT);
  pinMode( iLEDG , OUTPUT);

  // Attach Servo
  serv.attach( pinServo );

  // RFM12B Radio
  isSetupRFM12BRadio();

}
——
People can contact us: https://www.donluc.com/?page_id=1927
Teacher, Instructor, E-Mentor, R&D and Consulting
- Programming Language
- Single-Board Microcontrollers (PIC, Arduino, Raspberry Pi, Arm, Silicon Labs, Espressif, Etc…)
- IoT
- Wireless (Radio Frequency, Bluetooth, WiFi, Etc…)
- Robotics
- Automation
- Camera and Video Capture Receiver Stationary, Wheel/Tank and Underwater Vehicle
- Unmanned Vehicles Terrestrial and Marine
- Machine Learning
- Artificial Intelligence (AI)
- RTOS
- eHealth Sensors, Biosensor, and Biometric
- Research & Development (R & D)
- Consulting
Follow Us
Luc Paquin – Curriculum Vitae – 2023
https://www.donluc.com/luc/
Web: https://www.donluc.com/
Facebook: https://www.facebook.com/neosteam.labs.9/
YouTube: https://www.youtube.com/@thesass2063
Twitter: https://twitter.com/labs_steam
Pinterest: https://www.pinterest.com/NeoSteamLabs/
Instagram: https://www.instagram.com/neosteamlabs/
Don Luc