——
#DonLucElectronics #DonLuc #DFRobot #L3G4200D #HMC5883L #ADXL335 #GPS #FireBeetle2ESP32E #EEPROM #RTC #SD #Display #SparkFun #ESP32 #IoT #Arduino #Project #Fritzing #Programming #Electronics #Microcontrollers #Consultant
——
——
——
——
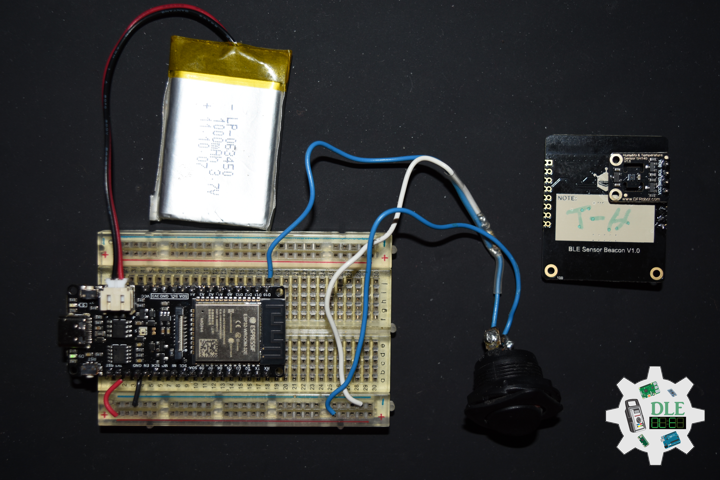
SparkFun Tri-Axis Gyroscope – L3G4200D
This is a breakout board for the L3G4200D low-power three-axis angular rate sensor. The L3G4200D is a MEMS motion sensor and has a full scale of dps and is capable of measuring rates with a user-selectable bandwidth. These work great in gaming and virtual reality input devices, motion control with MMI, GPS navigation systems, appliances and robotics. The L3G4200D is a low-power three-axis angular rate sensor able to provide unprecedented stablility of zero rate level and sensitivity over temperature and time. It includes a sensing element and an IC interface capable of providing the measured angular rate to the external world through a digital interface.
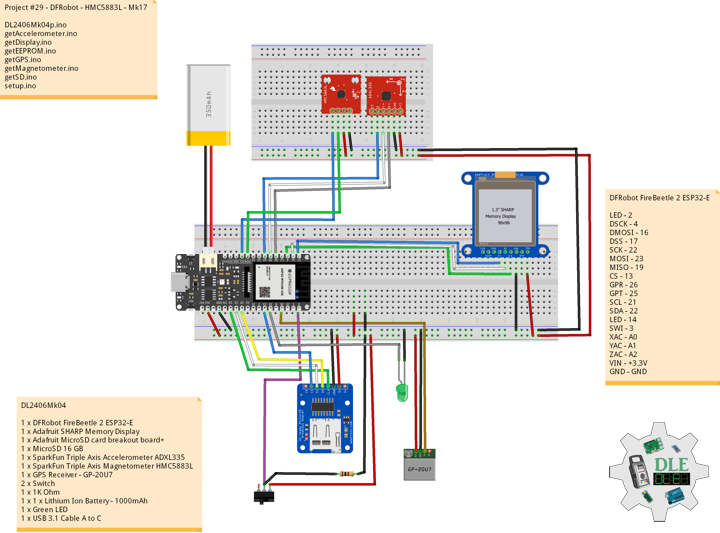
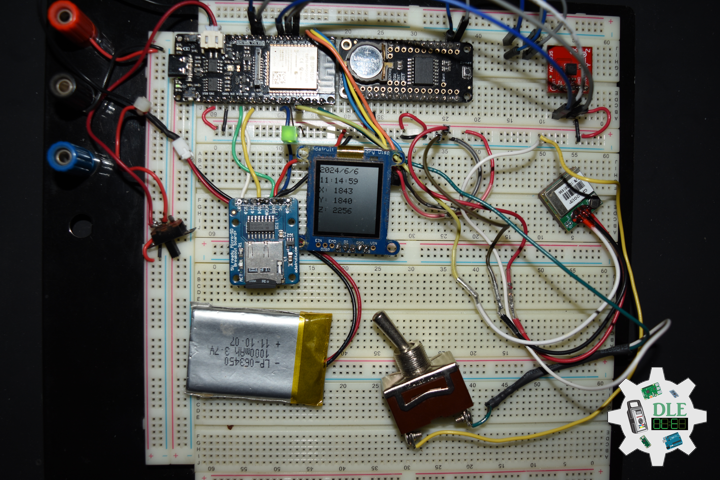
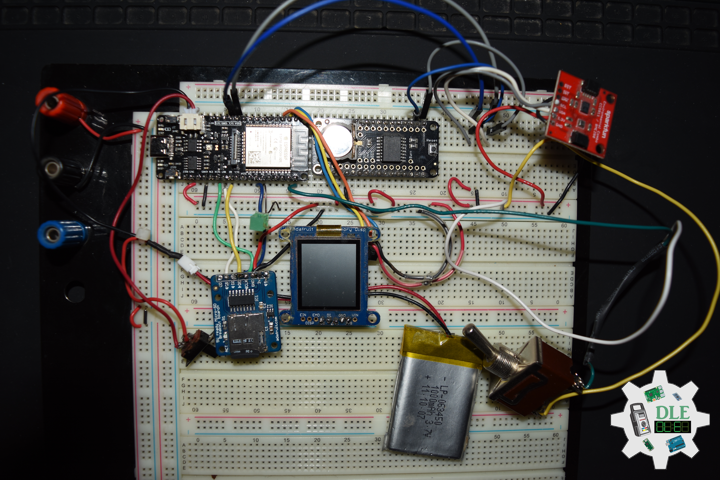
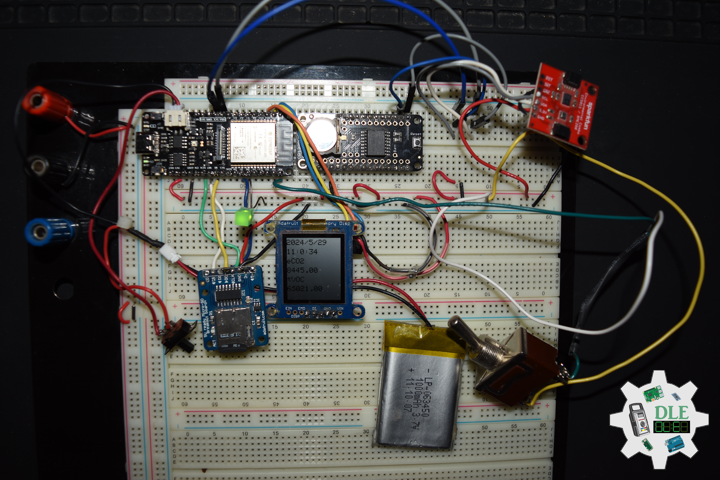
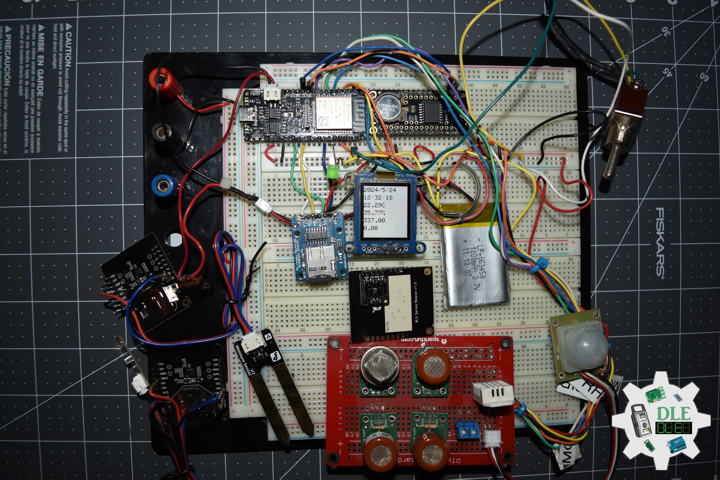
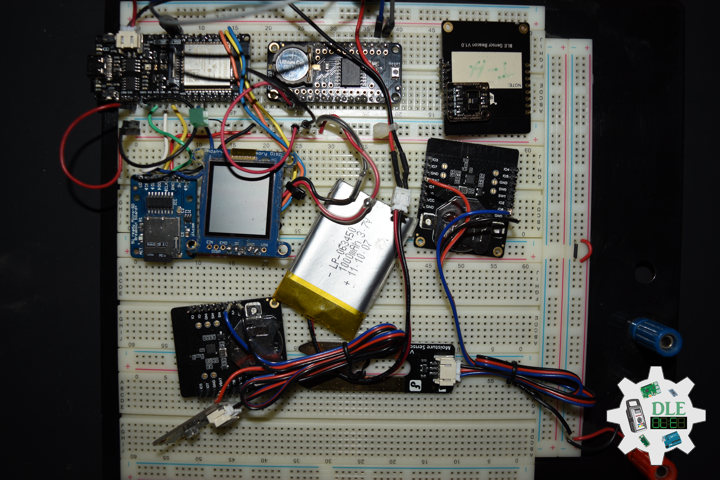
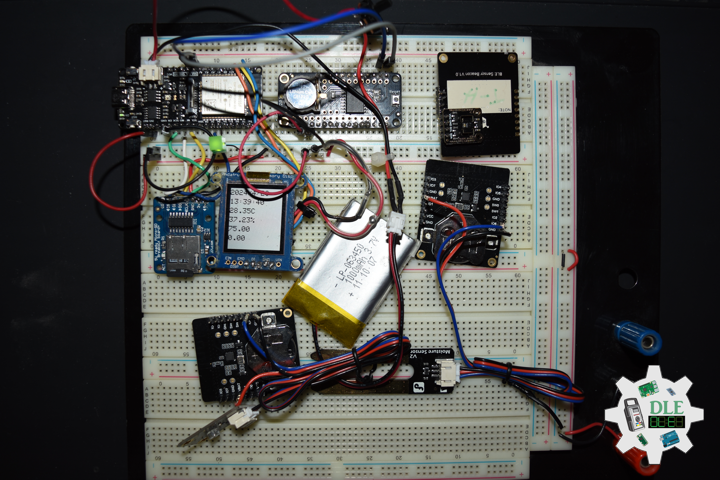
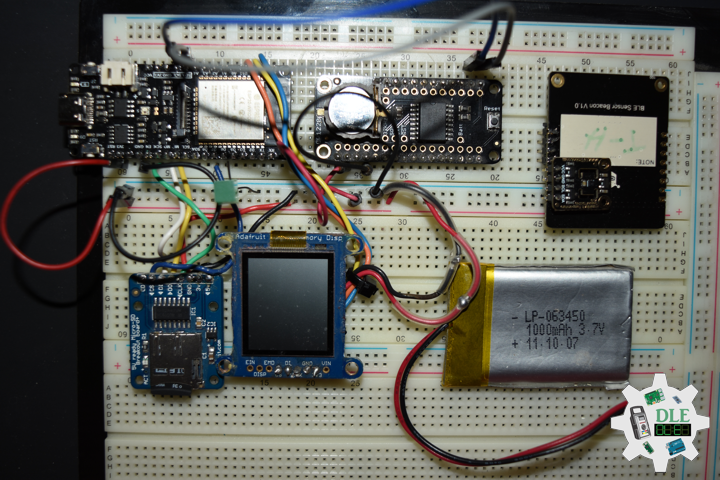
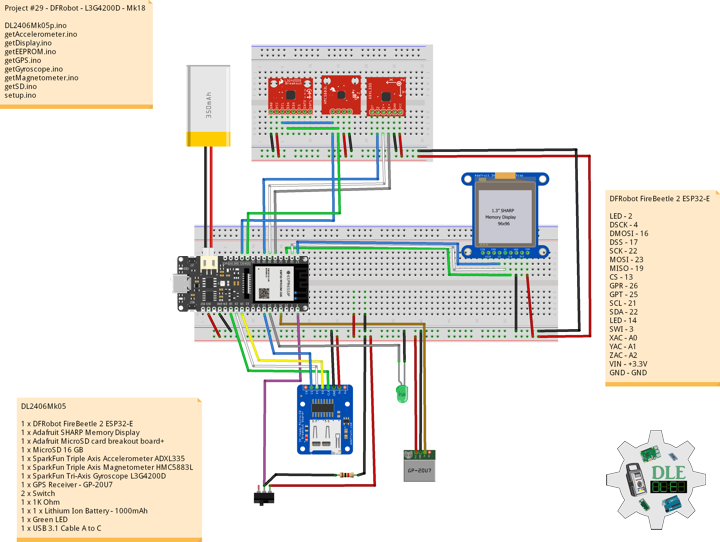
DL2406Mk05
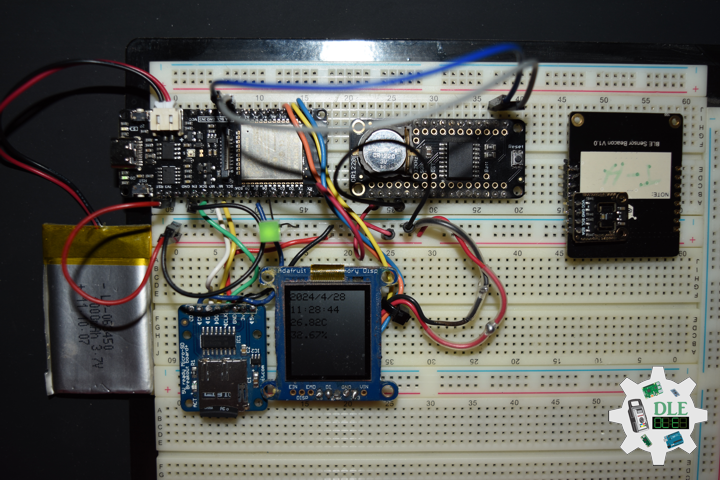
1 x DFRobot FireBeetle 2 ESP32-E
1 x Adafruit SHARP Memory Display
1 x Adafruit MicroSD card breakout board+
1 x MicroSD 16 GB
1 x SparkFun Triple Axis Accelerometer ADXL335
1 x SparkFun Triple Axis Magnetometer HMC5883L
1 x SparkFun Tri-Axis Gyroscope L3G4200D
1 x GPS Receiver – GP-20U7
2 x Switch
1 x 1K Ohm
1 x 1 x Lithium Ion Battery – 1000mAh
1 x Green LED
1 x USB 3.1 Cable A to C
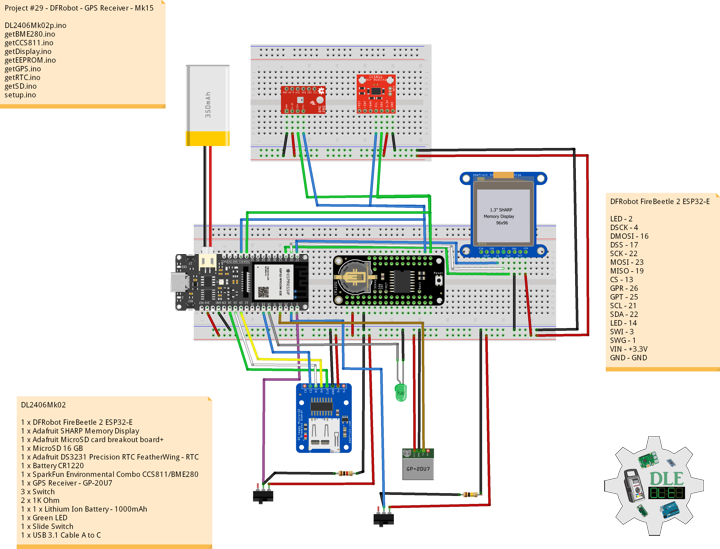
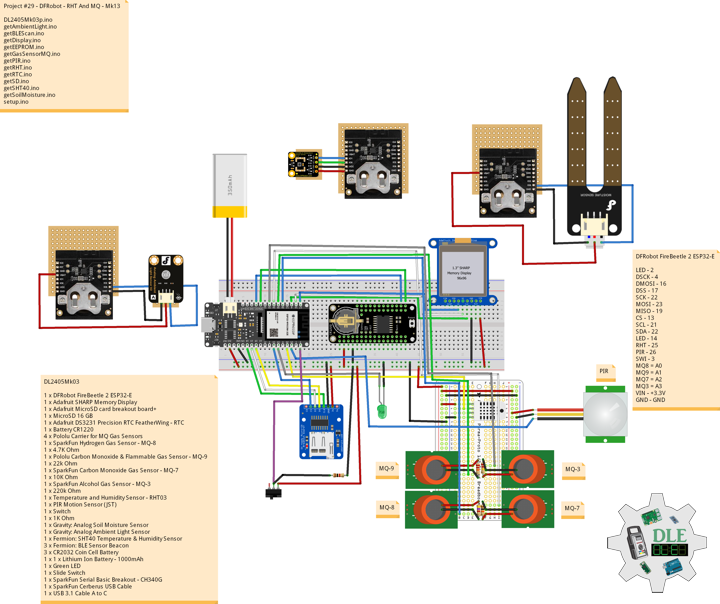
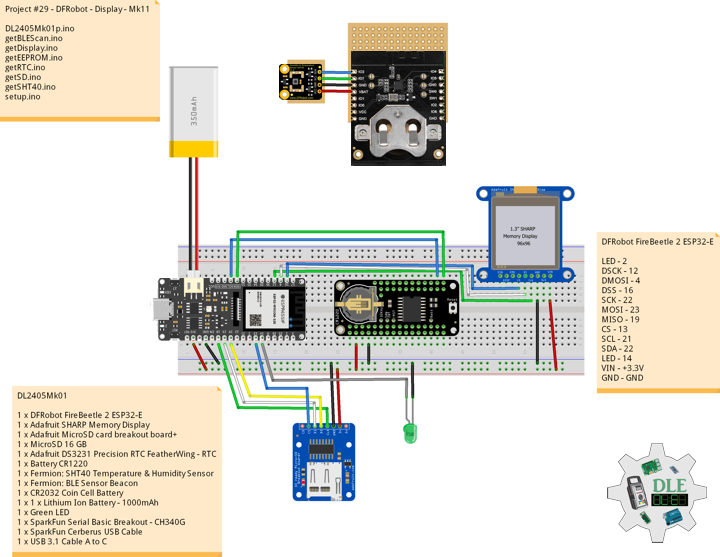
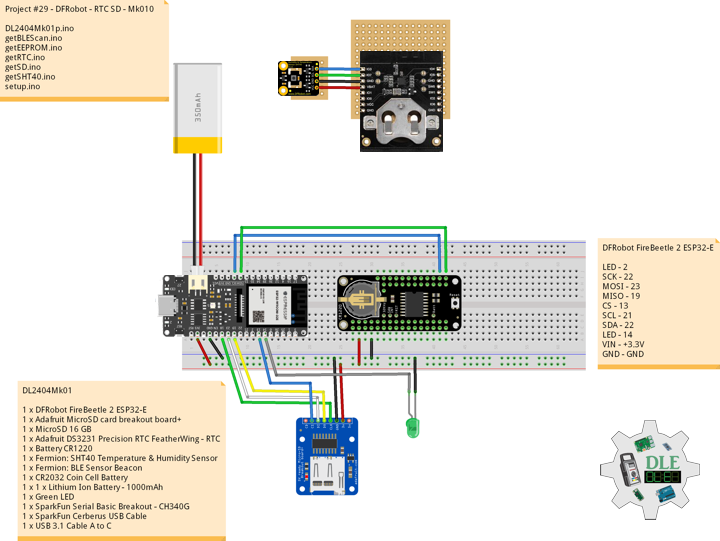
DFRobot FireBeetle 2 ESP32-E
LED – 2
DSCK – 4
DMOSI – 16
DSS – 17
SCK – 22
MOSI – 23
MISO – 19
CS – 13
GPR – 26
GPT – 25
SCL – 21
SDA – 22
LED – 14
SWI – 3
XAC – A0
YAC – A1
ZAC – A2
VIN – +3.3V
GND – GND
——
DL2406Mk05p.ino
/****** Don Luc Electronics © ******
Software Version Information
Project #29 - DFRobot - L3G4200D - Mk18
29-18
DL2406Mk05p.ino
DL2406Mk05
1 x DFRobot FireBeetle 2 ESP32-E
1 x Adafruit SHARP Memory Display
1 x Adafruit MicroSD card breakout board+
1 x MicroSD 16 GB
1 x SparkFun Triple Axis Magnetometer HMC5883L
1 x SparkFun Triple Axis Accelerometer ADXL335
1 x SparkFun Tri-Axis Gyroscope L3G4200D
1 x GPS Receiver - GP-20U7
2 x Switch
1 x 1K Ohm
1 x 1 x Lithium Ion Battery - 1000mAh
1 x Green LED
1 x USB 3.1 Cable A to C
*/

// Include the Library Code
// EEPROM Library to Read and Write EEPROM
// with Unique ID for Unit
#include "EEPROM.h"
// Wire
#include <Wire.h>
// SD Card
#include "FS.h"
#include "SD.h"
#include "SPI.h"
// SHARP Memory Display
#include <Adafruit_SharpMem.h>
#include <Adafruit_GFX.h>
// GPS Receiver
#include <TinyGPS++.h>
// ESP32 Hardware Serial
#include <HardwareSerial.h>
// Triple Axis Magnetometer
#include <HMC5883L.h>
// Gyroscope
#include <L3G4200D.h>

// Gyroscope
L3G4200D gyroscope;
// Timers
unsigned long timer = 0;
float timeStep = 0.01;
// Pitch, Roll and Yaw values
float pitch = 0;
float roll = 0;
float yaw = 0;

// Triple Axis Magnetometer
HMC5883L compass;
// Triple Axis Magnetometer
int mX = 0;
int mY = 0;
int mZ = 0;

// Accelerometer ADXL335
int iX = A0;
int iY = A1;
int iZ = A2;
// Accelerometer
int X = 0;
int Y = 0;
int Z = 0;

// ESP32 HardwareSerial
HardwareSerial tGPS(2);

// GPS Receiver
#define gpsRXPIN 26
// This one is unused and doesnt have a conection
#define gpsTXPIN 25
// The TinyGPS++ object
TinyGPSPlus gps;
// Latitude
float TargetLat;
// Longitude
float TargetLon;
// GPS Date, Time, Speed, Altitude
// GPS Date
String TargetDat;
// GPS Time
String TargetTim;
// GPS Speeds M/S
String TargetSMS;
// GPS Speeds Km/h
String TargetSKH;
// GPS Altitude Meters
String TargetALT;
// GPS Status
String GPSSt = "";

// MicroSD Card
const int chipSelect = 13;
String zzzzzz = "";

// SHARP Memory Display
#define SHARP_SCK  4
#define SHARP_MOSI 16
#define SHARP_SS   17
// Set the size of the display here, e.g. 144x168!
Adafruit_SharpMem display(SHARP_SCK, SHARP_MOSI, SHARP_SS, 144, 168);
// The currently-available SHARP Memory Display (144x168 pixels)
// requires > 4K of microcontroller RAM; it WILL NOT WORK on Arduino Uno
// or other <4K "classic" devices.
#define BLACK 0
#define WHITE 1

// LED Green
int iLEDGreen = 2;

// Define LED
int iLED = 14;

// Switch
int iSwitch = 3;
// Variable for reading the Switch status
int iSwitchState = 0;

// EEPROM Unique ID Information
#define EEPROM_SIZE 64
String uid = "";

// Software Version Information
String sver = "29-18";

void loop() {

  // isGPS
  isGPS();

  // Accelerometer ADXL335
  isADXL335();

  // Magnetometer
  isMagnetometer();

  // Gyroscope
  isGyroscope();

  // Read the state of the Switch value
  iSwitchState = digitalRead(iSwitch);

  // The Switch is HIGH:
  if (iSwitchState == HIGH) {

    // Display Accelerometer ADXL335
    isDisplayADXL335();

  } else {

    // Display GPS
    isDisplayGPS();

  }

  // MicroSD Card
  isSD();

  // iLED HIGH
  digitalWrite(iLED, HIGH );

  // Delay 5 Second
  delay(5000);

}
getAccelerometer.ino
// Accelerometer ADXL335
// ADXL335
void isADXL335() {

  // Accelerometer ADXL335
  // Accelerometer X, Y, Z
  // X
  X = analogRead(iX);
  // Y
  Y = analogRead(iY);
  // Z
  Z = analogRead(iZ);

}
getDisplay.ino
// SHARP Memory Display
// SHARP Memory Display - UID
void isDisplayUID() {

    // Text Display
    // Clear Display
    display.clearDisplay();
    display.setRotation(4);
    display.setTextSize(3);
    display.setTextColor(BLACK);
    // Don Luc Electronics
    display.setCursor(0,10);
    display.println( "Don Luc" );
    display.setTextSize(2);
    display.setCursor(0,40);
    display.println( "Electronics" );
    // Version
    //display.setTextSize(3);
    display.setCursor(0,70);
    display.println( "Version" );
    //display.setTextSize(2);
    display.setCursor(0,95);
    display.println( sver );
    // EEPROM
    display.setCursor(0,120);
    display.println( "EEPROM" );
    display.setCursor(0,140);
    display.println( uid );
    // Refresh
    display.refresh();
    delay( 100 );

}
// Display Accelerometer ADXL335
void isDisplayADXL335() {

    // Text Display
    // Clear Display
    display.clearDisplay();
    display.setRotation(4);
    display.setTextSize(1);
    display.setTextColor(BLACK);
    // Accelerometer X
    display.setCursor(0,5);
    display.print( "AX: " );
    display.println( X );
    // Accelerometer Y
    display.setCursor(0,20);
    display.print( "AY: " );
    display.println( Y );
    // Accelerometer Z
    display.setCursor(0,35);
    display.print( "AZ: " );
    display.println( Z );
    // Magnetometer X
    display.setCursor(0,50);
    display.print( "MX: " );
    display.println( mX );
    // Magnetometer Y
    display.setCursor(0,65);
    display.print( "MY: " );
    display.println( mY );
    // Magnetometer Z
    display.setCursor(0,80);
    display.print( "MZ: " );
    display.println( mZ );
    // Gyroscope Pitch
    display.setCursor(0,95);
    display.print( "Pitch: " );
    display.println( pitch );
    // Gyroscope Roll
    display.setCursor(0,110);
    display.print( "Roll: " );
    display.println( roll );
    // Gyroscope Yaw
    display.setCursor(0,125);
    display.print( "Yaw: " );
    display.println( yaw );
    // Refresh
    display.refresh();
    delay( 100 );

}
// Display GPS
void isDisplayGPS() {

    // Text Display Date
    // Clear Display
    display.clearDisplay();
    display.setRotation(4);
    display.setTextSize(2);
    display.setTextColor(BLACK);
    // Latitude
    display.setCursor(0,5);
    display.print( "Lat: " );
    display.println( TargetLat );
    // Longitude
    display.setCursor(0,30);
    display.print( "Lon: " );
    display.println( TargetLon );
    // GPS Date
    display.setCursor(0,55);
    display.println( TargetDat );
    // GPS Time
    display.setCursor(0,80);
    display.println( TargetTim );
    // GPS Speed M/S
    display.setCursor(0,105);
    display.print( TargetSMS );
    display.println( " M/S" );
    // GPS Altitude Meters
    display.setCursor(0,130);
    display.print( TargetALT );
    display.println( " M" );
    // Refresh
    display.refresh();
    delay( 100 );

}
getEEPROM.ino
// EEPROM
// isUID EEPROM Unique ID
void isUID() {

  // Is Unit ID
  uid = "";
  for (int x = 0; x < 7; x++)
  {
    uid = uid + char(EEPROM.read(x));
  }

}
getGPS.ino
// GPS Receiver
// Setup GPS
void isSetupGPS() {

  // Setup GPS
  tGPS.begin(  9600 , SERIAL_8N1 , gpsRXPIN , gpsTXPIN );

}
// isGPS
void isGPS(){

  // Receives NEMA data from GPS receiver
  // This sketch displays information every time a new sentence is correctly encoded
  while ( tGPS.available() > 0)

    if (gps.encode( tGPS.read() ))
    {

       // GPS Vector Pointer Target
       displayInfo();
       // GPS Date, Time, Speed, Altitude
       displayDTS();

    }

  if (millis() > 5000 && gps.charsProcessed() < 10)
  {

     while(true);

  }

}
// GPS Vector Pointer Target
void displayInfo(){

  // Location
  if (gps.location.isValid())
  {

     // Latitude
     TargetLat = gps.location.lat();
     // Longitude
     TargetLon = gps.location.lng();
     // GPS Status 2
     GPSSt = "Yes";

  }
  else
  {

     // GPS Status 0
     GPSSt = "No";

  }

}
// GPS Date, Time, Speed, Altitude
void displayDTS(){

  // Date
  TargetDat = "";
  if (gps.date.isValid())
  {

     // Date
     // Year
     TargetDat += String(gps.date.year(), DEC);
     TargetDat += "/";
     // Month
     TargetDat += String(gps.date.month(), DEC);
     TargetDat += "/";
     // Day
     TargetDat += String(gps.date.day(), DEC);

  }

  // Time
  TargetTim = "";
  if (gps.time.isValid())
  {

     // Time
     // Hour
     TargetTim += String(gps.time.hour(), DEC);
     TargetTim += ":";
     // Minute
     TargetTim += String(gps.time.minute(), DEC);
     TargetTim += ":";
     // Secound
     TargetTim += String(gps.time.second(), DEC);

  }

  // Speed
  TargetSMS = "";
  TargetSKH = "";
  if (gps.speed.isValid())
  {

     // Speed
     // M/S
     int x = gps.speed.mps();
     TargetSMS = String( x, DEC);
     // Km/h
     int y = gps.speed.kmph();
     TargetSKH = String( y, DEC);

  }

  // Altitude
  TargetALT = "";
  if (gps.altitude.isValid())
  {

     // Altitude
     // Meters
     int z = gps.altitude.meters();
     TargetALT = String( z, DEC);

  }

}
getGyroscope.ino
// L3G4200D Triple Axis Gyroscope
// Setup Gyroscope
void isSetupGyroscope() {

  // Setup Gyroscope
  // Set scale 2000 dps and 400HZ Output data rate (cut-off 50)
  while(!gyroscope.begin(L3G4200D_SCALE_2000DPS, L3G4200D_DATARATE_400HZ_50))
  {
    // Could not find a valid L3G4200D sensor, check wiring!
    delay(500);

  }

  // Calibrate gyroscope. The calibration must be at rest.
  // If you don't want calibrate, comment this line.
  gyroscope.calibrate(100);

}
// L3G4200D Gyroscope
void isGyroscope(){

  // Timer
  timer = millis();

  // Read normalized values
  Vector norm = gyroscope.readNormalize();

  // Calculate Pitch, Roll and Yaw
  pitch = pitch + norm.YAxis * timeStep;
  roll = roll + norm.XAxis * timeStep;
  yaw = yaw + norm.ZAxis * timeStep;

}
getMagnetometer.ino
// Magnetometer
// Setup Magnetometer
void isSetupMagnetometer(){

  // Magnetometer Serial
  // Initialize HMC5883L
  while (!compass.begin())
  {
    delay(500);
  }

  // Set measurement range
  // +/- 1.30 Ga: HMC5883L_RANGE_1_3GA (default)
  compass.setRange(HMC5883L_RANGE_1_3GA);

  // Set measurement mode
  // Continuous-Measurement: HMC5883L_CONTINOUS (default)
  compass.setMeasurementMode(HMC5883L_CONTINOUS);

  // Set data rate
  // 15.00Hz: HMC5883L_DATARATE_15HZ (default)
  compass.setDataRate(HMC5883L_DATARATE_15HZ);

  // Set number of samples averaged
  // 1 sample:  HMC5883L_SAMPLES_1 (default)
  compass.setSamples(HMC5883L_SAMPLES_1);

}
// Magnetometer
void isMagnetometer(){

  // Magnetometer Vector Norm
  Vector norm = compass.readNormalize();
  // Vector X, Y, Z
  // Magnetometer X Normalize
  mX = norm.XAxis;
  // Magnetometer Y Normalize
  mY = norm.YAxis;
  // Magnetometer Z Normalize
  mZ = norm.ZAxis;

}
getSD.ino
// MicroSD Card
// MicroSD Setup
void isSetupSD() {

    // MicroSD Card
    pinMode( chipSelect , OUTPUT );
    if(!SD.begin( chipSelect )){
        ;
        return;
    }

    uint8_t cardType = SD.cardType();

    // CARD NONE
    if(cardType == CARD_NONE){
        ;
        return;
    }

    // SD Card Type
    if(cardType == CARD_MMC){
        ;
    } else if(cardType == CARD_SD){
        ;
    } else if(cardType == CARD_SDHC){
        ;
    } else {
        ;
    }

    // Size
    uint64_t cardSize = SD.cardSize() / (1024 * 1024);

}
// MicroSD Card
void isSD() {

  zzzzzz = "";

  // DFR|EEPROM Unique ID|Version|Date|Time|
  //Accelerometer X|Accelerometer Y|Accelerometer Z
  //Magnetometer X|Magnetometer Y|Magnetometer Z
  //Gyroscope Pitch|Gyroscope Roll|Gyroscope Yaw
  //|GPS|Latitude|Longitude|GPS Date|GPS Time|GPS Speed M/S|GPS Altitude|*\r
  zzzzzz = "DFR|" + uid + "|" + sver + "|"
  + String(X) + "|" + String(Y) + "|" + String(Z) + "|"
  + String(mX) + "|" + String(mY) + "|" + String(mZ) + "|"
  + String(pitch) + "|" + String(roll) + "|" + String(yaw) + "|"
  + String(GPSSt) + "|" + String(TargetLat) + "|"
  + String(TargetLon) + "|" + String(TargetDat) + "|" + String(TargetTim) + "|"
  + String(TargetSMS) + "|" + String(TargetALT)+ "|*\r";

  // msg + 1
  char msg[zzzzzz.length() + 1];

  zzzzzz.toCharArray(msg, zzzzzz.length() + 1);

  // Append File
  appendFile(SD, "/dfrdata.txt", msg );

}
// List Dir
void listDir(fs::FS &fs, const char * dirname, uint8_t levels){

    // List Dir
    dirname;

    File root = fs.open(dirname);

    if(!root){
        return;
    }

    if(!root.isDirectory()){
        return;
    }

    File file = root.openNextFile();

    while(file){
        if(file.isDirectory()){
            file.name();
            if(levels){
                listDir(fs, file.name(), levels -1);
            }
        } else {
            file.name();
            file.size();
        }
        file = root.openNextFile();
    }

}
// Write File
void writeFile(fs::FS &fs, const char * path, const char * message){

    // Write File
    path;

    File file = fs.open(path, FILE_WRITE);

    if(!file){
        return;
    }

    if(file.print(message)){
        ;
    } else {
        ;
    }

    file.close();

}
// Append File
void appendFile(fs::FS &fs, const char * path, const char * message){

    // Append File
    path;

    File file = fs.open(path, FILE_APPEND);

    if(!file){
        return;
    }

    if(file.print(message)){
        ;
    } else {
        ;
    }

    file.close();

}
setup.ino
// Setup
void setup()
{

  // Give display time to power on
  delay(100);

  // EEPROM Size
  EEPROM.begin(EEPROM_SIZE);

  // EEPROM Unique ID
  isUID();

  // Give display
  delay(100);

  // Set up I2C bus
  Wire.begin();

  // Give display
  delay(100);

  //MicroSD Card
  isSetupSD();

  // SHARP Display Start & Clear the Display
  display.begin();
  // Clear Display
  display.clearDisplay();

  // Delay
  delay( 100 );

  // GPS Receiver
  // Setup GPS
  isSetupGPS();

  // Delay
  delay( 100 );

  // Setup Triple Axis Magnetometer
  isSetupMagnetometer();

  // L3G4200D Gyroscope
  isSetupGyroscope();

  // Delay
  delay( 100 );

  // Initialize digital pin iLED as an output
  pinMode(iLED, OUTPUT);

  // Outputting high, the LED turns on
  digitalWrite(iLED, HIGH);

  // Initialize the LED Green
  pinMode(iLEDGreen, OUTPUT);

  // iLEDGreen HIGH
  digitalWrite(iLEDGreen, HIGH );

  // Initialize the Switch
  pinMode(iSwitch, INPUT);

  // Don Luc Electronics
  // Version
  // EEPROM
  isDisplayUID();

  // Delay 5 Second
  delay( 5000 );

}
——
People can contact us: https://www.donluc.com/?page_id=1927
Teacher, Instructor, E-Mentor, R&D and Consulting
- Programming Language
- Single-Board Microcontrollers (PIC, Arduino, Raspberry Pi, Arm, Silicon Labs, Espressif, Etc…)
- IoT
- Wireless (Radio Frequency, Bluetooth, WiFi, Etc…)
- Robotics
- Automation
- Camera and Video Capture Receiver Stationary, Wheel/Tank and Underwater Vehicle
- Unmanned Vehicles Terrestrial and Marine
- Machine Learning
- Artificial Intelligence (AI)
- RTOS
- Sensors, eHealth Sensors, Biosensor, and Biometric
- Research & Development (R & D)
- Consulting
Follow Us
Luc Paquin – Curriculum Vitae – 2024
https://www.donluc.com/luc/
Web: https://www.donluc.com/
Facebook: https://www.facebook.com/neosteam.labs.9/
YouTube: https://www.youtube.com/@thesass2063
Twitter: https://twitter.com/labs_steam
Pinterest: https://www.pinterest.com/NeoSteamLabs/
Instagram: https://www.instagram.com/neosteamlabs/
LinkedIn: https://www.linkedin.com/in/jlucpaquin/
Don Luc