——
——
——
——
EMF Meter
EMF measurements are measurements of ambient electromagnetic fields that are performed using particular sensors or probes, such as EMF meters. These probes can be generally considered as antennas although with different characteristics. In fact probes should not perturb the electromagnetic field and must prevent coupling and reflection as much as possible in order to obtain precise results.
EMF probes may respond to fields only on one axis. Amplified, active, probes can improve measurement precision and sensitivity but their active components may limit their speed of response.
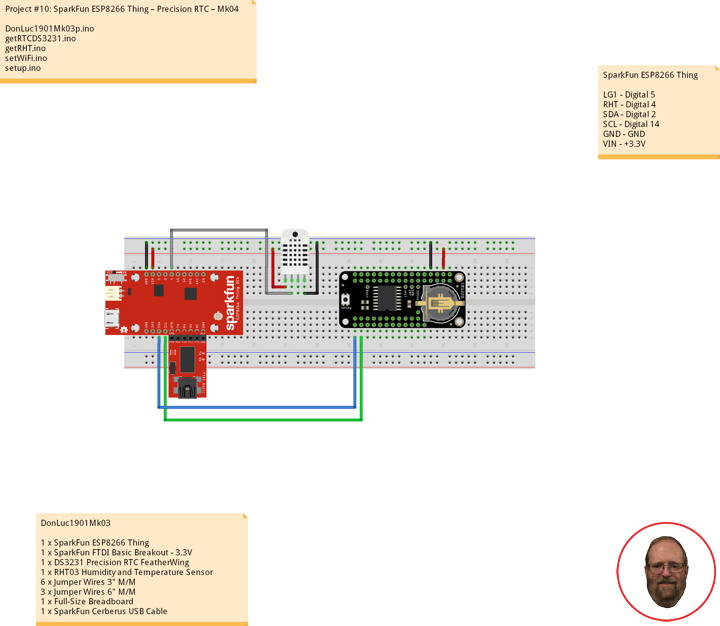
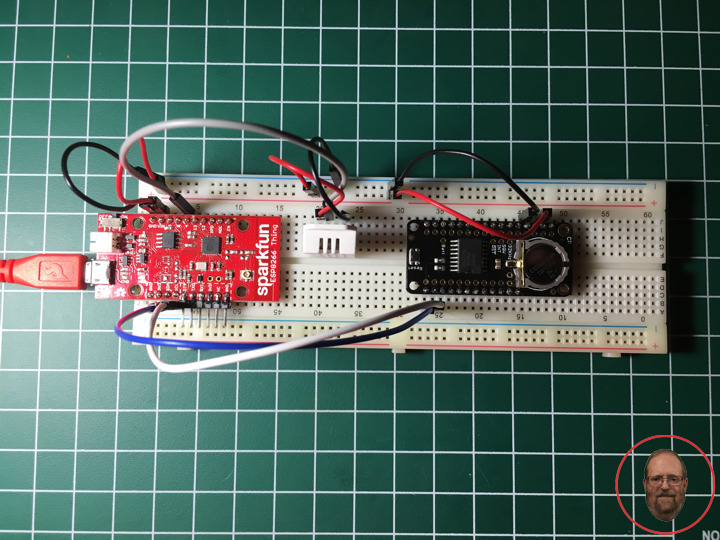
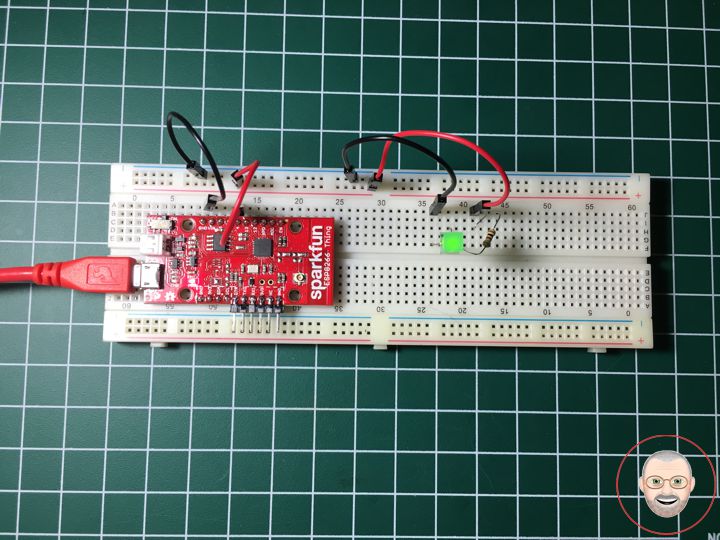
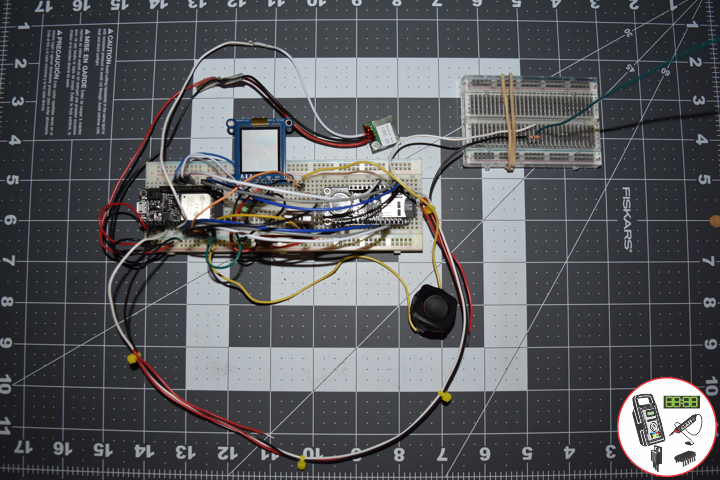
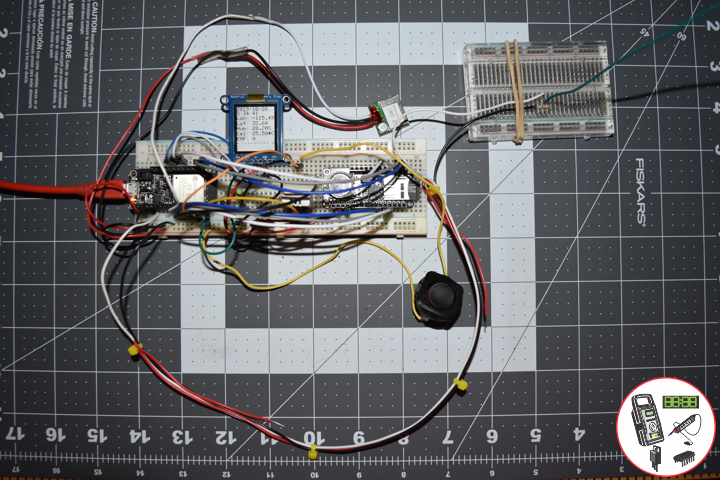
DL1910Mk01
1 x Adafruit HUZZAH32 ESP32 Feather
1 x Adafruit SHARP Memory Display
1 x Adafruit Adalogger FeatherWing – RTC + SD
1 x CR1220 12mm Lithium Battery
1 x 8Gb Micro SD Card
1 x RHT03 Humidity and Temperature Sensor
1 x GPS Receiver GP-20U
1 x LED Green
1 x Rocker Switches
1 x 100 Ohm
1 x 10K Ohm
1 x 3.3M Ohm
1 x Antenna
14 x Jumper Wires 3″ M/M
6 x Jumper Wires 6″ M/M
2 x Wire
1 x Full-Size Breadboard
1 x Breadboard
1 x SparkFun Cerberus USB Cable
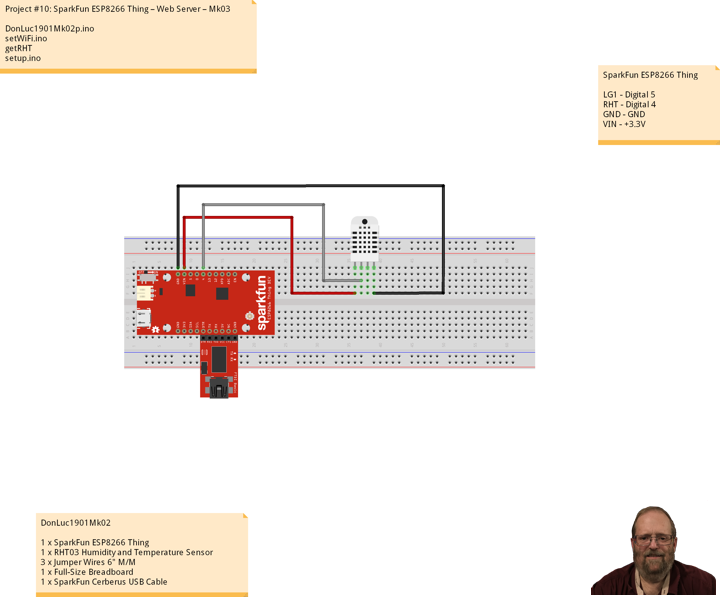
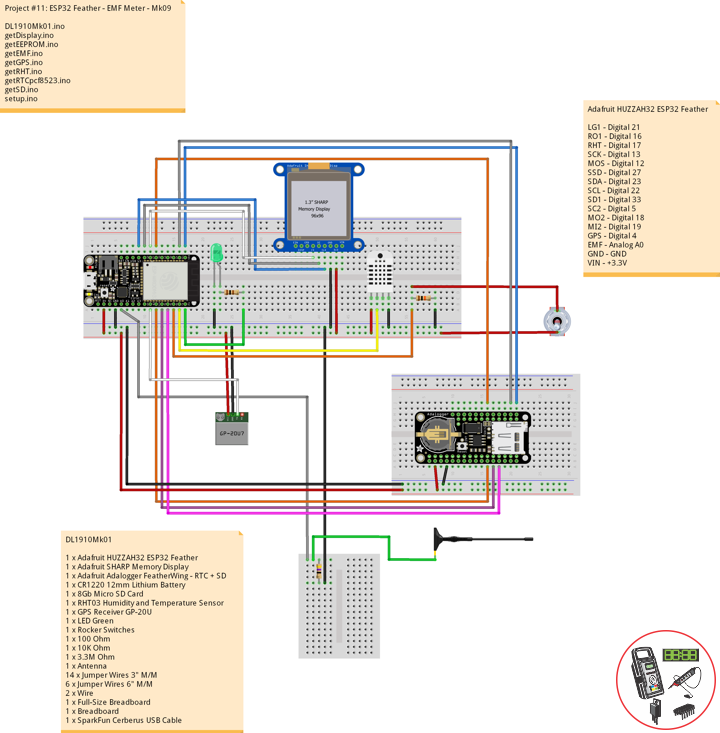
Adafruit HUZZAH32 ESP32 Feather
LG1 – Digital 21
RO1 – Digital 16
RHT – Digital 17
SCK – Digital 13
MOS – Digital 12
SSD – Digital 27
SDA – Digital 23
SCL – Digital 22
SD1 – Digital 33
SC2 – Digital 5
MO2 – Digital 18
MI2 – Digital 19
GPS – Digital 4
EMF – Analog A0
GND – GND
VIN – +3.3V
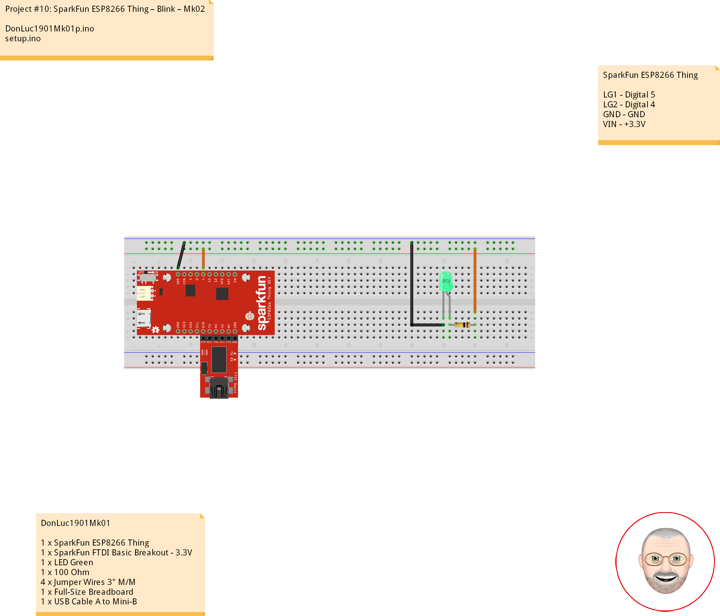
DL1910Mk01.ino
// ***** Don Luc Electronics *****
// Software Version Information
// Project #11: HUZZAH32 ESP32 Feather - EMF - Mk09
// 10-01
// DL1910Mk01p.ino 11-09
// Adafruit HUZZAH32 ESP32 Feather Board
// SHARP Display
// LED Green
// Adalogger FeatherWing - RTC + SD
// EEPROM
// RHT03 Humidity and Temperature Sensor
// Rocker Switches
// GPS Receiver
// EMF Meter (Single Axis)

// include Library Code
// SHARP Memory Display
#include <Adafruit_SharpMem.h>
#include <Adafruit_GFX.h>
// Date and Time
#include "RTClib.h"
// EEPROM library to read EEPROM with unique ID for unit
#include "EEPROM.h"
// RHT Humidity and Temperature Sensor
#include <SparkFun_RHT03.h>
// SD Card
#include "FS.h"
#include "SD.h"
#include "SPI.h"
// GPS Receiver
#include <TinyGPS++.h>
#include <HardwareSerial.h>

// SHARP Memory Display
// any pins can be used
#define SHARP_SCK  13
#define SHARP_MOSI 12
#define SHARP_SS   27
// Set the size of the display here, e.g. 144x168!
Adafruit_SharpMem display(SHARP_SCK, SHARP_MOSI, SHARP_SS, 144, 168);
// The currently-available SHARP Memory Display (144x168 pixels)
// requires > 4K of microcontroller RAM; it WILL NOT WORK on Arduino Uno
// or other <4K "classic" devices!
#define BLACK 0
#define WHITE 1
int minorHalfSize; // 1/2 of lesser of display width or height

// LED Green
int iLEDGreen =  21;                 // LED Green

// PCF8523 Precision RTC
RTC_PCF8523 rtc;
String dateRTC = "";
String timeRTC = "";

// RHT Humidity and Temperature Sensor
const int RHT03_DATA_PIN = 17;          // RHT03 data pin Digital 17
RHT03 rht;                              // This creates a RTH03 object, which we'll use to interact with the sensor
float latestHumidity;
float latestTempC;
float latestTempF;

// SD Card
const int chipSelect = 33;              // SD Card
String zzzzzz = "";

// Rocker Switches
int iRow1 = 16;                         // Rocker Switches Digital 16
int iRow1State = 0;                     // Variable for reading the pushbutton status

// ESP32 HardwareSerial
HardwareSerial tGPS(2);

// GPS Receiver
#define gpsRXPIN 4
#define gpsTXPIN 36                     // This one is unused and doesnt have a conection
// The TinyGPS++ object
TinyGPSPlus gps;
float TargetLat;
float TargetLon;
int Status = 0;

// EMF Meter (Single Axis)
#define NUMREADINGS 15                    // Raise this number to increase data smoothing
int senseLimit = 15;                      // Raise this number to decrease sensitivity (up to 1023 max)
int val = 0;                              // Val
int iEMF = A0;                            // EMF Meter
int readings[ NUMREADINGS ];              // Readings from the analog input
int ind = 0;                              // Index of the current reading
int total = 0;                            // Running total
int average = 0;                          // Final average of the probe reading
int iEMFDis = 0;
int iEMFRect = 0;

// The current address in the EEPROM (i.e. which byte
// we're going to  read to next)
#define EEPROM_SIZE 64
String sver = "10-1.p";
// Unit ID information
String uid = "";

void loop() {

  // Receives NEMA data from GPS receiver
  // This sketch displays information every time a new sentence is correctly encoded.
  while ( tGPS.available() > 0)
    if (gps.encode( tGPS.read() ))
    {
     displayInfo();
    }

  if (millis() > 5000 && gps.charsProcessed() < 10)
  {
    while(true);
  }

  // Date and Time
  isRTC();

  // RHT03 Humidity and Temperature Sensor
  isRHT03();

  // SHARP Memory Display On
  isDisplayOn();

  // Rocker Switched
  // Read the state of the iRow1 value
  iRow1State = digitalRead(iRow1);

  // EMF Meter (Single Axis)
  isEMF();

  // Check if the pushbutton is pressed. If it is, the buttonState is HIGH:
  if (iRow1State == HIGH) {

    // iLEDGreen
    digitalWrite(iLEDGreen,  HIGH );
    // SD Card
    isSD();

  } else {

    // iLEDGreen
    digitalWrite(iLEDGreen,  LOW );

  }

  // Delay
  delay( 1000 );

}
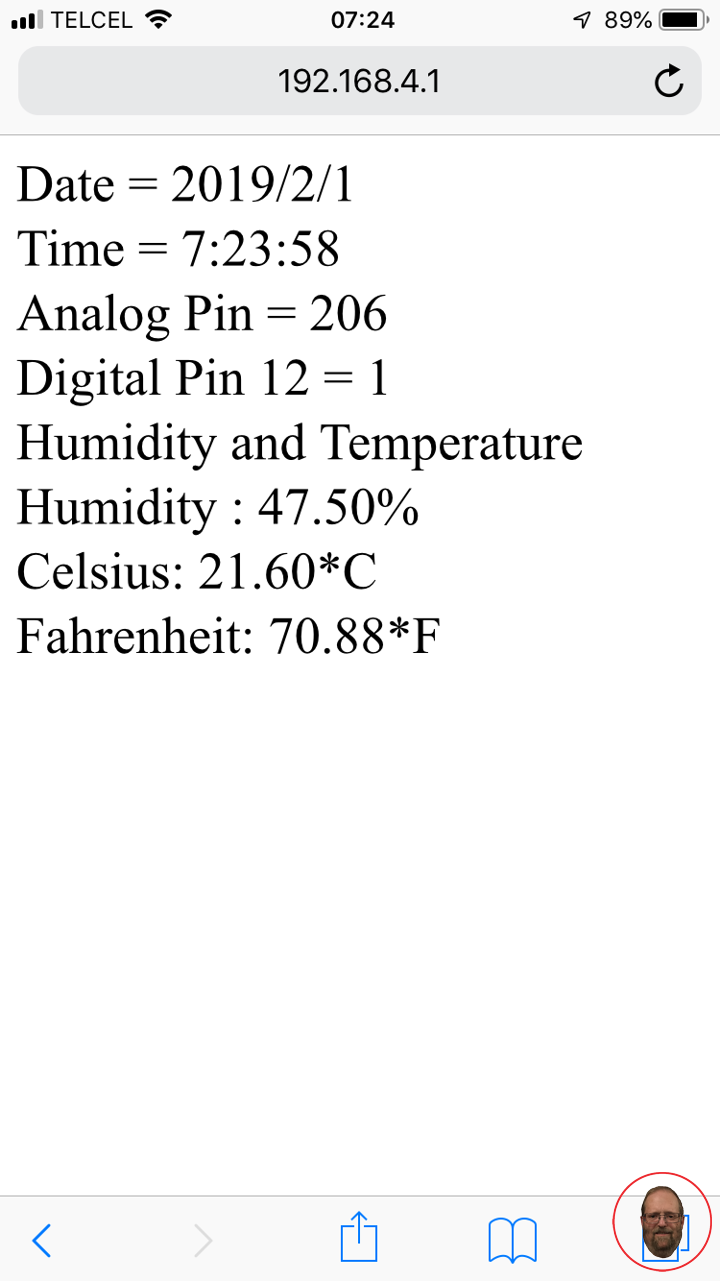
getDisplay.ino
// SHARP Memory Display On
void isDisplayOn() {

    // Clear Display
    display.clearDisplay();
    // text display date, time, LED on
    display.setRotation(4);
    display.setTextSize(2);
    display.setTextColor(BLACK);
    display.setCursor(0,1);
    display.println( dateRTC );
    display.setCursor(0,17);
    display.println( timeRTC );
    //display.setTextSize(2);
    display.setCursor(0,35);
    display.print("Lon: ");
    display.println( TargetLon );
    display.setCursor(0,55);
    display.print("Lat: ");
    display.println( TargetLat );
    display.setCursor(0,74);
    display.print("Hum: ");
    display.print( latestHumidity );
    display.println("%");
    display.setCursor(0,94);
    display.print("Cel: ");
    display.print( latestTempC );
    display.println("*C");
    display.setCursor(0,114);
    display.print("EMF: ");
    display.println( iEMFDis );
    display.setCursor(0,134);
    display.setTextSize(1);
    display.println( "0  1 2 3 4 5 6 7 8 9  10" );
    display.setCursor(0,144);
    display.drawRect(0, 144, iEMFRect , display.height(), BLACK);
    display.fillRect(0, 144, iEMFRect , display.height(), BLACK);
    display.refresh();

}
// SHARP Memory Display - UID
void isDisplayUID() {

    // text display EEPROM
    display.setRotation(4);
    display.setTextSize(2);
    display.setTextColor(BLACK);
    display.setCursor(0,20);
    display.print( "UID: " );
    display.println( uid );
   // display.setTextSize();
    display.setTextColor(BLACK);
    display.setCursor(0,45);
    display.print( "VER: ");
    display.println( sver  );
    display.refresh();
    delay( 100 );

}
getEEPROM.ino
// EEPROM
void GetUID()
{

  // Get unit ID
  uid = "";
  for (int x = 0; x < 5; x++)
  {
    uid = uid + char(EEPROM.read(x));
  }

}
getEMF.ino
// EMF Meter (Single Axis)
// setupEMF
void setupEMF() {

  // EMF Meter (Single Axis)
  pinMode( iEMF, OUTPUT ); // EMF Meter
  for (int i = 0; i < NUMREADINGS; i++){
    readings[ i ] = 0;     // Initialize all the readings to 0
  }

}
// isEMF
void isEMF(){

  // Probe
  val = analogRead( iEMF );                    // Take a reading from the probe

  if( val >= 1 ){                              // If the reading isn't zero, proceed

    val = constrain( val, 1, senseLimit );     // Turn any reading higher than the senseLimit value into the senseLimit value
    val = map( val, 1, senseLimit, 1, 1023 );  // Remap the constrained value within a 1 to 1023 range

    total -= readings[ ind ];                  // Subtract the last reading
    readings[ ind ] = val;                     // Read from the sensor
    total += readings[ ind ];                  // Add the reading to the total
    ind = ( ind + 1 );                         // Advance to the next index

    if ( ind >= NUMREADINGS ) {                // If we're at the end of the array...
      ind = 0;                                 // ...wrap around to the beginning
    }

    average = total / NUMREADINGS;             // Calculate the average

  }
  else
  {

    iEMFRect = 0;
    val = 0;
    average = 0;

  }

  iEMFDis = average;
  iEMFRect = map( average, 1, 1023, 1, 144 );

}
getGPS.ino
// GPS Receiver
void setupGPS() {

  // Setup GPS
  tGPS.begin(  9600 , SERIAL_8N1, gpsRXPIN, gpsTXPIN );

}
// GPS Vector Pointer Target
void displayInfo()
{

  // Location
  if (gps.location.isValid())
  {

    TargetLat = gps.location.lat();
    TargetLon = gps.location.lng();
    Status = 2;

  }
  else
  {

    Status = 0;

  }

}
getRHT.ino
// RHT03 Humidity and Temperature Sensor
void isRHT03(){

  // Call rht.update() to get new humidity and temperature values from the sensor.
  int updateRet = rht.update();

  // The humidity(), tempC(), and tempF() functions can be called -- after
  // a successful update() -- to get the last humidity and temperature value
  latestHumidity = rht.humidity();
  latestTempC = rht.tempC();
  latestTempF = rht.tempF();

}
getRTCpcf8523.ino
// PCF8523 Precision RTC
void setupRTC() {

  // pcf8523 Precision RTC
  if (! rtc.begin()) {
    while (1);
  }
  if (! rtc.initialized()) {
    // Following line sets the RTC to the date & time this sketch was compiled
    rtc.adjust(DateTime(F(__DATE__), F(__TIME__)));
    // This line sets the RTC with an explicit date & time, for example to set
    // January 21, 2014 at 3am you would call:
    // rtc.adjust(DateTime(2018, 9, 29, 12, 17, 0));
  }

}
// Date and Time RTC
void isRTC () {

  // Date and Time
  DateTime now = rtc.now();
  // Date
  dateRTC = now.year(), DEC;
  dateRTC = dateRTC + "/";
  dateRTC = dateRTC + now.month(), DEC;
  dateRTC = dateRTC + "/";
  dateRTC = dateRTC + now.day(), DEC;
  // Time
  timeRTC = now.hour(), DEC;
  timeRTC = timeRTC + ":";
  timeRTC = timeRTC + now.minute(), DEC;
  timeRTC = timeRTC + ":";
  timeRTC = timeRTC + now.second(), DEC;

}
getSD.ino
// SD Card
void setupSD() {

  // SD Card
    pinMode( chipSelect , OUTPUT );
    if(!SD.begin( chipSelect )){
        ;
        return;
    }
    uint8_t cardType = SD.cardType();

    if(cardType == CARD_NONE){
        ;
        return;
    }

    //Serial.print("SD Card Type: ");
    if(cardType == CARD_MMC){
        ;
    } else if(cardType == CARD_SD){
        ;
    } else if(cardType == CARD_SDHC){
        ;
    } else {
        ;
    }

    uint64_t cardSize = SD.cardSize() / (1024 * 1024);

}
// SD Card
void isSD() {

  zzzzzz = "";

  zzzzzz = uid + "|" + sver + "|" + dateRTC + "|" + timeRTC + "|" + Status + "|" + TargetLon + "|" + TargetLat + "|" + latestHumidity + "|" + latestTempC + "|" + latestTempF + "|" + average + "|\r";

  char msg[zzzzzz.length() + 1];

  zzzzzz.toCharArray(msg, zzzzzz.length() + 1);

  appendFile(SD, "/espdata.txt", msg );

}
// List Dir
void listDir(fs::FS &fs, const char * dirname, uint8_t levels){
    dirname;
    File root = fs.open(dirname);
    if(!root){
        return;
    }
    if(!root.isDirectory()){
        return;
    }

    File file = root.openNextFile();
    while(file){
        if(file.isDirectory()){
            file.name();
            if(levels){
                listDir(fs, file.name(), levels -1);
            }
        } else {
            file.name();
            file.size();
        }
        file = root.openNextFile();
    }
}
// Write File
void writeFile(fs::FS &fs, const char * path, const char * message){
    path;
    File file = fs.open(path, FILE_WRITE);
    if(!file){
        return;
    }
    if(file.print(message)){
        ;
    } else {
        ;
    }
    file.close();
}
// Append File
void appendFile(fs::FS &fs, const char * path, const char * message){
    //Serial.printf("Appending to file: %s\n", path);
    path;
    File file = fs.open(path, FILE_APPEND);
    if(!file){
        return;
    }
    if(file.print(message)){
        ;
    } else {
        ;
    }
    file.close();
}
setup.ino
// Setup
void setup() {

  // EEPROM with unique ID
  EEPROM.begin(EEPROM_SIZE);

  // Get Unit ID
  GetUID();

  // GPS Receiver
  // Setup GPS
  setupGPS();

  // SHARP Display start & clear the display
  display.begin();
  display.clearDisplay();

  isDisplayUID();

  delay( 5000 );

  // Initialize the LED Green
  pinMode(iLEDGreen, OUTPUT);

  // PCF8523 Precision RTC
  setupRTC();

  // Date and Time RTC
  isRTC();

  // RHT03 Humidity and Temperature Sensor
  // Call rht.begin() to initialize the sensor and our data pin
  rht.begin(RHT03_DATA_PIN);

  // SD Card
  setupSD();

  // Rocker Switches
  pinMode(iRow1, INPUT);

  // EMF Meter (Single Axis)
  setupEMF();

}
Follow Us
Web: https://www.donluc.com/
Web: http://neosteamlabs.com/
Web: http://www.jlpconsultants.com/
YouTube: https://www.youtube.com/channel/UC5eRjrGn1CqkkGfZy0jxEdA
Facebook: https://www.facebook.com/neosteam.labs.9/
Instagram: https://www.instagram.com/neosteamlabs/
Pinterest: https://www.pinterest.com/NeoSteamLabs/
Twitter: https://twitter.com/labs_steam
Etsy: https://www.etsy.com/shop/NeoSteamLabs
Don Luc