——
#DonLucElectronics #DonLuc #RadioFrequency #Bluetooth #SparkFun #BME280 #Arduino #Project #Fritzing #Programming #Electronics #Microcontrollers #Consultant
——
——

——
——
SparkFun Atmospheric Sensor Breakout – BME280
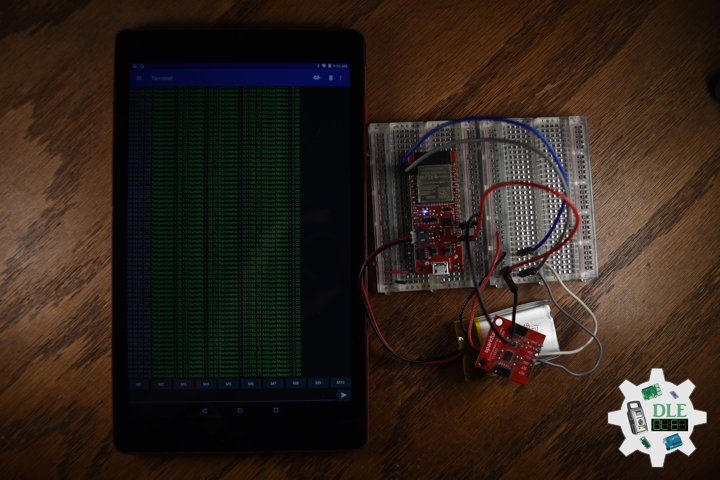
The SparkFun BME280 Atmospheric Sensor Breakout is the easy way to measure barometric pressure, humidity, and temperature readings all without taking up too much space. Basically, anything you need to know about atmospheric conditions you can find out from this tiny breakout. The BME280 Breakout has been design to be used in indoor/outdoor navigation, weather forecasting, home automation, and even personal health and wellness monitoring.
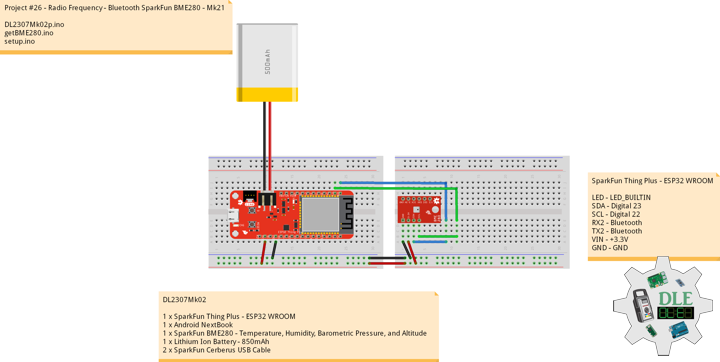
DL2307Mk02
1 x SparkFun Thing Plus – ESP32 WROOM
1 x Android NextBook
1 x SparkFun BME280 – Temperature, Humidity, Barometric Pressure, and Altitude
1 x Lithium Ion Battery – 850mAh
1 x SparkFun Cerberus USB Cable
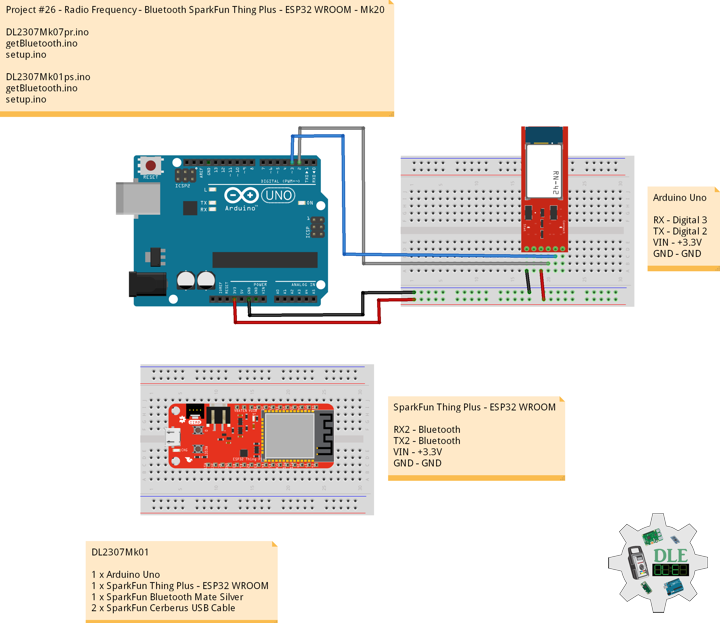
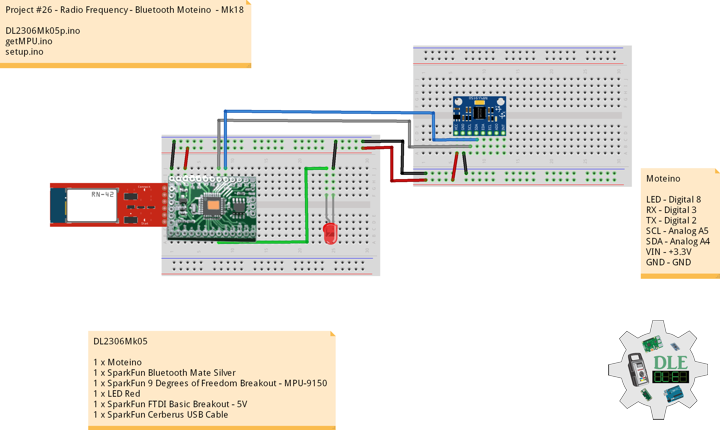
SparkFun Thing Plus – ESP32 WROOM
LED – LED_BUILTIN
SDA – Digital 23
SCL – Digital 22
RX2 – Bluetooth
TX2 – Bluetooth
VIN – +3.3V
GND – GND
——
DL2307Mk02p.ino
/* ***** Don Luc Electronics © *****
Software Version Information
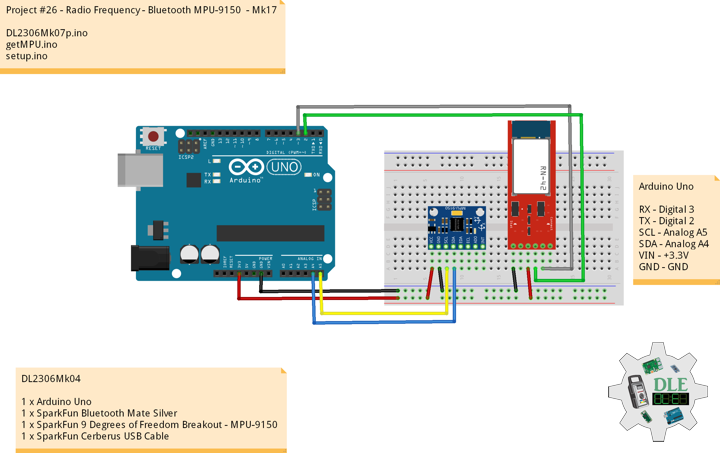
Project #26 - Radio Frequency - SparkFun BME280 - Mk21
26-21
DL2307Mk02pr.ino
1 x SparkFun Thing Plus - ESP32 WROOM
1 x Android NextBook
1 x SparkFun BME280 - Temperature, Humidity, Barometric Pressure, and Altitude
1 x Lithium Ion Battery - 850mAh
1 x SparkFun Cerberus USB Cable
*/
// Include the Library Code
// Bluetooth Serial
#include "BluetoothSerial.h"
#if !defined(CONFIG_BT_ENABLED) || !defined(CONFIG_BLUEDROID_ENABLED)
#error Bluetooth is not enabled! Please run `make menuconfig` to and enable it
#endif
// Two Wire Interface (TWI/I2C)
#include <Wire.h>
// SparkFun BME280 - Temperature, Humidity, Barometric Pressure, and Altitude
#include <SparkFunBME280.h>
// Bluetooth Serial
BluetoothSerial SerialBT;
// SparkFun BME280 - Temperature, Humidity, Barometric Pressure, and Altitude
BME280 myBME280;
float BMEtempC = 0;
float BMEhumid = 0;
float BMEpressure = 0;
float BMEaltitudeM = 0;
String FullString = "";
// Software Version Information
String sver = "26-21";
void loop() {
// SparkFun BME280 - Temperature, Humidity, Barometric Pressure, and Altitude
isBME280();
// Delay 1 sec
delay(1000);
}
getBME280.ino
// SparkFun BME280 - Temperature, Humidity, Barometric Pressure, and Altitude
// isBME280 - Temperature, Humidity, Barometric Pressure, and Altitude
void isBME280(){

  // Temperature Celsius
  BMEtempC = myBME280.readTempC();
  // Humidity
  BMEhumid = myBME280.readFloatHumidity();
  // Barometric Pressure
  BMEpressure = myBME280.readFloatPressure();
  // Altitude Meters
  BMEaltitudeM = (myBME280.readFloatAltitudeMeters(), 2);

  // FullString
  FullString = "Temperature = " + String(BMEtempC,2) + " Humidity = "
  + String(BMEhumid,2) + " Barometric = " + String(BMEpressure,2)
  + " Altitude Meters = " + String(BMEaltitudeM,2) + "\r\n";

  // FullString Bluetooth Serial + Serial
  for(int i = 0; i < FullString.length(); i++)
  {

    // Bluetooth Serial
    SerialBT.write(FullString.c_str()[i]);
    // Serial
    Serial.write(FullString.c_str()[i]);

  }

}
setup.ino
// Setup
void setup()
{

  // Serial Begin
  Serial.begin(115200);
  Serial.println("Starting BLE work!");

  // Bluetooth Serial
  SerialBT.begin("Don Luc Electronics");
  Serial.println("Bluetooth Started! Ready to pair...");

  // Give display time to power on
  delay(100);

  // Wire - Inialize I2C Hardware
  Wire.begin();

  // Give display time to power on
  delay(100);

  // SparkFun BME280 - Temperature, Humidity, Barometric Pressure, and Altitude
  myBME280.begin();

  // Initialize digital pin LED_BUILTIN as an output
  pinMode(LED_BUILTIN, OUTPUT);
  // Turn the LED on HIGH
  digitalWrite(LED_BUILTIN, HIGH);

}
——
People can contact us: https://www.donluc.com/?page_id=1927
Technology Experience
- Programming Language
- Single-Board Microcontrollers (PIC, Arduino, Raspberry Pi,Espressif, etc…)
- IoT
- Wireless (Radio Frequency, Bluetooth, WiFi, Etc…)
- Robotics
- Camera and Video Capture Receiver Stationary, Wheel/Tank and Underwater Vehicle
- Unmanned Vehicles Terrestrial and Marine
- Machine Learning
- RTOS
- Research & Development (R & D)
Instructor, E-Mentor, STEAM, and Arts-Based Training
- Programming Language
- IoT
- PIC Microcontrollers
- Arduino
- Raspberry Pi
- Espressif
- Robotics
Follow Us
Luc Paquin – Curriculum Vitae – 2023
https://www.donluc.com/luc/
Web: https://www.donluc.com/
Facebook: https://www.facebook.com/neosteam.labs.9/
YouTube: https://www.youtube.com/@thesass2063
Twitter: https://twitter.com/labs_steam
Pinterest: https://www.pinterest.com/NeoSteamLabs/
Instagram: https://www.instagram.com/neosteamlabs/
Don Luc