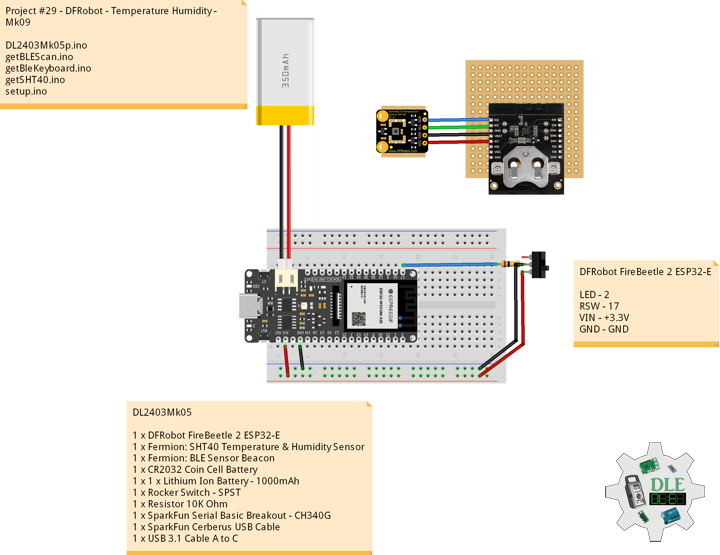
Project #29 – DFRobot – Temperature Humidity – Mk09
——
#DonLucElectronics #DonLuc #DFRobot #SHT40 #FireBeetle2ESP32E #ESP32 #IoT #Arduino #Project #Fritzing #Programming #Electronics #Microcontrollers #Consultant
——
——

——
——
Temperature Humidity Relationship
Temperature is something that tells us about the coldness or warmness of any object which is generally measured in Celsius. It determines the intensity of the heat whereas if we talk about humidity, it talks about the water content that is present in the air, or simply we can say it determines the moisture of the air. These two concepts are different but show a great impact on each other. We will see the relation between temperature and humidity further below. Before that, let’s understand more about humidity and its types.
Absolute Humidity and Relative Humidity
There are generally two types of humidity ie. absolute and relative. The former tells the humidity present in a parcel of air without taking temperature into consideration whereas the latter tells the humidity present in the air concerning the temperature of the air. The former defines the amount of water content by dividing the weight of the parcel by its volume whereas the latter is calculated by dividing the amount of water content present divided by the total capacity of the parcel of the air to hold multiplied by 100. The former decreases with height whereas the latter when reaching 100%, the air gets saturated.
Relation Between Relative Humidity and Temperature
We have already learned what is temperature and what is humidity and we have also learned two types of humidity. As we know, both these two concepts ie. Temperature and Humidity are different but they are related to each other. The relation between humidity and temperature formula simply says they are inversely proportional. If temperature increases it will lead to a decrease in relative humidity, thus the air will become drier whereas when temperature decreases, the air will become wet means the relative humidity will increase.
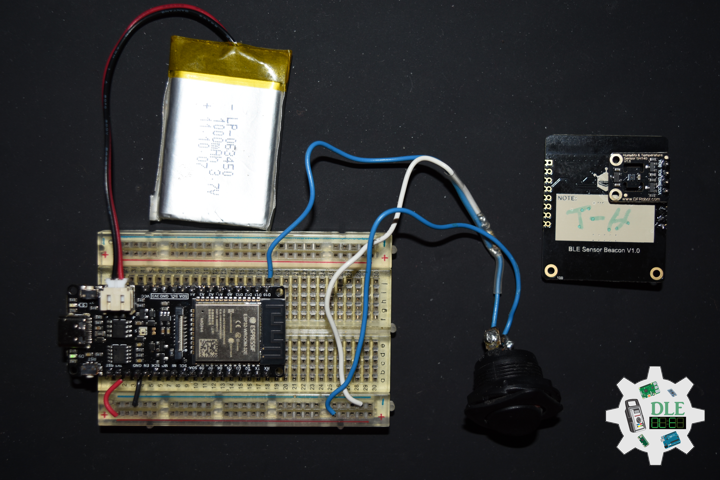
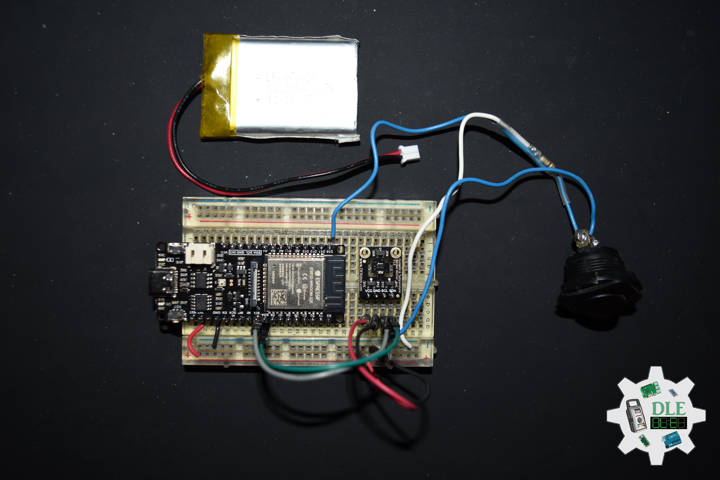
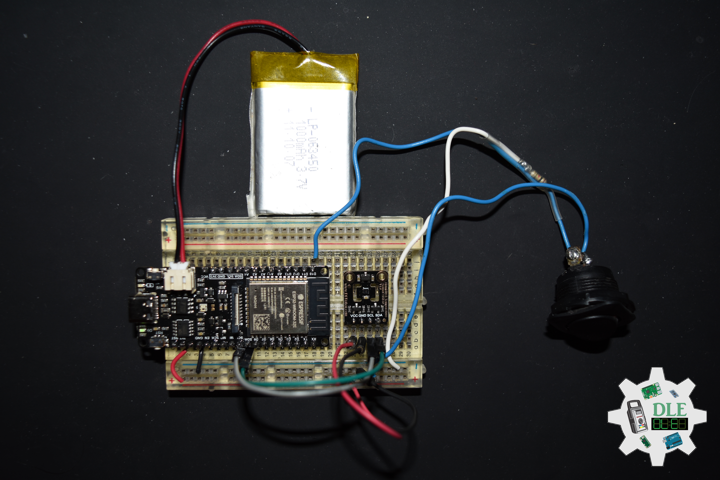
DL2403Mk05
1 x DFRobot FireBeetle 2 ESP32-E
1 x Fermion: SHT40 Temperature & Humidity Sensor
1 x Fermion: BLE Sensor Beacon
1 x CR2032 Coin Cell Battery
1 x 1 x Lithium Ion Battery – 1000mAh
1 x Rocker Switch – SPST
1 x Resistor 10K Ohm
1 x SparkFun Serial Basic Breakout – CH340G
1 x SparkFun Cerberus USB Cable
1 x USB 3.1 Cable A to C
DFRobot FireBeetle 2 ESP32-E
LED – 2
RSW – 17
VIN – +3.3V
GND – GND
——
DL2403Mk05p.ino
/****** Don Luc Electronics © ******
Software Version Information
Project #29 - DFRobot - Temperature Humidity - Mk09
29-09
DL2403Mk05p.ino
1 x DFRobot FireBeetle 2 ESP32-E
1 x Fermion: SHT40 Temperature & Humidity Sensor
1 x Fermion: BLE Sensor Beacon
1 x CR2032 Coin Cell Battery
1 x 1 x Lithium Ion Battery - 1000mAh
1 x Rocker Switch - SPST
1 x Resistor 10K Ohm
1 x SparkFun Serial Basic Breakout - CH340G
1 x SparkFun Cerberus USB Cable
1 x USB 3.1 Cable A to C
*/

// Include the Library Code
// Bluetooth LE keyboard
#include <BleKeyboard.h>
// Arduino
#include <Arduino.h>
// BLE Device
#include <BLEDevice.h>
// BLE Utils
#include <BLEUtils.h>
// BLEScan
#include <BLEScan.h>
// BLE Advertised Device
#include <BLEAdvertisedDevice.h>
// BLE Eddystone URL
#include <BLEEddystoneURL.h>
// BLE Eddystone TLM
#include <BLEEddystoneTLM.h>
// BLE Beacon
#include <BLEBeacon.h>

// ENDIAN_CHANGE
#define ENDIAN_CHANGE_U16(x) ((((x)&0xFF00) >> 8) + (((x)&0xFF) << 8))

// Bluetooth LE Keyboard
BleKeyboard bleKeyboard;
String sKeyboard = "";
// Send Size
byte sendSize = 0;

// Fermion: SHT40 Temperature & Humidity Sensor
// Temperature
float TemperatureData;
float Temperature;
// Humidity
float HumidityData;
float Humidity;
// In seconds
int scanTime = 5;
// BLE Scan
BLEScan *pBLEScan;

// My Advertised Device Callbacks
class MyAdvertisedDeviceCallbacks : public BLEAdvertisedDeviceCallbacks
{

    // onResult
    void onResult(BLEAdvertisedDevice advertisedDevice)
    {
      // Advertised Device
      if (advertisedDevice.haveName())
      {
        // Name: Fermion: Sensor Beacon
        if(String(advertisedDevice.getName().c_str()) == "SHT40"){

          // strManufacturerData
          std::string strManufacturerData = advertisedDevice.getManufacturerData();
          uint8_t cManufacturerData[100];
          strManufacturerData.copy((char *)cManufacturerData, strManufacturerData.length(), 0);

          // strManufacturerData.length
          for (int i = 0; i < strManufacturerData.length(); i++)
          {

             // cManufacturerData[i]
             cManufacturerData[i];

          }

          // TemperatureData
          TemperatureData = int(cManufacturerData[2]<<8 | cManufacturerData[3]);
          // HumidityData
          HumidityData = int(cManufacturerData[5]<<8 | cManufacturerData[6]);

        }
      }
    }
};

// The number of the Rocker Switch pin
int iSwitch = 17;
// Variable for reading the button status
int SwitchState = 0;

// Define LED
int iLED = 2;

// Software Version Information
String sver = "29-09";

void loop() {

  // ScanResults
  isBLEScanResults();

  // Fermion: SHT40 Temperature & Humidity Sensor
  isSHT40();

  // Read the state of the Switch value:
  SwitchState = digitalRead(iSwitch);

  // Check if the button is pressed. If it is, the SwitchState is HIGH:
  if (SwitchState == HIGH) {

    // Bluetooth LE Keyboard
    isBluetooth();

  }

  // Delay 2 Second
  delay(2000);

}
getBLEScan.ino
// getBLEScan
// Setup BLE Scan
void isSetupBLEScan(){

  // BLE Device
  BLEDevice::init("");
  // Create new scan
  pBLEScan = BLEDevice::getScan();
  // Set Advertised Device Callbacks
  pBLEScan->setAdvertisedDeviceCallbacks(new MyAdvertisedDeviceCallbacks());
  // Active scan uses more power, but get results faster
  pBLEScan->setActiveScan(true);
  // Set Interval
  pBLEScan->setInterval(100);
  // Less or equal setInterval value
  pBLEScan->setWindow(99);

}
// BLE Scan Results
void isBLEScanResults(){

  // Put your main code here, to run repeatedly:
  BLEScanResults foundDevices = pBLEScan->start(scanTime, false);
  // Delete results fromBLEScan buffer to release memory
  pBLEScan->clearResults();

}
getBleKeyboard.ino
// Ble Keyboard
// Bluetooth
// isBluetooth
void isBluetooth() {

  // ESP32 BLE Keyboard
  if(bleKeyboard.isConnected()) {

    // Send Size Length
    sendSize = sKeyboard.length();

    // Send Size, charAt
    for(byte i = 0; i < sendSize+1; i++){

       // Write
       bleKeyboard.write(sKeyboard.charAt(i));
       delay(50);

    }
    bleKeyboard.write(KEY_RETURN);

  }

}
getSHT40.ino
// Fermion: SHT40 Temperature & Humidity Sensor
// SHT40 Temperature & Humidity
void isSHT40(){

  // Fermion: SHT40 Temperature & Humidity Sensor
  // Temperature
  Temperature = (175 * TemperatureData/65535) - 45;
  // Humidity
  Humidity = (125 * HumidityData/65535) - 6;
  // DFR|Version|Temperature|Humidity|*
  sKeyboard = "DFR|" + sver + "|" + String(Temperature) + "C|" + String(Humidity) + "%|*";

}
setup.ino
// Setup
void setup()
{

  // Give display time to power on
  delay(100);

  // Bluetooth LE keyboard
  bleKeyboard.begin();

  // Give display time to power on
  delay(100);

  // Setup BLE Scan
  isSetupBLEScan();

  // Initialize the Switch pin as an input
  pinMode(iSwitch, INPUT);

  // Initialize digital pin iLED as an output
  pinMode(iLED, OUTPUT);
  // Outputting high, the LED turns on
  digitalWrite(iLED, HIGH);

  // Delay 5 Second
  delay( 5000 );

}
——
People can contact us: https://www.donluc.com/?page_id=1927
Teacher, Instructor, E-Mentor, R&D and Consulting
- Programming Language
- Single-Board Microcontrollers (PIC, Arduino, Raspberry Pi, Arm, Silicon Labs, Espressif, Etc…)
- IoT
- Wireless (Radio Frequency, Bluetooth, WiFi, Etc…)
- Robotics
- Automation
- Camera and Video Capture Receiver Stationary, Wheel/Tank and Underwater Vehicle
- Unmanned Vehicles Terrestrial and Marine
- Machine Learning
- Artificial Intelligence (AI)
- RTOS
- Sensors, eHealth Sensors, Biosensor, and Biometric
- Research & Development (R & D)
- Consulting
Follow Us
Luc Paquin – Curriculum Vitae – 2024
https://www.donluc.com/luc/
Web: https://www.donluc.com/
Facebook: https://www.facebook.com/neosteam.labs.9/
YouTube: https://www.youtube.com/@thesass2063
Twitter: https://twitter.com/labs_steam
Pinterest: https://www.pinterest.com/NeoSteamLabs/
Instagram: https://www.instagram.com/neosteamlabs/
LinkedIn: https://www.linkedin.com/in/jlucpaquin/
Don Luc
Project #29 – DFRobot – SHT40 – Mk08
——
#DonLucElectronics #DonLuc #DFRobot #SHT40 #FireBeetle2ESP32E #ESP32 #IoT #Arduino #Project #Fritzing #Programming #Electronics #Microcontrollers #Consultant
——

——
——
——
Fermion: SHT40 Temperature And Humidity Sensor
The SHT4X is the 4th generation digital temperature and humidity sensor from Sensirion. In line with Sensirion’s industry-proven humidity and temperature sensors, the SHT40 offers consistent high accuracy within measuring range. The SHT40 sensor covers a humidity measurement range of 0 to 100%RH and a temperature detection range of -40°C to 125°C. The internal variable power heater enables the device to work properly under extreme operating conditions like condensing environment.
The board supply voltage of 3.3V to 5V and an current consumption below 0.15mA in low power mode make the SHT40 perfectly suitable for mobile or wireless battery-driven applications. It is suitable for urban environment monitoring, intelligent buildings, industrial automation, smart home and other Internet of Things applications.
DL2403Mk04
1 x DFRobot FireBeetle 2 ESP32-E
1 x Fermion: SHT40 Temperature & Humidity Sensor
1 x 1 x Lithium Ion Battery – 1000mAh
1 x Rocker Switch – SPST
1 x Resistor 10K Ohm
1 x USB 3.1 Cable A to C
DFRobot FireBeetle 2 ESP32-E
LED – 2
RSW – 17
SDA – 21
SCL – 22
VIN – +3.3V
GND – GND
——
DL2403Mk04p.ino
/****** Don Luc Electronics © ******
Software Version Information
Project #29 - DFRobot - SHT40 - Mk08
29-08
DL2403Mk04p.ino
DL2403Mk04
1 x DFRobot FireBeetle 2 ESP32-E
1 x Fermion: SHT40 Temperature & Humidity Sensor
1 x 1 x Lithium Ion Battery - 1000mAh
1 x Rocker Switch - SPST
1 x Resistor 10K Ohm
1 x USB 3.1 Cable A to C
*/

// Include the Library Code
// Bluetooth LE keyboard
#include <BleKeyboard.h>
// Fermion: SHT40 Temperature & Humidity Sensor
#include "Adafruit_SHT4x.h"

// Bluetooth LE Keyboard
BleKeyboard bleKeyboard;
String sKeyboard = "";
// Send Size
byte sendSize = 0;

// Fermion: SHT40 Temperature & Humidity Sensor
Adafruit_SHT4x sht4 = Adafruit_SHT4x();
// Temperature
float T;
// Humidity
float H;

// The number of the Rocker Switch pin
int iSwitch = 17;
// Variable for reading the button status
int SwitchState = 0;

// Define LED
int iLED = 2;

// Software Version Information
String sver = "29-08";

void loop() {

  // Fermion: SHT40 Temperature & Humidity Sensor
  isSHT40();

  // Read the state of the Switch value:
  SwitchState = digitalRead(iSwitch);

  // Check if the button is pressed. If it is, the SwitchState is HIGH:
  if (SwitchState == HIGH) {

    // Bluetooth LE Keyboard
    isBluetooth();

  }

  // Delay 1 Second
  delay(1000);

}
getBleKeyboard.ino
// Ble Keyboard
// Bluetooth
// isBluetooth
void isBluetooth() {

  // ESP32 BLE Keyboard
  if(bleKeyboard.isConnected()) {

    // Send Size Length
    sendSize = sKeyboard.length();

    // Send Size, charAt
    for(byte i = 0; i < sendSize+1; i++){

       // Write
       bleKeyboard.write(sKeyboard.charAt(i));
       delay(50);

    }
    bleKeyboard.write(KEY_RETURN);

  }

}
getSHT40.ino
// Fermion: SHT40 Temperature & Humidity Sensor
// SHT40 Temperature & Humidity
void isSHT40(){

  // Fermion: SHT40 Temperature & Humidity Sensor
  // Sensors Event
  sensors_event_t humidity, temp;
  // Populate temp and humidity objects
  sht4.getEvent(&humidity, &temp);
  // Temperature
  T = temp.temperature;
  // Humidity
  H = humidity.relative_humidity;
  // DFR|Version|Temperature|Humidity|*
  sKeyboard = "DFR|" + sver + "|" + String(T) + "C|" + String(H) + "% rH|*";

}
setup.ino
// Setup
void setup()
{

  // Give display time to power on
  delay(100);

  // Bluetooth LE keyboard
  bleKeyboard.begin();

  // Give display time to power on
  delay(100);

  // Fermion: SHT40 Temperature & Humidity Sensor
  sht4.begin();
  // You can have 3 different precisions, higher precision takes longer
  sht4.setPrecision(SHT4X_HIGH_PRECISION);
  // You can have 6 different heater settings
  sht4.setHeater(SHT4X_NO_HEATER);

  // Give display time to power on
  delay(100);

  // Initialize the Switch pin as an input
  pinMode(iSwitch, INPUT);

  // Initialize digital pin iLED as an output
  pinMode(iLED, OUTPUT);
  // Outputting high, the LED turns on
  digitalWrite(iLED, HIGH);

  // Delay 5 Second
  delay( 5000 );

}
——
People can contact us: https://www.donluc.com/?page_id=1927
Teacher, Instructor, E-Mentor, R&D and Consulting
- Programming Language
- Single-Board Microcontrollers (PIC, Arduino, Raspberry Pi, Arm, Silicon Labs, Espressif, Etc…)
- IoT
- Wireless (Radio Frequency, Bluetooth, WiFi, Etc…)
- Robotics
- Automation
- Camera and Video Capture Receiver Stationary, Wheel/Tank and Underwater Vehicle
- Unmanned Vehicles Terrestrial and Marine
- Machine Learning
- Artificial Intelligence (AI)
- RTOS
- Sensors, eHealth Sensors, Biosensor, and Biometric
- Research & Development (R & D)
- Consulting
Follow Us
Luc Paquin – Curriculum Vitae – 2024
https://www.donluc.com/luc/
Web: https://www.donluc.com/
Facebook: https://www.facebook.com/neosteam.labs.9/
YouTube: https://www.youtube.com/@thesass2063
Twitter: https://twitter.com/labs_steam
Pinterest: https://www.pinterest.com/NeoSteamLabs/
Instagram: https://www.instagram.com/neosteamlabs/
LinkedIn: https://www.linkedin.com/in/jlucpaquin/
Don Luc
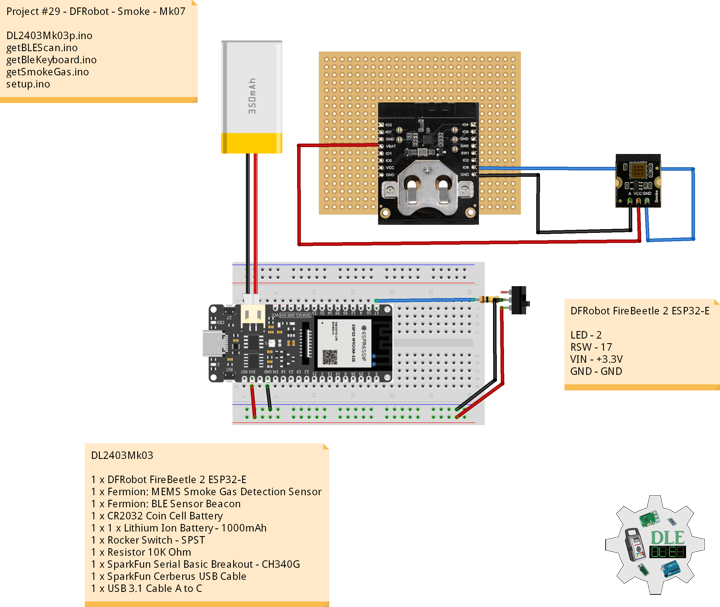
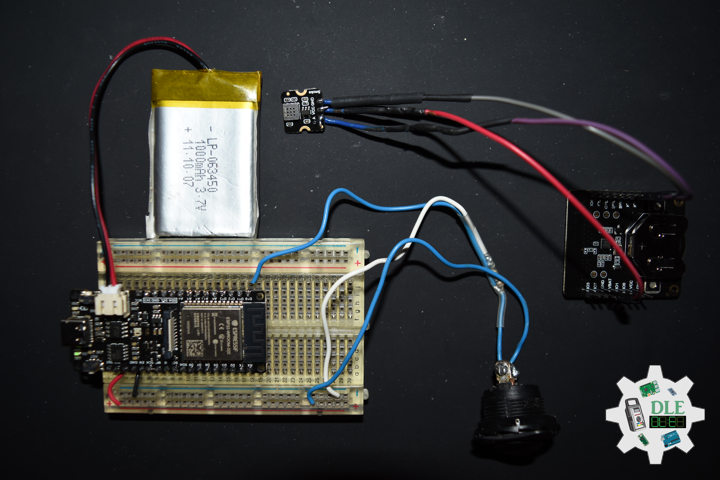
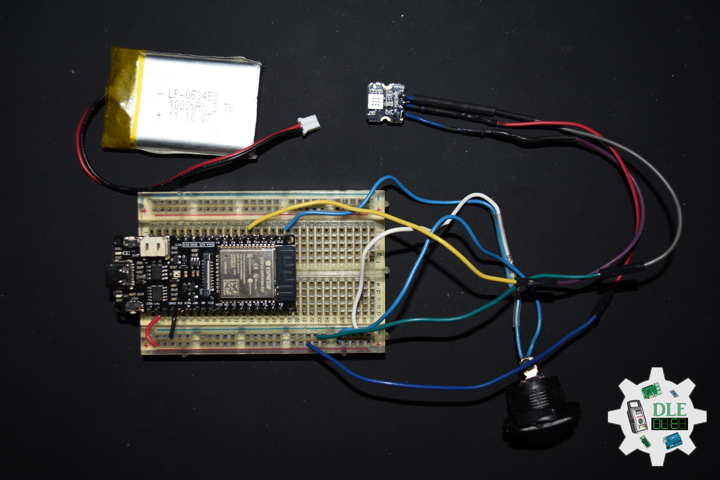
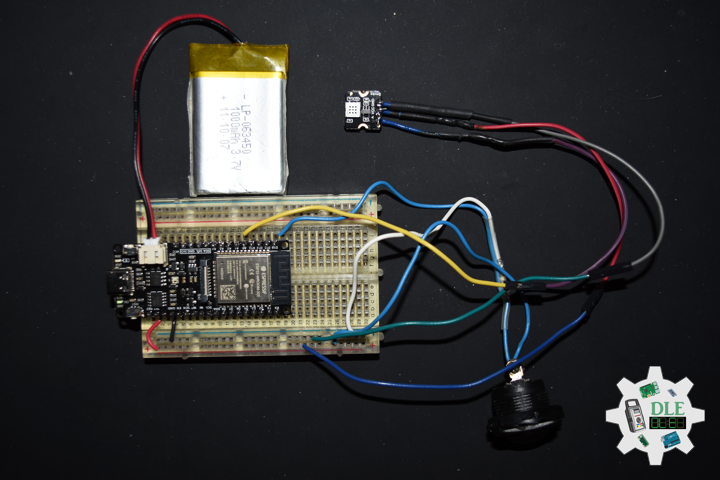
Project #29 – DFRobot – Smoke – Mk07
——
#DonLucElectronics #DonLuc #DFRobot #FermionBLESensorBeacon #MEMSSmokeGas #FireBeetle2ESP32E #ESP32 #IoT #Arduino #Project #Fritzing #Programming #Electronics #Microcontrollers #Consultant
——
——

——
——
Smoke
Smoke is a suspension of airborne particulates and gases emitted when a material undergoes combustion or pyrolysis, together with the quantity of air that is entrained or otherwise mixed into the mass. It is commonly an unwanted by-product of fires, but may also be used for pest control, communication, defensive and offensive capabilities in the military, cooking, or smoking. It is used in rituals where incense, sage, or resin is burned to produce a smell for spiritual or magical purposes. It can also be a flavoring agent and preservative.
Smoke inhalation is the primary cause of death in victims of indoor fires. The smoke kills by a combination of thermal damage, poisoning and pulmonary irritation caused by carbon monoxide, hydrogen cyanide and other combustion products. Smoke is an aerosol of solid particles and liquid droplets that are close to the ideal range of sizes for Mie scattering of visible light.
DL2403Mk03
1 x DFRobot FireBeetle 2 ESP32-E
1 x Fermion: MEMS Smoke Gas Detection Sensor
1 x Fermion: BLE Sensor Beacon
1 x CR2032 Coin Cell Battery
1 x 1 x Lithium Ion Battery – 1000mAh
1 x Rocker Switch – SPST
1 x Resistor 10K Ohm
1 x SparkFun Serial Basic Breakout – CH340G
1 x SparkFun Cerberus USB Cable
1 x USB 3.1 Cable A to C
DFRobot FireBeetle 2 ESP32-E
LED – 2
RSW – 17
VIN – +3.3V
GND – GND
——
DL2403Mk03p.ino
/****** Don Luc Electronics © ******
Software Version Information
Project #29 - DFRobot - Smoke - Mk07
29-07
DL2403Mk03p.ino
1 x DFRobot FireBeetle 2 ESP32-E
1 x Fermion: MEMS Smoke Gas Detection Sensor
1 x Fermion: BLE Sensor Beacon
1 x CR2032 Coin Cell Battery
1 x 1 x Lithium Ion Battery - 1000mAh
1 x Rocker Switch - SPST
1 x Resistor 10K Ohm
1 x SparkFun Serial Basic Breakout - CH340G
1 x SparkFun Cerberus USB Cable
1 x USB 3.1 Cable A to C
*/

// Include the Library Code
// Bluetooth LE keyboard
#include <BleKeyboard.h>
// Arduino
#include <Arduino.h>
// BLE Device
#include <BLEDevice.h>
// BLE Utils
#include <BLEUtils.h>
// BLEScan
#include <BLEScan.h>
// BLE Advertised Device
#include <BLEAdvertisedDevice.h>
// BLE Eddystone URL
#include <BLEEddystoneURL.h>
// BLE Eddystone TLM
#include <BLEEddystoneTLM.h>
// BLE Beacon
#include <BLEBeacon.h>

// ENDIAN_CHANGE
#define ENDIAN_CHANGE_U16(x) ((((x)&0xFF00) >> 8) + (((x)&0xFF) << 8))

// Bluetooth LE Keyboard
BleKeyboard bleKeyboard;
String sKeyboard = "";
// Send Size
byte sendSize = 0;

// Fermion: MEMS Smoke Gas Detection Sensor
float Sensor_Data;
// In seconds
int scanTime = 5;
// BLE Scan
BLEScan *pBLEScan;

// My Advertised Device Callbacks
class MyAdvertisedDeviceCallbacks : public BLEAdvertisedDeviceCallbacks
{

    // onResult
    void onResult(BLEAdvertisedDevice advertisedDevice)
    {
      // Advertised Device
      if (advertisedDevice.haveName())
      {
        // Name: Fermion: Sensor Beacon
        if(String(advertisedDevice.getName().c_str()) == "Smoke Gas"){

          // strManufacturerData
          std::string strManufacturerData = advertisedDevice.getManufacturerData();
          uint8_t cManufacturerData[100];
          strManufacturerData.copy((char *)cManufacturerData, strManufacturerData.length(), 0);

          // strManufacturerData.length
          for (int i = 0; i < strManufacturerData.length(); i++)
          {

             // cManufacturerData[i]
             cManufacturerData[i];

          }

          // Sensor_Data
          Sensor_Data = int(cManufacturerData[2]<<8 | cManufacturerData[3]);

        }
      }
    }
};

// The number of the Rocker Switch pin
int iSwitch = 17;
// Variable for reading the button status
int SwitchState = 0;

// Define LED
int iLED = 2;

// Software Version Information
String sver = "29-07";

void loop() {

  // ScanResults
  isBLEScanResults();

  // Fermion: MEMS Smoke Gas Detection Sensor
  isSmokeGas();

  // Read the state of the Switch value:
  SwitchState = digitalRead(iSwitch);

  // Check if the button is pressed. If it is, the SwitchState is HIGH:
  if (SwitchState == HIGH) {

    // Bluetooth LE Keyboard
    isBluetooth();

  }

  // Delay 2 Second
  delay(2000);

}
getBLEScan.ino
// getBLEScan
// Setup BLE Scan
void isSetupBLEScan(){

  // BLE Device
  BLEDevice::init("");
  // Create new scan
  pBLEScan = BLEDevice::getScan();
  // Set Advertised Device Callbacks
  pBLEScan->setAdvertisedDeviceCallbacks(new MyAdvertisedDeviceCallbacks());
  // Active scan uses more power, but get results faster
  pBLEScan->setActiveScan(true);
  // Set Interval
  pBLEScan->setInterval(100);
  // Less or equal setInterval value
  pBLEScan->setWindow(99);

}
// BLE Scan Results
void isBLEScanResults(){

  // Put your main code here, to run repeatedly:
  BLEScanResults foundDevices = pBLEScan->start(scanTime, false);
  // Delete results fromBLEScan buffer to release memory
  pBLEScan->clearResults();

}
getBleKeyboard.ino
// Ble Keyboard
// Bluetooth
// isBluetooth
void isBluetooth() {

  // ESP32 BLE Keyboard
  if(bleKeyboard.isConnected()) {

    // Send Size Length
    sendSize = sKeyboard.length();

    // Send Size, charAt
    for(byte i = 0; i < sendSize+1; i++){

       // Write
       bleKeyboard.write(sKeyboard.charAt(i));
       delay(50);

    }
    bleKeyboard.write(KEY_RETURN);

  }

}
getSmokeGas.ino
// Fermion: MEMS Smoke Gas Detection Sensor
// Smoke Gas
void isSmokeGas(){

  // bleKeyboard (10-1000ppm)
  // DFR|Version|Smoke Gas Detection|*
  sKeyboard = "DFR|" + sver + "|" + String(Sensor_Data) + "|*";

}
setup.ino
// Setup
void setup()
{

  // Give display time to power on
  delay(100);

  // Bluetooth LE keyboard
  bleKeyboard.begin();

  // Give display time to power on
  delay(100);

  // Setup BLE Scan
  isSetupBLEScan();

  // Initialize the Switch pin as an input
  pinMode(iSwitch, INPUT);

  // Initialize digital pin iLED as an output
  pinMode(iLED, OUTPUT);
  // Outputting high, the LED turns on
  digitalWrite(iLED, HIGH);

  // Delay 5 Second
  delay( 5000 );

}
——
People can contact us: https://www.donluc.com/?page_id=1927
Teacher, Instructor, E-Mentor, R&D and Consulting
- Programming Language
- Single-Board Microcontrollers (PIC, Arduino, Raspberry Pi, Arm, Silicon Labs, Espressif, Etc…)
- IoT
- Wireless (Radio Frequency, Bluetooth, WiFi, Etc…)
- Robotics
- Automation
- Camera and Video Capture Receiver Stationary, Wheel/Tank and Underwater Vehicle
- Unmanned Vehicles Terrestrial and Marine
- Machine Learning
- Artificial Intelligence (AI)
- RTOS
- Sensors, eHealth Sensors, Biosensor, and Biometric
- Research & Development (R & D)
- Consulting
Follow Us
Luc Paquin – Curriculum Vitae – 2024
https://www.donluc.com/luc/
Web: https://www.donluc.com/
Facebook: https://www.facebook.com/neosteam.labs.9/
YouTube: https://www.youtube.com/@thesass2063
Twitter: https://twitter.com/labs_steam
Pinterest: https://www.pinterest.com/NeoSteamLabs/
Instagram: https://www.instagram.com/neosteamlabs/
LinkedIn: https://www.linkedin.com/in/jlucpaquin/
Don Luc
Project #29 – DFRobot – Fermion MEMS Smoke Gas – Mk06
——
#DonLucElectronics #DonLuc #DFRobot #MEMSSmokeGas #FireBeetle2ESP32E #ESP32 #IoT #Arduino #Project #Fritzing #Programming #Electronics #Microcontrollers #Consultant
——

——
——
——
Fermion: MEMS Smoke Gas Detection Sensor
Fermion: MEMS Smoke Gas Detection Sensor employs state-of-the-art microelectromechanical system (MEMS) technology, endowing the sensor with compact dimensions, low power consumption, minimal heat generation, short preheating time, and swift response recovery. The sensor can measure smoke concentration qualitatively and is suitable for smoke alarm and other application scenarios.
Precautions for use:
- Kindly remove the protective film before usage.
- To prevent exposure to volatile silicon compounds vapors.
- Refrain from prolonged exposure to extreme environments.
- Avoid contact with water, condensation, and freezing.
- Minimize excessive vibration, impact, and dropping.
- For extended periods of non-usage, it is advisable to preheat the module for at least 24 hours.
DL2403Mk02
1 x DFRobot FireBeetle 2 ESP32-E
1 x Fermion: MEMS Smoke Gas Detection Sensor
1 x 1 x Lithium Ion Battery – 1000mAh
1 x Rocker Switch – SPST
1 x Resistor 10K Ohm
1 x USB 3.1 Cable A to C
DFRobot FireBeetle 2 ESP32-E
LED – 2
RSW – 17
SMO – A0
VIN – +3.3V
GND – GND
——
DL2403Mk02p.ino
/****** Don Luc Electronics © ******
Software Version Information
Project #29 - DFRobot - Fermion MEMS Smoke Gas - Mk06
29-06
DL2403Mk02p.ino
1 x DFRobot FireBeetle 2 ESP32-E
1 x Fermion: MEMS Smoke Gas Detection Sensor
1 x 1 x Lithium Ion Battery - 1000mAh
1 x Rocker Switch - SPST
1 x Resistor 10K Ohm
1 x USB 3.1 Cable A to C
*/

// Include the Library Code
// Bluetooth LE keyboard
#include <BleKeyboard.h>

// Bluetooth LE Keyboard
BleKeyboard bleKeyboard;
String sKeyboard = "";
// Send Size
byte sendSize = 0;

// Fermion: MEMS Smoke Gas Detection Sensor
int iSmokeGas = A0;
int iSmokeGasVal = 0;

// The number of the Rocker Switch pin
int iSwitch = 17;
// Variable for reading the button status
int SwitchState = 0;

// Define LED
int iLED = 2;

// Software Version Information
String sver = "29-06";

void loop() {

  // Fermion: MEMS Smoke Gas Detection Sensor
  isSmokeGas();

  // Read the state of the Switch value:
  SwitchState = digitalRead(iSwitch);

  // Check if the button is pressed. If it is, the SwitchState is HIGH:
  if (SwitchState == HIGH) {

    // Bluetooth LE Keyboard
    isBluetooth();

  }

  // Delay 1 Second
  delay(1000);

}
getBleKeyboard.ino
// Ble Keyboard
// Bluetooth
// isBluetooth
void isBluetooth() {

  // ESP32 BLE Keyboard
  if(bleKeyboard.isConnected()) {

    // Send Size Length
    sendSize = sKeyboard.length();

    // Send Size, charAt
    for(byte i = 0; i < sendSize+1; i++){

       // Write
       bleKeyboard.write(sKeyboard.charAt(i));
       delay(50);

    }
    bleKeyboard.write(KEY_RETURN);

  }

}
getSmokeGas.ino
// Fermion: MEMS Smoke Gas Detection Sensor
// Smoke Gas
void isSmokeGas(){

  // Connect Smoke Gas Sensor to Analog 0
  iSmokeGasVal = analogRead( iSmokeGas );

  // bleKeyboard (10-1000ppm)
  // DFR|Version|Smoke Gas Detection|*
  sKeyboard = "DFR|" + sver + "|" + String(iSmokeGasVal) + "|*";

}
setup.ino
// Setup
void setup()
{

  // Give display time to power on
  delay(100);

  // Bluetooth LE keyboard
  bleKeyboard.begin();

  // Give display time to power on
  delay(100);

  // Initialize the Switch pin as an input
  pinMode(iSwitch, INPUT);

  // Initialize digital pin iLED as an output
  pinMode(iLED, OUTPUT);
  // Outputting high, the LED turns on
  digitalWrite(iLED, HIGH);

  // Delay 5 Second
  delay( 5000 );

}
——
People can contact us: https://www.donluc.com/?page_id=1927
Teacher, Instructor, E-Mentor, R&D and Consulting
- Programming Language
- Single-Board Microcontrollers (PIC, Arduino, Raspberry Pi, Arm, Silicon Labs, Espressif, Etc…)
- IoT
- Wireless (Radio Frequency, Bluetooth, WiFi, Etc…)
- Robotics
- Automation
- Camera and Video Capture Receiver Stationary, Wheel/Tank and Underwater Vehicle
- Unmanned Vehicles Terrestrial and Marine
- Machine Learning
- Artificial Intelligence (AI)
- RTOS
- Sensors, eHealth Sensors, Biosensor, and Biometric
- Research & Development (R & D)
- Consulting
Follow Us
Luc Paquin – Curriculum Vitae – 2024
https://www.donluc.com/luc/
Web: https://www.donluc.com/
Facebook: https://www.facebook.com/neosteam.labs.9/
YouTube: https://www.youtube.com/@thesass2063
Twitter: https://twitter.com/labs_steam
Pinterest: https://www.pinterest.com/NeoSteamLabs/
Instagram: https://www.instagram.com/neosteamlabs/
Don Luc
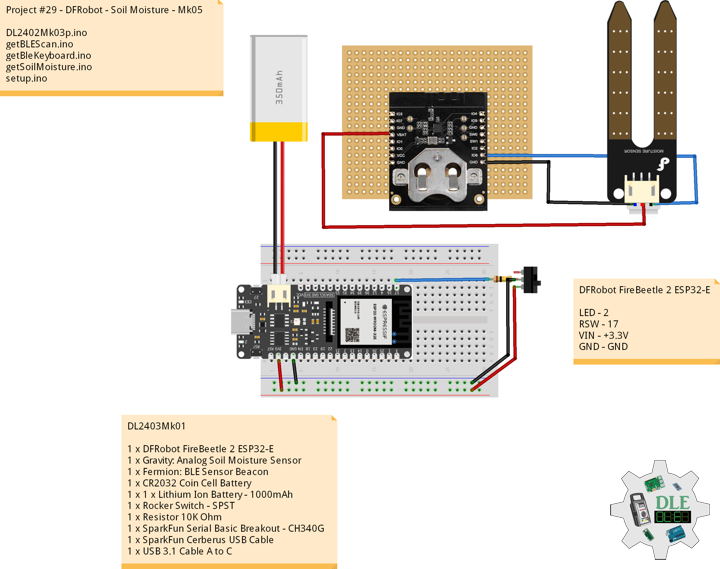
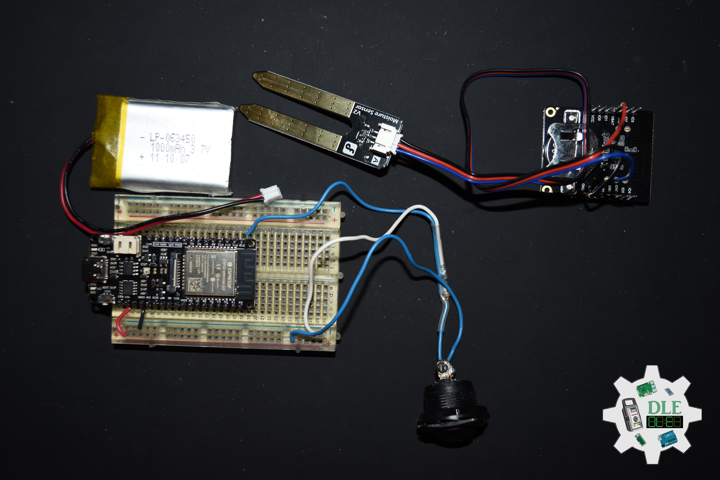
Project #29 – DFRobot – Soil Moisture – Mk05
——
#DonLucElectronics #DonLuc #DFRobot #SoilMoistureSensor #FireBeetle2ESP32E #ESP32 #IoT #Arduino #Project #Fritzing #Programming #Electronics #Microcontrollers #Consultant
——
——
——
——
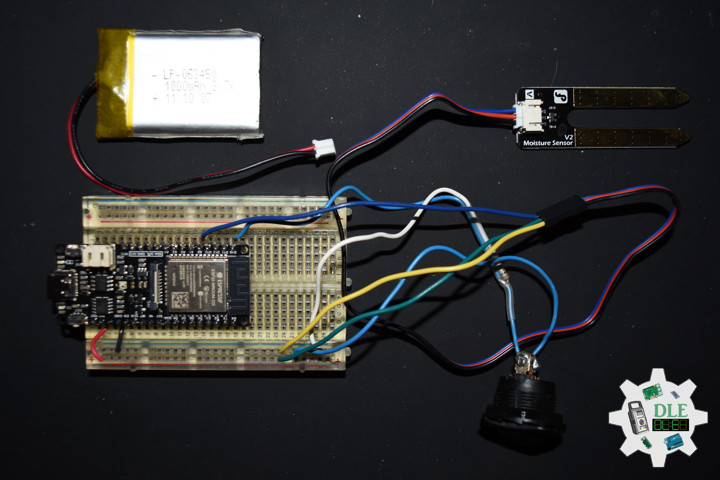
Soil Moisture
Soil moisture is the critical parameter in agriculture. If there is a shortage or overabundance of water, plants may die. At the same time, this data depends on many external factors, primarily weather conditions and climate changes. That is why it is so vital to understand the most effective methods for analyzing soil moisture content.
This term refers to the entire quantity of water in the ground’s pores or on its surface. The moisture content of soil depends on such factors as weather, type of land, and plants. The parameter is vital in monitoring soil moisture activities, predicting natural disasters, managing water supply, etc. This data may signal a future flood or water deficit ahead of other indicators.
Soil moisture affects:
- Content of air, salinity, and amount of toxic substances.
- Ground structure and thickness.
- Temperature and heat capacity of the ground.
DL2403Mk01
1 x DFRobot FireBeetle 2 ESP32-E
1 x Gravity: Analog Soil Moisture Sensor
1 x Fermion: BLE Sensor Beacon
1 x CR2032 Coin Cell Battery
1 x 1 x Lithium Ion Battery – 1000mAh
1 x Rocker Switch – SPST
1 x Resistor 10K Ohm
1 x SparkFun Serial Basic Breakout – CH340G
1 x SparkFun Cerberus USB Cable
1 x USB 3.1 Cable A to C
DFRobot FireBeetle 2 ESP32-E
LED – 2
RSW – 17
VIN – +3.3V
GND – GND
——
DL2403Mk01p.ino
/****** Don Luc Electronics © ******
Software Version Information
Project #29 - DFRobot - Soil Moisture - Mk05
29-05
DL2403Mk01p.ino
1 x DFRobot FireBeetle 2 ESP32-E
1 x Gravity: Analog Soil Moisture Sensor
1 x Fermion: BLE Sensor Beacon
1 x CR2032 Coin Cell Battery
1 x 1 x Lithium Ion Battery - 1000mAh
1 x Rocker Switch - SPST
1 x Resistor 10K Ohm
1 x SparkFun Serial Basic Breakout - CH340G
1 x SparkFun Cerberus USB Cable
1 x USB 3.1 Cable A to C
*/

// Include the Library Code
// Bluetooth LE keyboard
#include <BleKeyboard.h>
// Arduino
#include <Arduino.h>
// BLE Device
#include <BLEDevice.h>
// BLE Utils
#include <BLEUtils.h>
// BLEScan
#include <BLEScan.h>
// BLE Advertised Device
#include <BLEAdvertisedDevice.h>
// BLE Eddystone URL
#include <BLEEddystoneURL.h>
// BLE Eddystone TLM
#include <BLEEddystoneTLM.h>
// BLE Beacon
#include <BLEBeacon.h>

// ENDIAN_CHANGE
#define ENDIAN_CHANGE_U16(x) ((((x)&0xFF00) >> 8) + (((x)&0xFF) << 8))

// Bluetooth LE Keyboard
BleKeyboard bleKeyboard;
String sKeyboard = "";
// Send Size
byte sendSize = 0;

// Gravity: Analog Soil Moisture Sensor
float Sensor_Data;
// In seconds
int scanTime = 5;
// BLE Scan
BLEScan *pBLEScan;

// My Advertised Device Callbacks
class MyAdvertisedDeviceCallbacks : public BLEAdvertisedDeviceCallbacks
{

    // onResult
    void onResult(BLEAdvertisedDevice advertisedDevice)
    {
      // Advertised Device
      if (advertisedDevice.haveName())
      {
        // Name: Fermion: Sensor Beacon
        if(String(advertisedDevice.getName().c_str()) == "Soil Moisture"){

          // strManufacturerData
          std::string strManufacturerData = advertisedDevice.getManufacturerData();
          uint8_t cManufacturerData[100];
          strManufacturerData.copy((char *)cManufacturerData, strManufacturerData.length(), 0);

          // strManufacturerData.length
          for (int i = 0; i < strManufacturerData.length(); i++)
          {

             // cManufacturerData[i]
             cManufacturerData[i];

          }

          // Sensor_Data
          Sensor_Data = int(cManufacturerData[2]<<8 | cManufacturerData[3]);

        }
      }
    }
};

// The number of the Rocker Switch pin
int iSwitch = 17;
// Variable for reading the button status
int SwitchState = 0;

// Define LED
int iLED = 2;

// Software Version Information
String sver = "29-05";

void loop() {

  // ScanResults
  isBLEScanResults();

  // Gravity: Analog Soil Moisture Sensor
  isSoilMoisture();

  // Read the state of the Switch value:
  SwitchState = digitalRead(iSwitch);

  // Check if the button is pressed. If it is, the SwitchState is HIGH:
  if (SwitchState == HIGH) {

    // Bluetooth LE Keyboard
    isBluetooth();

  }

  // Delay 2 Second
  delay(2000);

}
getBLEScan.ino
// getBLEScan
// Setup BLE Scan
void isSetupBLEScan(){

  // BLE Device
  BLEDevice::init("");
  // Create new scan
  pBLEScan = BLEDevice::getScan();
  // Set Advertised Device Callbacks
  pBLEScan->setAdvertisedDeviceCallbacks(new MyAdvertisedDeviceCallbacks());
  // Active scan uses more power, but get results faster
  pBLEScan->setActiveScan(true);
  // Set Interval
  pBLEScan->setInterval(100);
  // Less or equal setInterval value
  pBLEScan->setWindow(99);

}
// BLE Scan Results
void isBLEScanResults(){

  // Put your main code here, to run repeatedly:
  BLEScanResults foundDevices = pBLEScan->start(scanTime, false);
  // Delete results fromBLEScan buffer to release memory
  pBLEScan->clearResults();

}
getBleKeyboard.ino
// Ble Keyboard
// Bluetooth
// isBluetooth
void isBluetooth() {

  // ESP32 BLE Keyboard
  if(bleKeyboard.isConnected()) {

    // Send Size Length
    sendSize = sKeyboard.length();

    // Send Size, charAt
    for(byte i = 0; i < sendSize+1; i++){

       // Write
       bleKeyboard.write(sKeyboard.charAt(i));
       delay(50);

    }
    bleKeyboard.write(KEY_RETURN);

  }

}
getSoilMoisture.ino
// Gravity: Analog Soil Moisture Sensor
// Soil Moisture
void isSoilMoisture(){

  // bleKeyboard
  // DFR|Version|Soil Moisture|*
  // SData => 0~900 Soil Moisture
  float SData = map( Sensor_Data, 1, 3000, 0, 900);
  sKeyboard = "DFR|" + sver + "|" + String(SData) + "|*";

}
setup.ino
// Setup
void setup()
{

  // Give display time to power on
  delay(100);

  // Bluetooth LE keyboard
  bleKeyboard.begin();

  // Give display time to power on
  delay(100);

  // Setup BLE Scan
  isSetupBLEScan();

  // Initialize the Switch pin as an input
  pinMode(iSwitch, INPUT);

  // Initialize digital pin iLED as an output
  pinMode(iLED, OUTPUT);
  // Outputting high, the LED turns on
  digitalWrite(iLED, HIGH);

  // Delay 5 Second
  delay( 5000 );

}
——
People can contact us: https://www.donluc.com/?page_id=1927
Teacher, Instructor, E-Mentor, R&D and Consulting
- Programming Language
- Single-Board Microcontrollers (PIC, Arduino, Raspberry Pi, Arm, Silicon Labs, Espressif, Etc…)
- IoT
- Wireless (Radio Frequency, Bluetooth, WiFi, Etc…)
- Robotics
- Automation
- Camera and Video Capture Receiver Stationary, Wheel/Tank and Underwater Vehicle
- Unmanned Vehicles Terrestrial and Marine
- Machine Learning
- Artificial Intelligence (AI)
- RTOS
- eHealth Sensors, Biosensor, and Biometric
- Research & Development (R & D)
- Consulting
Follow Us
Luc Paquin – Curriculum Vitae – 2024
https://www.donluc.com/luc/
Web: https://www.donluc.com/
Facebook: https://www.facebook.com/neosteam.labs.9/
YouTube: https://www.youtube.com/@thesass2063
Twitter: https://twitter.com/labs_steam
Pinterest: https://www.pinterest.com/NeoSteamLabs/
Instagram: https://www.instagram.com/neosteamlabs/
Don Luc
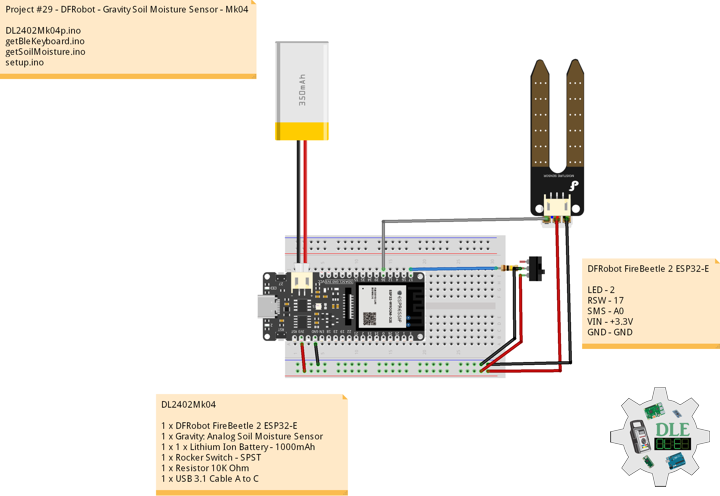
Project #29 – DFRobot – Gravity Soil Moisture Sensor – Mk04
——
#DonLucElectronics #DonLuc #DFRobot #SoilMoistureSensor #FireBeetle2ESP32E #ESP32 #IoT #Arduino #Project #Fritzing #Programming #Electronics #Microcontrollers #Consultant
——
——
——
——
Gravity: Analog Soil Moisture Sensor
A soil moisture sensor can read the amount of moisture present in the soil surrounding it. It’s an ideal for monitoring an urban garden, or your pet plant’s water level. This is a must have component for a IOT Garden / Agriculture. The new soil moisture sensor uses Immersion Gold which protects the nickel from oxidation. Electroless nickel immersion gold has several advantages over more conventional surface platings such as HASL, including excellent surface planarity, good oxidation resistance, and usability for untreated contact surfaces such as membrane switches and contact points.
This Soil Moisture Sensor uses the two probes to pass current through the soil, and then it reads that resistance to get the moisture level. More water makes the soil conduct electricity more easily, while dry soil conducts electricity poorly. This sensor will be helpful to remind you to water your indoor plants or to monitor the soil moisture in your garden.
DL2402Mk04
1 x DFRobot FireBeetle 2 ESP32-E
1 x Gravity: Analog Soil Moisture Sensor
1 x 1 x Lithium Ion Battery – 1000mAh
1 x Rocker Switch – SPST
1 x Resistor 10K Ohm
1 x USB 3.1 Cable A to C
DFRobot FireBeetle 2 ESP32-E
LED – 2
RSW – 17
SMS – A0
VIN – +3.3V
GND – GND
——
DL2402Mk04p.ino
/****** Don Luc Electronics © ******
Software Version Information
Project #29 - DFRobot - Gravity Soil Moisture Sensor - Mk04
29-04
DL2402Mk04p.ino
1 x DFRobot FireBeetle 2 ESP32-E
1 x Gravity: Analog Soil Moisture Sensor
1 x Rocker Switch - SPST
1 x Resistor 10K Ohm
1 x 1 x Lithium Ion Battery - 1000mAh
1 x USB 3.1 Cable A to C
*/

// Include the Library Code
// Bluetooth LE keyboard
#include <BleKeyboard.h>

// Bluetooth LE Keyboard
BleKeyboard bleKeyboard;
String sKeyboard = "";
// Send Size
byte sendSize = 0;

// Gravity: Analog Soil Moisture Sensor
int iSoilMoisture = A0;
int iSoilMoistureVal = 0;

// The number of the Rocker Switch pin
int iSwitch = 17;
// Variable for reading the button status
int SwitchState = 0;

// Define LED
int iLED = 2;

// Software Version Information
String sver = "29-04";

void loop() {

  // Gravity: Analog Soil Moisture Sensor
  isSoilMoisture();

  // Read the state of the Switch value:
  SwitchState = digitalRead(iSwitch);

  // Check if the button is pressed. If it is, the SwitchState is HIGH:
  if (SwitchState == HIGH) {

    // Bluetooth LE Keyboard
    isBluetooth();

  }

  // Delay 1 Second
  delay(1000);

}
getBleKeyboard.ino
// Ble Keyboard
// Bluetooth
// isBluetooth
void isBluetooth() {

  // ESP32 BLE Keyboard
  if(bleKeyboard.isConnected()) {

    // Send Size Length
    sendSize = sKeyboard.length();

    // Send Size, charAt
    for(byte i = 0; i < sendSize+1; i++){

       // Write
       bleKeyboard.write(sKeyboard.charAt(i));
       delay(50);

    }
    bleKeyboard.write(KEY_RETURN);

  }

}
getSoilMoisture.ino
// Gravity: Analog Soil Moisture Sensor
// Soil Moisture
void isSoilMoisture(){

  // Connect Soil Moisture Sensor to Analog 0
  iSoilMoistureVal = analogRead( iSoilMoisture );

  // SData => 0~900 Soil Moisture
  float SData = map( iSoilMoistureVal, 1, 3000, 0, 900);

  // bleKeyboard
  // DFR|Version|Soil Moisture|*
  sKeyboard = "DFR|" + sver + "|" + String(SData) + "|*";

}
setup.ino
// Setup
void setup()
{

  // Give display time to power on
  delay(100);

  // Bluetooth LE keyboard
  bleKeyboard.begin();

  // Give display time to power on
  delay(100);

  // Initialize the Switch pin as an input
  pinMode(iSwitch, INPUT);

  // Initialize digital pin iLED as an output
  pinMode(iLED, OUTPUT);
  // Outputting high, the LED turns on
  digitalWrite(iLED, HIGH);

  // Delay 5 Second
  delay( 5000 );

}
——
People can contact us: https://www.donluc.com/?page_id=1927
Teacher, Instructor, E-Mentor, R&D and Consulting
- Programming Language
- Single-Board Microcontrollers (PIC, Arduino, Raspberry Pi, Arm, Silicon Labs, Espressif, Etc…)
- IoT
- Wireless (Radio Frequency, Bluetooth, WiFi, Etc…)
- Robotics
- Automation
- Camera and Video Capture Receiver Stationary, Wheel/Tank and Underwater Vehicle
- Unmanned Vehicles Terrestrial and Marine
- Machine Learning
- Artificial Intelligence (AI)
- RTOS
- eHealth Sensors, Biosensor, and Biometric
- Research & Development (R & D)
- Consulting
Follow Us
Luc Paquin – Curriculum Vitae – 2024
https://www.donluc.com/luc/
Web: https://www.donluc.com/
Facebook: https://www.facebook.com/neosteam.labs.9/
YouTube: https://www.youtube.com/@thesass2063
Twitter: https://twitter.com/labs_steam
Pinterest: https://www.pinterest.com/NeoSteamLabs/
Instagram: https://www.instagram.com/neosteamlabs/
Don Luc
Project #29 – DFRobot – Fermion BLE Sensor Beacon – Mk03
——
#DonLucElectronics #DonLuc #DFRobot #FermionBLESensorBeacon #AmbientLight #FireBeetle2ESP32E #ESP32 #IoT #Arduino #Project #Fritzing #Programming #Electronics #Microcontrollers #Consultant
——
——
——
——
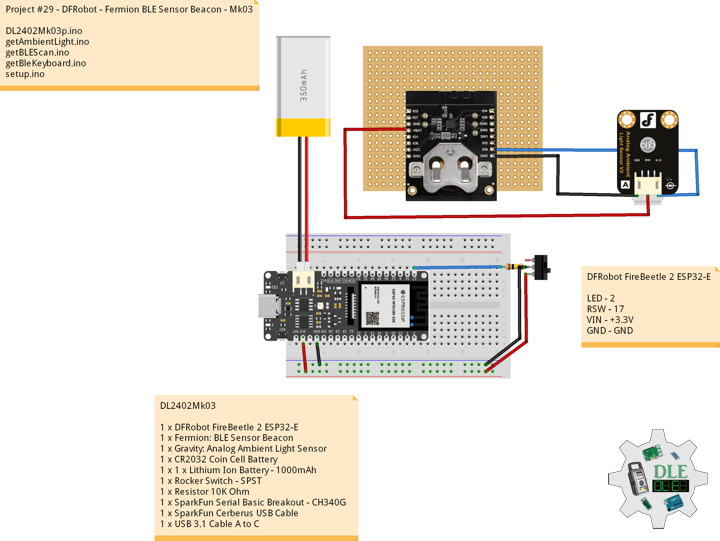
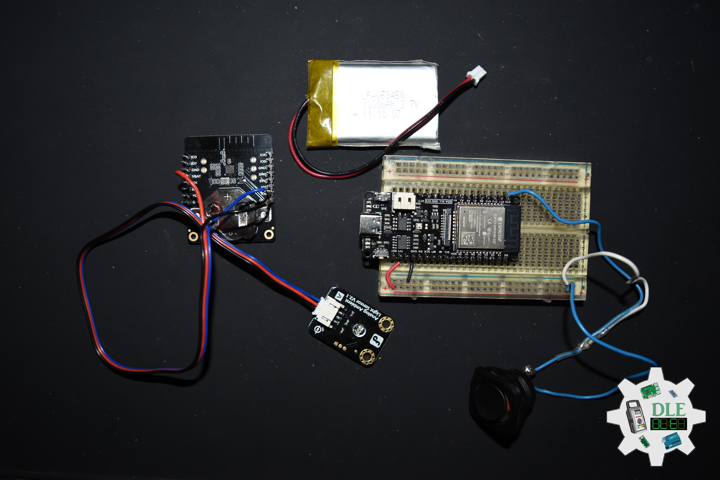
Fermion: BLE Sensor Beacon
BLE Beacon, also known as Low Energy Bluetooth Beacon, is a small wireless device that broadcasts signals using BLE technology. Due to its broadcast nature, pairing is not required between the beacon and receiving devices. Each beacon contains a unique identifier, detectable by nearby devices equipped with Bluetooth technology, such as ESP32 and smartphones supporting BLE scanning.
This Bluetooth beacon has a built-in 11-bit ADC, Fermion version, and multiple I/Os that can be multiplexed to SDA/SCL while broadcasting over Bluetooth. Users can access sensor data within broadcast range on a Bluetooth-equipped device such as a Smartphone or ESP32. This BLE beacon has a built-in 11-bit ADC and an I2C interface, allowing it to real-time collect and broadcast data from various types of sensors, including analog, digital, and I2C sensors.
DL2402Mk03
1 x DFRobot FireBeetle 2 ESP32-E
1 x Fermion: BLE Sensor Beacon
1 x Gravity: Analog Ambient Light Sensor
1 x CR2032 Coin Cell Battery
1 x 1 x Lithium Ion Battery – 1000mAh
1 x Rocker Switch – SPST
1 x Resistor 10K Ohm
1 x SparkFun Serial Basic Breakout – CH340G
1 x SparkFun Cerberus USB Cable
1 x USB 3.1 Cable A to C
DFRobot FireBeetle 2 ESP32-E
LED – 2
RSW – 17
VIN – +3.3V
GND – GND
——
DL2402Mk03p.ino
/****** Don Luc Electronics © ******
Software Version Information
Project #29 - DFRobot -  - Mk03
29-03
DL2402Mk03p.ino
1 x DFRobot FireBeetle 2 ESP32-E
1 x Fermion: BLE Sensor Beacon
1 x Gravity: Analog Ambient Light Sensor
1 x CR2032 Coin Cell Battery
1 x 1 x Lithium Ion Battery - 1000mAh
1 x Rocker Switch - SPST
1 x Resistor 10K Ohm
1 x SparkFun Serial Basic Breakout - CH340G
1 x SparkFun Cerberus USB Cable
1 x USB 3.1 Cable A to C
*/

// Include the Library Code
// Bluetooth LE keyboard
#include <BleKeyboard.h>
// Arduino
#include <Arduino.h>
// BLE Device
#include <BLEDevice.h>
// BLE Utils
#include <BLEUtils.h>
// BLEScan
#include <BLEScan.h>
// BLE Advertised Device
#include <BLEAdvertisedDevice.h>
// BLE Eddystone URL
#include <BLEEddystoneURL.h>
// BLE Eddystone TLM
#include <BLEEddystoneTLM.h>
// BLE Beacon
#include <BLEBeacon.h>

// ENDIAN_CHANGE
#define ENDIAN_CHANGE_U16(x) ((((x)&0xFF00) >> 8) + (((x)&0xFF) << 8))

// Bluetooth LE Keyboard
BleKeyboard bleKeyboard;
String sKeyboard = "";
// Send Size
byte sendSize = 0;

// Gravity: Analog Ambient Light Sensor
float Sensor_Data;
// In seconds
int scanTime = 5;
// BLE Scan
BLEScan *pBLEScan;

// My Advertised Device Callbacks
class MyAdvertisedDeviceCallbacks : public BLEAdvertisedDeviceCallbacks
{

    // onResult
    void onResult(BLEAdvertisedDevice advertisedDevice)
    {
      // Advertised Device
      if (advertisedDevice.haveName())
      {
        // Name: Fermion: Sensor Beacon
        if(String(advertisedDevice.getName().c_str()) == "Fermion: Sensor Beacon"){

          // strManufacturerData
          std::string strManufacturerData = advertisedDevice.getManufacturerData();
          uint8_t cManufacturerData[100];
          strManufacturerData.copy((char *)cManufacturerData, strManufacturerData.length(), 0);

          // strManufacturerData.length
          for (int i = 0; i < strManufacturerData.length(); i++)
          {

             // cManufacturerData[i]
             cManufacturerData[i];

          }

          // Sensor_Data
          Sensor_Data = int(cManufacturerData[2]<<8 | cManufacturerData[3]);

        }
      }
    }
};

// The number of the Rocker Switch pin
int iSwitch = 17;
// Variable for reading the button status
int SwitchState = 0;

// Define LED
int iLED = 2;

// Software Version Information
String sver = "29-03";

void loop() {

  // ScanResults
  isBLEScanResults();

  // Gravity: Analog Ambient Light Sensor
  isAmbientLight();

  // Read the state of the Switch value:
  SwitchState = digitalRead(iSwitch);

  // Check if the button is pressed. If it is, the SwitchState is HIGH:
  if (SwitchState == HIGH) {

    // Bluetooth LE Keyboard
    isBluetooth();

  }

  // Delay 2 Second
  delay(2000);

}
getAmbientLight.ino
// Gravity: Analog Ambient Light Sensor
// Ambient Light
void isAmbientLight(){

  // bleKeyboard
  // DFR|Version|Lux|*
  // SData => 1~6000 Lux
  float SData = map(Sensor_Data, 1, 3000, 1, 6000);
  sKeyboard = "DFR|" + sver + "|" + String(SData) + "|*";

}
getBLEScan.ino
// getBLEScan
// Setup BLE Scan
void isSetupBLEScan(){

  // BLE Device
  BLEDevice::init("");
  // Create new scan
  pBLEScan = BLEDevice::getScan();
  // Set Advertised Device Callbacks
  pBLEScan->setAdvertisedDeviceCallbacks(new MyAdvertisedDeviceCallbacks());
  // Active scan uses more power, but get results faster
  pBLEScan->setActiveScan(true);
  // Set Interval
  pBLEScan->setInterval(100);
  // Less or equal setInterval value
  pBLEScan->setWindow(99);

}
// BLE Scan Results
void isBLEScanResults(){

  // Put your main code here, to run repeatedly:
  BLEScanResults foundDevices = pBLEScan->start(scanTime, false);
  // Delete results fromBLEScan buffer to release memory
  pBLEScan->clearResults();

}
getBleKeyboard.ino
// Ble Keyboard
// Bluetooth
// isBluetooth
void isBluetooth() {

  // ESP32 BLE Keyboard
  if(bleKeyboard.isConnected()) {

    // Send Size Length
    sendSize = sKeyboard.length();

    // Send Size, charAt
    for(byte i = 0; i < sendSize+1; i++){

       // Write
       bleKeyboard.write(sKeyboard.charAt(i));
       delay(50);

    }
    bleKeyboard.write(KEY_RETURN);

  }

}
setup.ino
// Setup
void setup()
{

  // Give display time to power on
  delay(100);

  // Bluetooth LE keyboard
  bleKeyboard.begin();

  // Give display time to power on
  delay(100);

  // Setup BLE Scan
  isSetupBLEScan();

  // Initialize the Switch pin as an input
  pinMode(iSwitch, INPUT);

  // Initialize digital pin iLED as an output
  pinMode(iLED, OUTPUT);
  // Outputting high, the LED turns on
  digitalWrite(iLED, HIGH);

  // Delay 5 Second
  delay( 5000 );

}
——
People can contact us: https://www.donluc.com/?page_id=1927
Teacher, Instructor, E-Mentor, R&D and Consulting
- Programming Language
- Single-Board Microcontrollers (PIC, Arduino, Raspberry Pi, Arm, Silicon Labs, Espressif, Etc…)
- IoT
- Wireless (Radio Frequency, Bluetooth, WiFi, Etc…)
- Robotics
- Automation
- Camera and Video Capture Receiver Stationary, Wheel/Tank and Underwater Vehicle
- Unmanned Vehicles Terrestrial and Marine
- Machine Learning
- Artificial Intelligence (AI)
- RTOS
- eHealth Sensors, Biosensor, and Biometric
- Research & Development (R & D)
- Consulting
Follow Us
Luc Paquin – Curriculum Vitae – 2024
https://www.donluc.com/luc/
Web: https://www.donluc.com/
Facebook: https://www.facebook.com/neosteam.labs.9/
YouTube: https://www.youtube.com/@thesass2063
Twitter: https://twitter.com/labs_steam
Pinterest: https://www.pinterest.com/NeoSteamLabs/
Instagram: https://www.instagram.com/neosteamlabs/
Don Luc
Project #28 – Sensors – MMA7361 – Mk14
——
#DonLucElectronics #DonLuc #Sensors #MMA7361 #Adafruit #SparkFun #Arduino #Project #Fritzing #Programming #Electronics #Microcontrollers #Consultant
——
——
——
——
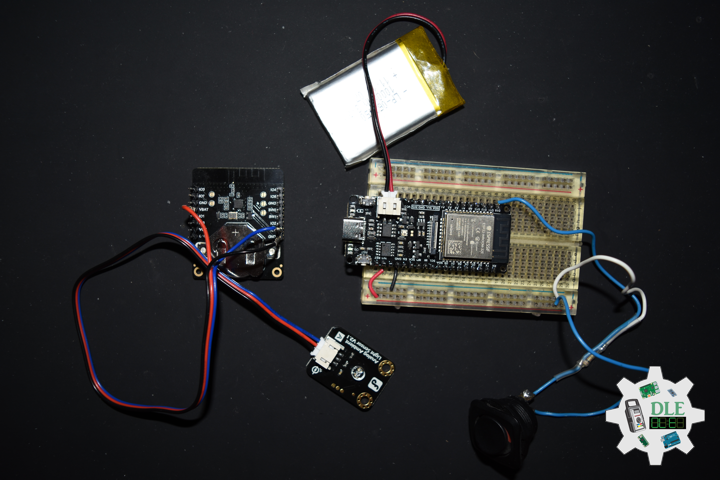
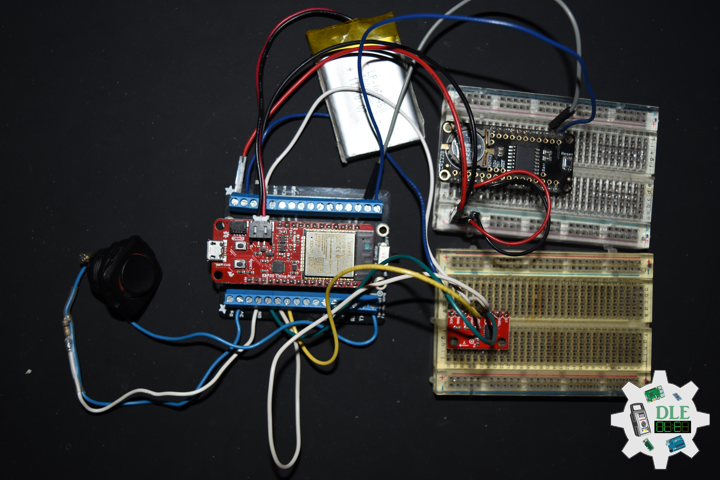
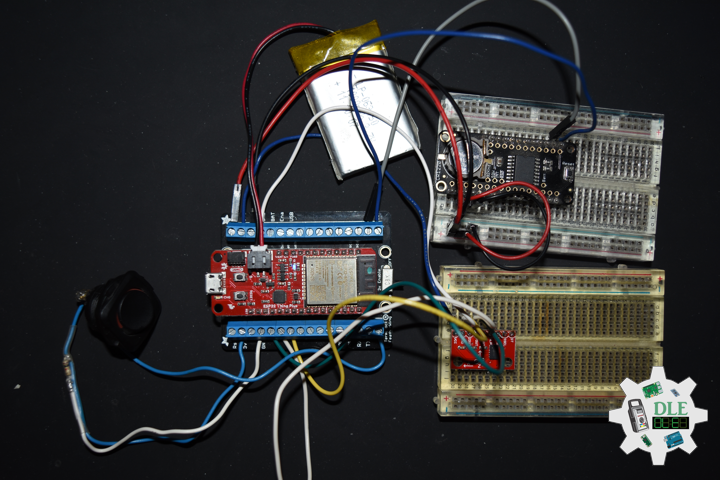
SparkFun Triple Axis Accelerometer Breakout – MMA7361
This is a breakout board for Freescale’s MMA7361L three-axis analog MEMS accelerometer. The sensor requires a very low amount of power and has a g-select input which switches the accelerometer between ±1.5g and ±6g measurement ranges. Other features include a sleep mode, signal conditioning, a 1-pole low pass filter, temperature compensation, self test, and 0g-detect which detects linear freefall. Zero-g offset and sensitivity are factory set and require no external devices.
This breadboard friendly board breaks out every pin of the MMA7361L to a 9-pin, 0.1″ pitch header. The sensor works on power between 2.2 and 3.6VDC (3.3 Volt optimal), and typically consumes just 400µA of current. All three axes have their own analog output.
- Two selectable measuring ranges (±1.5g, ±6g)
- Breadboard friendly – 0.1″ pitch header
- Low current consumption: 400 µA
- Sleep mode: 3 µA
- Low voltage operation: 2.2 Volt – 3.6 Volt
- High sensitivity (800 mV/g at 1.5g)
- Fast turn on time (0.5 ms enable response time)
- Self test for freefall detect diagnosis
- 0g-Detect for freefall protection
- Signal conditioning with low pass filter
- Robust design, high shocks survivability
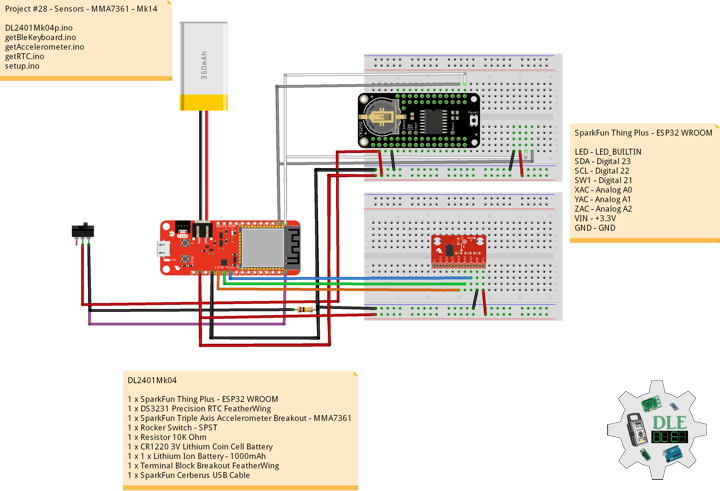
DL2401Mk04
1 x SparkFun Thing Plus – ESP32 WROOM
1 x DS3231 Precision RTC FeatherWing
1 x SparkFun Triple Axis Accelerometer Breakout – MMA7361
1 x Rocker Switch – SPST
1 x Resistor 10K Ohm
1 x CR1220 3V Lithium Coin Cell Battery
1 x 1 x Lithium Ion Battery – 1000mAh
1 x Terminal Block Breakout FeatherWing
1 x SparkFun Cerberus USB Cable
SparkFun Thing Plus – ESP32 WROOM
LED – LED_BUILTIN
SDA – Digital 23
SCL – Digital 22
SW1 – Digital 21
XAC – Analog A0
YAC – Analog A1
ZAC – Analog A2
VIN – +3.3V
GND – GND
——
DL2401Mk04p.ino
/****** Don Luc Electronics © ******
Software Version Information
Project #28 - Sensors - MMA7361 - Mk14
28-14
DL2401Mk04p.ino
1 x SparkFun Thing Plus - ESP32 WROOM
1 x DS3231 Precision RTC FeatherWing
1 x SparkFun Triple Axis Accelerometer Breakout - MMA7361
1 x Rocker Switch - SPST
1 x Resistor 10K Ohm
1 x Lithium Ion Battery - 1000mAh
1 x CR1220 3V Lithium Coin Cell Battery
1 x Terminal Block Breakout FeatherWing
1 x SparkFun Cerberus USB Cable
*/

// Include the Library Code
// Bluetooth LE keyboard
#include <BleKeyboard.h>
// Two Wire Interface (TWI/I2C)
#include <Wire.h>
// Serial Peripheral Interface
#include <SPI.h>
// DS3231 Precision RTC
#include <RTClib.h>

// Bluetooth LE Keyboard
BleKeyboard bleKeyboard;
String sKeyboard = "";
// Send Size
byte sendSize = 0;

// DS3231 Precision RTC
RTC_DS3231 rtc;
String dateRTC = "";
String timeRTC = "";

// Accelerometer MMA7361
int XAc = A0;
int YAc = A1;
int ZAc = A2;
// Read
int x = 0;
int y = 0;
int z = 0;

// The number of the Rocker Switch pin
int iSwitch = 21;
// Variable for reading the button status
int SwitchState = 0;

// Software Version Information
String sver = "28-14";

void loop() {

  // Date and Time RTC
  isRTC ();

  // Accelerometer MMA7361
  isMMA7361();

  // Read the state of the Switch value:
  SwitchState = digitalRead(iSwitch);

  // Check if the button is pressed. If it is, the SwitchState is HIGH:
  if (SwitchState == HIGH) {

    // Bluetooth LE Keyboard
    isBluetooth();

  }

  // Delay 1 Second
  delay(1000);

}
getAccelerometer.ino
// Accelerometer MMA7361
// isMMA7361
void isMMA7361(){

  // Accelerometer Read
  x = analogRead(XAc);
  y = analogRead(YAc);
  z = analogRead(ZAc);

  sKeyboard = sKeyboard + String(x) + "|" + String(y) + "|" + String(z) + "|*";

}
getBleKeyboard.ino
// Ble Keyboard
// Bluetooth
// isBluetooth
void isBluetooth() {

  // ESP32 BLE Keyboard
  if(bleKeyboard.isConnected()) {

    // Send Size Length
    sendSize = sKeyboard.length();

    // Send Size, charAt
    for(byte i = 0; i < sendSize+1; i++){

       // Write
       bleKeyboard.write(sKeyboard.charAt(i));
       delay(50);

    }
    bleKeyboard.write(KEY_RETURN);

  }

}
getRTC.ino
// Date & Time
// DS3231 Precision RTC
void isSetupRTC() {

  // DS3231 Precision RTC
  if (! rtc.begin()) {
    //Serial.println("Couldn't find RTC");
    //Serial.flush();
    while (1) delay(10);
  }

  if (rtc.lostPower()) {
    //Serial.println("RTC lost power, let's set the time!");
    // When time needs to be set on a new device, or after a power loss, the
    // following line sets the RTC to the date & time this sketch was compiled
    rtc.adjust(DateTime(F(__DATE__), F(__TIME__)));
    // This line sets the RTC with an explicit date & time, for example to set
    // January 21, 2014 at 3am you would call:
    //rtc.adjust(DateTime(2023, 8, 10, 11, 0, 0));
  }

}
// Date and Time RTC
void isRTC () {

  // Date and Time
  dateRTC = "";
  timeRTC = "";
  DateTime now = rtc.now();

  // Date
  dateRTC = now.year(), DEC;
  dateRTC = dateRTC + "/";
  dateRTC = dateRTC + now.month(), DEC;
  dateRTC = dateRTC + "/";
  dateRTC = dateRTC + now.day(), DEC;

  // Time
  timeRTC = now.hour(), DEC;
  timeRTC = timeRTC + ":";
  timeRTC = timeRTC + now.minute(), DEC;
  timeRTC = timeRTC + ":";
  timeRTC = timeRTC + now.second(), DEC;

  // bleKeyboard
  sKeyboard = "SEN|" + sver + "|" + String(dateRTC)
  + "|" + String(timeRTC) + "|";

}
setup.ino
// Setup
void setup()
{

  // Give display time to power on
  delay(100);

  // Bluetooth LE keyboard
  bleKeyboard.begin();

  // Wire - Inialize I2C Hardware
  Wire.begin();

  // Give display time to power on
  delay(100);

  // Date & Time RTC
  // DS3231 Precision RTC
  isSetupRTC();

  // Give display time to power on
  delay(100);

  // Initialize the Switch pin as an input
  pinMode(iSwitch, INPUT);

  // Initialize digital pin LED_BUILTIN as an output
  pinMode(LED_BUILTIN, OUTPUT);
  // Turn the LED on HIGH
  digitalWrite(LED_BUILTIN, HIGH);

  // Delay 5 Second
  delay( 5000 );

}
——
People can contact us: https://www.donluc.com/?page_id=1927
Teacher, Instructor, E-Mentor, R&D and Consulting
- Programming Language
- Single-Board Microcontrollers (PIC, Arduino, Raspberry Pi, Arm, Silicon Labs, Espressif, Etc…)
- IoT
- Wireless (Radio Frequency, Bluetooth, WiFi, Etc…)
- Robotics
- Automation
- Camera and Video Capture Receiver Stationary, Wheel/Tank and Underwater Vehicle
- Unmanned Vehicles Terrestrial and Marine
- Machine Learning
- Artificial Intelligence (AI)
- RTOS
- eHealth Sensors, Biosensor, and Biometric
- Research & Development (R & D)
- Consulting
Follow Us
Luc Paquin – Curriculum Vitae – 2024
https://www.donluc.com/luc/
Web: https://www.donluc.com/
Facebook: https://www.facebook.com/neosteam.labs.9/
YouTube: https://www.youtube.com/@thesass2063
Twitter: https://twitter.com/labs_steam
Pinterest: https://www.pinterest.com/NeoSteamLabs/
Instagram: https://www.instagram.com/neosteamlabs/
Don Luc
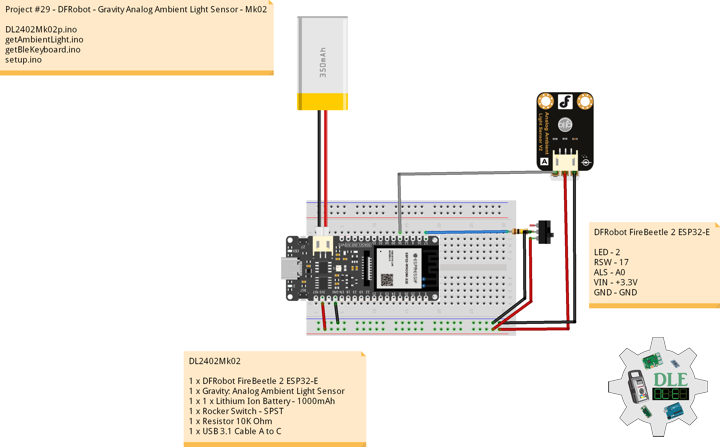
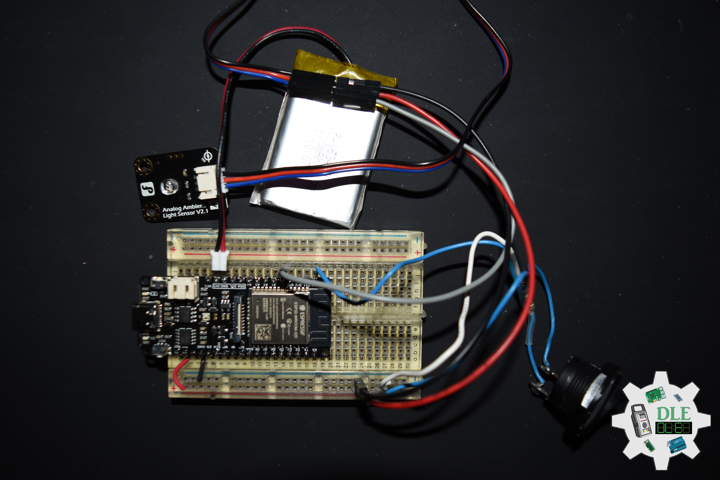
Project #29 – DFRobot – Gravity Analog Ambient Light Sensor – Mk02
——
#DonLucElectronics #DonLuc #DFRobot #AmbientLight #FireBeetle2ESP32E #ESP32 #IoT #Arduino #Project #Fritzing #Programming #Electronics #Microcontrollers #Consultant
——
——
——

——
Gravity: Analog Ambient Light Sensor
This Gravity: Analog ambient light sensor can assist you in detecting light density and provide an analog voltage signal to the controller as feedback. Additionally, you have the ability to trigger other components within your project by setting voltage thresholds. This ambient light sensor is operational within the voltage range of 3.3 to 5 volts.
DL2402Mk02
1 x DFRobot FireBeetle 2 ESP32-E
1 x Gravity: Analog Ambient Light Sensor
1 x 1 x Lithium Ion Battery – 1000mAh
1 x Rocker Switch – SPST
1 x Resistor 10K Ohm
1 x USB 3.1 Cable A to C
DFRobot FireBeetle 2 ESP32-E
LED – 2
RSW – 17
ALS – A0
VIN – +3.3V
GND – GND
——
DL2402Mk02p.ino
/****** Don Luc Electronics © ******
Software Version Information
Project #29 - DFRobot - FireBeetle 2 ESP32-E - Mk02
29-02
DL2402Mk02p.ino
1 x DFRobot FireBeetle 2 ESP32-E
1 x Gravity: Analog Ambient Light Sensor
1 x Rocker Switch - SPST
1 x Resistor 10K Ohm
1 x 1 x Lithium Ion Battery - 1000mAh
1 x USB 3.1 Cable A to C
*/

// Include the Library Code
// Bluetooth LE keyboard
#include <BleKeyboard.h>

// Bluetooth LE Keyboard
BleKeyboard bleKeyboard;
String sKeyboard = "";
// Send Size
byte sendSize = 0;

// Gravity: Analog Ambient Light Sensor
int iAmbientLight = A0;
int iAmbientLightVal = 0;

// The number of the Rocker Switch pin
int iSwitch = 17;
// Variable for reading the button status
int SwitchState = 0;

// Define LED
int iLED = 2;

// Software Version Information
String sver = "29-02";

void loop() {

  // Gravity: Analog Ambient Light Sensor
  isAmbientLight();

  // Read the state of the Switch value:
  SwitchState = digitalRead(iSwitch);

  // Check if the button is pressed. If it is, the SwitchState is HIGH:
  if (SwitchState == HIGH) {

    // Bluetooth LE Keyboard
    isBluetooth();

  }

  // Delay 1 Second
  delay(1000);

}
getAmbientLight.ino
// Gravity: Analog Ambient Light Sensor
// Ambient Light
void isAmbientLight(){

  // Connect Ambient Light Sensor to Analog 0
  iAmbientLightVal = analogRead( iAmbientLight );

  // bleKeyboard
  // DFR|Version|Lux|*
  sKeyboard = "DFR|" + sver + "|" + String(iAmbientLightVal) + "|*";

}
getBleKeyboard.ino
// Ble Keyboard
// Bluetooth
// isBluetooth
void isBluetooth() {

  // ESP32 BLE Keyboard
  if(bleKeyboard.isConnected()) {

    // Send Size Length
    sendSize = sKeyboard.length();

    // Send Size, charAt
    for(byte i = 0; i < sendSize+1; i++){

       // Write
       bleKeyboard.write(sKeyboard.charAt(i));
       delay(50);

    }
    bleKeyboard.write(KEY_RETURN);

  }

}
setup.ino
// Setup
void setup()
{

  // Give display time to power on
  delay(100);

  // Bluetooth LE keyboard
  bleKeyboard.begin();

  // Give display time to power on
  delay(100);

  // Initialize the Switch pin as an input
  pinMode(iSwitch, INPUT);

  // Initialize digital pin iLED as an output
  pinMode(iLED, OUTPUT);
  // Outputting high, the LED turns on
  digitalWrite(iLED, HIGH);

  // Delay 5 Second
  delay( 5000 );

}
——
People can contact us: https://www.donluc.com/?page_id=1927
Teacher, Instructor, E-Mentor, R&D and Consulting
- Programming Language
- Single-Board Microcontrollers (PIC, Arduino, Raspberry Pi, Arm, Silicon Labs, Espressif, Etc…)
- IoT
- Wireless (Radio Frequency, Bluetooth, WiFi, Etc…)
- Robotics
- Automation
- Camera and Video Capture Receiver Stationary, Wheel/Tank and Underwater Vehicle
- Unmanned Vehicles Terrestrial and Marine
- Machine Learning
- Artificial Intelligence (AI)
- RTOS
- eHealth Sensors, Biosensor, and Biometric
- Research & Development (R & D)
- Consulting
Follow Us
Luc Paquin – Curriculum Vitae – 2024
https://www.donluc.com/luc/
Web: https://www.donluc.com/
Facebook: https://www.facebook.com/neosteam.labs.9/
YouTube: https://www.youtube.com/@thesass2063
Twitter: https://twitter.com/labs_steam
Pinterest: https://www.pinterest.com/NeoSteamLabs/
Instagram: https://www.instagram.com/neosteamlabs/
Don Luc
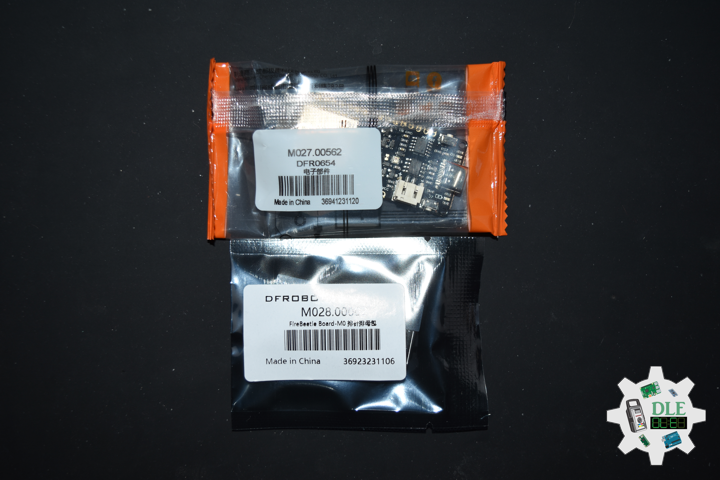
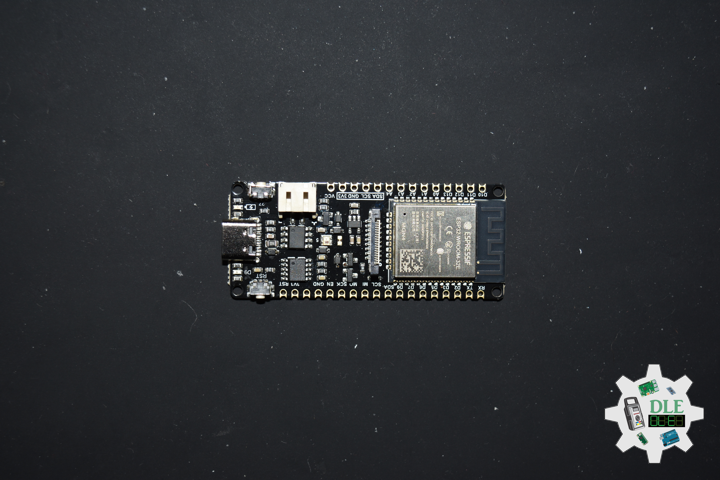
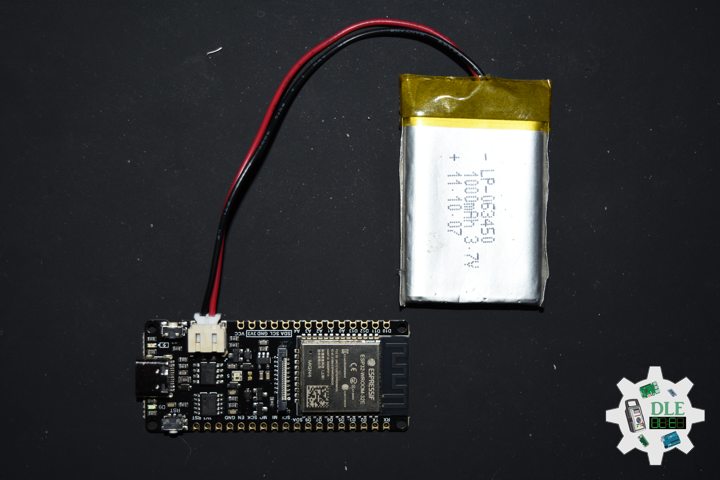
Project #29 – DFRobot – FireBeetle 2 ESP32-E – Mk01
——
#DonLucElectronics #DonLuc #DFRobot #FireBeetle2ESP32E #ESP32 #Arduino #Project #Fritzing #Programming #Electronics #Microcontrollers #Consultant
——

——

——
——
——
——
FireBeetle 2 ESP32-E
FireBeetle 2 ESP32-E, specially designed for IoT, is an ESP-WROOM-32E-based main controller board with dual-core chips. It supports WiFi and Bluetooth dual-mode communication and features a small size, ultra-low power consumption, on-board charging circuit, and easy-to-use interface, which can be conveniently used for smart home IoT, industrial IoT applications, and wearable devices, and so on. You can easily create your own IoT smart home system when connecting it with an IoT platform like IFTTT. FireBeetle 2 ESP32-E supports Arduino programming.
- Compatible with DFRobot FireBeetle V2 Series
- Small Size of 25.4 mm × 60 mm
- ESP32 Dual-core low power maincontroller, WiFi+BT4.0
- GDI Display Port, say to connect
- Onboard Charging Circuit and PH2.0 li-ion Battery Port
- Operating Voltage: 3.3 Volt
- Input Voltage: 3.3 Volt -5.5 Volt (Support USB Charging)
DL2402Mk01
1 x DFRobot FireBeetle 2 ESP32-E
1 x 1 x Lithium Ion Battery – 1000mAh
1 x USB 3.1 Cable A to C
DFRobot FireBeetle 2 ESP32-E
LED – 2
VIN – +3.3V
GND – GND
——
DL2402Mk01p.ino
/****** Don Luc Electronics © ******
Software Version Information
Project #29 - DFRobot - FireBeetle 2 ESP32-E - Mk01
29-01
DL2402Mk01p.ino
1 x DFRobot FireBeetle 2 ESP32-E
1 x 1 x Lithium Ion Battery - 1000mAh
1 x USB 3.1 Cable A to C
*/

// Include the Library Code

// Define LED
int iLED = 2;

// Software Version Information
String sver = "29-01";

void loop() {

  // Outputting high, the LED turns on
  digitalWrite(iLED, HIGH);
  // Delay 1 Second
  delay(1000);
  // Outputting low, the LED turns off
  digitalWrite(iLED, LOW);
  // Delay 1 Second
  delay(1000);

}
setup.ino
// Setup
void setup()
{

  // Initialize digital pin iLED as an output
  pinMode(iLED, OUTPUT);

  // Delay 5 Second
  delay( 5000 );

}
——
People can contact us: https://www.donluc.com/?page_id=1927
Teacher, Instructor, E-Mentor, R&D and Consulting
- Programming Language
- Single-Board Microcontrollers (PIC, Arduino, Raspberry Pi, Arm, Silicon Labs, Espressif, Etc…)
- IoT
- Wireless (Radio Frequency, Bluetooth, WiFi, Etc…)
- Robotics
- Automation
- Camera and Video Capture Receiver Stationary, Wheel/Tank and Underwater Vehicle
- Unmanned Vehicles Terrestrial and Marine
- Machine Learning
- Artificial Intelligence (AI)
- RTOS
- eHealth Sensors, Biosensor, and Biometric
- Research & Development (R & D)
- Consulting
Follow Us
Luc Paquin – Curriculum Vitae – 2024
https://www.donluc.com/luc/
Web: https://www.donluc.com/
Facebook: https://www.facebook.com/neosteam.labs.9/
YouTube: https://www.youtube.com/@thesass2063
Twitter: https://twitter.com/labs_steam
Pinterest: https://www.pinterest.com/NeoSteamLabs/
Instagram: https://www.instagram.com/neosteamlabs/
Don Luc