
——
#DonLucElectronics #DonLuc #RadioFrequency #Moteino #Receive #Arduino #Project #Fritzing #Programming #Electronics #Microcontrollers #Consultant
——
——
——
——
Radio Receiver
In radio communications, a radio receiver, also known as a receiver, a wireless, or simply a radio, is an electronic device that receives radio waves and converts the information carried by them to a usable form. It is used with an antenna. The antenna intercepts radio waves and converts them to tiny alternating currents which are applied to the receiver, and the receiver extracts the desired information. The receiver uses electronic filters to separate the desired radio frequency signal from all the other signals picked up by the antenna, an electronic amplifier to increase the power of the signal for further processing, and finally recovers the desired information through demodulation.
Full Duplex
A simple illustration of a full-duplex communication system. Full-duplex is not common in handheld radios as shown here due to the cost and complexity of common duplexing methods, but is used in telephones, cellphones and cordless phones. A full-duplex (FDX) system allows communication in both directions, and, unlike half-duplex, allows this to happen simultaneously.
Land-line telephone networks are full-duplex since they allow both callers to speak and be heard at the same time. Full-duplex operation is achieved on a two-wire circuit through the use of a hybrid coil in a telephone hybrid. Modern cell phones are also full-duplex.
There is a technical distinction between full-duplex communication, which uses a single physical communication channel for both directions simultaneously, and dual-simplex communication which uses two distinct channels, one for each direction. From the user perspective, the technical difference doesn’t matter and both variants are commonly referred to as full duplex.
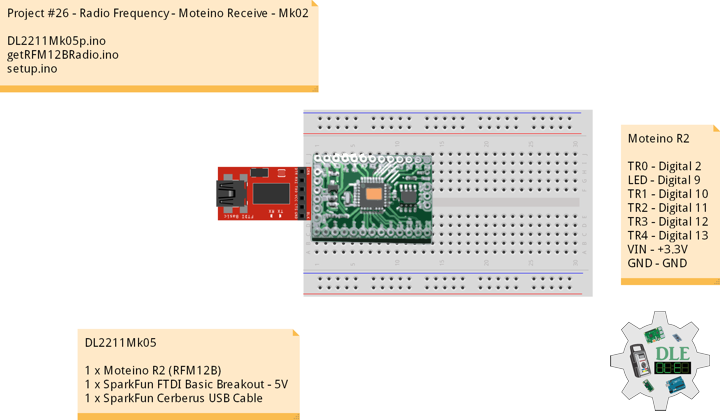
DL2211Mk05
1 x Moteino R2 (RFM12B)
1 x SparkFun FTDI Basic Breakout – 5V
1 x SparkFun Cerberus USB Cable
Moteino R2
TR0 – Digital 2
LED – Digital 9
TR1 – Digital 10
TR2 – Digital 11
TR3 – Digital 12
TR4 – Digital 13
VIN – +3.3V
GND – GND
——
DL2211Mk05p.ino
/* ***** Don Luc Electronics © *****
Software Version Information
Project #26 - Radio Frequency - Moteino Receive - Mk02
26-02
DL2211Mk05p.ino
1 x Moteino R2 (RFM12B)
1 x SparkFun FTDI Basic Breakout - 5V
1 x SparkFun Cerberus USB Cable
*/

// Include the Library Code
// RFM12B Radio
#include <RFM12B.h>

// You will need to initialize the radio by telling it what ID
// it has and what network it's on
// The NodeID takes values from 1-127, 0 is reserved for sending
// broadcast messages (send to all nodes)
// The Network ID takes values from 0-255
// By default the SPI-SS line used is D10 on Atmega328.
// You can change it by calling .SetCS(pin) where pin can be {8,9,10}
// Network ID used for this unit
#define NODEID        1
// The network ID we are on
#define NETWORKID    99
// Serial
#define SERIAL_BAUD  115200

// Encryption is OPTIONAL
// to enable encryption you will need to:
// - provide a 16-byte encryption KEY (same on all nodes that talk encrypted)
// - to call .Encrypt(KEY) to start encrypting
// - to stop encrypting call .Encrypt(NULL)
uint8_t KEY[] = "ABCDABCDABCDABCD";

// Need an instance of the RFM12B Radio Module
RFM12B radio;

// LED
int iLED = 9;

// Software Version Information
String sver = "26-02";

void loop() {

  // is RFM12B Radio
  isRFM12BRadio();

}
getRFM12BRadio.ino
// RFM12B Radio
void isSetupRFM12BRadio()
{

  // RFM12B Radio
  radio.Initialize(NODEID, RF12_433MHZ, NETWORKID);
  // Encryption
  radio.Encrypt(KEY);
  // Transmitting
  Serial.println("Listening...");

}
// is RFM12 BRadio
void isRFM12BRadio()
{

  // Receive
  if (radio.ReceiveComplete())
  {

    // CRC Pass
    if (radio.CRCPass())
    {

      // Serial
      Serial.print('[');
      Serial.print(radio.GetSender());
      Serial.print("] ");
      // Can also use radio.GetDataLen() if you don't like pointers
      for (byte i = 0; i < *radio.DataLen; i++)
      {

        Serial.print((char)radio.Data[i]);

      }

      // Turn the LED on HIGH
      digitalWrite( iLED , HIGH);

      // ACK Requested
      if (radio.ACKRequested())
      {

        // Send ACK
        radio.SendACK();
        Serial.print(" - ACK Sent");

      }

      // Turn the LED on LOW
      digitalWrite( iLED , LOW);

    }
    else
    {

      // BAD-CRC
      Serial.print("BAD-CRC");

    }

    // Serial
    Serial.println();

  }

}
setup.ino
// Setup
void setup()
{

  // Serial
  Serial.begin(SERIAL_BAUD);

  // LED
  pinMode( iLED , OUTPUT);

  // RFM12B Radio
  isSetupRFM12BRadio();

}
——
People can contact us: https://www.donluc.com/?page_id=1927
Technology Experience
- Single-Board Microcontrollers (PIC, Arduino, Raspberry Pi,Espressif, etc…)
- IoT
- Wireless (Radio Frequency, Bluetooth, WiFi, Etc…)
- Robotics
- Camera and Video Capture Receiver Stationary, Wheel/Tank and Underwater Vehicle
- Unmanned Vehicles Terrestrial and Marine
- Machine Learning
- RTOS
- Research & Development (R & D)
Instructor, E-Mentor, STEAM, and Arts-Based Training
- IoT
- PIC Microcontrollers
- Arduino
- Raspberry Pi
- Espressif
- Robotics
Follow Us
Luc Paquin – Curriculum Vitae – 2023
https://www.donluc.com/luc/
Web: https://www.donluc.com/
Facebook: https://www.facebook.com/neosteam.labs.9/
YouTube: https://www.youtube.com/channel/UC5eRjrGn1CqkkGfZy0jxEdA
Twitter: https://twitter.com/labs_steam
Pinterest: https://www.pinterest.com/NeoSteamLabs/
Instagram: https://www.instagram.com/neosteamlabs/
Don Luc