Bluetooth
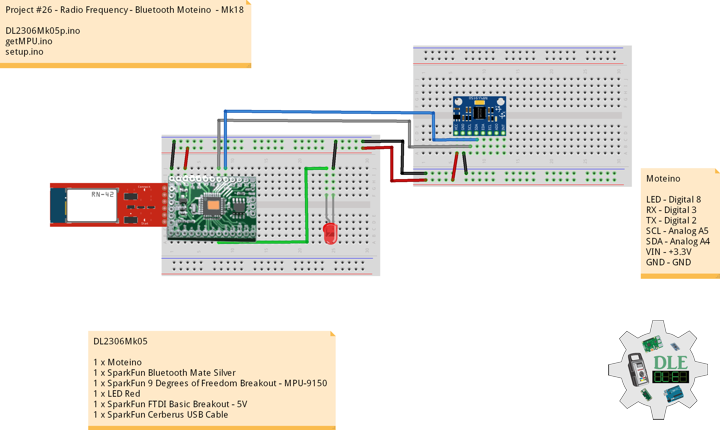
Project #26 – Radio Frequency – Bluetooth Moteino – Mk18
——
#DonLucElectronics #DonLuc #RadioFrequency #Bluetooth #Accelerometer #Magnetometer #Gyroscope #Arduino #Project #Fritzing #Programming #Electronics #Microcontrollers #Consultant
——
——
——
——
Moteino
Moteino began as a low power wireless Arduino compatible development platform based on the popular ATmega328p chip used in the Arduino UNO. Moteinos are compatible and can communicate with any other Arduino or development platform that uses the popular HopeRF RFM69 or LoRa transceivers, or even the older RFM12B. Moteino also comes with an optional SPI flash memory chip for wireless programming, or data logging. Moteino was designed to be a compact, highly customizable and affordable development platform, suitable for IoT, home automation and long range wireless projects.
Moteino in RFM12B to rebuild suggests doing as new without completely replacing. I decided to stripped down at RFM12B and rebuild in Bluetooth.
DL2306Mk05
1 x Moteino
1 x SparkFun Bluetooth Mate Silver
1 x SparkFun 9 Degrees of Freedom Breakout – MPU-9150
1 x LED Red
1 x SparkFun FTDI Basic Breakout – 5V
1 x SparkFun Cerberus USB Cable
Moteino
LED – Digital 8
RX – Digital 3
TX – Digital 2
SDA – Analog A4
SCL – Analog A5
VIN – +3.3V
GND – GND
——
DL2306Mk05p.ino
/* ***** Don Luc Electronics © *****
Software Version Information
Project #26 - Radio Frequency - Bluetooth Moteino - Mk18
26-18
DL2306Mk05p.ino
1 x Moteino
1 x SparkFun Bluetooth Mate Silver
1 x SparkFun 9 Degrees of Freedom Breakout - MPU-9150
1 x LED Red
1 x SparkFun FTDI Basic Breakout - 5V
1 x SparkFun Cerberus USB Cable
*/

// Include the Library Code
// Software Serial
#include <SoftwareSerial.h>
// Two Wire Interface (TWI/I2C)
#include <Wire.h>
// I2CDev I2C utilities
#include "I2Cdev.h"
// MPU9150Lib 9-axis fusion
#include "MPU9150Lib.h"
// CalLib magnetometer and accelerometer calibration
#include "CalLib.h"
// Motion Driver InvenSense Embedded SDK v5.1
#include <dmpKey.h>
#include <dmpmap.h>
#include <inv_mpu.h>
#include <inv_mpu_dmp_motion_driver.h>
// EEPROM Magnetometer and Accelerometer data is stored
#include <EEPROM.h>

// the MPU object
MPU9150Lib MPU;
//  MPU_UPDATE_RATE defines the rate (in Hz)
// at which the MPU updates the sensor data and DMP output
#define MPU_UPDATE_RATE  (20)
//  MAG_UPDATE_RATE defines the rate (in Hz) at which the
// MPU updates the magnetometer data
//  MAG_UPDATE_RATE should be less than or equal to the MPU_UPDATE_RATE
#define MAG_UPDATE_RATE  (10)
//  MPU_MAG_MIX defines the influence that the magnetometer has on the yaw output.
//  The magnetometer itself is quite noisy so some mixing with the gyro yaw can help
//  significantly. Some example values are defined below:
// Just use gyro yaw
#define  MPU_MAG_MIX_GYRO_ONLY          0
// Just use magnetometer and no gyro yaw
#define  MPU_MAG_MIX_MAG_ONLY           1
// A good mix value
#define  MPU_MAG_MIX_GYRO_AND_MAG       10
// mainly gyros with a bit of mag correction
#define  MPU_MAG_MIX_GYRO_AND_SOME_MAG  50
//  MPU_LPF_RATE is the low pas filter rate and can be between 5 and 188Hz
#define MPU_LPF_RATE   5

// This is our earth frame gravity vector - quaternions and vectors
MPUQuaternion gravity;

// Quaternion Result
float Quaternion_X = 0.0;
float Quaternion_Y = 0.0;
float Quaternion_Z = 0.0;

//  SERIAL_PORT_SPEED defines the speed to use for the debug serial port
#define  SERIAL_PORT_SPEED  115200

// Software Serial
// TX-O pin of bluetooth mate, Arduino D2
int bluetoothTx = 2;
// RX-I pin of bluetooth mate, Arduino D3
int bluetoothRx = 3;
// Bluetooth
SoftwareSerial bluetooth(bluetoothTx, bluetoothRx);
// BTA
String BTA = "0006664FAE18";

// LED Red
int iLedRed = 8;

// Variable to calculate frequency
unsigned long curr = 0;
unsigned long last = 0;
unsigned long freq;

// Software Version Information
String sver = "26-18";

void loop() {

  // MPU
  isMPU();

}
getMPU.ino
// MPU
// Setup MPU
void isSetupMPU() {

  // MPU
  MPU.init(MPU_UPDATE_RATE, MPU_MAG_MIX_GYRO_AND_MAG, MAG_UPDATE_RATE, MPU_LPF_RATE);     // start the MPU

  // Set up the initial gravity vector for quaternion rotation
  // Max value down the z axis
  gravity[QUAT_W] = 0;
  gravity[QUAT_X] = 0;
  gravity[QUAT_Y] = 0;
  gravity[QUAT_Z] = SENSOR_RANGE;

}
// MPU
void isMPU() {

  // Quaternion
  // This is our body frame gravity vector
  MPUQuaternion rotatedGravity;
  // This is the conjugate of the fused quaternion
  MPUQuaternion fusedConjugate;
  // Used in the rotation
  MPUQuaternion qTemp;
  // The accelerations
  MPUVector3 result;

  // Get the latest data
  if (MPU.read()) {

    // Need this for the rotation
    MPUQuaternionConjugate(MPU.m_fusedQuaternion, fusedConjugate);

    // Rotate the gravity vector into the body frame
    MPUQuaternionMultiply(gravity, MPU.m_fusedQuaternion, qTemp);
    MPUQuaternionMultiply(fusedConjugate, qTemp, rotatedGravity);

    // Now subtract rotated gravity from the body accels to get real accelerations.
    // Note that signs are reversed to get +ve acceleration results
    // in the conventional axes.
    // Quaternion Result
    Quaternion_X = -(MPU.m_calAccel[VEC3_X] - rotatedGravity[QUAT_X]);
    Quaternion_Y = -(MPU.m_calAccel[VEC3_Y] - rotatedGravity[QUAT_Y]);
    Quaternion_Z = -(MPU.m_calAccel[VEC3_Z] - rotatedGravity[QUAT_Z]);

    // Variable to calculate frequency
    curr = micros();
    freq = curr - last;
    last = curr;
    // Bluetooth
    Serial.print( "Blue|" + BTA + "|" );
    Serial.print( Quaternion_X );
    Serial.print( "|" );
    Serial.print( Quaternion_Y );
    Serial.print( "|" );
    Serial.print( Quaternion_Z );
    Serial.print( "|" );
    Serial.print( freq );
    Serial.println( "|*" );
    // Send any characters the Serial monitor prints to the bluetooth
    bluetooth.print((char)Serial.read());

  }

}
setup.ino
// Setup
void setup()
{

  // Serial
  Serial.begin(SERIAL_PORT_SPEED);

  // Bluetooth
  // The Bluetooth Mate defaults to 115200bps
  bluetooth.begin(115200);

  // LED Red
  pinMode(iLedRed, OUTPUT);
  digitalWrite(iLedRed, HIGH);

  // Give display time to power on
  delay(100);

  // Wire communicate with I2C / TWI devices
  Wire.begin();

  // Pause
  delay(50);

  // Setup MPU
  isSetupMPU();

}
——
People can contact us: https://www.donluc.com/?page_id=1927
Technology Experience
- Programming Language
- Single-Board Microcontrollers (PIC, Arduino, Raspberry Pi,Espressif, etc…)
- IoT
- Wireless (Radio Frequency, Bluetooth, WiFi, Etc…)
- Robotics
- Camera and Video Capture Receiver Stationary, Wheel/Tank and Underwater Vehicle
- Unmanned Vehicles Terrestrial and Marine
- Machine Learning
- RTOS
- Research & Development (R & D)
Instructor, E-Mentor, STEAM, and Arts-Based Training
- Programming Language
- IoT
- PIC Microcontrollers
- Arduino
- Raspberry Pi
- Espressif
- Robotics
Follow Us
Luc Paquin – Curriculum Vitae – 2023
https://www.donluc.com/luc/
Web: https://www.donluc.com/
Facebook: https://www.facebook.com/neosteam.labs.9/
YouTube: https://www.youtube.com/@thesass2063
Twitter: https://twitter.com/labs_steam
Pinterest: https://www.pinterest.com/NeoSteamLabs/
Instagram: https://www.instagram.com/neosteamlabs/
Don Luc
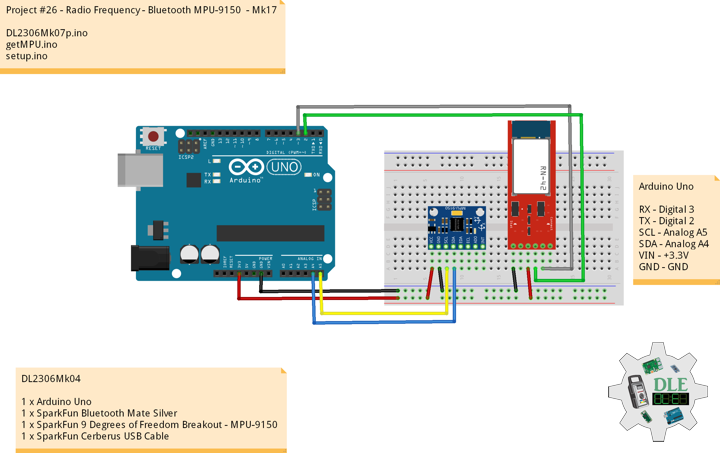
Project #26 – Radio Frequency – Bluetooth MPU-9150 – Mk17
——
#DonLucElectronics #DonLuc #RadioFrequency #Bluetooth #Accelerometer #Magnetometer #Gyroscope #Arduino #Project #Fritzing #Programming #Electronics #Microcontrollers #Consultant
——
——
——
——
MPU-9150
MotionInterface is becoming a “Must-Have” function being adopted by smartphone and tablet manufacturers due to the enormous value it adds to the end user experience. In smartphones, it finds use in applications such as gesture commands for applications and phone control, enhanced gaming, augmented reality, panoramic photo capture and viewing, and pedestrian and vehicle navigation. With its ability to precisely and accurately track user motions, MotionTracking technology can convert handsets and tablets into powerful 3D intelligent devices that can be used in applications ranging from health and fitness monitoring to location-based services. Key requirements for MotionInterface enabled devices are small package size, low power consumption, high accuracy and repeatability, high shock tolerance, and application specific performance programmability, all at a low consumer price point.
DL2306Mk04
1 x Arduino Uno
1 x SparkFun Bluetooth Mate Silver
1 x SparkFun 9 Degrees of Freedom Breakout – MPU-9150
1 x SparkFun Cerberus USB Cable
Arduino Uno
RX – Digital 3
TX – Digital 2
SDA – Analog A4
SCL – Analog A5
VIN – +3.3V
GND – GND
——
DL2306Mk04p.ino
/* ***** Don Luc Electronics © *****
Software Version Information
Project #26 - Radio Frequency - Bluetooth MPU-9150 - Mk17
26-17
DL2306Mk07p.ino
1 x Arduino Uno
1 x SparkFun Bluetooth Mate Silver
1 x SparkFun 9 Degrees of Freedom Breakout - MPU-9150
1 x SparkFun Cerberus USB Cable
*/

// Include the Library Code
// Software Serial
#include <SoftwareSerial.h>
// Two Wire Interface (TWI/I2C)
#include <Wire.h>
// I2CDev I2C utilities
#include "I2Cdev.h"
// MPU9150Lib 9-axis fusion
#include "MPU9150Lib.h"
// CalLib magnetometer and accelerometer calibration
#include "CalLib.h"
// Motion Driver InvenSense Embedded SDK v5.1
#include <dmpKey.h>
#include <dmpmap.h>
#include <inv_mpu.h>
#include <inv_mpu_dmp_motion_driver.h>
// EEPROM Magnetometer and Accelerometer data is stored
#include <EEPROM.h>

// the MPU object
MPU9150Lib MPU;
//  MPU_UPDATE_RATE defines the rate (in Hz)
// at which the MPU updates the sensor data and DMP output
#define MPU_UPDATE_RATE  (20)
//  MAG_UPDATE_RATE defines the rate (in Hz) at which the
// MPU updates the magnetometer data
//  MAG_UPDATE_RATE should be less than or equal to the MPU_UPDATE_RATE
#define MAG_UPDATE_RATE  (10)
//  MPU_MAG_MIX defines the influence that the magnetometer has on the yaw output.
//  The magnetometer itself is quite noisy so some mixing with the gyro yaw can help
//  significantly. Some example values are defined below:
// Just use gyro yaw
#define  MPU_MAG_MIX_GYRO_ONLY          0
// Just use magnetometer and no gyro yaw
#define  MPU_MAG_MIX_MAG_ONLY           1
// A good mix value
#define  MPU_MAG_MIX_GYRO_AND_MAG       10
// mainly gyros with a bit of mag correction
#define  MPU_MAG_MIX_GYRO_AND_SOME_MAG  50
//  MPU_LPF_RATE is the low pas filter rate and can be between 5 and 188Hz
#define MPU_LPF_RATE   5

// This is our earth frame gravity vector - quaternions and vectors
MPUQuaternion gravity;

// Quaternion Result
float Quaternion_X = 0.0;
float Quaternion_Y = 0.0;
float Quaternion_Z = 0.0;

//  SERIAL_PORT_SPEED defines the speed to use for the debug serial port
#define  SERIAL_PORT_SPEED  115200

// Software Serial
// TX-O pin of bluetooth mate, Arduino D2
int bluetoothTx = 2;
// RX-I pin of bluetooth mate, Arduino D3
int bluetoothRx = 3;
// Bluetooth
SoftwareSerial bluetooth(bluetoothTx, bluetoothRx);
// BTA
String BTA = "0006664FDC9E";

// Variable to calculate frequency
unsigned long curr = 0;
unsigned long last = 0;
unsigned long freq;

// Software Version Information
String sver = "26-17";

void loop() {

  // MPU
  isMPU();

}
getMPU.ino
// MPU
// Setup MPU
void isSetupMPU() {

  // MPU
  MPU.init(MPU_UPDATE_RATE, MPU_MAG_MIX_GYRO_AND_MAG, MAG_UPDATE_RATE, MPU_LPF_RATE);     // start the MPU

  // Set up the initial gravity vector for quaternion rotation
  // Max value down the z axis
  gravity[QUAT_W] = 0;
  gravity[QUAT_X] = 0;
  gravity[QUAT_Y] = 0;
  gravity[QUAT_Z] = SENSOR_RANGE;

}
// MPU
void isMPU() {

  // Quaternion
  // This is our body frame gravity vector
  MPUQuaternion rotatedGravity;
  // This is the conjugate of the fused quaternion
  MPUQuaternion fusedConjugate;
  // Used in the rotation
  MPUQuaternion qTemp;
  // The accelerations
  MPUVector3 result;

  // Get the latest data
  if (MPU.read()) {

    // Need this for the rotation
    MPUQuaternionConjugate(MPU.m_fusedQuaternion, fusedConjugate);

    // Rotate the gravity vector into the body frame
    MPUQuaternionMultiply(gravity, MPU.m_fusedQuaternion, qTemp);
    MPUQuaternionMultiply(fusedConjugate, qTemp, rotatedGravity);

    // Now subtract rotated gravity from the body accels to get real accelerations.
    // Note that signs are reversed to get +ve acceleration results
    // in the conventional axes.
    // Quaternion Result
    Quaternion_X = -(MPU.m_calAccel[VEC3_X] - rotatedGravity[QUAT_X]);
    Quaternion_Y = -(MPU.m_calAccel[VEC3_Y] - rotatedGravity[QUAT_Y]);
    Quaternion_Z = -(MPU.m_calAccel[VEC3_Z] - rotatedGravity[QUAT_Z]);

    // Variable to calculate frequency
    curr = micros();
    freq = curr - last;
    last = curr;
    // Bluetooth
    Serial.print( "Blue|" + BTA + "|" );
    Serial.print( Quaternion_X );
    Serial.print( "|" );
    Serial.print( Quaternion_Y );
    Serial.print( "|" );
    Serial.print( Quaternion_Z );
    Serial.print( "|" );
    Serial.print( freq );
    Serial.println( "|*" );
    // Send any characters the Serial monitor prints to the bluetooth
    bluetooth.print((char)Serial.read());

  }

}
setup.ino
// Setup
void setup()
{

  // Serial
  Serial.begin(SERIAL_PORT_SPEED);

  // Bluetooth
  // The Bluetooth Mate defaults to 115200bps
  bluetooth.begin(115200);

  // Give display time to power on
  delay(100);

  // Wire communicate with I2C / TWI devices
  Wire.begin();

  // Pause
  delay(50);

  // Setup MPU
  isSetupMPU();

}
——
People can contact us: https://www.donluc.com/?page_id=1927
Technology Experience
- Programming Language
- Single-Board Microcontrollers (PIC, Arduino, Raspberry Pi,Espressif, etc…)
- IoT
- Wireless (Radio Frequency, Bluetooth, WiFi, Etc…)
- Robotics
- Camera and Video Capture Receiver Stationary, Wheel/Tank and Underwater Vehicle
- Unmanned Vehicles Terrestrial and Marine
- Machine Learning
- RTOS
- Research & Development (R & D)
Instructor, E-Mentor, STEAM, and Arts-Based Training
- Programming Language
- IoT
- PIC Microcontrollers
- Arduino
- Raspberry Pi
- Espressif
- Robotics
Follow Us
Luc Paquin – Curriculum Vitae – 2023
https://www.donluc.com/luc/
Web: https://www.donluc.com/
Facebook: https://www.facebook.com/neosteam.labs.9/
YouTube: https://www.youtube.com/@thesass2063
Twitter: https://twitter.com/labs_steam
Pinterest: https://www.pinterest.com/NeoSteamLabs/
Instagram: https://www.instagram.com/neosteamlabs/
Don Luc
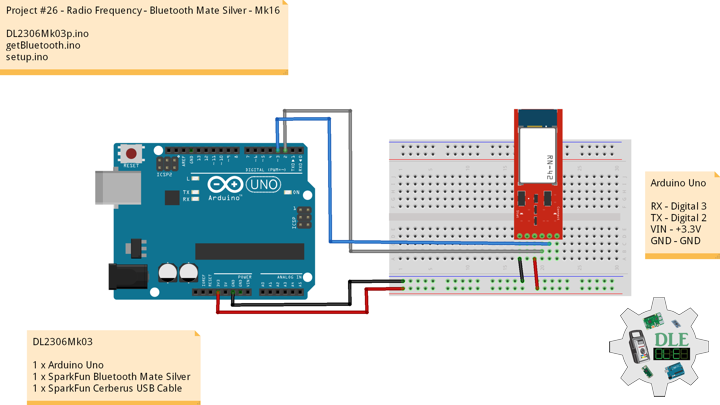
Project #26 – Radio Frequency – Bluetooth Mate Silver – Mk16
——
#DonLucElectronics #DonLuc #RadioFrequency #Bluetooth #Arduino #Project #Fritzing #Programming #Electronics #Microcontrollers #Consultant
——
——
——
——
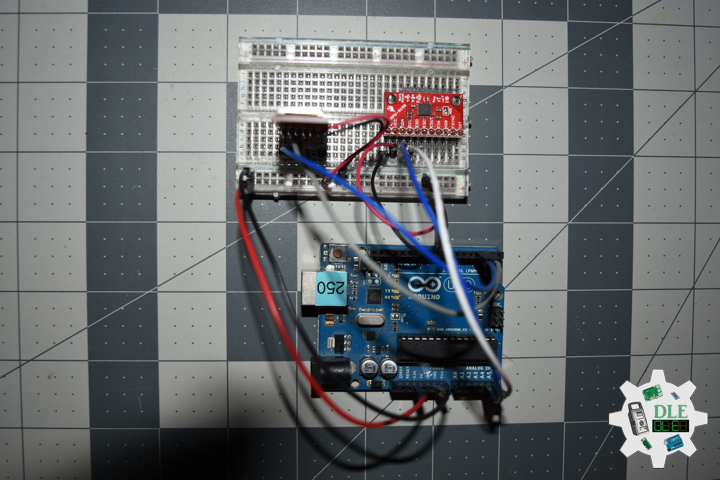
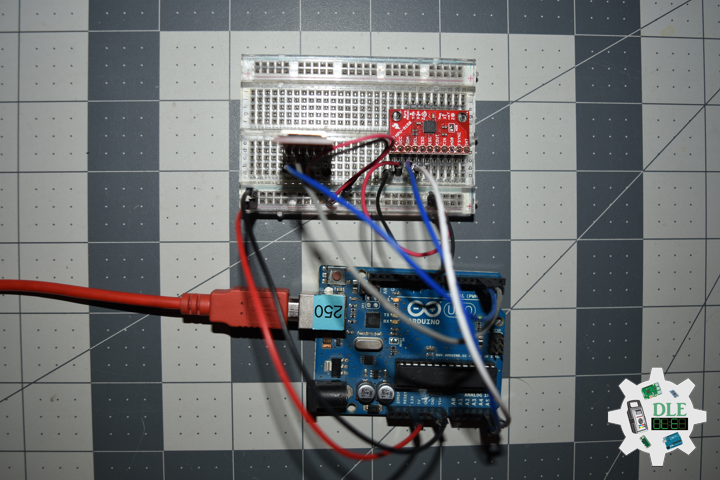
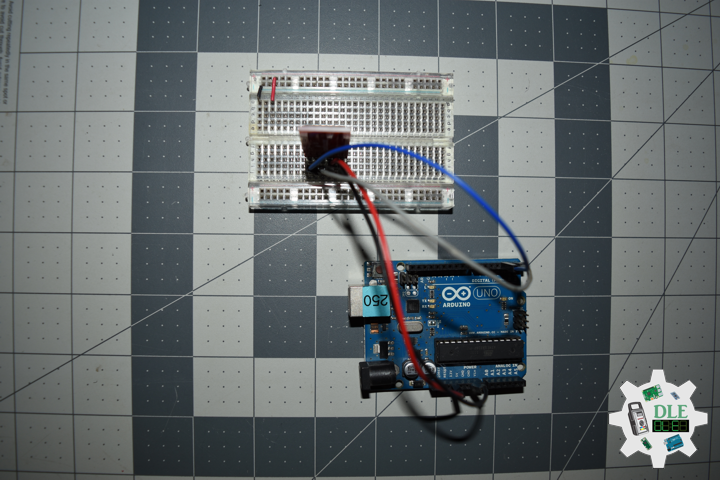
SparkFun Bluetooth Mate Silver
The Bluetooth Mate is very similar to our BlueSMiRF modem, but it is designed specifically to be used with our Arduino Pros and LilyPad Arduinos. These modems work as a serial (RX/TX) pipe, and are a great wireless replacement for serial cables. Any serial stream from 2400 to 115200bps can be passed seamlessly from your computer to your target.
Bluetooth Mate has the same pin out as the FTDI Basic, and is meant to plug directly into an Arduino Pro, Pro Mini, or LilyPad Mainboard. Because we’ve arranged the pins to do this, you cannot directly plug the Bluetooth Mate to an FTDI Basic board.
The RN-42 is perfect for short range, battery powered applications. The RN-42 uses only 26uA in sleep mode while still being discoverable and connectable. Multiple user configurable power modes allow the user to dial in the lowest power profile for a given application. The Bluetooth Mate has on-board voltage regulators, so it can be powered from any 3.3 to 6VDC power supply. We’ve got level shifting all set up so the RX and TX pins on the remote unit are 3-6VDC tolerant.
DL2306Mk03
1 x Arduino Uno
1 x SparkFun Bluetooth Mate Silver
1 x SparkFun Cerberus USB Cable
Arduino Uno
RX – Digital 3
TX – Digital 2
VIN – +3.3V
GND – GND
——
DL2306Mk03p.ino
/* ***** Don Luc Electronics © *****
Software Version Information
Project #26 - Radio Frequency - Bluetooth Mate Silver - Mk16
26-16
DL2306Mk03p.ino
1 x Arduino Uno
1 x SparkFun Bluetooth Mate Silver
1 x SparkFun Cerberus USB Cable
*/

// Include the Library Code
// Software Serial
#include <SoftwareSerial.h>

// Software Serial
// TX-O pin of bluetooth mate, Arduino D2
int bluetoothTx = 2;
// RX-I pin of bluetooth mate, Arduino D3
int bluetoothRx = 3;
// Bluetooth
SoftwareSerial bluetooth(bluetoothTx, bluetoothRx);
// BTA
//String BTA = "0006664FDC9E";

// Software Version Information
String sver = "26-16";

void loop() {

  // isBluetooth
  isBluetooth();

}
getBluetooth.ino
// Bluetooth
// Setup Bluetooth
void isSetupBluetooth(){

  // Setup Bluetooth
  // Begin the serial monitor at 9600bps
  Serial.begin(9600);
  // Bluetooth
  // The Bluetooth Mate defaults to 115200bps
  bluetooth.begin(115200);
  // Print three times individually
  bluetooth.print("$");
  bluetooth.print("$");
  bluetooth.print("$");
  // Enter command mode
  // Short delay, wait for the Mate to send back CMD
  delay(100);
  // Temporarily Change the baudrate to 9600, no parity
  bluetooth.println("U,9600,N");
  // 115200 can be too fast at times for NewSoftSerial to relay the data reliably
  // Start bluetooth serial at 9600
  bluetooth.begin(9600);

}
// isBluetooth
void isBluetooth() {

  // If the bluetooth sent any characters
  if(bluetooth.available())
  {

    // Send any characters the bluetooth prints to the serial monitor
    Serial.print((char)bluetooth.read());

  }
  // If stuff was typed in the serial monitor
  if(Serial.available())
  {

    // Send any characters the Serial monitor prints to the bluetooth
    bluetooth.print((char)Serial.read());

  }

}
setup.ino
// Setup
void setup()
{

  // Setup Bluetooth
  isSetupBluetooth();

}
——
People can contact us: https://www.donluc.com/?page_id=1927
Technology Experience
- Programming Language
- Single-Board Microcontrollers (PIC, Arduino, Raspberry Pi,Espressif, etc…)
- IoT
- Wireless (Radio Frequency, Bluetooth, WiFi, Etc…)
- Robotics
- Camera and Video Capture Receiver Stationary, Wheel/Tank and Underwater Vehicle
- Unmanned Vehicles Terrestrial and Marine
- Machine Learning
- RTOS
- Research & Development (R & D)
Instructor, E-Mentor, STEAM, and Arts-Based Training
- Programming Language
- IoT
- PIC Microcontrollers
- Arduino
- Raspberry Pi
- Espressif
- Robotics
Follow Us
Luc Paquin – Curriculum Vitae – 2023
https://www.donluc.com/luc/
Web: https://www.donluc.com/
Facebook: https://www.facebook.com/neosteam.labs.9/
YouTube: https://www.youtube.com/@thesass2063
Twitter: https://twitter.com/labs_steam
Pinterest: https://www.pinterest.com/NeoSteamLabs/
Instagram: https://www.instagram.com/neosteamlabs/
Don Luc
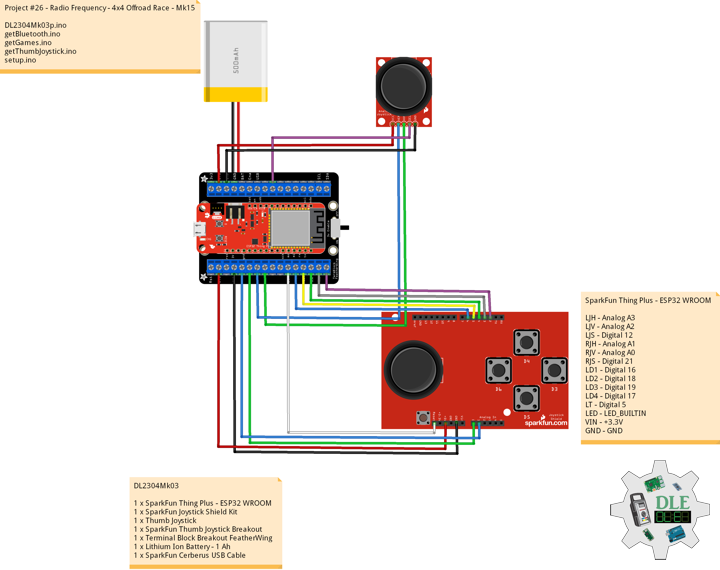
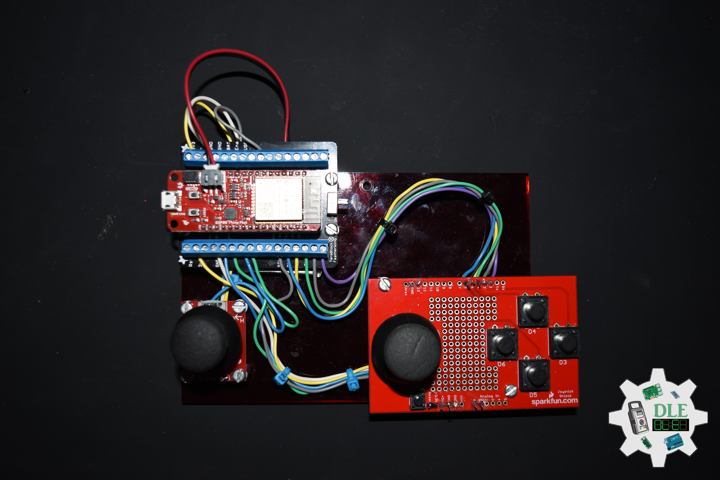
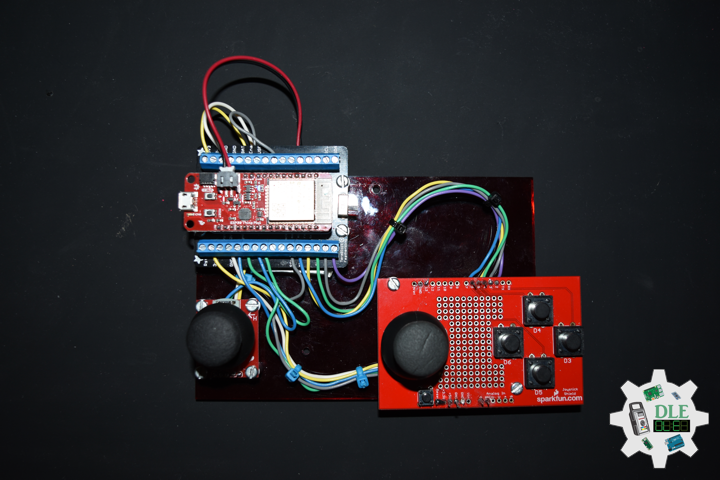
Project #26 – Radio Frequency – 4×4 Offroad Race – Mk15
——
#DonLucElectronics #DonLuc #RadioFrequency #Bluetooth #Games #Gamepad #ESP32 #Arduino #Project #Fritzing #Programming #Electronics #Microcontrollers #Consultant
——
——
——
——
4×4 Offroad Race
3D off-road racing game. Powerful off-road vehicles, trails and routes running on dirt roads, extreme weather conditions and violent opponents, all that we call 4×4 Offroad Race. You will be able to experience the most powerful four-wheel drive vehicles. You have to overcome terrible roads, do jumps over bumps and potholes and knock opponents off the track to win all the races.
DL2304Mk03
1 x SparkFun Thing Plus – ESP32 WROOM
1 x SparkFun Joystick Shield Kit
1 x Thumb Joystick
1 x SparkFun Thumb Joystick Breakout
1 x Terminal Block Breakout FeatherWing
1 x Lithium Ion Battery – 1 Ah
1 x SparkFun Cerberus USB Cable
SparkFun Thing Plus – ESP32 WROOM
LJH – Analog A3
LJV – Analog A2
LJS – Digital 12
RJH – Analog A1
RJV – Analog A0
RJS – Digital 21
LD1 – Digital 16
LD2 – Digital 18
LD3 – Digital 19
LD4 – Digital 17
LT – Digital 5
LED – LED_BUILTIN
VIN – +3.3V
GND – GND
——
DL2304Mk03p.ino
/* ***** Don Luc Electronics © *****
Software Version Information
Project #26 - Radio Frequency - 4x4 Offroad Race - Mk15
26-15
DL2304Mk03p.ino
1 x SparkFun Thing Plus - ESP32 WROOM
1 x SparkFun Joystick Shield Kit
1 x Thumb Joystick
1 x SparkFun Thumb Joystick Breakout
1 x Terminal Block Breakout FeatherWing
1 x Lithium Ion Battery - 1 Ah
1 x SparkFun Cerberus USB Cable
*/

// Include the Library Code
// Arduino
#include <Arduino.h>
// ESP32 BLE Gamepad
#include <BleGamepad.h>

// ESP32 BLE Gamepad
BleGamepad bleGamepad;

// Left Joystick
#define LJH A3
#define LJV A2
#define LJS 12

// Right Joystick
#define RJH A0
#define RJV A1
#define RJS 21

// D-pad
#define LD1 19
#define LD2 17
#define LD3 18
#define LD4 16

// LT
#define LT 5

// Previous Button State
int previousButton1State = HIGH;
int previousButton2State = HIGH;
int previousButton3State = HIGH;
int previousButton4State = HIGH;
int previousButton5State = HIGH;
int previousButton6State = HIGH;
int previousButton7State = HIGH;

// Number of pot samples to take (to smooth the values)
const int numberOfPotSamples = 5;
// Delay in milliseconds between pot samples
const int delayBetweenSamples = 2;
// Additional delay in milliseconds between HID reports
const int delayBetweenHIDReports = 5;
// Delay in milliseconds between button press
const int debounceDelay = 10;

// Software Version Information
String sver = "26-15";

void loop() {

  // Bluetooth Serial (ESP32SPP)
  isBluetooth();

}
getBluetooth.ino
// Bluetooth
// isBluetooth
void isBluetooth() {

  // ESP32 BLE Gamepad
  if(bleGamepad.isConnected())
  {

    // Button
    isButton();

    // Joystick
    isThumbJoystick();

  }

}
getGames.ino
// Games
// Set Inputs
void setInputs() {

  // Make the button line an input
  pinMode(LJS, INPUT_PULLUP);
  pinMode(RJS, INPUT_PULLUP);
  pinMode(LD1, INPUT_PULLUP);
  pinMode(LD2, INPUT_PULLUP);
  pinMode(LD3, INPUT_PULLUP);
  pinMode(LD4, INPUT_PULLUP);
  pinMode(LT, INPUT_PULLUP);
  // Initialize digital pin LED_BUILTIN as an output.
  pinMode(LED_BUILTIN, OUTPUT);
  // Turn the LED on HIGH
  digitalWrite(LED_BUILTIN, HIGH);

}

// Button
void isButton(){

  // Button1 State LD1
  int currentButton1State = digitalRead(LD1);
  if (currentButton1State != previousButton1State)
  {
    if (currentButton1State == LOW)
    {
      bleGamepad.press(BUTTON_1);
    }
    else
    {
      bleGamepad.release(BUTTON_1);
    }
  }
  previousButton1State = currentButton1State;
  // Button2 State LD2
  int currentButton2State = digitalRead(LD2);

  if (currentButton2State != previousButton2State)
  {
    if (currentButton2State == LOW)
    {
      bleGamepad.press(BUTTON_2);
    }
    else
    {
      bleGamepad.release(BUTTON_2);
    }
  }
  previousButton2State = currentButton2State;

  // Button3 State LD3
  int currentButton3State = digitalRead(LD3);
  if (currentButton3State != previousButton3State)
  {
    if (currentButton3State == LOW)
    {
      bleGamepad.press(BUTTON_3);
    }
    else
    {
      bleGamepad.release(BUTTON_3);
    }
  }
  previousButton3State = currentButton3State;

  // Button4 State LD4
  int currentButton4State = digitalRead(LD4);
  if (currentButton4State != previousButton4State)
  {
    if (currentButton4State == LOW)
    {
      bleGamepad.press(BUTTON_4);
    }
    else
    {
      bleGamepad.release(BUTTON_4);
    }
  }
  previousButton4State = currentButton4State;

  // Button5 State LJS
  int currentButton5State = digitalRead(LJS);
  if (currentButton5State != previousButton5State)
  {
    if (currentButton5State == LOW)
    {
      bleGamepad.press(BUTTON_5);
    }
    else
    {
      bleGamepad.release(BUTTON_5);
    }
  }
  previousButton5State = currentButton5State;

  // Button6 State RJS
  int currentButton6State = digitalRead(RJS);
  if (currentButton6State != previousButton6State)
  {
    if (currentButton6State == LOW)
    {
      bleGamepad.press(BUTTON_6);
    }
    else
    {
      bleGamepad.release(BUTTON_6);
    }
  }
  previousButton6State = currentButton6State;

  // Button7 State LT
  int currentButton7State = digitalRead(LT);
  if (currentButton7State != previousButton7State)
  {
    if (currentButton7State == LOW)
    {
      bleGamepad.press(BUTTON_7);
    }
    else
    {
      bleGamepad.release(BUTTON_7);
    }
  }
  previousButton7State = currentButton7State;

}
getThumbJoystick.ino
// Thumb Joystick
void isThumbJoystick() {

  // Joystick LJH
  // Joystick Pot Values LJH
  int potValues[numberOfPotSamples];
  for (int i = 0 ; i < numberOfPotSamples ; i++) {

    potValues[i] = analogRead(LJH);
    delay(delayBetweenSamples);

  }
  int potValue = 0;
  for (int i = 0 ; i < numberOfPotSamples ; i++) {

    potValue += potValues[i];

  }
  // Value / Pot Samples
  potValue = potValue / numberOfPotSamples;
  // Adjusted Value
  int adjustedValue = map(potValue, 0, 4095, 32737, 0);

  // Joystick LJV
  // Joystick Pot Values LJV
  int potValues2[numberOfPotSamples];
  for (int i = 0 ; i < numberOfPotSamples ; i++) {

    potValues2[i] = analogRead(LJV);
    delay(delayBetweenSamples);

  }
  int potValue2 = 0;
  for (int i = 0 ; i < numberOfPotSamples ; i++) {

    potValue2 += potValues2[i];

  }
  // Value2 / Pot Samples
  potValue2 = potValue2 / numberOfPotSamples;
  // Adjusted Value2
  int adjustedValue2 = map(potValue2, 0, 4095, 32737, 0);

  // Joystick RJH
  // Joystick Pot Values RJH
  int potValues3[numberOfPotSamples];
  for (int i = 0 ; i < numberOfPotSamples ; i++) {

    potValues3[i] = analogRead(RJH);
    delay(delayBetweenSamples);

  }
  int potValue3 = 0;
  for (int i = 0 ; i < numberOfPotSamples ; i++) {

      potValue3 += potValues3[i];

  }
  // Value3 / Pot Samples
  potValue3 = potValue3 / numberOfPotSamples;
  // Adjusted Value3
  int adjustedValue3 = map(potValue3, 0, 4095, 32737, 0);

  // Joystick RJV
  // Joystick Pot Values RJV
  int potValues4[numberOfPotSamples];
  for (int i = 0 ; i < numberOfPotSamples ; i++) {

    potValues4[i] = analogRead(RJV);
    delay(delayBetweenSamples);

  }
  int potValue4 = 0;
  for (int i = 0 ; i < numberOfPotSamples ; i++) {

      potValue4 += potValues4[i];

  }
  // Value4 / Pot Samples
  potValue4 = potValue4 / numberOfPotSamples;
  // Adjusted Value4
  int adjustedValue4 = map(potValue4, 0, 4095, 0, 32737);

  //bleGamepad.setAxes(adjustedValue, adjustedValue2, 0, 0, adjustedValue3, adjustedValue4, DPAD_CENTERED);
  bleGamepad.setAxes(adjustedValue, adjustedValue2, adjustedValue4, 0, adjustedValue3, 0, DPAD_CENTERED);
  delay(delayBetweenHIDReports);

  // D-pad
  // LD1
  if (digitalRead(LD1) == LOW){

    bleGamepad.setAxes(adjustedValue, adjustedValue2, adjustedValue4, 0, adjustedValue3, 0, DPAD_UP);

  }
  // LD2
  if (digitalRead(LD2) == LOW){

    bleGamepad.setAxes(adjustedValue, adjustedValue2, adjustedValue4, 0, adjustedValue3, 0, DPAD_LEFT);

  }
  // LD3
  if (digitalRead(LD3) == LOW){

    bleGamepad.setAxes(adjustedValue, adjustedValue2, adjustedValue4, 0, adjustedValue3, 0, DPAD_DOWN);

  }
  // LD4
  if (digitalRead(LD4) == LOW){

    bleGamepad.setAxes(adjustedValue, adjustedValue2, adjustedValue4, 0, adjustedValue3, 0, DPAD_RIGHT);

  }

}
setup.ino
// Setup
void setup()
{

  // Set Inputs
  setInputs();

  // ESP32 BLE Gamepad
  bleGamepad.begin();

}
——
People can contact us: https://www.donluc.com/?page_id=1927
Technology Experience
- Programming Language
- Single-Board Microcontrollers (PIC, Arduino, Raspberry Pi,Espressif, etc…)
- IoT
- Wireless (Radio Frequency, Bluetooth, WiFi, Etc…)
- Robotics
- Camera and Video Capture Receiver Stationary, Wheel/Tank and Underwater Vehicle
- Unmanned Vehicles Terrestrial and Marine
- Machine Learning
- RTOS
- Research & Development (R & D)
Instructor, E-Mentor, STEAM, and Arts-Based Training
- Programming Language
- IoT
- PIC Microcontrollers
- Arduino
- Raspberry Pi
- Espressif
- Robotics
Follow Us
Luc Paquin – Curriculum Vitae – 2023
https://www.donluc.com/luc/
Web: https://www.donluc.com/
Facebook: https://www.facebook.com/neosteam.labs.9/
YouTube: https://www.youtube.com/@thesass2063
Twitter: https://twitter.com/labs_steam
Pinterest: https://www.pinterest.com/NeoSteamLabs/
Instagram: https://www.instagram.com/neosteamlabs/
Don Luc
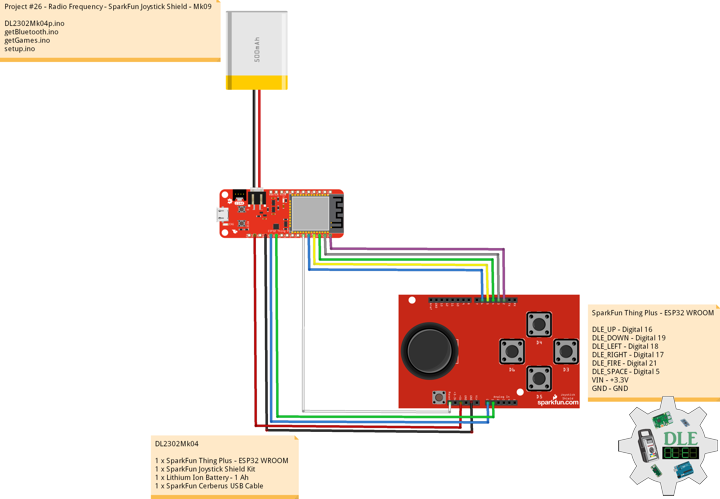
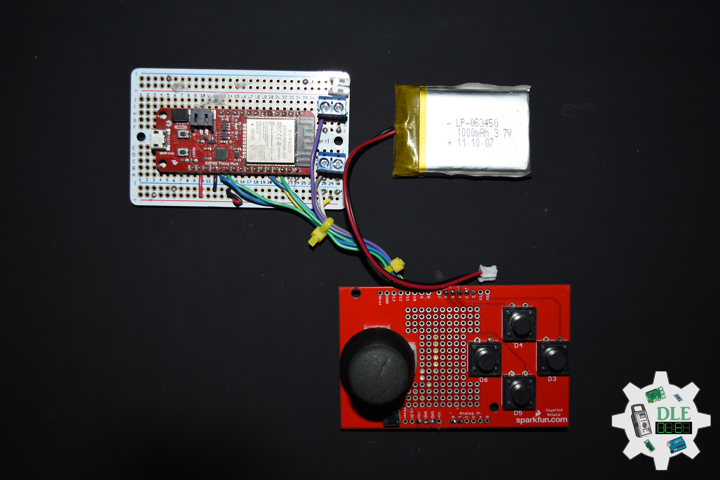
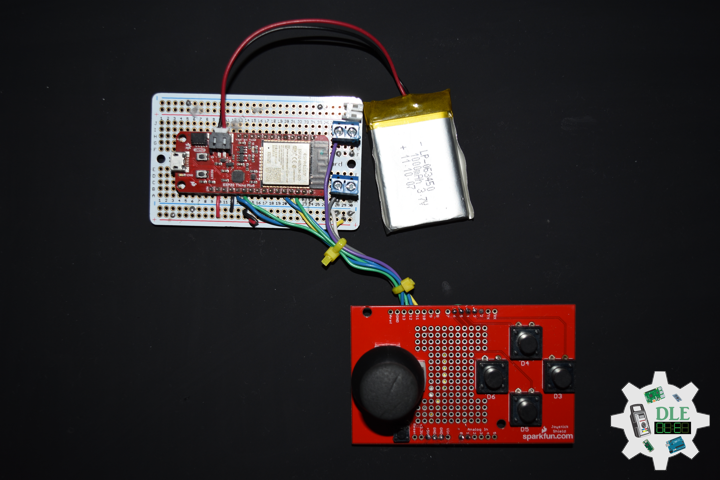
Project #26 – Radio Frequency – SparkFun Joystick Shield – Mk09
——
#DonLucElectronics #DonLuc #RadioFrequency #Bluetooth #SparkFunJoystickShield #SparkFunThingPlusESP32WROOM #Arduino #Project #Fritzing #Programming #Electronics #Microcontrollers #Consultant
——
——
——
——
SparkFun Joystick Shield Kit
The SparkFun Joystick Shield Kit contains all the parts you need to enable your Arduino with a joystick. The shield sits on top of your Arduino and turns it into a simple controller. Five momentary push buttons and a two-axis thumb joystick gives your Arduino functionality on the level of old Nintendo controllers. Soldering is required, but it’s relatively easy and requires minimal tools. We even have a step by step guide.
The momentary push buttons are connected to Arduino digital pins 2-6; when pressed they will pull the pin low. Vertical movement of the joystick will produce a proportional analog voltage on analog pin 0, likewise, horizontal movement of the joystick can be tracked on analog pin 1.
DL2302Mk04
1 x SparkFun Thing Plus – ESP32 WROOM
1 x SparkFun Joystick Shield Kit
1 x Lithium Ion Battery – 1 Ah
1 x SparkFun Cerberus USB Cable
SparkFun Thing Plus – ESP32 WROOM
DLE_UP – Digital 16
DLE_DOWN – Digital 19
DLE_LEFT – Digital 18
DLE_RIGHT – Digital 17
DLE_FIRE – Digital 21
DLE_SPACE – Digital 5
VIN – +3.3V
GND – GND
——
DL2302Mk04p.ino
/* ***** Don Luc Electronics © *****
Software Version Information
Project #26 - Radio Frequency - SparkFun Joystick Shield - Mk09
26-09
DL2301Mk01p.ino
1 x SparkFun Thing Plus - ESP32 WROOM
1 x SparkFun Joystick Shield Kit
1 x Lithium Ion Battery - 1 Ah
1 x SparkFun Cerberus USB Cable
*/

// Include the Library Code
// ESP32 BLE Keyboard - NIMBLE
#define USE_NIMBLE
#include <BleKeyboard.h>

// ESP32 BLE Keyboard
BleKeyboard bleKeyboard;

// Game Controller Buttons
#define DLE_UP 16
#define DLE_DOWN 19
#define DLE_LEFT 18
#define DLE_RIGHT 17
#define DLE_FIRE 21
#define DLE_SPACE 5

// Button
bool keyStates[6] = {false, false, false, false, false, false};
int keyPins[6] = {DLE_UP, DLE_DOWN, DLE_LEFT, DLE_RIGHT, DLE_FIRE, DLE_SPACE};
uint8_t keyCodes[6] = {'w', 'x', 'a', 'd', 'y', ' '};

// Connect Notification Sent
bool connectNotificationSent = false;

// Software Version Information
String sver = "26-09";

void loop() {

  // Bluetooth Serial (ESP32SPP)
  isBluetooth();

}
getBluetooth.ino
// Bluetooth
// isBluetooth
void isBluetooth() {

  // Counter
  int counter;

  // ESP32 BLE Keyboard
  if(bleKeyboard.isConnected()) {

    // Connect Notification Sent
    if (!connectNotificationSent) {

      connectNotificationSent = true;

    }

    // Button
    for(counter = 0; counter < 6; counter ++){

      handleButton(counter);

    }

  }

}
getGames.ino
// Games
// Set Inputs
void setInputs() {

  // Make the button line an input
  pinMode(DLE_UP, INPUT_PULLUP);
  pinMode(DLE_DOWN, INPUT_PULLUP);
  pinMode(DLE_LEFT, INPUT_PULLUP);
  pinMode(DLE_RIGHT, INPUT_PULLUP);
  pinMode(DLE_FIRE, INPUT_PULLUP);
  pinMode(DLE_SPACE, INPUT_PULLUP);

}

// Handle Button
void handleButton(int keyIndex){

  // Handle the button press
  if (!digitalRead(keyPins[keyIndex])){

    // Button pressed
    if (!keyStates[keyIndex]){

      // Key not currently pressed
      keyStates[keyIndex] = true;
      bleKeyboard.press(keyCodes[keyIndex]);

    }

  }
  else {

    // Button not pressed
    if (keyStates[keyIndex]){

      // Key currently pressed
      keyStates[keyIndex] = false;
      bleKeyboard.release(keyCodes[keyIndex]);

    }
  }

}
setup.ino
// Setup
void setup()
{

  // Set Inputs
  setInputs();

  // ESP32 BLE Keyboard
  bleKeyboard.begin();

}
——
People can contact us: https://www.donluc.com/?page_id=1927
Technology Experience
- Programming Language
- Single-Board Microcontrollers (PIC, Arduino, Raspberry Pi,Espressif, etc…)
- IoT
- Wireless (Radio Frequency, Bluetooth, WiFi, Etc…)
- Robotics
- Camera and Video Capture Receiver Stationary, Wheel/Tank and Underwater Vehicle
- Unmanned Vehicles Terrestrial and Marine
- Machine Learning
- RTOS
- Research & Development (R & D)
Instructor, E-Mentor, STEAM, and Arts-Based Training
- Programming Language
- IoT
- PIC Microcontrollers
- Arduino
- Raspberry Pi
- Espressif
- Robotics
Follow Us
Luc Paquin – Curriculum Vitae – 2023
https://www.donluc.com/luc/
Web: https://www.donluc.com/
Facebook: https://www.facebook.com/neosteam.labs.9/
YouTube: https://www.youtube.com/@thesass2063
Twitter: https://twitter.com/labs_steam
Pinterest: https://www.pinterest.com/NeoSteamLabs/
Instagram: https://www.instagram.com/neosteamlabs/
Don Luc
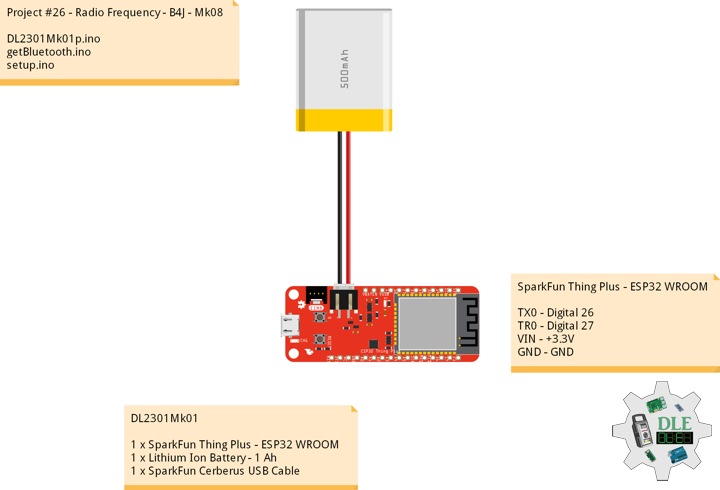
Project #26 – Radio Frequency – B4J – Mk08
——
#DonLucElectronics #DonLuc #RadioFrequency #B4J #Bluetooth #SparkFunThingPlusESP32WROOM #Arduino #Project #Fritzing #Programming #Electronics #Microcontrollers #Consultant
——
——
——
——
B4J
RAD development tool for cross platform desktop, server and IoT solutions. B4J is a 100% free development tool for desktop, server and IoT solutions. With B4J you can easily create desktop applications, console programs and server solutions. B4J apps can run on Windows, Mac, Linux and ARM boards such as Raspberry Pi. The compiled apps are standalone, without any external dependencies.
DL2301Mk01
1 x SparkFun Thing Plus – ESP32 WROOM
1 x Lithium Ion Battery – 1 Ah
1 x SparkFun Cerberus USB Cable
SparkFun Thing Plus – ESP32 WROOM
TX0 – Digital 26
TR0 – Digital 27
VIN – +3.3V
GND – GND
DL2301Mk01p.ino
/* ***** Don Luc Electronics © *****
Software Version Information
Project #26 - Radio Frequency - B4J - Mk08
26-08
DL2301Mk01p.ino
1 x SparkFun Thing Plus - ESP32 WROOM
1 x GPS Receiver - GP-20U7 (56 Channel)
1 x Lithium Ion Battery - 1 Ah
1 x SparkFun Cerberus USB Cable
*/

// Include the Library Code
// Bluetooth Serial (ESP32SPP)
#include "BluetoothSerial.h"

// Bluetooth Serial (ESP32SPP)
BluetoothSerial SerialBT;

// Software Version Information
String sver = "26-08";

void loop() {

  // Bluetooth Serial (ESP32SPP)
  isBluetooth();

}
getBluetooth.ino
// Bluetooth
// isBluetooth
void isBluetooth() {

  // Input
  byte inputFromOtherSide;

  // Bluetooth Serial (ESP32SPP)
  if (SerialBT.available()) {

    // Input Read
    inputFromOtherSide = SerialBT.read();
    // Write
    SerialBT.write(inputFromOtherSide);

  }

}
setup.ino
// Setup
void setup()
{

  // Bluetooth Serial (ESP32SPP)
  SerialBT.begin("DLE");

  // Delay
  delay(1000);

}
——
B4J – Bluetooth
Bluetooth.b4j
#Region  Project Attributes

	' Form Width and Form Height
	#MainFormWidth: 600
	#MainFormHeight: 400

#End Region

Sub Process_Globals

	'Java OpenJDK 11
	Private fx As JFX
	' MainForm => Form
	Private MainForm As Form
	' Button
	Private btnConnect As Button
	Private btnSearch As Button
	Private btnSend As Button
	' List View
	Private ListView1 As ListView
	' Text Field
	Private txtInput As TextField
	' Text Area
	Private txtLog As TextArea

	' Bluetooth
	Private bt As Bluetooth
	' Async Streams
	Private astream As AsyncStreams
	' Boolean
	Private connected As Boolean
	Private searchingForDevices As Boolean
	' Bluetooth Connection
	Private currentConnection As BluetoothConnection

	' Map
	Private foundDevices As Map
	' Button
	Private btnDisconnect As Button
	' Label
	Private lblConnectionState As Label
	Private lblSearchState As Label
	' Image View
	Private ImageView1 As ImageView

End Sub

Sub AppStart (Form1 As Form, Args() As String)

	' App Start => MainForm = Form1
	MainForm = Form1
	MainForm.SetFormStyle("UNIFIED")
	' Load the layout file.
	MainForm.RootPane.LoadLayout("1")
	' Show
	MainForm.Show
	' Bluetooth
	bt.Initialize("bt")
	foundDevices.Initialize
	If bt.IsEnabled Then
		bt.Listen
	End If
	' Update State
	UpdateState

End Sub

Private Sub UpdateState

	' Update State
	If bt.IsEnabled = False Then

		' No Bluetooth
		lblSearchState.Text = "Bluetooth not available"
		For Each n As Node In MainForm.RootPane
			n.Enabled = False
		Next

	Else

		' Bluetooth
		' Button
		btnSearch.Enabled = Not(searchingForDevices)
		btnConnect.Enabled = Not(connected) And ListView1.SelectedIndex > -1
		txtInput.Enabled = connected
		btnSend.Enabled = connected
		btnDisconnect.Enabled = connected

		' State => Connected or Disconnected
		Dim state As String
		If connected Then
			state = "Connected: " & currentConnection.Name
		Else
			state = "Disconnected"
		End If
		' Label
		lblConnectionState.Text = state
		lblSearchState.Text = "Searching..."
		lblSearchState.Visible = searchingForDevices

	End If

End Sub


Private Sub btnSearch_Action

	' Button
	' Search Boolean
	Dim res As Boolean = bt.StartDiscovery
	If res Then

		' Searching For Devices
		searchingForDevices = True
		' List View
		ListView1.Items.Clear
		' Update State
		UpdateState

	Else

		' Error
		Log("Error starting discovery")

	End If

End Sub

Private Sub bt_DeviceFound (Name As String, MacAddress As String)

	' Button
	' Device Found => Description
	Dim description As String = Name & ": " & MacAddress
	' List View
	ListView1.Items.Add(description)
	' Found Devices
	foundDevices.Put(description, MacAddress)

End Sub

Private Sub bt_DiscoveryFinished

	' Button
	' Discovery Finished
	searchingForDevices = False
	' Update State
	UpdateState

End Sub

Private Sub btnConnect_Action

	' Button
	' Connect
	Dim address As String = foundDevices.Get(ListView1.SelectedItem)
	' Bluetooth
	bt.Connect(address)

End Sub

Private Sub bt_Connected (Success As Boolean, connection As BluetoothConnection)

	' Button
	Log($"Connected, success=${Success}"$)
	' Success
	If Success Then

		' Connection
		currentConnection = connection
		connected = True
		' AStream
		If astream.IsInitialized Then astream.Close
		astream.InitializePrefix(connection.InputStream, True, connection.OutputStream, "AStream")

	End If
	' Bluetooth Listen
	bt.Listen
	' Update State
	UpdateState

End Sub

Sub AStream_NewData (Buffer() As Byte)

	' AStream New Data
	' You => Arduino
	LogMessage("You", BytesToString(Buffer, 0, Buffer.Length, "UTF8"))

End Sub


Sub AStream_Error

	' AStream Error
	connected = False
	' Update State
	UpdateState

End Sub

Sub AStream_Terminated

	' AStream Terminated
	AStream_Error

End Sub

Private Sub txtInput_Action

	' Button Send
	btnSend_Action

End Sub

Private Sub btnSend_Action

	' Button Send
	If txtInput.Text.Length > 0 Then

		' AStream
		' Me => B4J
		LogMessage("Me", txtInput.Text)
		' AStream Write
		astream.Write(txtInput.Text.GetBytes("utf8"))
		txtInput.Text = ""

	End If

End Sub

Private Sub LogMessage(From As String, Msg As String)

	' Log Message
	txtLog.Text = txtLog.Text & From & ": " & Msg & CRLF
	txtLog.SetSelection(txtLog.Text.Length, txtLog.Text.Length)

End Sub

Private Sub ListView1_SelectedIndexChanged(Index As Int)

	' Update State
	UpdateState

End Sub

Private Sub btnDisconnect_Action

	' Bluetooth Disconnect
	currentConnection.Disconnect
	' AStream Close
	If astream.IsInitialized Then astream.Close
	connected = False
	' Update State
	UpdateState

End Sub
——
People can contact us: https://www.donluc.com/?page_id=1927
Technology Experience
- Programming Language
- Single-Board Microcontrollers (PIC, Arduino, Raspberry Pi,Espressif, etc…)
- IoT
- Wireless (Radio Frequency, Bluetooth, WiFi, Etc…)
- Robotics
- Camera and Video Capture Receiver Stationary, Wheel/Tank and Underwater Vehicle
- Unmanned Vehicles Terrestrial and Marine
- Machine Learning
- RTOS
- Research & Development (R & D)
Instructor, E-Mentor, STEAM, and Arts-Based Training
- Programming Language
- IoT
- PIC Microcontrollers
- Arduino
- Raspberry Pi
- Espressif
- Robotics
Follow Us
Luc Paquin – Curriculum Vitae – 2022
https://www.donluc.com/luc/
Web: https://www.donluc.com/
Facebook: https://www.facebook.com/neosteam.labs.9/
YouTube: https://www.youtube.com/@thesass2063
Twitter: https://twitter.com/labs_steam
Pinterest: https://www.pinterest.com/NeoSteamLabs/
Instagram: https://www.instagram.com/neosteamlabs/
Don Luc
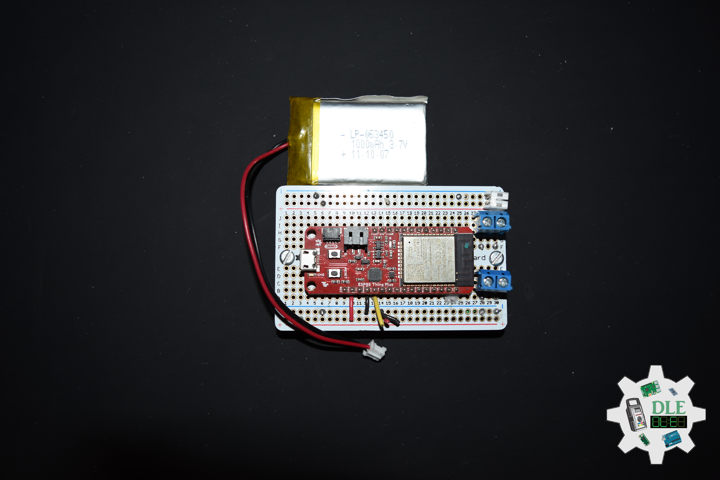
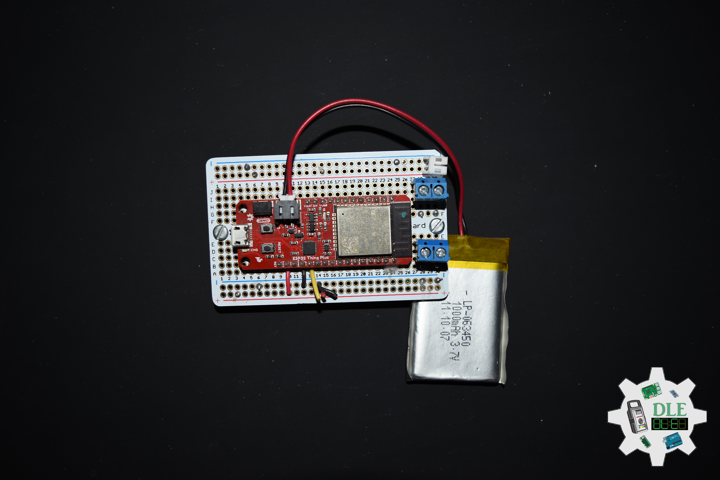
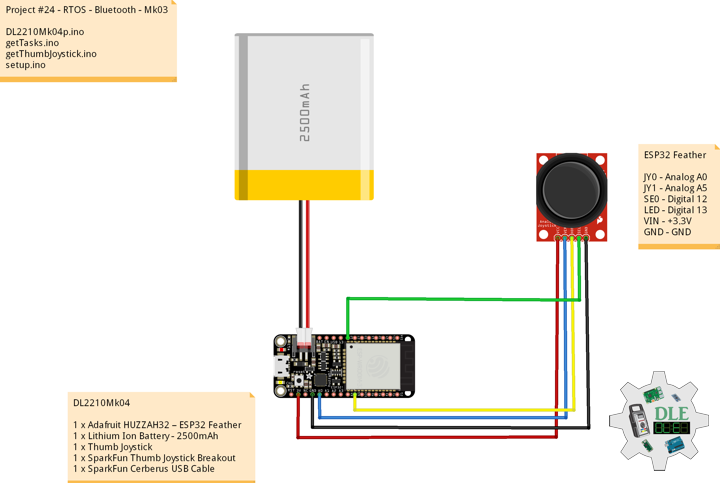
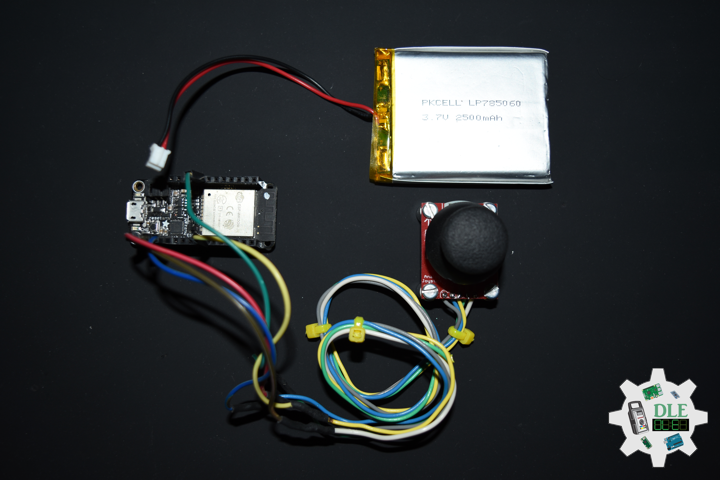
Project #24 – RTOS – Bluetooth – Mk03
——
#DonLucElectronics #DonLuc #ESP32 #RTOS #FreeRTOS #Bluetooth #ThumbJoystick #Keyboard #Arduino #Project #Fritzing #Programming #Electronics #Microcontrollers #Consultant
——
——
——
——
Joystick
A joystick is an input device consisting of a stick that pivots on a base and reports its angle or direction to the device it is controlling. Joysticks are often used to control video games, and usually have one or more push-buttons whose state can also be read by the computer. A popular variation of the joystick used on modern video game consoles is the analog stick. Joysticks are also used for controlling machines such as cranes, trucks, underwater unmanned vehicles, wheelchairs, surveillance cameras, and zero turning radius lawn mowers. This is a joystick very similar to the analog joysticks on PS2 controllers. Directional movements are simply two potentiometers, one for each axis. Pots are 10k Ohm each. This joystick also has a select button that is actuated when the joystick is pressed down.
DL2210Mk04
1 x Adafruit HUZZAH32 – ESP32 Feather
1 x Lithium Ion Battery – 2500mAh
1 x Thumb Joystick
1 x SparkFun Thumb Joystick Breakout
1 x SparkFun Cerberus USB Cable
ESP32 Feather
JY0 – Analog A0
JY1 – Analog A5
SE0 – Digital 12
LED – Digital 13
VIN – +3.3V
GND – GND
——
DL2210Mk04p.ino
/* ***** Don Luc Electronics © *****
Software Version Information
Project #24 - RTOS - Bluetooth - Mk03
24-03
DL2210Mk04p.ino
1 x Adafruit HUZZAH32 – ESP32 Feather
1 x Lithium Ion Battery - 2500mAh
1 x Thumb Joystick
1 x SparkFun Thumb Joystick Breakout
1 x SparkFun Cerberus USB Cable
*/

// Include the Library Code
// FreeRTOS ESP32
#if CONFIG_FREERTOS_UNICORE
#define ARDUINO_RUNNING_CORE 0
#else
#define ARDUINO_RUNNING_CORE 1
#endif
// ESP32 BLE Keyboard
#include <BleKeyboard.h>

// ESP32 BLE Keyboard
BleKeyboard bleKeyboard;

// Connections to joystick
// Vertical
const int VERT = A0;
// Horizontal
const int HORIZ = A5;
// Pushbutton
const int SEL = 12;
// Initialize variables for analog and digital values
int vertical;
int horizontal;
int selec;

// Led Built In
#ifndef LED_BUILTIN
#define LED_BUILTIN 13
#endif

// Define two tasks for Blink
void isTaskBlink( void *pvParameters );

// Software Version Information
String sver = "24-03";

void loop() {

  // ESP32 BLE Keyboard
  if(bleKeyboard.isConnected()) {

    // Thumb Joystick
    isThumbJoystick();

  }

  // Delay
  delay( 1000 );

}
getTasks.ino
// Tasks
// Setup Task
void isSetupTask(){

  // Now set up two tasks to run independently
  // TaskBlink
  xTaskCreatePinnedToCore(
    isTaskBlink
    ,  "TaskBlink"   // A name just for humans
    ,  1024  // This stack size can be checked & adjusted by reading.
    ,  NULL
    ,  2  // Priority, with 2 being the highest, and 0 being the lowest.
    ,  NULL
    ,  ARDUINO_RUNNING_CORE);

  // Now the task scheduler, which takes over control of scheduling individual tasks,
  // is automatically started.

}
// This is a Task Blink
void isTaskBlink(void *pvParameters)
{

  (void) pvParameters;

  // Blink
  // Turns on an LED on for 2 second, then off for 2 second, repeatedly

  // Initialize digital LED_BUILTIN on pin 13 as an output.
  pinMode(LED_BUILTIN, OUTPUT);

  // A Task shall never return or exit
  for (;;)
  {

    // Turn the LED on (HIGH is the voltage level)
    digitalWrite(LED_BUILTIN, HIGH);
    // One tick delay in between reads
    vTaskDelay(2000);
    // Turn the LED off by making the voltage LOW
    digitalWrite(LED_BUILTIN, LOW);
    // One tick delay in between reads
    vTaskDelay(2000);

  }

}
getThumbJoystick.ino
// Thumb Joystick
void isThumbJoystick() {

  // Read all values from the joystick
  // Joystick was sitting around 2047 for the vertical and horizontal values
  // Will be 0-4095
  // Vertical
  vertical = analogRead(VERT);
  if (vertical == 4095) {

    // Volume Up
    bleKeyboard.write(KEY_MEDIA_VOLUME_UP);

  } else if (vertical == 0) {

    // Volume Down
    bleKeyboard.write(KEY_MEDIA_VOLUME_DOWN);

  }
  // Horizontal
  // Will be 0-4095
  horizontal = analogRead(HORIZ);
  if (horizontal == 4095) {

    // Previous Track
    bleKeyboard.write(KEY_MEDIA_PREVIOUS_TRACK);

  } else if (horizontal == 0) {

    // Next Track
    bleKeyboard.write(KEY_MEDIA_NEXT_TRACK);

  }
  // Will be HIGH (1) if not pressed, and LOW (0) if pressed
  selec = digitalRead(SEL);
  if (selec == 0) {

    // Play/Pause media key
    bleKeyboard.write(KEY_MEDIA_PLAY_PAUSE);

  }

}
setup.ino
// Setup
void setup() {

  // Make the SEL line an input
  pinMode(SEL, INPUT_PULLUP);

  // ESP32 BLE Keyboard
  bleKeyboard.begin();

  // Setup Task
  isSetupTask();

}
——
People can contact us: https://www.donluc.com/?page_id=1927
Technology Experience
- Single-Board Microcontrollers (PIC, Arduino, Raspberry Pi,Espressif, etc…)
- IoT
- Wireless (Radio Frequency, Bluetooth, WiFi, Etc…)
- Robotics
- Camera and Video Capture Receiver Stationary, Wheel/Tank and Underwater Vehicle
- Unmanned Vehicles Terrestrial and Marine
- Machine Learning
- RTOS
- Research & Development (R & D)
Instructor and E-Mentor
- IoT
- PIC Microcontrollers
- Arduino
- Raspberry Pi
- Espressif
- Robotics
Follow Us
J. Luc Paquin – Curriculum Vitae – 2022 English & Español
https://www.jlpconsultants.com/luc/
Web: https://www.donluc.com/
Web: https://www.jlpconsultants.com/
Facebook: https://www.facebook.com/neosteam.labs.9/
YouTube: https://www.youtube.com/channel/UC5eRjrGn1CqkkGfZy0jxEdA
Twitter: https://twitter.com/labs_steam
Pinterest: https://www.pinterest.com/NeoSteamLabs/
Instagram: https://www.instagram.com/neosteamlabs/
Don Luc
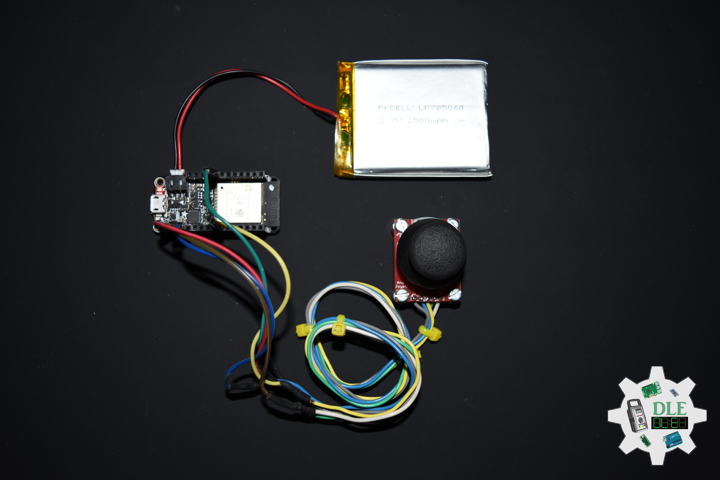
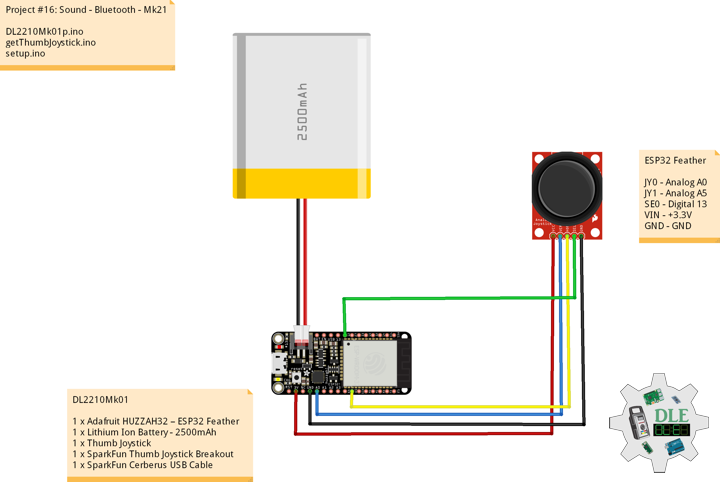
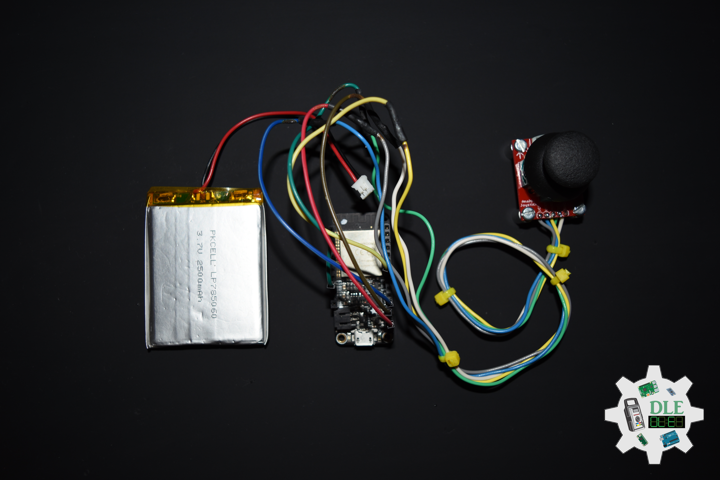
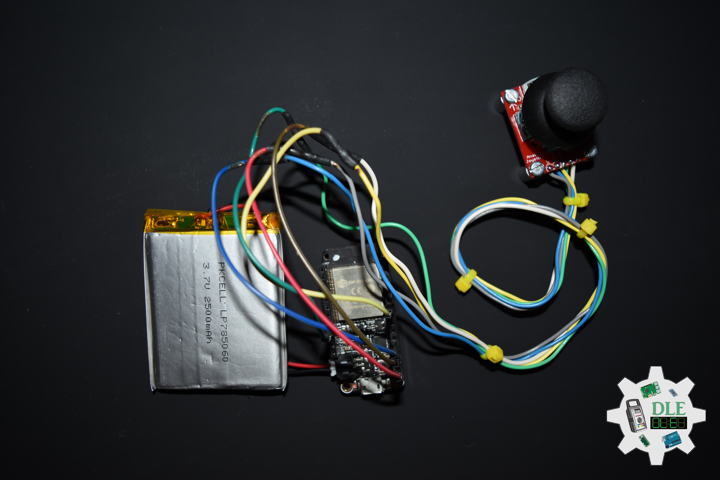
Project #16: Sound – Bluetooth – Mk21
——
#DonLucElectronics #DonLuc #ESP32 #Bluetooth #ThumbJoystick #Keyboard #Arduino #Project #Fritzing #Programming #Electronics #Microcontrollers #Consultant
——
——
——
——
Bluetooth
Bluetooth is a short-range wireless technology standard that is used for exchanging data between fixed and mobile devices over short distances and building personal area networks. It employs UHF radio waves in the ISM bands, from 2.402 GHz to 2.48 GHz. It is mainly used as an alternative to wire connections, to exchange files between nearby portable devices, computer and connect cell phones and music players with wireless headphones. In the most widely used mode, transmission power is limited to 2.5 milliwatts, giving it a very short range of up to 10 metres.
DL2210Mk01
1 x Adafruit HUZZAH32 – ESP32 Feather
1 x Lithium Ion Battery – 2500mAh
1 x Thumb Joystick
1 x SparkFun Thumb Joystick Breakout
1 x SparkFun Cerberus USB Cable
ESP32 Feather
JY0 – Analog A0
JY1 – Analog A5
SE0 – Digital 13
VIN – +3.3V
GND – GND
——
DL2210Mk01p.ino
/* ***** Don Luc Electronics © *****
Software Version Information
Project #16: Sound - Bluetooth - Mk21
16-21
DL2210Mk01p.ino
1 x Adafruit HUZZAH32 – ESP32 Feather
1 x Lithium Ion Battery - 2500mAh
1 x Thumb Joystick
1 x SparkFun Thumb Joystick Breakout
1 x SparkFun Cerberus USB Cable
*/

// Include the Library Code
// ESP32 BLE Keyboard
#include <BleKeyboard.h>

// ESP32 BLE Keyboard
BleKeyboard bleKeyboard;

// Connections to joystick
// Vertical
const int VERT = A0;
// Horizontal
const int HORIZ = A5;
// Pushbutton
const int SEL = 13;
// Initialize variables for analog and digital values
int vertical;
int horizontal;
int selec;

// Software Version Information
String sver = "16-21";

void loop() {

  // ESP32 BLE Keyboard
  if(bleKeyboard.isConnected()) {

    // Thumb Joystick
    isThumbJoystick();

  }

  // Delay
  delay( 1000 );

}
getThumbJoystick.ino
// Thumb Joystick
void isThumbJoystick() {

  // Read all values from the joystick
  // Joystick was sitting around 2047 for the vertical and horizontal values
  // Will be 0-4095
  // Vertical
  vertical = analogRead(VERT);
  if (vertical == 4095) {

    // Volume Up
    bleKeyboard.write(KEY_MEDIA_VOLUME_UP);

  } else if (vertical == 0) {

    // Volume Down
    bleKeyboard.write(KEY_MEDIA_VOLUME_DOWN);

  }
  // Horizontal
  // Will be 0-4095
  horizontal = analogRead(HORIZ);
  if (horizontal == 4095) {

    // Previous Track
    bleKeyboard.write(KEY_MEDIA_PREVIOUS_TRACK);

  } else if (horizontal == 0) {

    // Next Track
    bleKeyboard.write(KEY_MEDIA_NEXT_TRACK);

  }
  // Will be HIGH (1) if not pressed, and LOW (0) if pressed
  selec = digitalRead(SEL);
  if (selec == 0) {

    // Play/Pause media key
    bleKeyboard.write(KEY_MEDIA_PLAY_PAUSE);

  }

}
setup.ino
// Setup
void setup() {

  // Make the SEL line an input
  pinMode(SEL, INPUT_PULLUP);

  // ESP32 BLE Keyboard
  bleKeyboard.begin();

}
——
People can contact us: https://www.donluc.com/?page_id=1927
Technology Experience
- Single-Board Microcontrollers (PIC, Arduino, Raspberry Pi,Espressif, etc…)
- IoT
- Robotics
- Camera and Video Capture Receiver Stationary, Wheel/Tank and Underwater Vehicle
- Unmanned Vehicles Terrestrial and Marine
- Research & Development (R & D)
Instructor and E-Mentor
- IoT
- PIC Microcontrollers
- Arduino
- Raspberry Pi
- Espressif
- Robotics
Follow Us
J. Luc Paquin – Curriculum Vitae – 2022 English & Español
https://www.jlpconsultants.com/luc/
Web: https://www.donluc.com/
Web: https://www.jlpconsultants.com/
Facebook: https://www.facebook.com/neosteam.labs.9/
YouTube: https://www.youtube.com/channel/UC5eRjrGn1CqkkGfZy0jxEdA
Twitter: https://twitter.com/labs_steam
Pinterest: https://www.pinterest.com/NeoSteamLabs/
Instagram: https://www.instagram.com/neosteamlabs/
Don Luc