——
#DonLucElectronics #DonLuc #ESP32 #RTOS #FreeRTOS #Bluetooth #ThumbJoystick #Keyboard #Arduino #Project #Fritzing #Programming #Electronics #Microcontrollers #Consultant
——
——
——
——
Joystick
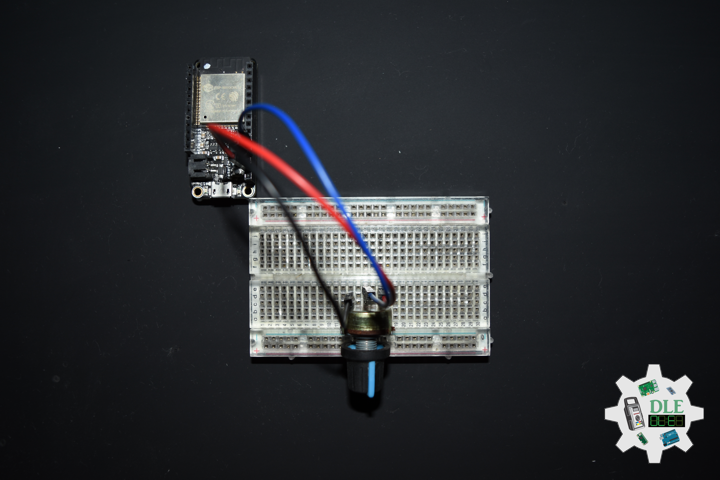
A joystick is an input device consisting of a stick that pivots on a base and reports its angle or direction to the device it is controlling. Joysticks are often used to control video games, and usually have one or more push-buttons whose state can also be read by the computer. A popular variation of the joystick used on modern video game consoles is the analog stick. Joysticks are also used for controlling machines such as cranes, trucks, underwater unmanned vehicles, wheelchairs, surveillance cameras, and zero turning radius lawn mowers. This is a joystick very similar to the analog joysticks on PS2 controllers. Directional movements are simply two potentiometers, one for each axis. Pots are 10k Ohm each. This joystick also has a select button that is actuated when the joystick is pressed down.
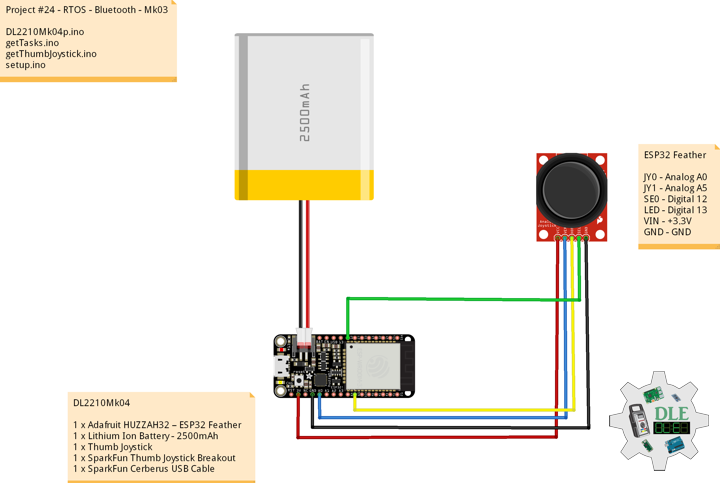
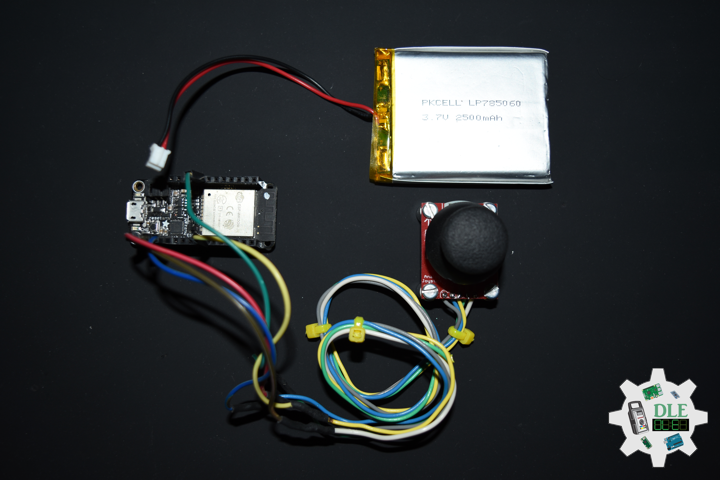
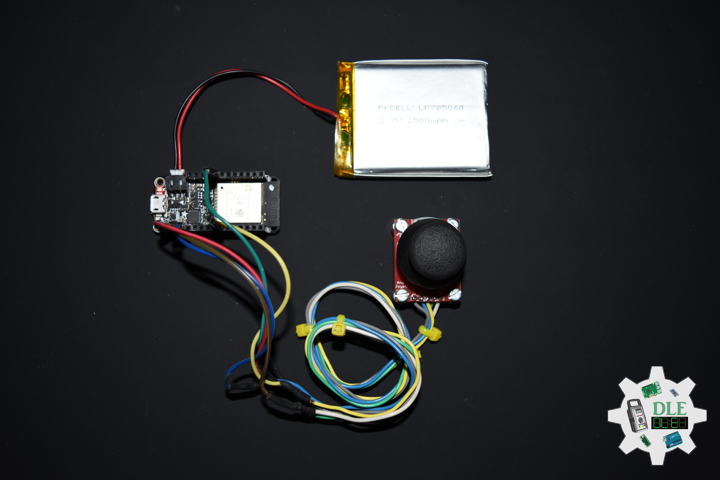
DL2210Mk04
1 x Adafruit HUZZAH32 – ESP32 Feather
1 x Lithium Ion Battery – 2500mAh
1 x Thumb Joystick
1 x SparkFun Thumb Joystick Breakout
1 x SparkFun Cerberus USB Cable
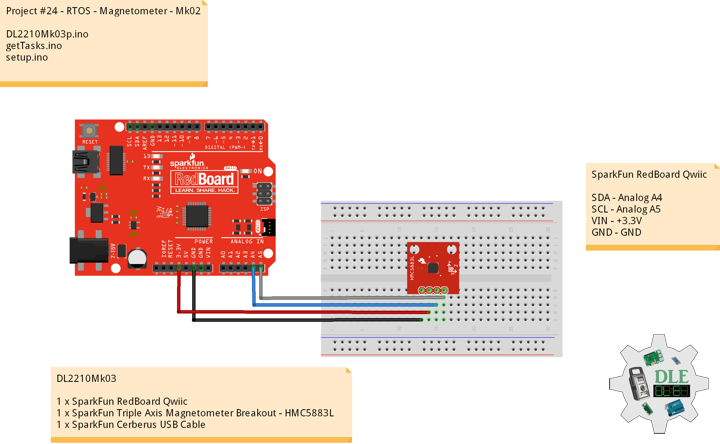
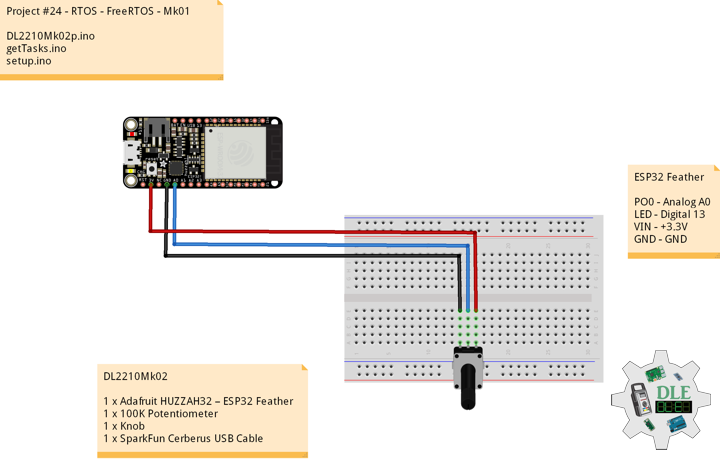
ESP32 Feather
JY0 – Analog A0
JY1 – Analog A5
SE0 – Digital 12
LED – Digital 13
VIN – +3.3V
GND – GND
——
DL2210Mk04p.ino
/* ***** Don Luc Electronics © *****
Software Version Information
Project #24 - RTOS - Bluetooth - Mk03
24-03
DL2210Mk04p.ino
1 x Adafruit HUZZAH32 – ESP32 Feather
1 x Lithium Ion Battery - 2500mAh
1 x Thumb Joystick
1 x SparkFun Thumb Joystick Breakout
1 x SparkFun Cerberus USB Cable
*/

// Include the Library Code
// FreeRTOS ESP32
#if CONFIG_FREERTOS_UNICORE
#define ARDUINO_RUNNING_CORE 0
#else
#define ARDUINO_RUNNING_CORE 1
#endif
// ESP32 BLE Keyboard
#include <BleKeyboard.h>

// ESP32 BLE Keyboard
BleKeyboard bleKeyboard;

// Connections to joystick
// Vertical
const int VERT = A0;
// Horizontal
const int HORIZ = A5;
// Pushbutton
const int SEL = 12;
// Initialize variables for analog and digital values
int vertical;
int horizontal;
int selec;

// Led Built In
#ifndef LED_BUILTIN
#define LED_BUILTIN 13
#endif

// Define two tasks for Blink
void isTaskBlink( void *pvParameters );

// Software Version Information
String sver = "24-03";

void loop() {

  // ESP32 BLE Keyboard
  if(bleKeyboard.isConnected()) {

    // Thumb Joystick
    isThumbJoystick();

  }

  // Delay
  delay( 1000 );

}
getTasks.ino
// Tasks
// Setup Task
void isSetupTask(){

  // Now set up two tasks to run independently
  // TaskBlink
  xTaskCreatePinnedToCore(
    isTaskBlink
    ,  "TaskBlink"   // A name just for humans
    ,  1024  // This stack size can be checked & adjusted by reading.
    ,  NULL
    ,  2  // Priority, with 2 being the highest, and 0 being the lowest.
    ,  NULL
    ,  ARDUINO_RUNNING_CORE);

  // Now the task scheduler, which takes over control of scheduling individual tasks,
  // is automatically started.

}
// This is a Task Blink
void isTaskBlink(void *pvParameters)
{

  (void) pvParameters;

  // Blink
  // Turns on an LED on for 2 second, then off for 2 second, repeatedly

  // Initialize digital LED_BUILTIN on pin 13 as an output.
  pinMode(LED_BUILTIN, OUTPUT);

  // A Task shall never return or exit
  for (;;)
  {

    // Turn the LED on (HIGH is the voltage level)
    digitalWrite(LED_BUILTIN, HIGH);
    // One tick delay in between reads
    vTaskDelay(2000);
    // Turn the LED off by making the voltage LOW
    digitalWrite(LED_BUILTIN, LOW);
    // One tick delay in between reads
    vTaskDelay(2000);

  }

}
getThumbJoystick.ino
// Thumb Joystick
void isThumbJoystick() {

  // Read all values from the joystick
  // Joystick was sitting around 2047 for the vertical and horizontal values
  // Will be 0-4095
  // Vertical
  vertical = analogRead(VERT);
  if (vertical == 4095) {

    // Volume Up
    bleKeyboard.write(KEY_MEDIA_VOLUME_UP);

  } else if (vertical == 0) {

    // Volume Down
    bleKeyboard.write(KEY_MEDIA_VOLUME_DOWN);

  }
  // Horizontal
  // Will be 0-4095
  horizontal = analogRead(HORIZ);
  if (horizontal == 4095) {

    // Previous Track
    bleKeyboard.write(KEY_MEDIA_PREVIOUS_TRACK);

  } else if (horizontal == 0) {

    // Next Track
    bleKeyboard.write(KEY_MEDIA_NEXT_TRACK);

  }
  // Will be HIGH (1) if not pressed, and LOW (0) if pressed
  selec = digitalRead(SEL);
  if (selec == 0) {

    // Play/Pause media key
    bleKeyboard.write(KEY_MEDIA_PLAY_PAUSE);

  }

}
setup.ino
// Setup
void setup() {

  // Make the SEL line an input
  pinMode(SEL, INPUT_PULLUP);

  // ESP32 BLE Keyboard
  bleKeyboard.begin();

  // Setup Task
  isSetupTask();

}
——
People can contact us: https://www.donluc.com/?page_id=1927
Technology Experience
- Single-Board Microcontrollers (PIC, Arduino, Raspberry Pi,Espressif, etc…)
- IoT
- Wireless (Radio Frequency, Bluetooth, WiFi, Etc…)
- Robotics
- Camera and Video Capture Receiver Stationary, Wheel/Tank and Underwater Vehicle
- Unmanned Vehicles Terrestrial and Marine
- Machine Learning
- RTOS
- Research & Development (R & D)
Instructor and E-Mentor
- IoT
- PIC Microcontrollers
- Arduino
- Raspberry Pi
- Espressif
- Robotics
Follow Us
J. Luc Paquin – Curriculum Vitae – 2022 English & Español
https://www.jlpconsultants.com/luc/
Web: https://www.donluc.com/
Web: https://www.jlpconsultants.com/
Facebook: https://www.facebook.com/neosteam.labs.9/
YouTube: https://www.youtube.com/channel/UC5eRjrGn1CqkkGfZy0jxEdA
Twitter: https://twitter.com/labs_steam
Pinterest: https://www.pinterest.com/NeoSteamLabs/
Instagram: https://www.instagram.com/neosteamlabs/
Don Luc