——
#DonLucElectronics #DonLuc #Accelerometer #FireBeetle2ESP32E #ESP32 #DFRobot #Display #IoT #Project #Fritzing #Programming #Electronics #Microcontrollers #Consultant
——
——
——
——
Gravity: I2C Triple Axis Accelerometer – LIS2DH
DFRobot presents the ultra low-power triple axis accelerometer. This device is based around a MEMS LIS2DH chip solution and has high-performance ultra-low power mode. The module is fitted with a Gravity I2C interface for easy plug and play integration in to your projects. The build in LDO power management chip gives you a wide range of input voltages, from 3.3 – 5 Volt. The on-board I2C level conversion also makes it compatible with 3.3 and 5 Volt devices. Compared to traditional ADXL345, the LIS2DH accelerometer has advantages such as extra stability and more efficient power consumption.
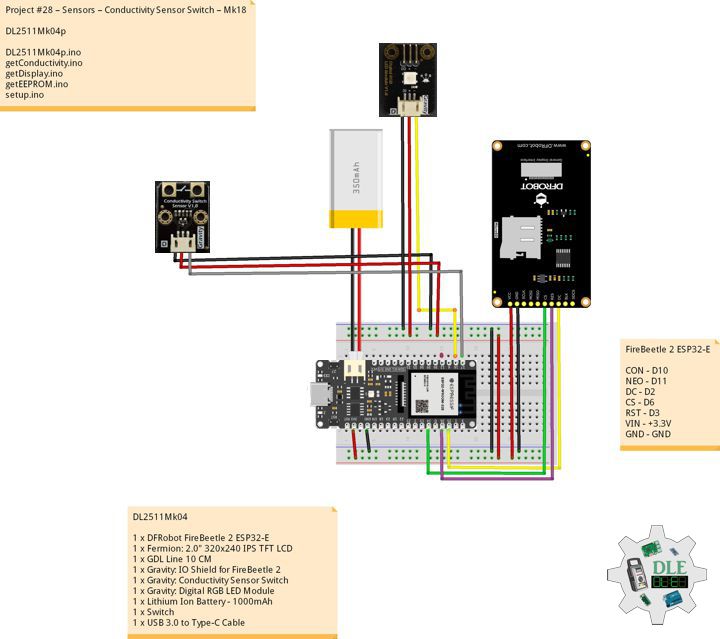
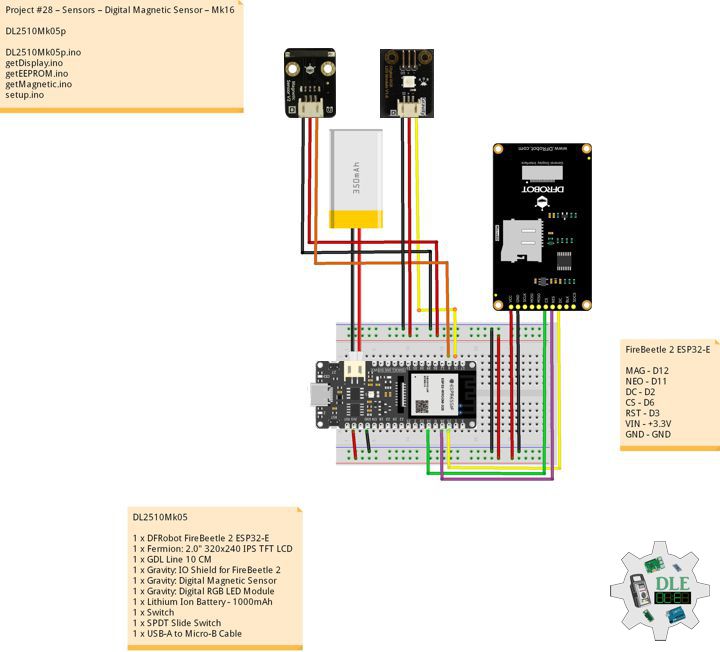
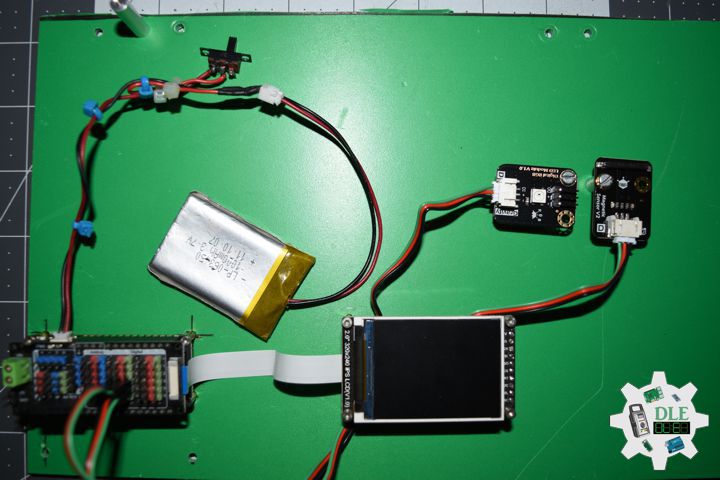
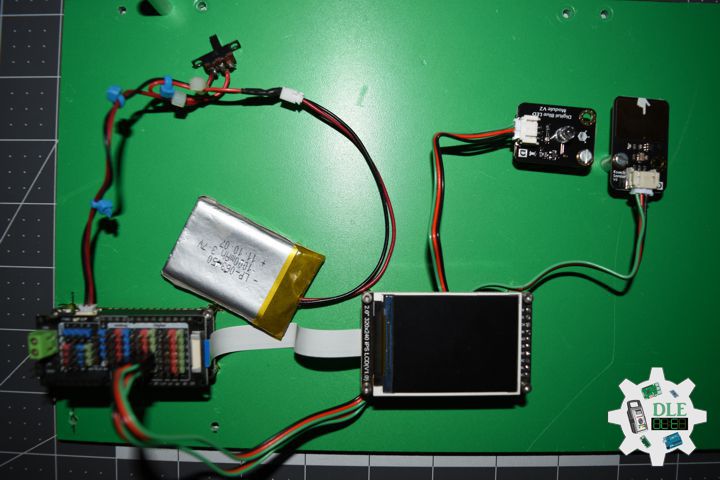
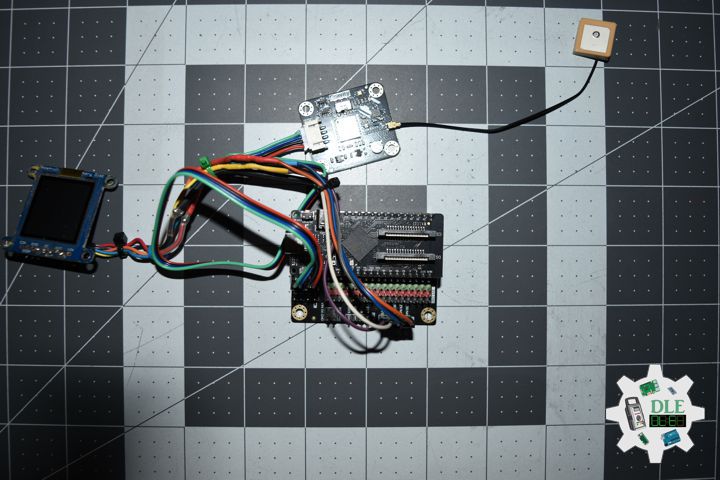
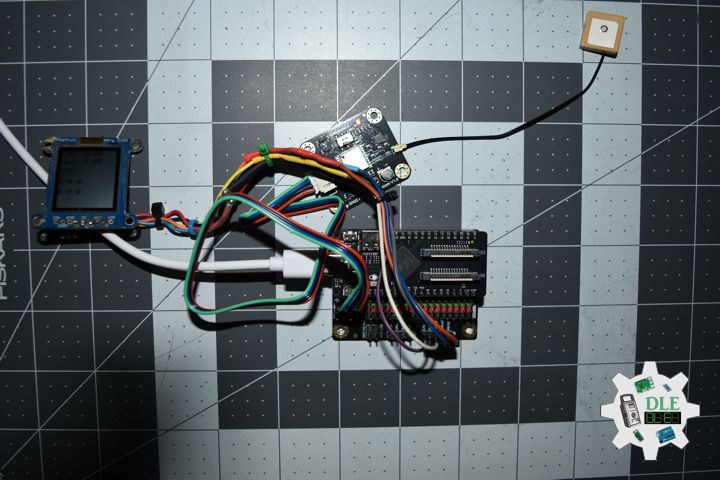
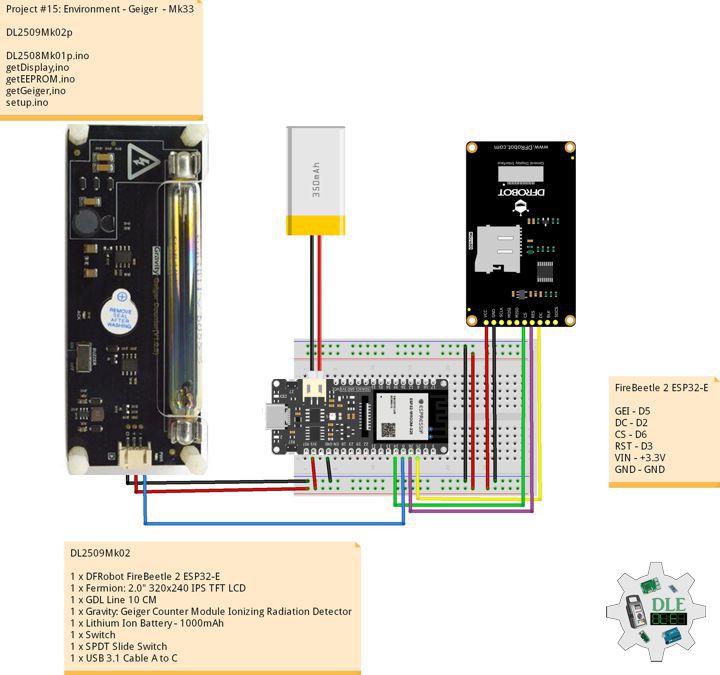
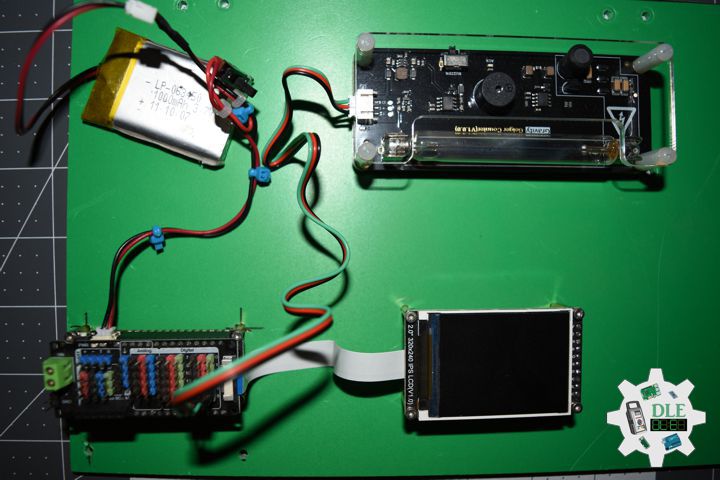
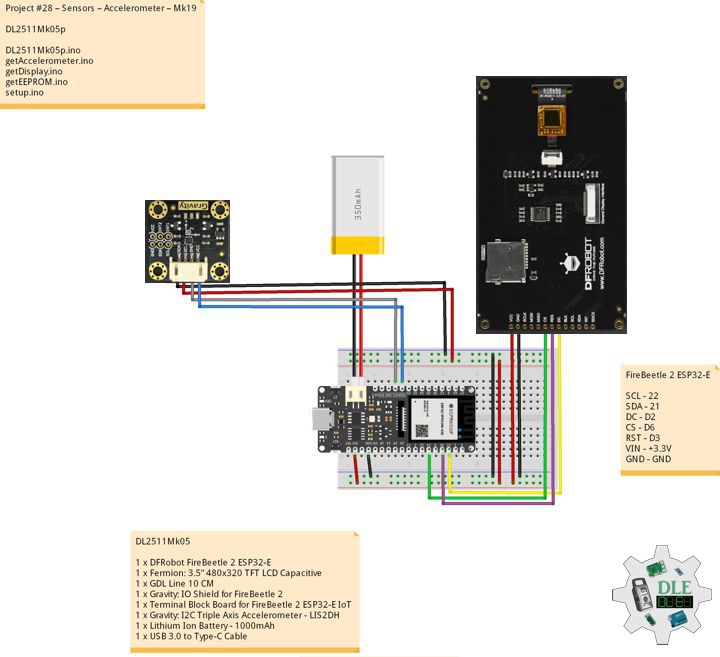
DL2511Mk05
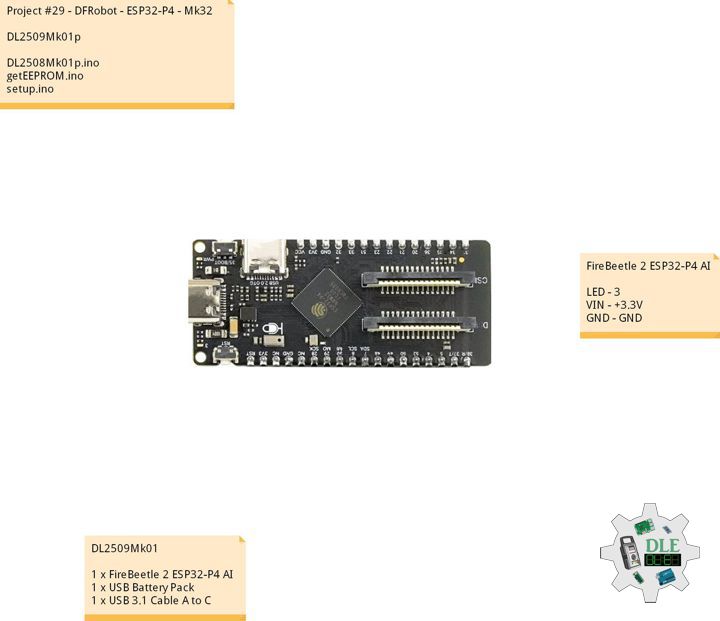
1 x DFRobot FireBeetle 2 ESP32-E
1 x Fermion: 3.5” 480×320 TFT LCD Capacitive
1 x GDL Line 10 CM
1 x Gravity: IO Shield for FireBeetle 2
1 x Terminal Block Board for FireBeetle 2 ESP32-E IoT
1 x Gravity: I2C Triple Axis Accelerometer – LIS2DH
1 x Lithium Ion Battery – 1000mAh
1 x USB 3.0 to Type-C Cable
DL2511Mk05p
DL2511Mk05p.ino
/****** Don Luc Electronics © ******
Software Version Information
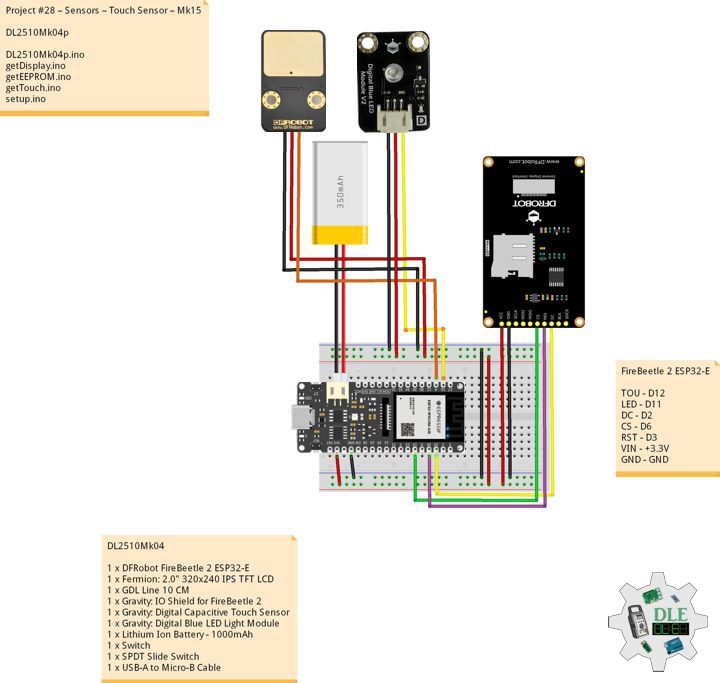
Project #28 – Sensors – Accelerometer – Mk19
28-19
DL2511Mk05p.ino
DL2511Mk05
1 x DFRobot FireBeetle 2 ESP32-E
1 x Fermion: 3.5” 480x320 TFT LCD Capacitive
1 x GDL Line 10 CM
1 x Gravity: IO Shield for FireBeetle 2
1 x Terminal Block Board for FireBeetle 2 ESP32-E IoT
1 x Gravity: I2C Triple Axis Accelerometer - LIS2DH
1 x Lithium Ion Battery - 1000mAh
1 x USB 3.0 to Type-C Cable
*/
// Include the Library Code
// EEPROM Library to Read and Write EEPROM
// with Unique ID for Unit
#include "EEPROM.h"
// Arduino
#include "Arduino.h"
// DFRobot Display GDL API
#include <DFRobot_GDL.h>
// Accelerometer
#include <DFRobot_LIS2DH12.h>
// Accelerometer
DFRobot_LIS2DH12 acce(&Wire,0x18);
// Get the acceleration in the three directions of xyz
long ax;
long ay;
long az;
// Defined ESP32
#define TFT_DC D2
#define TFT_CS D6
#define TFT_RST D3
/*dc=*/ /*cs=*/ /*rst=*/
// DFRobot Display 320x480
DFRobot_ILI9488_320x480_HW_SPI screen(TFT_DC, TFT_CS, TFT_RST);
// EEPROM Unique ID Information
#define EEPROM_SIZE 64
String uid = "";
// Software Version Information
String sver = "28-19";
void loop() {
// isAccelerometer
isAccelerometer();
// isDisplayAccelerometer
isDisplayAccelerometer();
// Delay
delay( 1000 );
}
getAccelerometer.ino
// Accelerometer
// isAccelerometer
void isAccelerometer(){

  // The measurement range can be ±100g or ±200g set by the setRange() function
  // Get the acceleration in the x direction
  ax = acce.readAccX();
// Get the acceleration in the y direction
  ay = acce.readAccY();
// Get the acceleration in the z direction
  az = acce.readAccZ();

}
getDisplay.ino
// DFRobot Display 320x480
// DFRobot Display 320x480 - UID
void isDisplayUID(){
// DFRobot Display 320x480
// Text Display
// Text Wrap
screen.setTextWrap(false);
// Rotation
screen.setRotation(3);
// Fill Screen => black
screen.fillScreen(0x0000);
// Text Color => white
screen.setTextColor(0xffff);
// Font => Free Sans Bold 12pt
screen.setFont(&FreeSansBold12pt7b);
// TextSize => 1.5
screen.setTextSize(1.5);
// Don Luc Electronics
screen.setCursor(0, 30);
screen.println("Don Luc Electronics");
// SD
screen.setCursor(0, 60);
screen.println("Accelerometer");
// Version
screen.setCursor(0, 90);
screen.println("Version");
screen.setCursor(0, 120);
screen.println( sver );
// EEPROM
screen.setCursor(0, 150);
screen.println("EEPROM");
screen.setCursor(0, 180);
screen.println( uid );
// Get chip id
screen.setCursor(0, 210);
screen.println("Chip Id:");
screen.setCursor(0, 240);
screen.println( acce.getID() );
}
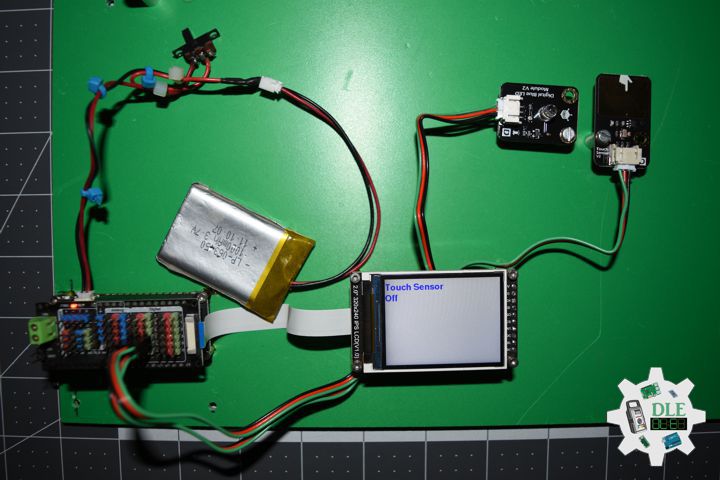
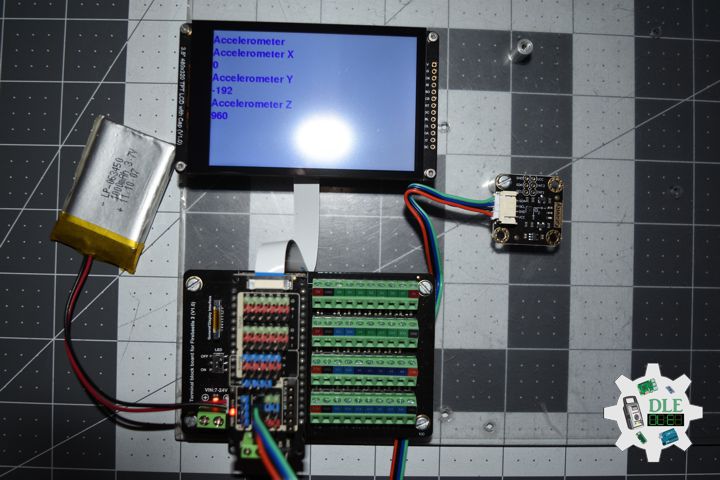
// isDisplayAccelerometer
void isDisplayAccelerometer(){
// DFRobot Display 320x480
// Text Display
// Text Wrap
screen.setTextWrap(false);
// Rotation
screen.setRotation(3);
// Fill Screen => white
screen.fillScreen(0xffff);
// Text Color => blue
screen.setTextColor(0x001F);
// Font => Free Sans Bold 12pt
screen.setFont(&FreeSansBold12pt7b);
// TextSize => 1.5
screen.setTextSize(1.5);
// Accelerometer
screen.setCursor(0, 30);
screen.println("Accelerometer");
// Accelerometer X
screen.setCursor(0, 60);
screen.println( "Accelerometer X" );
screen.setCursor(0, 90);
screen.println( ax );
// Accelerometer Y
screen.setCursor(0, 120);
screen.println( "Accelerometer Y" );
screen.setCursor(0, 150);
screen.println( ay );
// Accelerometer Z
screen.setCursor(0, 180);
screen.println( "Accelerometer Z" );
screen.setCursor(0, 210);
screen.println( az );
}
getEEPROM.ino
// EEPROM
// isUID EEPROM Unique ID
void isUID() {

  // Is Unit ID
  uid = "";
  for (int x = 0; x < 7; x++)
  {
    uid = uid + char(EEPROM.read(x));
  }

}
setup.ino
// Setup
void setup()
{

  // Delay
  delay( 100 );

  // EEPROM Size
  EEPROM.begin(EEPROM_SIZE);

  // EEPROM Unique ID
  isUID();

  // Delay
  delay( 100 );

  // DFRobot Display 320x480
  screen.begin();

  // Delay
  delay(100);

  // Accelerometer
  acce.begin();

  /*Range = */
  acce.setRange(DFRobot_LIS2DH12::eLIS2DH12_16g);

  /*
    Set data measurement rate:
      ePowerDown_0Hz
      eLowPower_1Hz
      eLowPower_10Hz
      eLowPower_25Hz
      eLowPower_50Hz
      eLowPower_100Hz
      eLowPower_200Hz
      eLowPower_400Hz
  */
  acce.setAcquireRate(DFRobot_LIS2DH12::eLowPower_10Hz);

  // Delay
  delay(100);

  // DFRobot Display 320x480 - UID
  // Don Luc Electronics
  // Version
  // EEPROM
  isDisplayUID();

  // Delay 5 Second
  delay( 5000 );

}
——
People can contact us: https://www.donluc.com/?page_id=1927
Consultant, R&D, Electronics, IoT, Teacher and Instructor
- Programming Language
- Single-Board Microcontrollers (PIC, Arduino, Raspberry Pi, Arm, Silicon Labs, Espressif, Etc…)
- IoT
- Wireless (Radio Frequency, Bluetooth, WiFi, Etc…)
- Robotics
- Automation
- Camera and Video Capture Receiver Stationary, Wheel/Tank , Underwater and UAV Vehicle
- Unmanned Vehicles Terrestrial, Marine and UAV
- Machine Learning
- Artificial Intelligence (AI)
- RTOS
- Sensors, eHealth Sensors, Biosensor, and Biometric
- Research & Development (R & D)
- Consulting
Follow Us
Luc Paquin – Curriculum Vitae – 2024
https://www.donluc.com/luc/
Web: https://www.donluc.com/
Facebook: https://www.facebook.com/neosteam.labs.9/
YouTube: https://www.youtube.com/@thesass2063
Twitter: https://twitter.com/labs_steam
Pinterest: https://www.pinterest.com/NeoSteamLabs/
Instagram: https://www.instagram.com/neosteamlabs/
DFRobot: https://learn.dfrobot.com/user-10186.html
Elecrow: https://www.elecrow.com/share/sharepj/center/no/760816d385ebb1edc0732fd873bfbf13
TikTok: https://www.tiktok.com/@luc.paquin8
Hackster: https://www.hackster.io/luc-paquin
LinkedIn: https://www.linkedin.com/in/jlucpaquin/
Don Luc