——
#DonLucElectronics #DonLuc #MAX30102PPG #FireBeetle2ESP32E #ESP32 #DFRobot #Display #IoT #Project #Fritzing #Programming #Electronics #Microcontrollers #Consultant
——
——
——
——
Photoplethysmography
A PPG sensor is a non-invasive optical device that uses light (usually LEDs) and a photodetector to measure changes in blood volume in tissues, commonly used in wearables for monitoring heart rate, oxygen saturation (SpO2), and respiration by detecting fluctuations in light absorption or reflection as blood pumps through vessels. These sensors are cost-effective and popular in smartwatches and fitness trackers, working by shining light into the skin and analyzing how much light returns, which varies with each heartbeat.
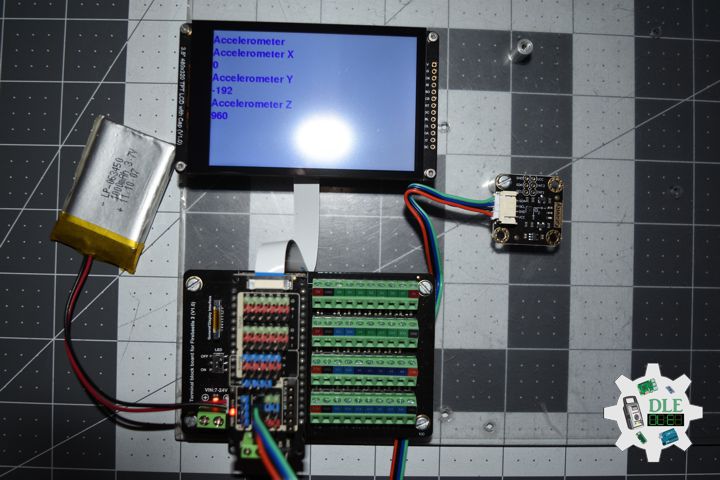
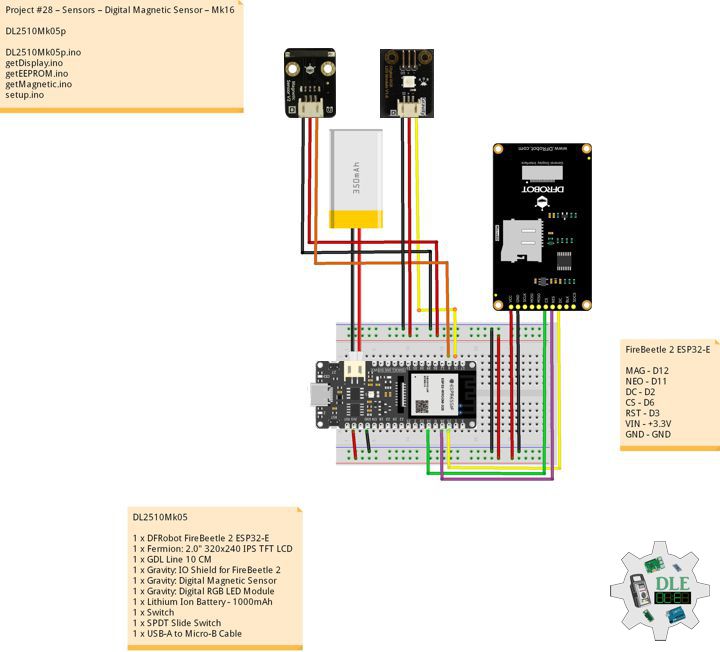
Gravity: MAX30102 PPG Heart Rate and Oximeter Sensor
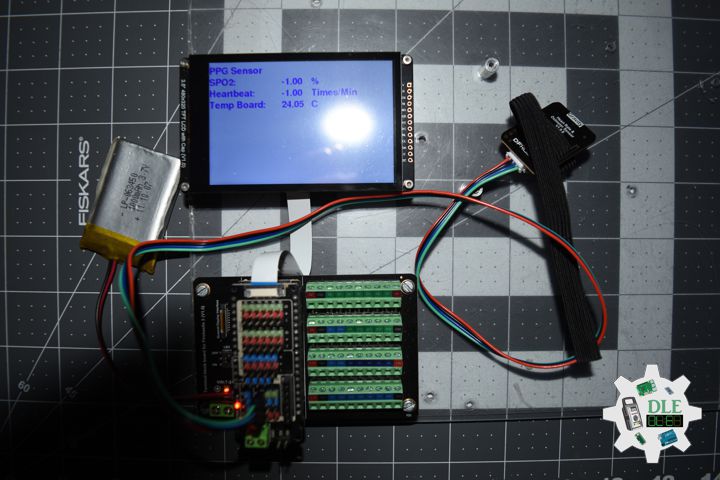
DFRobot Gravity: MAX30102 heart rate and blood oxygen sensor module integrates the Maxim MAX30102 chip and an MCU with heart rate and blood oxygen algorithm. The MAX30102 uses PPG to measure data, which will be converted into heart rate and oximetry values when processed by the MCU, then output through I2C or UART, making the sensor easy to use and greatly reducing resource occupation of the main controller. The pressure may change when the finger is directly pressed down the sensor, which will affect the data output. So please try to fix the sensor on your finger. Wear the sensor on your finger and there is no difference in the direction of wearing.
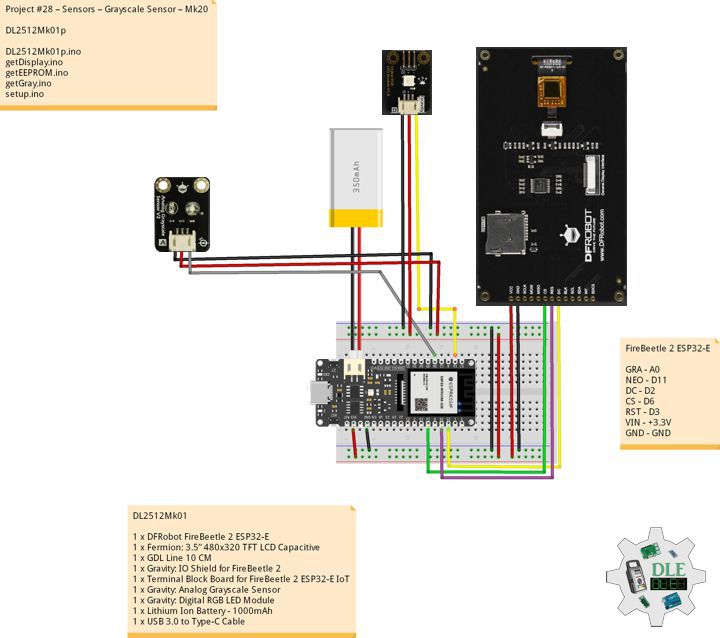
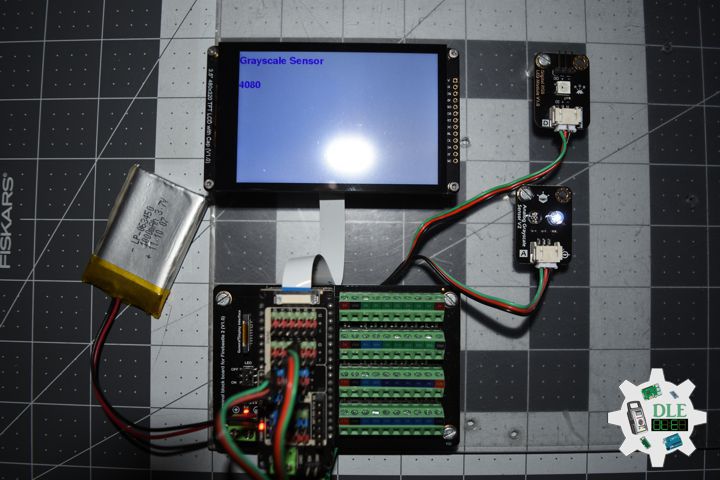
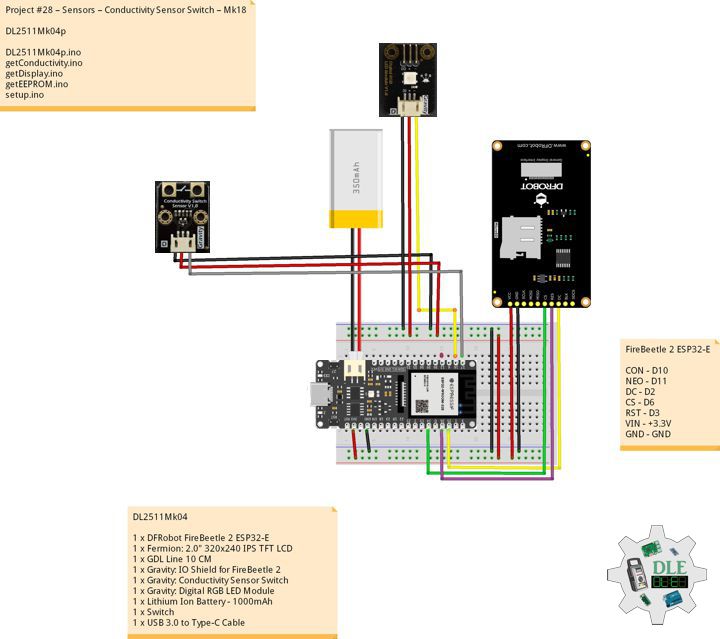
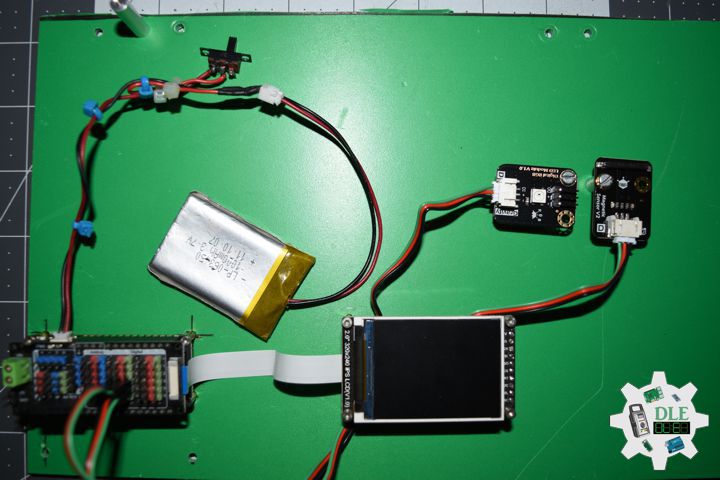
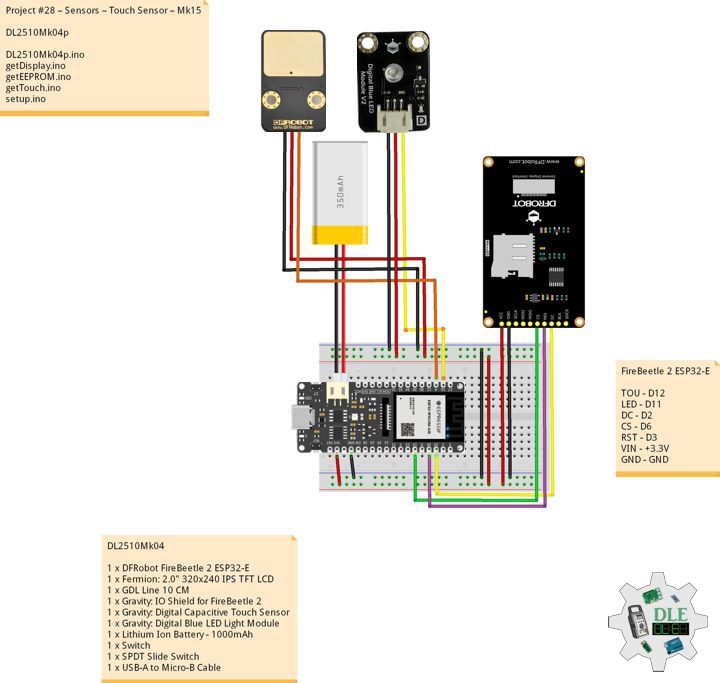
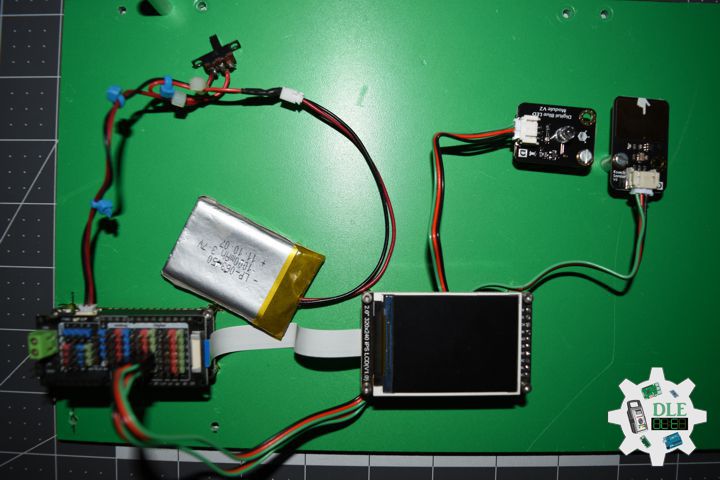
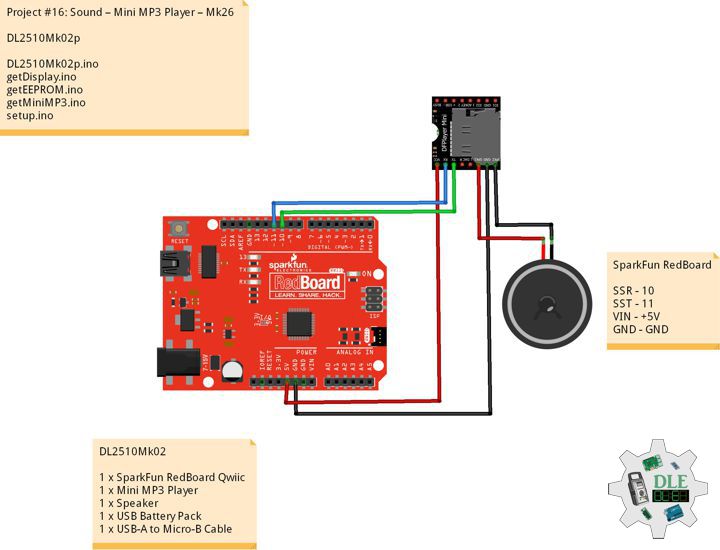
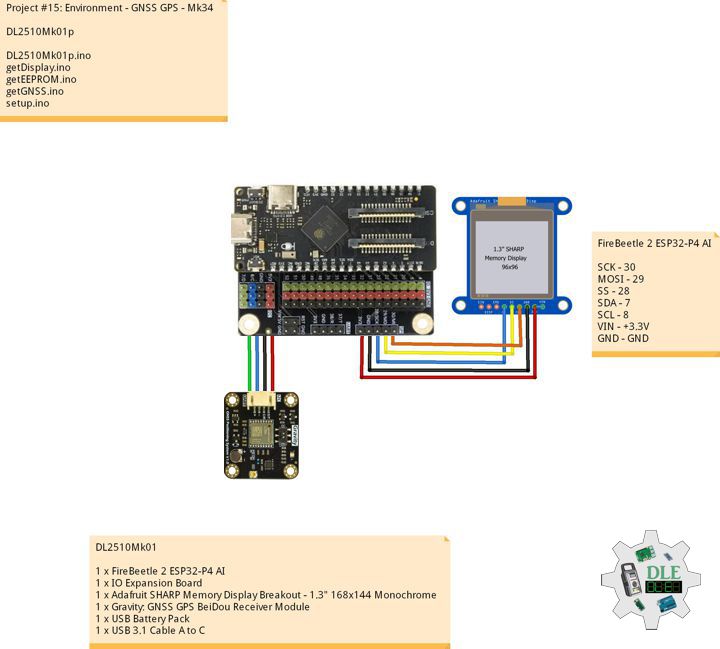
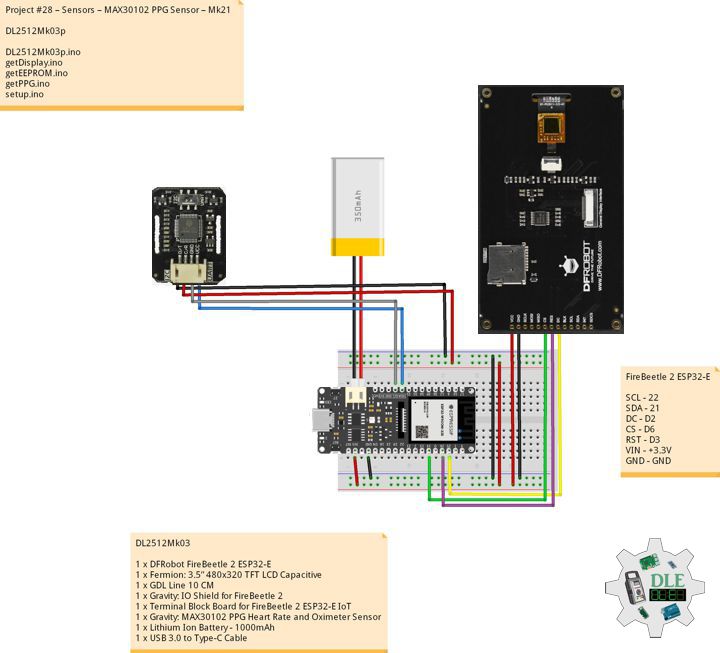
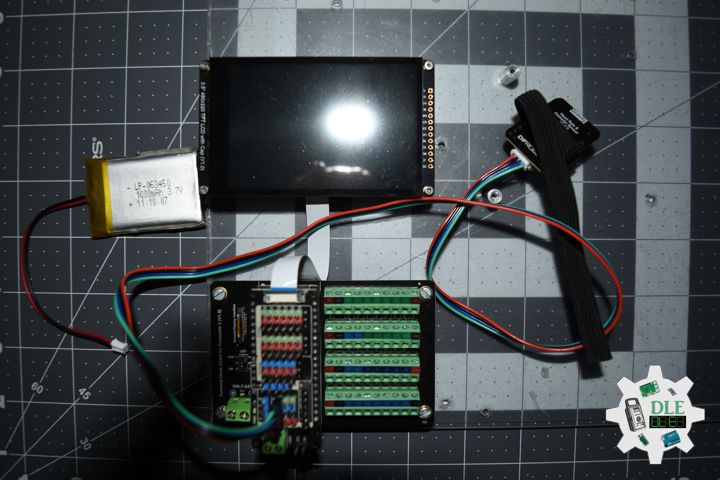
DL2512Mk03
1 x DFRobot FireBeetle 2 ESP32-E
1 x Fermion: 3.5” 480×320 TFT LCD Capacitive
1 x GDL Line 10 CM
1 x Gravity: IO Shield for FireBeetle 2
1 x Terminal Block Board for FireBeetle 2 ESP32-E IoT
1 x Gravity: MAX30102 PPG Heart Rate and Oximeter Sensor
1 x Lithium Ion Battery – 1000mAh
1 x USB 3.0 to Type-C Cable
DL2512Mk03p
DL2512Mk03p.ino
/****** Don Luc Electronics © ******
Software Version Information
Project #28 – Sensors – MAX30102 PPG Sensor – Mk21
28-21
DL2512Mk03p.ino
DL2512Mk03
1 x DFRobot FireBeetle 2 ESP32-E
1 x Fermion: 3.5” 480x320 TFT LCD Capacitive
1 x GDL Line 10 CM
1 x Gravity: IO Shield for FireBeetle 2
1 x Terminal Block Board for FireBeetle 2 ESP32-E IoT
1 x Gravity: MAX30102 PPG Heart Rate and Oximeter Sensor
1 x Lithium Ion Battery - 1000mAh
1 x USB 3.0 to Type-C Cable
*/

// Include the Library Code
// EEPROM Library to Read and Write EEPROM
// with Unique ID for Unit
#include "EEPROM.h"
// Arduino
#include "Arduino.h"
// DFRobot Display GDL API
#include <DFRobot_GDL.h>
// MAX30102 PPG Heart Rate and Oximeter
#include <DFRobot_BloodOxygen_S.h>

// Use I2C for communication, but use the
//serial port for communication if the
//line of codes were masked
#define I2C_COMMUNICATION
// Address
#define I2C_ADDRESS    0x57
// MAX30102 PPG Heart Rate and Oximeter
DFRobot_BloodOxygen_S_I2C MAX30102(&Wire ,I2C_ADDRESS);
float fSPO2 = 0;
float fHeartBeat = 0;
float fTempB = 0;

// Defined ESP32
#define TFT_DC  D2
#define TFT_CS  D6
#define TFT_RST D3

/*dc=*/ /*cs=*/ /*rst=*/
// DFRobot Display 320x480
DFRobot_ILI9488_320x480_HW_SPI screen(TFT_DC, TFT_CS, TFT_RST);

// EEPROM Unique ID Information
#define EEPROM_SIZE 64
String uid = "";

// Software Version Information
String sver = "28-21";

void loop() {

  // PPG
  isPPG();

  // isDisplayPPG
  isDisplayPPG();

  // Delay
  delay( 1000 );

}
getDisplay.ino
// DFRobot Display 320x480
// DFRobot Display 320x480 - UID
void isDisplayUID(){

  // DFRobot Display 320x480
  // Text Display
  // Text Wrap
  screen.setTextWrap(false);
  // Rotation
  screen.setRotation(3);
  // Fill Screen => black
  screen.fillScreen(0x0000);
  // Text Color => white
  screen.setTextColor(0xffff);
  // Font => Free Sans Bold 12pt
  screen.setFont(&FreeSansBold12pt7b);
  // TextSize => 1.5
  screen.setTextSize(1.5);
  // Don Luc Electronics
  screen.setCursor(0, 30);
  screen.println("Don Luc Electronics");
  // SD
  screen.setCursor(0, 60);
  screen.println("PPG Sensor");
  // Version
  screen.setCursor(0, 90);
  screen.println("Version");
  screen.setCursor(0, 120);
  screen.println( sver );
  // EEPROM
  screen.setCursor(0, 150);
  screen.println("EEPROM");
  screen.setCursor(0, 180);
  screen.println( uid );

}
// isDisplayPPG
void isDisplayPPG(){

  // DFRobot Display 320x480
  // Text Display
  // Text Wrap
  screen.setTextWrap(false);
  // Rotation
  screen.setRotation(3);
  // Fill Screen => white
  screen.fillScreen(0xffff);
  // Text Color => blue
  screen.setTextColor(0x001F);
  // Font => Free Sans Bold 12pt
  screen.setFont(&FreeSansBold12pt7b);
  // TextSize => 1.5
  screen.setTextSize(1.5);
  // Accelerometer
  screen.setCursor(0, 30);
  screen.println("PPG Sensor");
  // SPO2
  screen.setCursor(0, 60);
  screen.println("SPO2: ");
  screen.setCursor(190, 60);
  screen.println( fSPO2 );
  screen.setCursor(260, 60);
  screen.println(" %");
  // Heartbeat
  screen.setCursor(0, 90);
  screen.println("Heartbeat: ");
  screen.setCursor(190, 90);
  screen.println( fHeartBeat );
  screen.setCursor(260, 90);
  screen.println(" Times/Min");
  // Temperature Board
  screen.setCursor(0, 120);
  screen.println("Temp Board: ");
  screen.setCursor(190, 120);
  screen.println( fTempB );
  screen.setCursor(260, 120);
  screen.println(" C");

}
getEEPROM.ino
// EEPROM
// isUID EEPROM Unique ID
void isUID() {

  // Is Unit ID
  uid = "";
  for (int x = 0; x < 7; x++)
  {
    uid = uid + char(EEPROM.read(x));
  }

}
getPPG.ino
// MAX30102 PPG Heart Rate and Oximeter
// Setup PPG
void iSetupPPG(){

  // Setup PPG
  while (false == MAX30102.begin())
  {

    delay(1000);

  }

  // Begin
  MAX30102.sensorStartCollect();

}
// is PPG
void isPPG(){

  // MAX30102 PPG Heart Rate and Oximeter
  MAX30102.getHeartbeatSPO2();
  // SPO2
  fSPO2 = MAX30102._sHeartbeatSPO2.SPO2;
  // Heartbeat
  fHeartBeat = MAX30102._sHeartbeatSPO2.Heartbeat;
  // Temperature Board
  fTempB = MAX30102.getTemperature_C();

}
setup.ino
// Setup
void setup()
{

  // Delay
  delay( 100 );

  // EEPROM Size
  EEPROM.begin(EEPROM_SIZE);

  // EEPROM Unique ID
  isUID();

  // Delay
  delay( 100 );

  // Wire
  Wire.begin();

  // Delay
  delay( 100 );

  // Setup PPG
  iSetupPPG();

  // Delay
  delay( 100 );

  // DFRobot Display 320x480
  screen.begin();

  // Delay
  delay(100);

  // DFRobot Display 320x480 - UID
  // Don Luc Electronics
  // Version
  // EEPROM
  isDisplayUID();

  // Delay 5 Second
  delay( 5000 );

}
——
People can contact us: https://www.donluc.com/?page_id=1927
Consultant, R&D, Electronics, IoT, Teacher and Instructor
- Programming Language
- Single-Board Microcontrollers (PIC, Arduino, Raspberry Pi, Arm, Silicon Labs, Espressif, Etc…)
- IoT
- Wireless (Radio Frequency, Bluetooth, WiFi, Etc…)
- Robotics
- Automation
- Camera and Video Capture Receiver Stationary, Wheel/Tank , Underwater and UAV Vehicle
- Unmanned Vehicles Terrestrial, Marine and UAV
- Machine Learning
- Artificial Intelligence (AI)
- RTOS
- Sensors, eHealth Sensors, Biosensor, and Biometric
- Research & Development (R & D)
- Consulting
Follow Us
Luc Paquin – Curriculum Vitae – 2024
https://www.donluc.com/luc/
Web: https://www.donluc.com/
Facebook: https://www.facebook.com/neosteam.labs.9/
YouTube: https://www.youtube.com/@thesass2063
DFRobot: https://learn.dfrobot.com/user-10186.html
Elecrow: https://www.elecrow.com/share/sharepj/center/no/760816d385ebb1edc0732fd873bfbf13
TikTok: https://www.tiktok.com/@luc.paquin8
Hackster: https://www.hackster.io/luc-paquin
LinkedIn: https://www.linkedin.com/in/jlucpaquin/
Don Luc