——
#DonLucElectronics #DonLuc #DFRobot #GPS #BME280 #CCS811 #FireBeetle2ESP32E #EEPROM #RTC #SD #Display #Adafruit #SparkFun #ESP32 #IoT #Arduino #Project #Fritzing #Programming #Electronics #Microcontrollers #Consultant
——
——

——
——
Global Positioning System (GPS)
The Global Positioning System (GPS) is a satellite-based radionavigation system owned by the United States government and operated by the United States Space Force. It is one of the global navigation satellite systems (GNSS) that provides geolocation and time information to a GPS receiver anywhere on or near the Earth where there is an unobstructed line of sight to four or more GPS satellites. Obstacles such as mountains and buildings block the relatively weak GPS signals.
GPS Receiver – GP-20U7
The GP-20U7 is a compact GPS receiver with a built-in high performances All-In-One GPS chipset. The GP-20U7 accurately provides position, velocity, and time readings as well possessing high sensitivity and tracking capabilities. Thanks to the low power consumption this receiver requires, the GP-20U7 is ideal for portable applications such as tablet PCs, smart phones, and other devices requiring positioning capability.
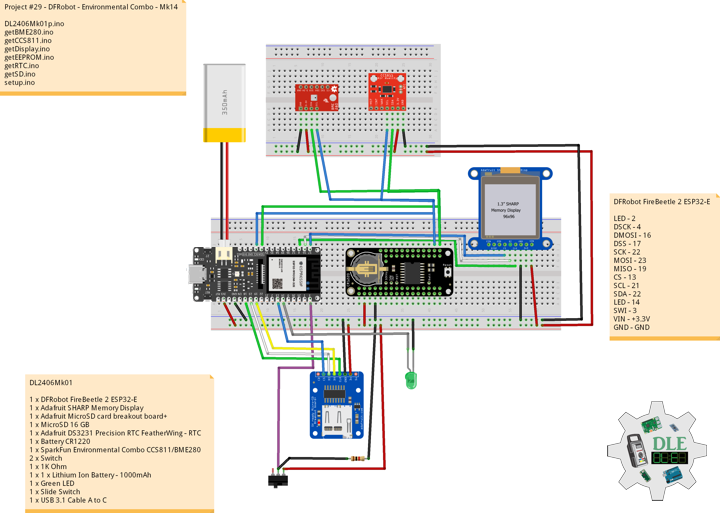
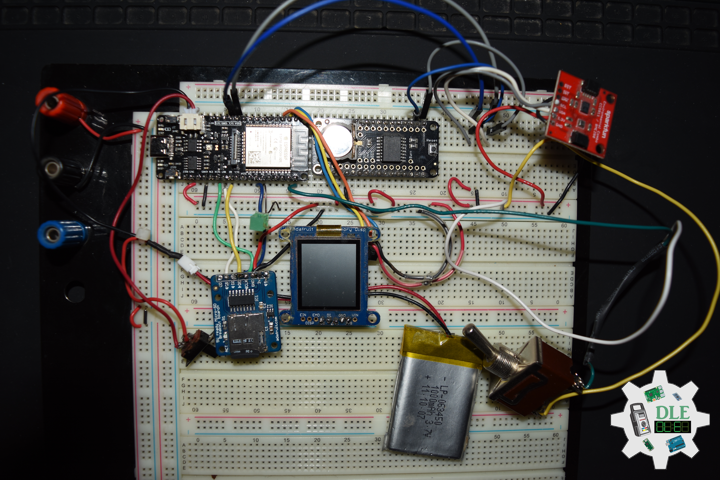
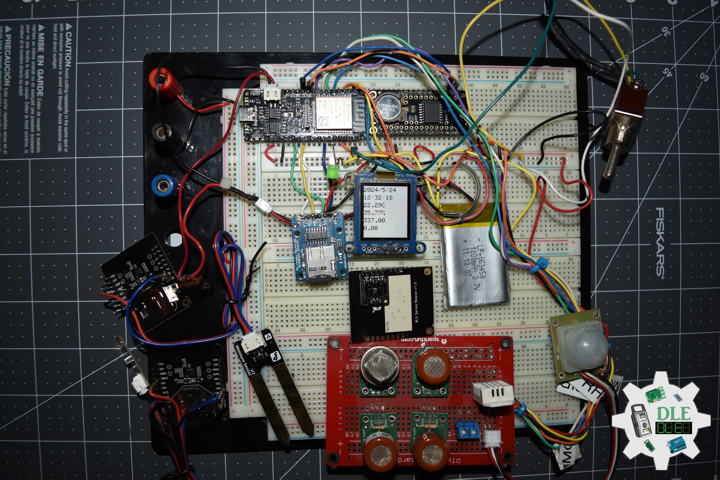
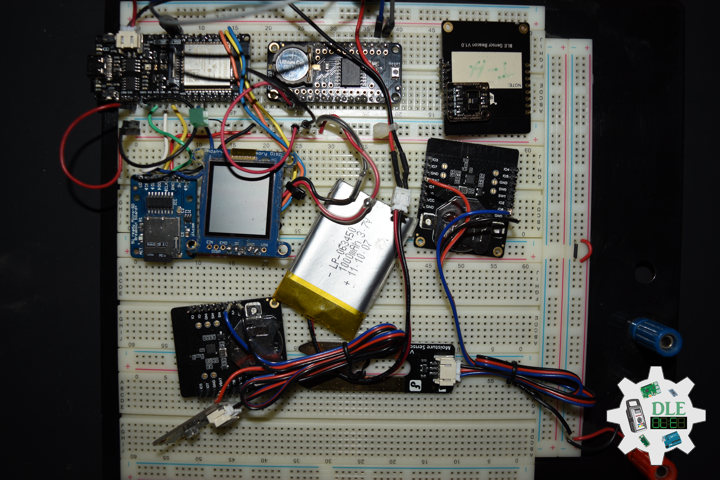
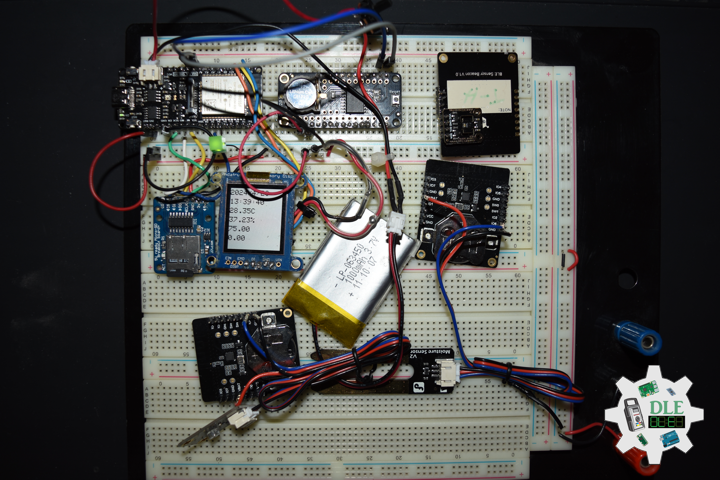
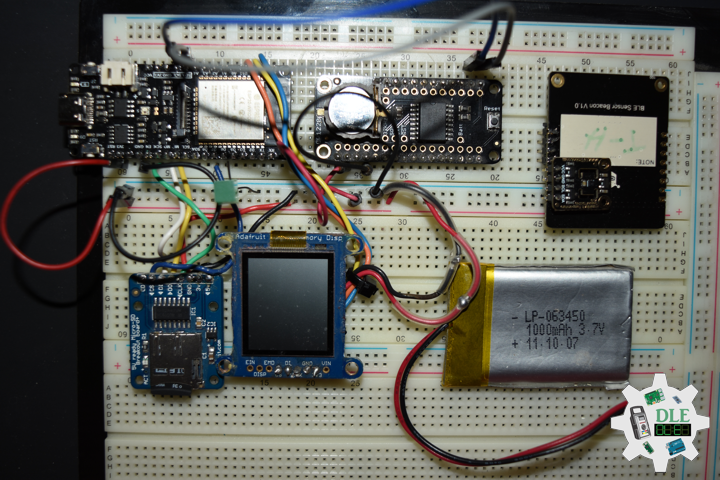
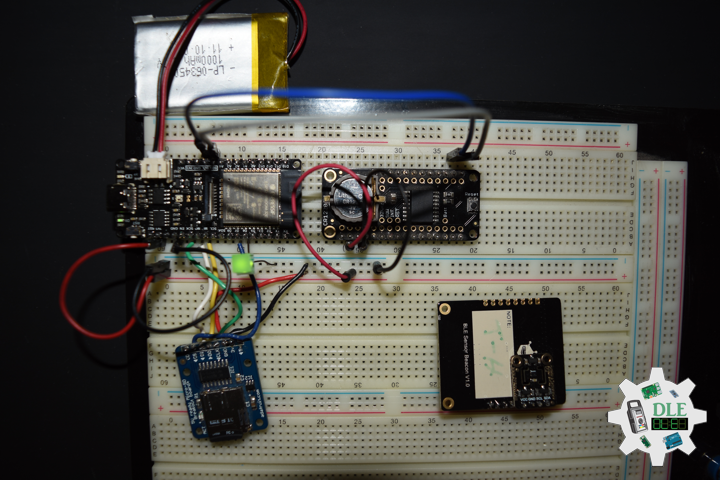
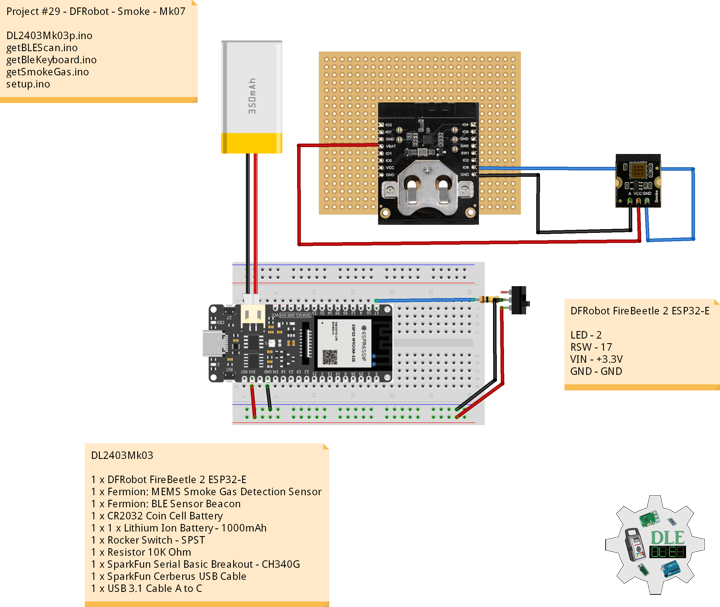
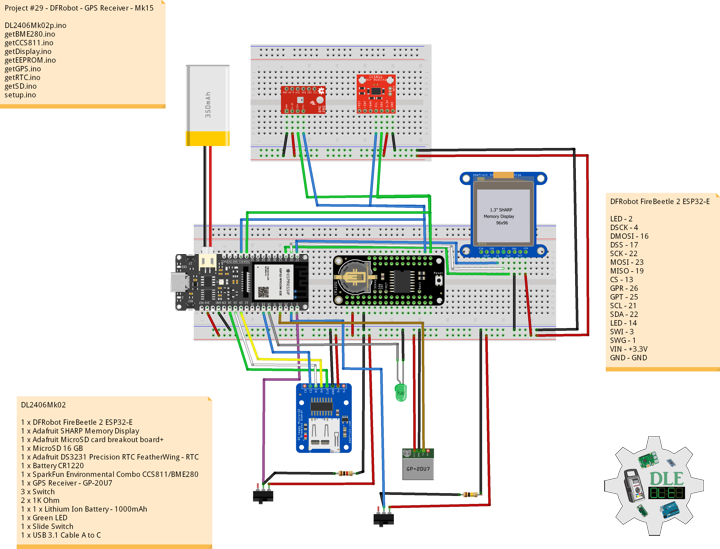
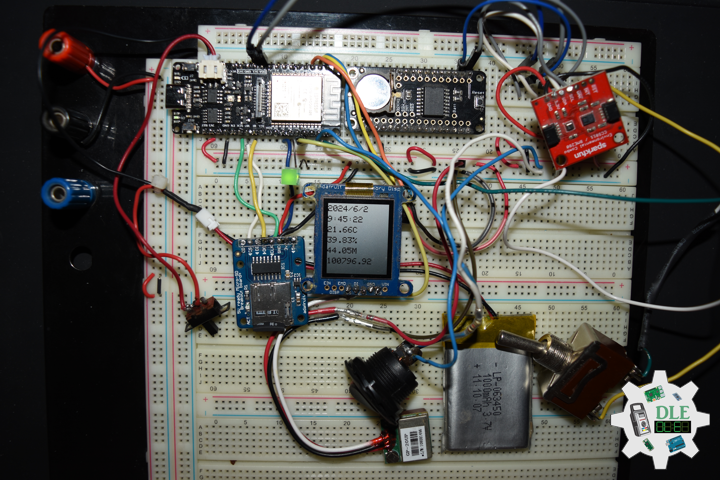
DL2406Mk02
1 x DFRobot FireBeetle 2 ESP32-E
1 x Adafruit SHARP Memory Display
1 x Adafruit MicroSD card breakout board+
1 x MicroSD 16 GB
1 x Adafruit DS3231 Precision RTC FeatherWing – RTC
1 x Battery CR1220
1 x SparkFun Environmental Combo CCS811/BME280
1 x GPS Receiver – GP-20U7
3 x Switch
2 x 1K Ohm
1 x 1 x Lithium Ion Battery – 1000mAh
1 x Green LED
1 x USB 3.1 Cable A to C
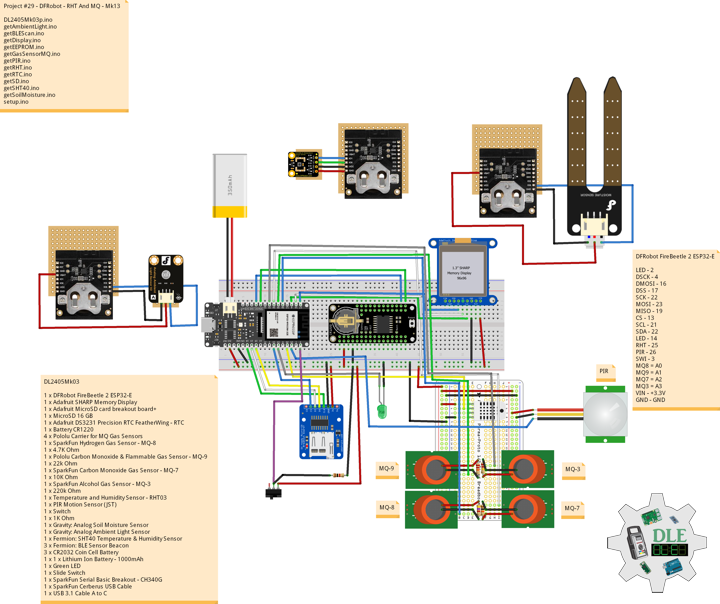
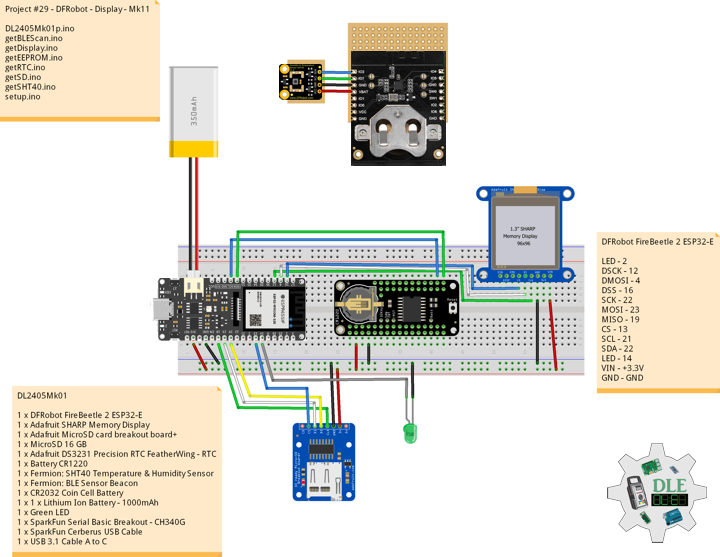
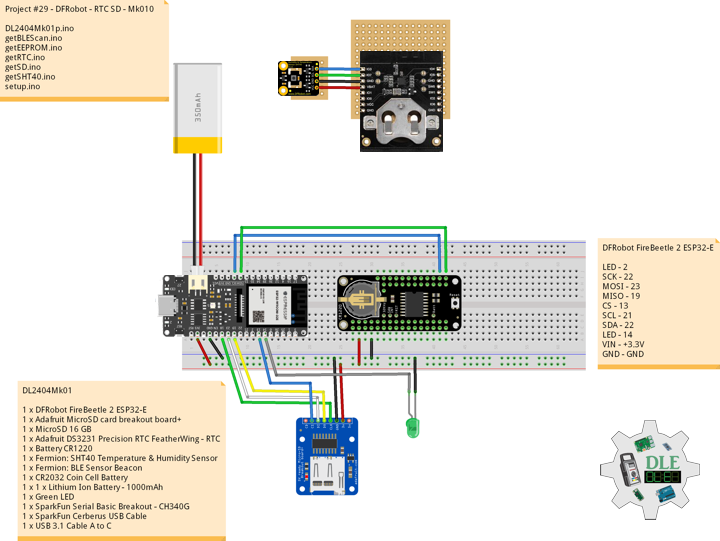
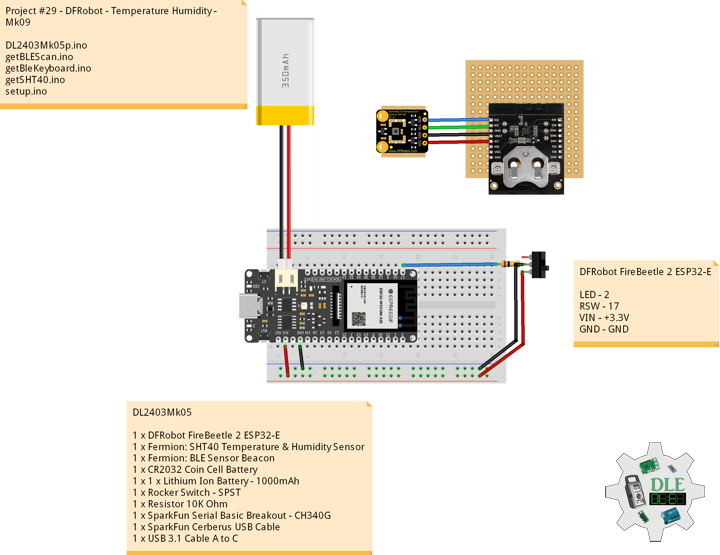
DFRobot FireBeetle 2 ESP32-E
LED – 2
DSCK – 4
DMOSI – 16
DSS – 17
SCK – 22
MOSI – 23
MISO – 19
CS – 13
GPR – 26
GPT – 25
SCL – 21
SDA – 22
LED – 14
SWI – 3
SWG – 1
VIN – +3.3V
GND – GND
——
DL2406Mk02p.ino
/****** Don Luc Electronics © ******
Software Version Information
Project #29 - DFRobot - GPS Receiver - Mk15
29-15
DL2406Mk02p.ino
DL2406Mk02
1 x DFRobot FireBeetle 2 ESP32-E
1 x Adafruit SHARP Memory Display
1 x Adafruit MicroSD card breakout board+
1 x MicroSD 16 GB
1 x Adafruit DS3231 Precision RTC FeatherWing - RTC
1 x Battery CR1220
1 x SparkFun Environmental Combo CCS811/BME280
1 x GPS Receiver - GP-20U7
3 x Switch
2 x 1K Ohm
1 x 1 x Lithium Ion Battery - 1000mAh
1 x Green LED
1 x USB 3.1 Cable A to C
*/

// Include the Library Code
// EEPROM Library to Read and Write EEPROM
// with Unique ID for Unit
#include "EEPROM.h"
// Wire
#include <Wire.h>
// DS3231 RTC Date and Time
#include <RTClib.h>
// SD Card
#include "FS.h"
#include "SD.h"
#include "SPI.h"
// SHARP Memory Display
#include <Adafruit_SharpMem.h>
#include <Adafruit_GFX.h>
// SparkFun BME280 - Humidity, Temperature, Altitude and Barometric Pressure
#include <SparkFunBME280.h>
// SparkFun CCS811 - eCO2 & tVOC
#include <SparkFunCCS811.h>
// GPS Receiver
#include <TinyGPS++.h>
// ESP32 Hardware Serial
#include <HardwareSerial.h>

// ESP32 HardwareSerial
HardwareSerial tGPS(2);

// GPS Receiver
#define gpsRXPIN 26
// This one is unused and doesnt have a conection
#define gpsTXPIN 25
// The TinyGPS++ object
TinyGPSPlus gps;
// Latitude
float TargetLat;
// Longitude
float TargetLon;
// GPS Date, Time, Speed, Altitude
// GPS Date
String TargetDat;
// GPS Time
String TargetTim;
// GPS Speeds M/S
String TargetSMS;
// GPS Speeds Km/h
String TargetSKH;
// GPS Altitude Meters
String TargetALT;
// GPS Status
String GPSSt = "";

// SparkFun BME280 - Temperature, Humidity, Altitude and Barometric Pressure
BME280 myBME280;
// Temperature Celsius
float BMEtempC = 0;
// Humidity
float BMEhumid = 0;
// Altitude Meters
float BMEaltitudeM = 0;
// Barometric Pressure
float BMEpressure = 0;

// SparkFun CCS811 - eCO2 & tVOC
// Default I2C Address
#define CCS811_ADDR 0x5B
CCS811 myCCS811(CCS811_ADDR);
// eCO2
float CCS811CO2 = 0;
// TVOC
float CCS811TVOC = 0;

// DS3231 RTC Date and Time
RTC_DS3231 rtc;
String sDate;
String sTime;

// MicroSD Card
const int chipSelect = 13;
String zzzzzz = "";

// SHARP Memory Display
#define SHARP_SCK  4
#define SHARP_MOSI 16
#define SHARP_SS   17
// Set the size of the display here, e.g. 144x168!
Adafruit_SharpMem display(SHARP_SCK, SHARP_MOSI, SHARP_SS, 144, 168);
// The currently-available SHARP Memory Display (144x168 pixels)
// requires > 4K of microcontroller RAM; it WILL NOT WORK on Arduino Uno
// or other <4K "classic" devices.
#define BLACK 0
#define WHITE 1

// LED Green
int iLEDGreen = 2;

// Define LED
int iLED = 14;

// Switch
int iSwitch = 3;
// Variable for reading the Switch status
int iSwitchState = 0;

// Switch GPS
int iSwitchGPS = 1;
// Variable for reading the Switch GPS status
int iSwitchGPSState = 0;

// EEPROM Unique ID Information
#define EEPROM_SIZE 64
String uid = "";

// Software Version Information
String sver = "29-15";

void loop() {

  // DS3231 RTC Date and Time
  isRTC();

  // SparkFun BME280 - Temperature, Humidity, Altitude and Barometric Pressure
  isBME280();

  // SparkFun CCS811 - eCO2 & tVOC
  isCCS811();

  // isGPS
  isGPS();

  // Read the state of the Switch value
  iSwitchState = digitalRead(iSwitch);

  // The Switch is HIGH:
  if (iSwitchState == HIGH) {

    // Display Date, Time, Temperature, Humidity
    isDisplayDTTH();

  } else {

    // Read the state of the Switch value
    iSwitchGPSState = digitalRead(iSwitchGPS);

    if (iSwitchGPSState == HIGH) {

      // Display GPS
      isDisplayGPS();

    } else {

      // Display Date, Time, eCO2 Concentration, tVOC Concentration
      isDisplayDTCOVO();

    }

  }

  // MicroSD Card
  isSD();

  // iLED HIGH
  digitalWrite(iLED, HIGH );

  // Delay 5 Second
  delay(5000);

}
getBME280.ino
// SparkFun BME280 - Temperature, Humidity, Altitude and Barometric Pressure
// isBME280 - Temperature, Humidity, Altitude and Barometric Pressure
void isBME280(){

  // Temperature Celsius
  BMEtempC = myBME280.readTempC();
  // Humidity
  BMEhumid = myBME280.readFloatHumidity() ;
  // Altitude Meters
  BMEaltitudeM = myBME280.readFloatAltitudeMeters();
  // Barometric Pressure
  BMEpressure = myBME280.readFloatPressure();

}
getCCS811.ino
// CCS811 - eCO2 & tVOC
// isCCS811 - eCO2 & tVOC
void isCCS811(){

  // This sends the temperature & humidity data to the CCS811
  myCCS811.setEnvironmentalData(BMEhumid, BMEtempC);

  // Calling this function updates the global tVOC and eCO2 variables
  myCCS811.readAlgorithmResults();

  // eCO2 Concentration
  CCS811CO2 = myCCS811.getCO2();

  // tVOC Concentration
  CCS811TVOC = myCCS811.getTVOC();

}
getDisplay.ino
// SHARP Memory Display
// SHARP Memory Display - UID
void isDisplayUID() {
// Text Display
// Clear Display
display.clearDisplay();
display.setRotation(4);
display.setTextSize(3);
display.setTextColor(BLACK);
// Don Luc Electronics
display.setCursor(0,10);
display.println( "Don Luc" );
display.setTextSize(2);
display.setCursor(0,40);
display.println( "Electronics" );
// Version
//display.setTextSize(3);
display.setCursor(0,70);
display.println( "Version" );
//display.setTextSize(2);
display.setCursor(0,95);
display.println( sver );
// EEPROM
display.setCursor(0,120);
display.println( "EEPROM" );
display.setCursor(0,140);
display.println( uid );
// Refresh
display.refresh();
delay( 100 );
}
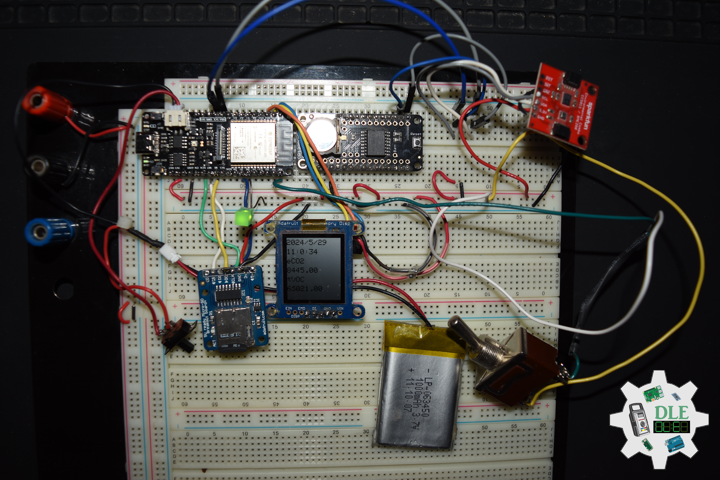
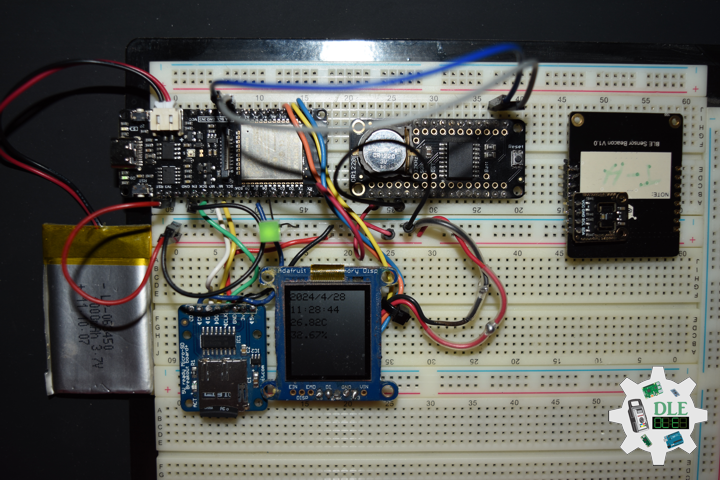
// Display Date, Time, Temperature, Humidity, Altitude and Barometric Pressure
void isDisplayDTTH() {
// Text Display Date
// Clear Display
display.clearDisplay();
display.setRotation(4);
display.setTextSize(2);
display.setTextColor(BLACK);
// Date
display.setCursor(0,5);
display.println( sDate );
// Time
display.setCursor(0,30);
display.println( sTime );
// Temperature
display.setCursor(0,55);
display.print( BMEtempC );
display.println( "C" );
// Humidity
display.setCursor(0,80);
display.print( BMEhumid );
display.println( "%" );
// Altitude Meters
display.setCursor(0,105);
display.print( BMEaltitudeM );
display.println( "M" );
// Barometric Pressure
display.setCursor(0,130);
display.println( BMEpressure );
// Refresh
display.refresh();
delay( 100 );
}
// Display Display Date, Time, eCO2 Concentration, tVOC Concentration
void isDisplayDTCOVO() {
// Text Display Date
// Clear Display
display.clearDisplay();
display.setRotation(4);
display.setTextSize(2);
display.setTextColor(BLACK);
// Date
display.setCursor(0,5);
display.println( sDate );
// Time
display.setCursor(0,30);
display.println( sTime );
// eCO2 Concentration
display.setCursor(0,55);
display.println( "eCO2" );
display.setCursor(0,80);
display.println( CCS811CO2 );
// tVOC Concentration
display.setCursor(0,105);
display.println( "tVOC" );
display.setCursor(0,130);
display.println( CCS811TVOC );
// Refresh
display.refresh();
delay( 100 );
}
// Display GPS
void isDisplayGPS() {
// Text Display Date
// Clear Display
display.clearDisplay();
display.setRotation(4);
display.setTextSize(2);
display.setTextColor(BLACK);
// Latitude
display.setCursor(0,5);
display.print( "Lat: " );
display.println( TargetLat );
// Longitude
display.setCursor(0,30);
display.print( "Lon: " );
display.println( TargetLon );
// GPS Date
display.setCursor(0,55);
display.println( TargetDat );
// GPS Time
display.setCursor(0,80);
display.println( TargetTim );
// GPS Speed M/S
display.setCursor(0,105);
display.print( TargetSMS );
display.println( " M/S" );
// GPS Altitude Meters
display.setCursor(0,130);
display.print( TargetALT );
display.println( " M" );
// Refresh
display.refresh();
delay( 100 );
}
getEEPROM.ino
// EEPROM
// isUID EEPROM Unique ID
void isUID()
{

  // Is Unit ID
  uid = "";
  for (int x = 0; x < 7; x++)
  {
    uid = uid + char(EEPROM.read(x));
  }

}
getGPS.ino
// GPS Receiver
// Setup GPS
void isSetupGPS() {

  // Setup GPS
  tGPS.begin(  9600 , SERIAL_8N1 , gpsRXPIN , gpsTXPIN );

}
// isGPS
void isGPS(){

  // Receives NEMA data from GPS receiver
  // This sketch displays information every time a new sentence is correctly encoded
  while ( tGPS.available() > 0)

    if (gps.encode( tGPS.read() ))
    {

       // GPS Vector Pointer Target
       displayInfo();
       // GPS Date, Time, Speed, Altitude
       displayDTS();

    }

  if (millis() > 5000 && gps.charsProcessed() < 10)
  {

     while(true);

  }

}
// GPS Vector Pointer Target
void displayInfo(){

  // Location
  if (gps.location.isValid())
  {

     // Latitude
     TargetLat = gps.location.lat();
     // Longitude
     TargetLon = gps.location.lng();
     // GPS Status 2
     GPSSt = "Yes";

  }
  else
  {

     // GPS Status 0
     GPSSt = "No";

  }

}
// GPS Date, Time, Speed, Altitude
void displayDTS(){

  // Date
  TargetDat = "";
  if (gps.date.isValid())
  {

     // Date
     // Year
     TargetDat += String(gps.date.year(), DEC);
     TargetDat += "/";
     // Month
     TargetDat += String(gps.date.month(), DEC);
     TargetDat += "/";
     // Day
     TargetDat += String(gps.date.day(), DEC);

  }

  // Time
  TargetTim = "";
  if (gps.time.isValid())
  {

     // Time
     // Hour
     TargetTim += String(gps.time.hour(), DEC);
     TargetTim += ":";
     // Minute
     TargetTim += String(gps.time.minute(), DEC);
     TargetTim += ":";
     // Secound
     TargetTim += String(gps.time.second(), DEC);

  }

  // Speed
  TargetSMS = "";
  TargetSKH = "";
  if (gps.speed.isValid())
  {

     // Speed
     // M/S
     int x = gps.speed.mps();
     TargetSMS = String( x, DEC);
     // Km/h
     int y = gps.speed.kmph();
     TargetSKH = String( y, DEC);

  }

  // Altitude
  TargetALT = "";
  if (gps.altitude.isValid())
  {

     // Altitude
     // Meters
     int z = gps.altitude.meters();
     TargetALT = String( z, DEC);

  }

}
getRTC.ino
// DS3231 RTC Date and Time
// Setup DS3231 RTC
void isSetupRTC() {

  if (! rtc.begin()) {
    while (1);
  }

  if (rtc.lostPower()) {
    // Following line sets the RTC to the date & time this sketch was compiled
    rtc.adjust(DateTime(F(__DATE__), F(__TIME__)));
    // This line sets the RTC with an explicit date & time, for example to set
    // January 21, 2014 at 3am you would call:
    // rtc.adjust(DateTime(2014, 1, 21, 3, 0, 0));
  }

}
// DS3231 RTC Date and Time
void isRTC(){

    // Date and Time
    sDate = "";
    sTime = "";
    // Date Time
    DateTime now = rtc.now();

    // sData
    sDate += String(now.year(), DEC);
    sDate += "/";
    sDate += String(now.month(), DEC);
    sDate += "/";
    sDate += String(now.day(), DEC);

    // sTime
    sTime += String(now.hour(), DEC);
    sTime += ":";
    sTime += String(now.minute(), DEC);
    sTime += ":";
    sTime += String(now.second(), DEC);

}
getSD.ino
// MicroSD Card
// MicroSD Setup
void isSetupSD() {

    // MicroSD Card
    pinMode( chipSelect , OUTPUT );
    if(!SD.begin( chipSelect )){
        ;
        return;
    }

    uint8_t cardType = SD.cardType();

    // CARD NONE
    if(cardType == CARD_NONE){
        ;
        return;
    }

    // SD Card Type
    if(cardType == CARD_MMC){
        ;
    } else if(cardType == CARD_SD){
        ;
    } else if(cardType == CARD_SDHC){
        ;
    } else {
        ;
    }

    // Size
    uint64_t cardSize = SD.cardSize() / (1024 * 1024);

}
// MicroSD Card
void isSD() {

  zzzzzz = "";

  // DFR|EEPROM Unique ID|Version|Date|Time|Temperature Celsius|Humidity
  //|Altitude Meters|Barometric Pressure|eCO2 Concentration|tVOC Concentration
  //|GPS|Latitude|Longitude|GPS Date|GPS Time|GPS Speed M/S|GPS Altitude|*\r
  zzzzzz = "DFR|" + uid + "|" + sver + "|" + sDate + "|" + sTime + "|"
  + String(BMEtempC) + "C|" + String(BMEhumid) + "%|"
  + String(BMEaltitudeM) + " M|" + String(BMEpressure) + "|" + String(CCS811CO2) + "|"
  + String(CCS811TVOC) + "|" + String(GPSSt) + "|" + String(TargetLat) + "|"
  + String(TargetLon) + "|" + String(TargetDat) + "|" + String(TargetTim) + "|"
  + String(TargetSMS) + "|" + String(TargetALT)+ "|*\r";

  // msg + 1
  char msg[zzzzzz.length() + 1];

  zzzzzz.toCharArray(msg, zzzzzz.length() + 1);

  // Append File
  appendFile(SD, "/dfrdata.txt", msg );

}
// List Dir
void listDir(fs::FS &fs, const char * dirname, uint8_t levels){

    // List Dir
    dirname;

    File root = fs.open(dirname);

    if(!root){
        return;
    }

    if(!root.isDirectory()){
        return;
    }

    File file = root.openNextFile();

    while(file){
        if(file.isDirectory()){
            file.name();
            if(levels){
                listDir(fs, file.name(), levels -1);
            }
        } else {
            file.name();
            file.size();
        }
        file = root.openNextFile();
    }

}
// Write File
void writeFile(fs::FS &fs, const char * path, const char * message){

    // Write File
    path;

    File file = fs.open(path, FILE_WRITE);

    if(!file){
        return;
    }

    if(file.print(message)){
        ;
    } else {
        ;
    }

    file.close();

}
// Append File
void appendFile(fs::FS &fs, const char * path, const char * message){

    // Append File
    path;

    File file = fs.open(path, FILE_APPEND);

    if(!file){
        return;
    }

    if(file.print(message)){
        ;
    } else {
        ;
    }

    file.close();

}
setup.ino
// Setup
void setup()
{

  // Give display time to power on
  delay(100);

  // EEPROM Size
  EEPROM.begin(EEPROM_SIZE);

  // EEPROM Unique ID
  isUID();

  // Give display
  delay(100);

  // Set up I2C bus
  Wire.begin();

  // Give display
  delay(100);

  // Setup DS3231 RTC
  isSetupRTC();

  //MicroSD Card
  isSetupSD();

  // SHARP Display Start & Clear the Display
  display.begin();
  // Clear Display
  display.clearDisplay();

  // Delay
  delay( 100 );

  // SparkFun BME280 - Temperature, Humidity, Altitude and Barometric Pressure
  myBME280.begin();

  // CCS811 - eCO2 & tVOC
  myCCS811.begin();

  // Delay
  delay( 100 );

  // GPS Receiver
  // Setup GPS
  isSetupGPS();

  // Initialize digital pin iLED as an output
  pinMode(iLED, OUTPUT);

  // Outputting high, the LED turns on
  digitalWrite(iLED, HIGH);

  // Initialize the LED Green
  pinMode(iLEDGreen, OUTPUT);

  // iLEDGreen HIGH
  digitalWrite(iLEDGreen, HIGH );

  // Initialize the Switch
  pinMode(iSwitch, INPUT);

  // Initialize the Switch GPS
  pinMode(iSwitchGPS, INPUT);

  // Don Luc Electronics
  // Version
  // EEPROM
  isDisplayUID();

  // Delay 5 Second
  delay( 5000 );

}
——
People can contact us: https://www.donluc.com/?page_id=1927
Teacher, Instructor, E-Mentor, R&D and Consulting
- Programming Language
- Single-Board Microcontrollers (PIC, Arduino, Raspberry Pi, Arm, Silicon Labs, Espressif, Etc…)
- IoT
- Wireless (Radio Frequency, Bluetooth, WiFi, Etc…)
- Robotics
- Automation
- Camera and Video Capture Receiver Stationary, Wheel/Tank and Underwater Vehicle
- Unmanned Vehicles Terrestrial and Marine
- Machine Learning
- Artificial Intelligence (AI)
- RTOS
- Sensors, eHealth Sensors, Biosensor, and Biometric
- Research & Development (R & D)
- Consulting
Follow Us
Luc Paquin – Curriculum Vitae – 2024
https://www.donluc.com/luc/
Web: https://www.donluc.com/
Facebook: https://www.facebook.com/neosteam.labs.9/
YouTube: https://www.youtube.com/@thesass2063
Twitter: https://twitter.com/labs_steam
Pinterest: https://www.pinterest.com/NeoSteamLabs/
Instagram: https://www.instagram.com/neosteamlabs/
LinkedIn: https://www.linkedin.com/in/jlucpaquin/
Don Luc