——
#DonLucElectronics #DonLuc #Robotics #Arduino #Fio #ArduinoProMini #XBee #DCMotor #MotorDriver #Project #Fritzing #Programming #Electronics #Microcontrollers #Consultant
——
——
——
——
USB/DC Lithium Polymer Battery Charger 5-12V – 3.7/4.2v Cells
Charge your single-cell lithium ion/polymer battery any which way you like with this board. Other nice things about this charger include multiple LEDs for power & charging status, including a charging LED which will blink when the battery is full. If the charger gets too hot from high-speed charging, it will slow down the charge rate automatically. You can easily adjust the charge rate up to 1.2A or down to 100mA. For use with Adafruit Lipoly/LiIon batteries only. Other batteries may have different voltage, chemistry, polarity or pinout.
- Use USB or DC power – 5 to 12V input
- Charges one single-cell 3.7/4.2v batteries with constant current/constant voltage
- Three indicator LEDs – green for Power, orange for charging and red for error
- Charging LED will blink when the battery is full
- 2 JST connections so you can keep the battery plugged in and powering your project
- Terminal block connections galore just solder in 3.5mm terminal blocks
- Default charge rate is about 500mA, but you can easily change this by soldering in a through-hole resistor on. The chip can do 100-1200 mA charging
- Safety timer will stop charging after about 14 hours
- The chip supports a standard 10K thermistor, which we have stuffed as a standard resistor. You can solder in a thermistor easily
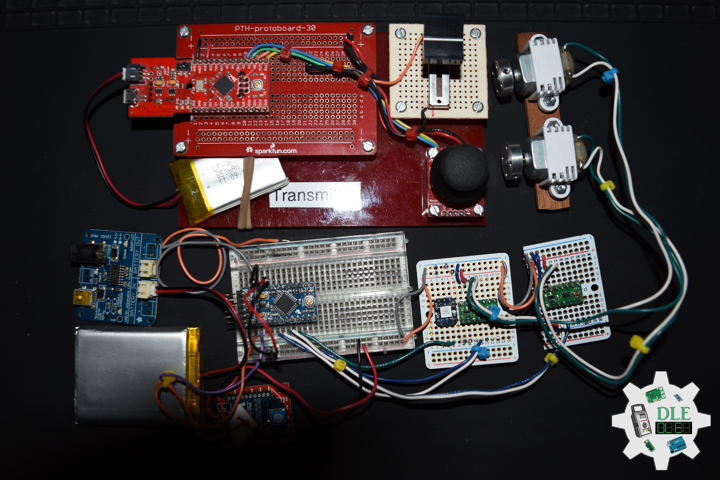
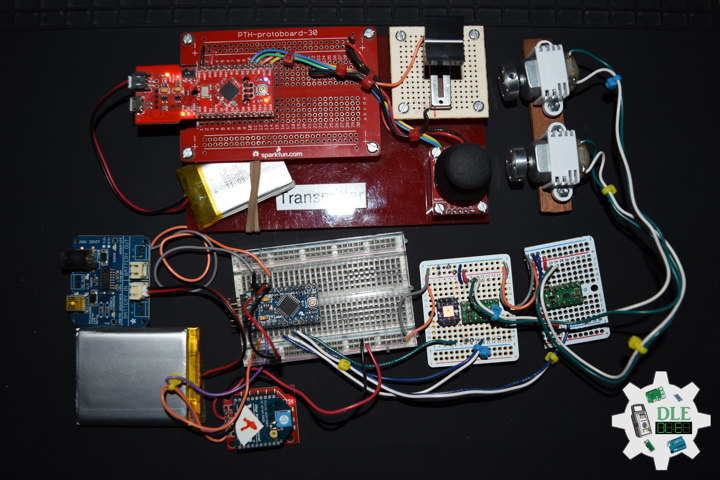
DL2201Mk04
1 x Fio v3 – ATmega32U4
1 x Arduino Pro Mini 328 – 5V/16MHz
1 x SparkFun FTDI Basic Breakout – 5V
1 x USB/DC Lithium Polymer Battery Charger
2 x XBee S1
1 x XBee Explorer Regulated
1 x Lithium Ion Battery – 850mAh
1 x Lithium Ion Battery – 2500mAh
1 x Thumb Joystick
1 x SparkFun Thumb Joystick Breakout
1 x Slide Pot (Small)
1 x Slide Potentiometer Knob
1 x RGB Smart NeoPixel
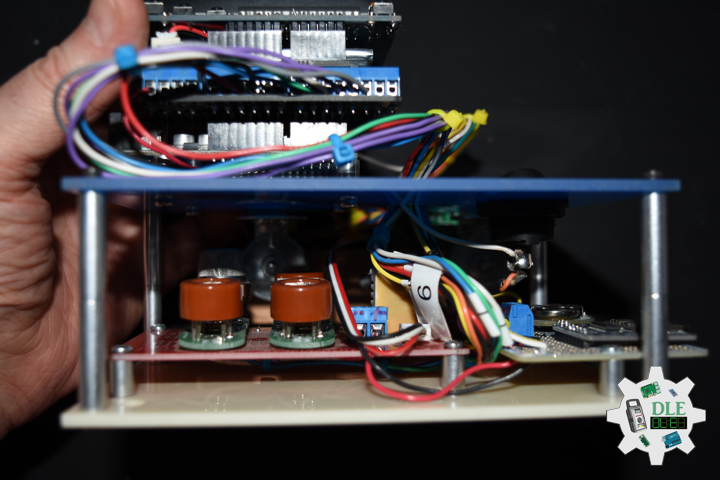
2 x DRV8835 Dual Motor Driver Carrier
2 x Solarbotics RM2
2 x Pololu Universal Aluminum Mounting Hub 3mm Shaft, #4-40 Holes
2 x Pololu Mini Plastic Gearmotor Bracket Pair – Wide
1 x Half-Size Breadboard
2 x Adafruit Perma-Proto Quarter-Sized Breadboard
1 x SparkFun Cerberus USB Cable
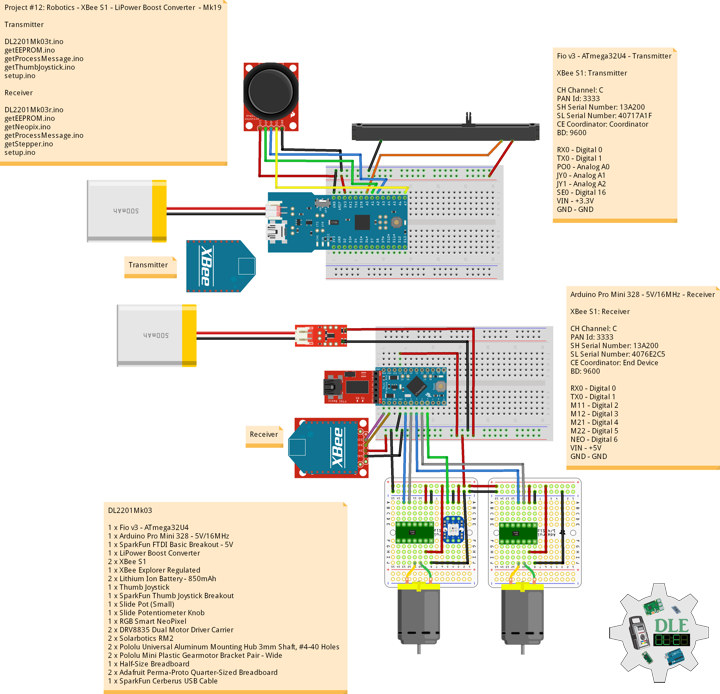
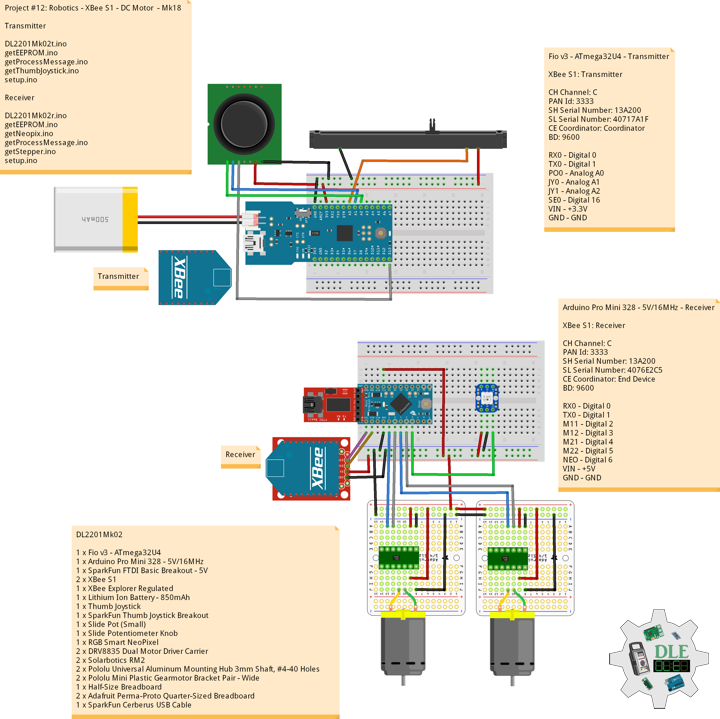
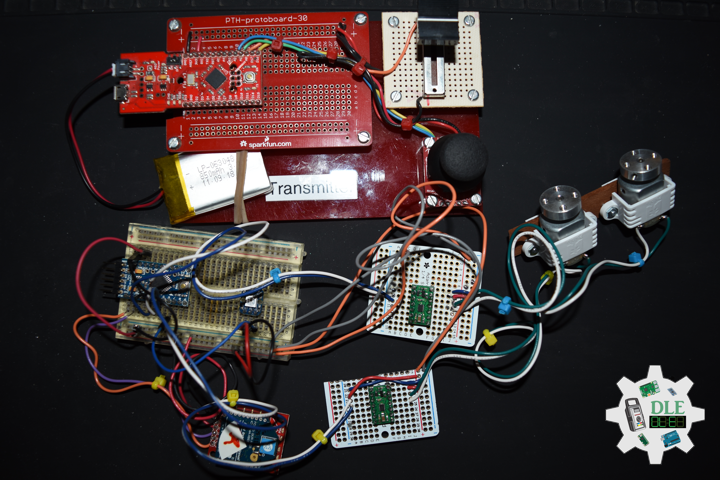
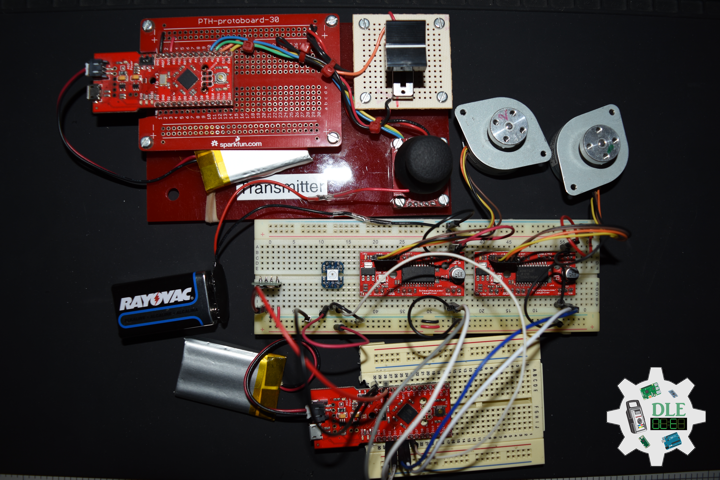
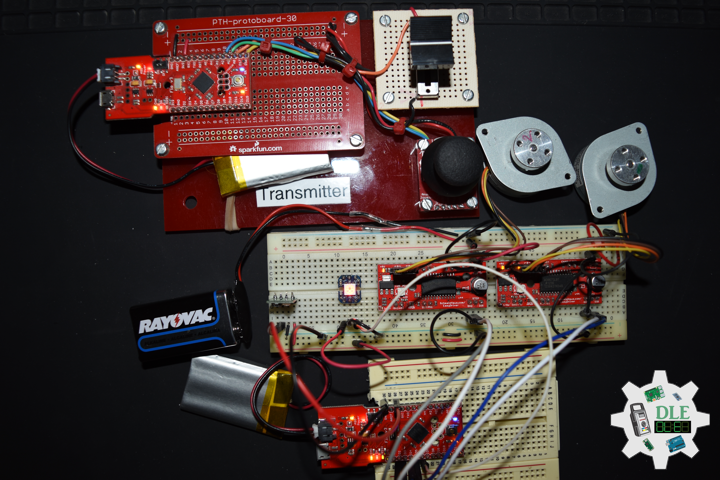
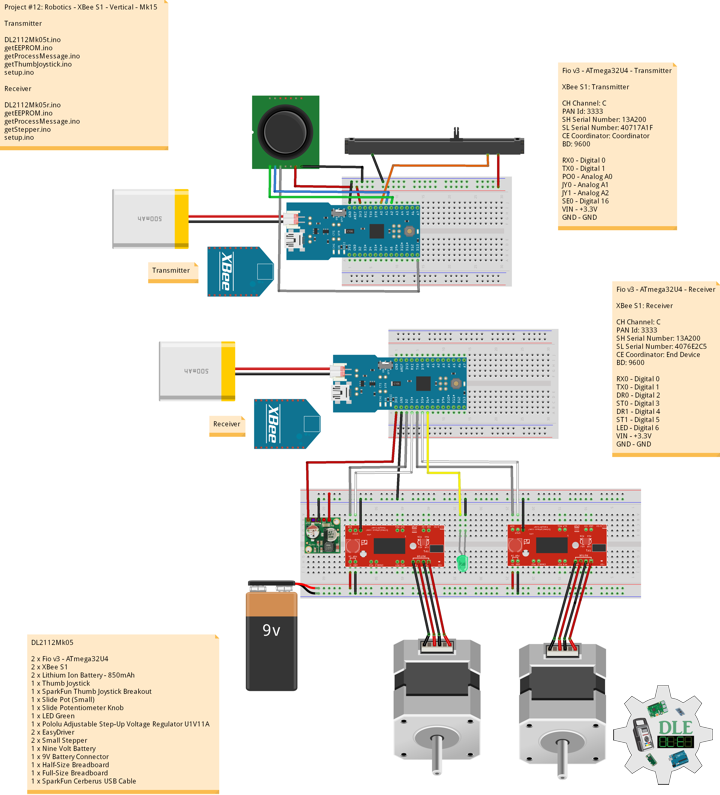
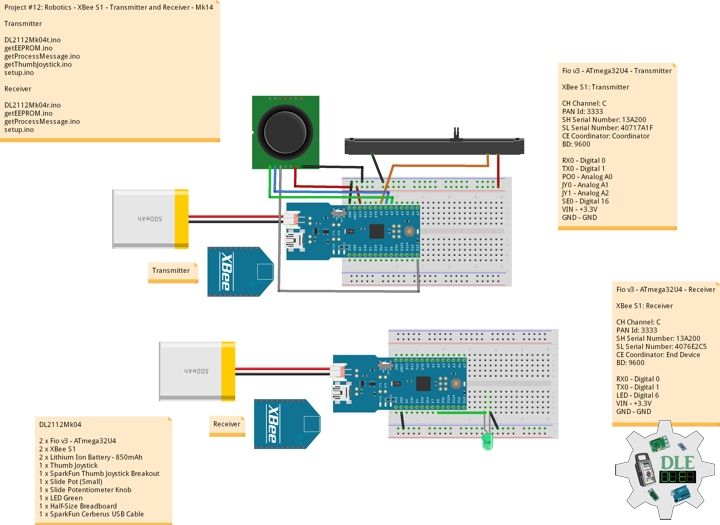
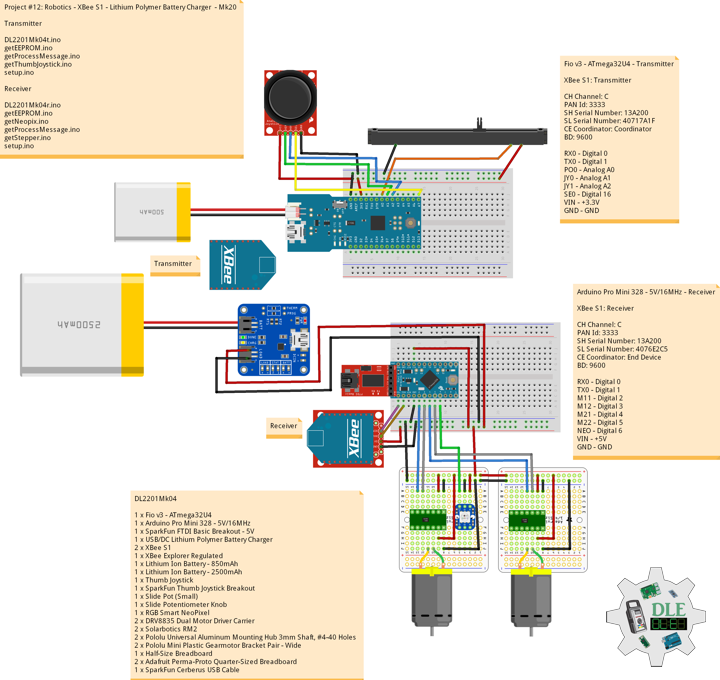
Fio v3 – ATmega32U4 – Transmitter
XBee S1: Transmitter
CH Channel: C
PAN Id: 3333
SH Serial Number: 13A200
SL Serial Number: 40717A1F
CE Coordinator: Coordinator
BD: 9600
RX0 – Digital 0
TX0 – Digital 1
PO0 – Analog A0
JY0 – Analog A1
JY1 – Analog A2
SE0 – Digital 16
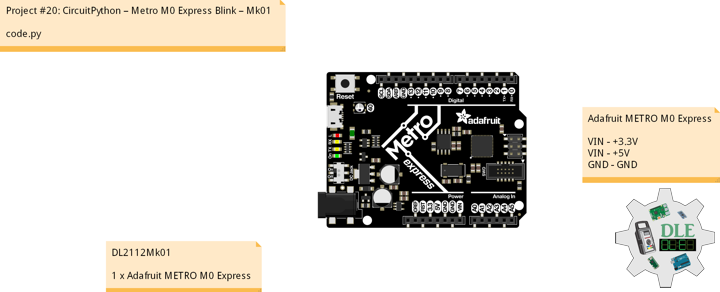
VIN – +3.3V
GND – GND
——
DL2201Mk04t.ino
/* ***** Don Luc Electronics © *****
Software Version Information
Project #12: Robotics - Lithium Polymer Battery Charger - Mk20
01-04
Transmitter
DL2201Mk04t.ino
1 x Fio v3 - ATmega32U4
1 x XBee S1
1 x Lithium Ion Battery - 850mAh
1 x Thumb Joystick
1 x SparkFun Thumb Joystick Breakout
1 x Slide Pot (Small)
1 x Slide Potentiometer Knob
1 x SparkFun Cerberus USB Cable
*/

// Include the Library Code
// EEPROM library to read and write EEPROM with unique ID for unit
#include <EEPROM.h>

// Communication
unsigned long dTime = 200;

// Slide Pot (Small)
// Select the input pin for the slide pot
// Power
const int iSP1 = A0;
// Power to store the value
int iPower = 0;

// Connections to joystick
// Vertical
const int VERT = A1;
// Horizontal
const int HORIZ = A2;
// Pushbutton
const int SEL = 16;
// Initialize variables for analog and digital values
int vertical;
int horizontal;
int select;

// Software Version Information
// Version
String sver = "12-20t";
// Unit ID Information
// UID
String uid = "";

void loop()
{

  // Thumb Joystick
  isThumbJoystick();

  // Process Message
  isProcessMessage();

  delay( dTime );

}
getEEPROM.ino
// EEPROM
// is UID
void isUID()
{

  // Is Unit ID
  // UID
  uid = "";
  for (int x = 0; x < 5; x++)
  {
    uid = uid + char(EEPROM.read(x));
  }

}
getProcessMessage.ino
// Process Message
// isProcessMessage
void isProcessMessage() {

   // Loop through serial buffer
   // Print = "<" + vertical + "|" + horizontal + "|" + select + "|" + iValue + "|" + sver + "|" + uid + "*"

   Serial1.print( '<'  );
   Serial1.print( vertical );
   Serial1.print( '|' );
   Serial1.print( horizontal );
   Serial1.print( '|' );
   Serial1.print( select );
   Serial1.print( '|' );
   Serial1.print( iPower );
   Serial1.print( '|' );
   Serial1.print( sver );
   Serial1.print( '|' );
   Serial1.print( uid );
   Serial1.println( '*' );

}
getThumbJoystick.ino
// Thumb Joystick
void isThumbJoystick() {

  // Read all values from the joystick
  // Joystick was sitting around 520 for the vertical and horizontal values
  // Will be 0-1023
  vertical = analogRead(VERT);
  // Will be 0-1023
  horizontal = analogRead(HORIZ);
  // Will be HIGH (1) if not pressed, and LOW (0) if pressed
  select = digitalRead(SEL);
  // Read the value
  // Power be 0-1023
  iPower = analogRead( iSP1 );

}
setup.ino
// Setup
void setup()
{

  // EEPROM Unit ID
  isUID();

  // Pause
  delay(5);

  // Make the SEL line an input
  pinMode(SEL, INPUT_PULLUP);

  // Open Serial1 port at 9600 baud
  Serial1.begin( 9600 );

  // Pause
  delay(5);

}
——
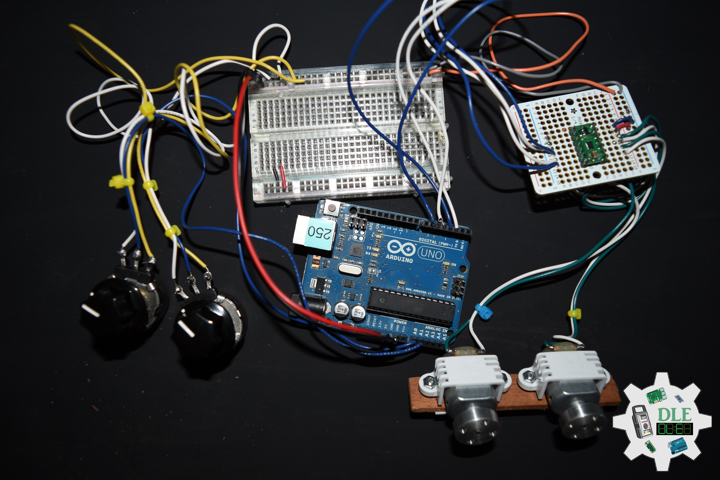
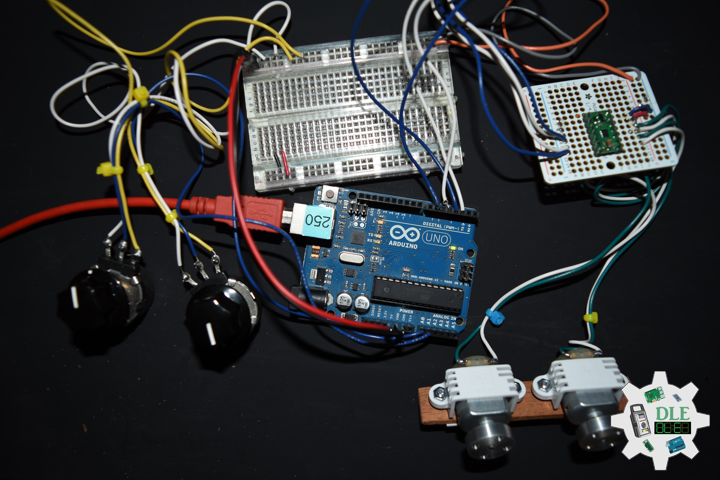
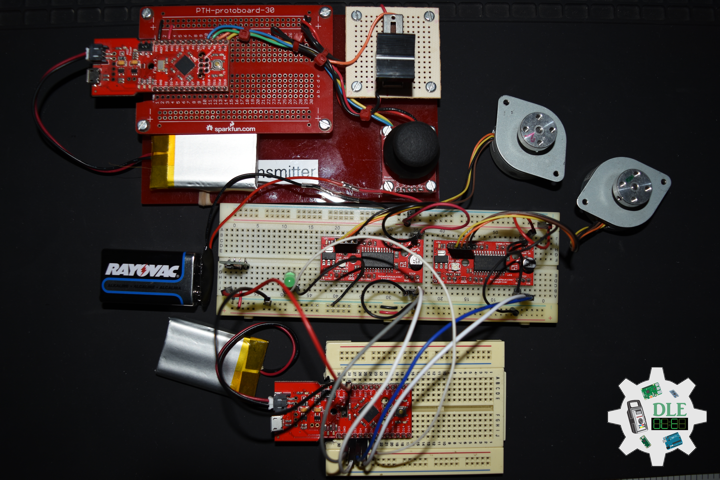
Arduino Pro Mini 328 – 5V/16MHz – Receiver
XBee S1: Receiver
CH Channel: C
PAN Id: 3333
SH Serial Number: 13A200
SL Serial Number: 4076E2C5
CE Coordinator: End Device
BD: 9600
RX0 – Digital 0
TX0 – Digital 1
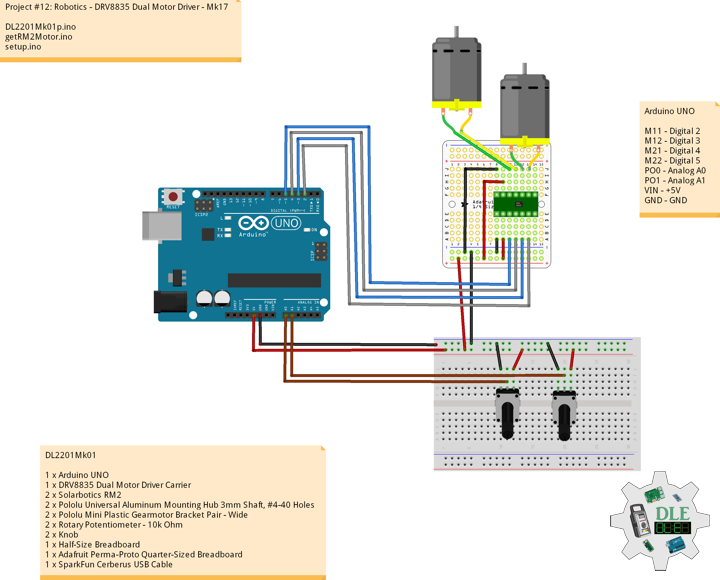
M11 – Digital 2
M12 – Digital 3
M21 – Digital 4
M22 – Digital 5
NEO – Digital 6
VIN – +5V
GND – GND
——
DL2201Mk04r.ino
/* ***** Don Luc Electronics © *****
Software Version Information
Project #12: Robotics - Lithium Polymer Battery Charger - Mk20
01-04
Receiver
DL2201Mk04r.ino
1 x Arduino Pro Mini 328 - 5V/16MHz
1 x SparkFun FTDI Basic Breakout - 5V
1 x XBee S1
1 x XBee Explorer Regulated
1 x USB/DC Lithium Polymer Battery Charger
1 x Lithium Ion Battery - 2500mAh
1 x RGB Smart NeoPixel
2 x DRV8835 Dual Motor Driver Carrier
2 x Solarbotics RM2
2 x Pololu Universal Aluminum Mounting Hub 3mm Shaft, #4-40 Holes
2 x Pololu Mini Plastic Gearmotor Bracket Pair - Wide
1 x Half-Size Breadboard
2 x Adafruit Perma-Proto Quarter-Sized Breadboard
1 x SparkFun Cerberus USB Cable
*/

// Include the library code:
// EEPROM library to read and write EEPROM with unique ID for unit
#include <EEPROM.h>
// NeoPixels
#include <Adafruit_NeoPixel.h>

// Solarbotics RM2 -> 1
#define MOTOR1_IN1 2
#define MOTOR1_IN2 3
// Solarbotics RM2 -> 2
#define MOTOR2_IN1 4
#define MOTOR2_IN2 5

// Power be 0-1023
int iPower = 0;
String POW = "";
// Joystick was sitting around 520 for the vertical and horizontal values
// Will be 0-1023
// Vertical
int vertical;
String VER = "";
// Horizontal
// Will be 0-1023
int horizontal;
String HOR = "";
// Select
// Will be HIGH (1) if not pressed, and LOW (0) if pressed
int select1 = 0;
String SEL = "";
int firstClosingBracket = 0;
// Map Vertical and Horizontal
int mapVer = 0;
int mapHor = 0;
int iVer = 1;
int iHor = 0;

// NeoPixels
// On digital pin 6
#define PIN 6
// NeoPixels NUMPIXELS = 1
#define NUMPIXELS 1
// Pixels
Adafruit_NeoPixel pixels = Adafruit_NeoPixel(NUMPIXELS, PIN, NEO_GRB + NEO_KHZ800);
// Red
int red = 0;
// Green
int green = 0;
// Blue
int blue = 0;
// Neopix
int iNeo = 0;
// Value
int zz = 0;

// Process Message
// Start
bool bStart = false;
// End
bool bEnd   = false;
// Variable to store the incoming byte
int incb = 0;
// Message
String msg = "";
// Index
byte in = 0;
int x = 0;

// Software Version Information
String sver = "12-20r";
// Unit ID information
String uid = "";

void loop() {

  // Check for serial messages
  isProcessMessage();

}
getEEPROM.ino
// EEPROM
// isUID
void isUID()
{

  // Is Unit ID
  uid = "";
  for (int x = 0; x < 5; x++)
  {
    uid = uid + char(EEPROM.read(x));
  }

}
getNeopix.ino
// NeoPixels
// Neopix
void isNeopix()
{

    // Pixels
    pixels.setBrightness( 130 );
    // Pixels color takes RGB values, from 0,0,0 up to 255,255,255
    pixels.setPixelColor( iNeo, pixels.Color(red,green,blue) );
    // This sends the updated pixel color to the hardware
    pixels.show();
    // Delay for a period of time (in milliseconds)
    delay(50);

}
// isNUMPIXELS
void isNUMPIXELS()
{

  // Neopix Value
  switch ( zz ) {
    case 0:
      // NeoPixels Green
      // Red
      red = 0;
      // Green
      green = 255;
      // Blue
      blue = 0;
      // Neopix
      iNeo = 0;
      isNeopix();
      break;
    case 1:
      // NeoPixels Blue
      // Red
      red = 0;
      // Green
      green = 0;
      // Blue
      blue = 255;
      // Neopix
      iNeo = 0;
      isNeopix();
      break;
    case 2:
      // NeoPixels Red
      // Red
      red = 255;
      // Green
      green = 0;
      // Blue
      blue = 0;
      // Neopix
      iNeo = 0;
      isNeopix();
      break;
    case 3:
      // NeoPixels Yellow
      // Red
      red = 255;
      // Green
      green = 255;
      // Blue
      blue = 0;
      // Neopix
      iNeo = 0;
      isNeopix();
      break;
    case 4:
      // NeoPixels Magenta
      // Red
      red = 255;
      // Green
      green = 0;
      // Blue
      blue = 255;
      // Neopix
      iNeo = 0;
      isNeopix();
      break;
    case 5:
      // NeoPixels Cyan
      // Red
      red = 0;
      // Green
      green = 255;
      // Blue
      blue = 255;
      // Neopix
      iNeo = 0;
      isNeopix();
      break;
    case 6:
      // NeoPixels White
      // Red
      red = 255;
      // Green
      green = 255;
      // Blue
      blue = 255;
      // Neopix
      iNeo = 0;
      isNeopix();
      break;
  }

}
// isNUMPIXELSoff
void isNUMPIXELSoff()
{

   // Black Off
   // NeoPixels
   // Red
   red = 0;
   // Green
   green = 0;
   // Blue
   blue = 0;
   isNeopix();

}
getProcessMessage.ino
// ProcessMessage
// isProcessMessage
void isProcessMessage() {

  // Loop through serial buffer one byte at a time until you reach * which will be end of message
  while ( Serial.available() > 0 )
  {

      // Read the incoming byte:
      incb = Serial.read();

      // Start the message when the '<' symbol is received
      if(incb == '<')
      {

        // Start
        bStart = true;
        in = 0;
        msg = "";

      }
      // End the message when the '*' symbol is received
      else if(incb == '*')
      {

        // End
        bEnd = true;
        x = msg.length();
        msg.remove( x , 1);
        // Done reading

        break;
      }
      // Read the message
      else
      {

        // Message
        msg = msg + char(incb);
        in++;

      }

   }

   // Start - End
   if( bStart && bEnd)
   {

      // isRM2Motor => Message
      isRM2Motor();

      // Start - End
      in = 0;
      msg = "";
      bStart = false;
      bEnd = false;
      vertical;
      horizontal;
      iPower;

   }

}
getRM2Motor.ino
// RM2 Motor
// Setup RM2 Motor
void isSetupRM2Motor() {

  // Solarbotics RM2 -> 1
  pinMode(MOTOR1_IN1, OUTPUT);
  pinMode(MOTOR1_IN2, OUTPUT);
  // Solarbotics RM2 -> 2
  pinMode(MOTOR2_IN1, OUTPUT);
  pinMode(MOTOR2_IN2, OUTPUT);

}
// isRM2Motor
void isRM2Motor() {

  // msg = vertical + "|" + horizontal + "|" + select + "|" + iValue + "|" + sver + "|" + uid
  firstClosingBracket = 0;
  // Vertical
  firstClosingBracket = msg.indexOf('|');
  VER = msg;
  VER.remove(firstClosingBracket);
  vertical = VER.toInt();
  // Horizontal
  firstClosingBracket = firstClosingBracket + 1;
  msg.remove(0, firstClosingBracket );
  firstClosingBracket = msg.indexOf('|');
  HOR = msg;
  HOR.remove(firstClosingBracket);
  horizontal = HOR.toInt();
  // Select
  firstClosingBracket = firstClosingBracket + 1;
  msg.remove(0, firstClosingBracket );
  firstClosingBracket = msg.indexOf('|');
  SEL = msg;
  SEL.remove(firstClosingBracket);
  select1 = SEL.toInt();
  // Power
  firstClosingBracket = firstClosingBracket + 1;
  msg.remove(0, firstClosingBracket );
  firstClosingBracket = msg.indexOf('|');
  POW = msg;
  POW.remove(firstClosingBracket);
  iPower = POW.toInt();

  // Set the direction
  // Joystick was sitting around 520 for the vertical and horizontal values
  // Will be 0-1023
  mapVer = map(vertical, 0, 1023, -512, 512);
  mapHor = map(horizontal, 0, 1023, -512, 512);
  // Power
  iPower = map(iPower, 0, 1023, 30, 200);

  // Vertical and Horizontal
  if ( mapVer == -512 ) {

      // Down
      // NeoPixels Blue
      zz = 1;
      isNUMPIXELS();
      iVer = 1;

  } else if ( mapVer == 512 ) {

      // Up
      // NeoPixels Green
      zz = 0;
      isNUMPIXELS();
      iVer = 2;

  } else if ( mapHor == -512 ) {

      // Left
      // NeoPixels Yellow
      zz = 3;
      isNUMPIXELS();
      iVer = 3;

  } else if ( mapHor == 512 ) {

      // Right
      // NeoPixels Magenta
      zz = 4;
      isNUMPIXELS();
      iVer = 4;

  } else {

    // Stop
    // NeoPixels Red
    zz = 2;
    isNUMPIXELS();
    iVer = 5;

  }

  // XBee Car
  switch ( iVer ) {
    case 1:

      // Solarbotics RM2 -> 1 Forward
      digitalWrite(MOTOR1_IN1, LOW);
      analogWrite(MOTOR1_IN2, iPower);
      delay(10);

      // Solarbotics RM2 -> 2 Forward
      digitalWrite(MOTOR2_IN1, LOW);
      analogWrite(MOTOR2_IN2, iPower);
      delay(10);

      break;
    case 2:

      // Solarbotics RM2 -> 1 Backward
      digitalWrite(MOTOR1_IN2, LOW);
      analogWrite(MOTOR1_IN1, iPower);
      delay(10);

      // Solarbotics RM2 -> 2 Backward
      digitalWrite(MOTOR2_IN2, LOW);
      analogWrite(MOTOR2_IN1, iPower);
      delay(10);

      break;
    case 3:

      // Right
      // Solarbotics RM2 -> 1 Forward
      digitalWrite(MOTOR1_IN1, LOW);
      analogWrite(MOTOR1_IN2, iPower);
      delay(10);

      // Solarbotics RM2 -> 2 Backward
      digitalWrite(MOTOR2_IN2, LOW);
      analogWrite(MOTOR2_IN1, iPower);
      delay(10);

      break;
    case 4:

      // Left
      // Solarbotics RM2 -> 1 Backward
      digitalWrite(MOTOR1_IN2, LOW);
      analogWrite(MOTOR1_IN1, iPower);
      delay(10);

      // Solarbotics RM2 -> 2 Forward
      digitalWrite(MOTOR2_IN1, LOW);
      analogWrite(MOTOR2_IN2, iPower);
      delay(10);

      break;
    case 5:

      // Stop
      // NeoPixels Red
      //zz = 2;
      //isNUMPIXELS();
      // Solarbotics RM2 -> 1
      digitalWrite(MOTOR1_IN1, LOW);
      analogWrite(MOTOR1_IN2, 0);
      delay(10);

      // Solarbotics RM2 -> 2
      digitalWrite(MOTOR2_IN1, LOW);
      analogWrite(MOTOR2_IN2, 0);
      delay(10);

      break;
 }

}
setup.ino
// Setup
void setup() {

  // Open the serial port at 9600 bps:
  Serial.begin( 9600 );

  // Pause
  delay(5);

  // EEPROM Unit ID
  isUID();

  // Pause
  delay(5);

  // Setup Solarbotics RM2 Motor
  isSetupRM2Motor();

  // Pause
  delay(5);

  // NeoPixels
  // This initializes the NeoPixel library
  pixels.begin();
  // Delay for a period of time (in milliseconds)
  delay(50);
  // isNUMPIXELS Off
  isNUMPIXELSoff();

}
——
People can contact us: https://www.donluc.com/?page_id=1927
Technology Experience
- Single-Board Microcontrollers (PIC, Arduino, Raspberry Pi,Espressif, etc…)
- IoT
- Robotics
- Camera and Video Capture Receiver Stationary, Wheel/Tank and Underwater Vehicle
- Unmanned Vehicles Terrestrial and Marine
- Research & Development (R & D)
- Desktop Applications (Windows, OSX, Linux, Multi-OS, Multi-Tier, etc…)
- Mobile Applications (Android, iOS, Blackberry, Windows Mobile, Windows CE, etc…)
- Web Applications (LAMP, Scripting, Java, ASP, ASP.NET, RoR, Wakanda, etc…)
- Social Media Programming & Integration (Facebook, Twitter, YouTube, Pinterest, etc…)
- Content Management Systems (WordPress, Drupal, Joomla, Moodle, etc…)
- Bulletin Boards (phpBB, SMF, Vanilla, jobberBase, etc…)
- eCommerce (WooCommerce, OSCommerce, ZenCart, PayPal Shopping Cart, etc…)
Instructor and E-Mentor
- IoT
- PIC Microcontrollers
- Arduino
- Raspberry Pi
- Espressif
- Robotics
- DOS, Windows, OSX, Linux, iOS, Android, Multi-OS
- Linux-Apache-PHP-MySQL
Follow Us
J. Luc Paquin – Curriculum Vitae – 2022 English & Español
https://www.jlpconsultants.com/luc/
Web: https://www.donluc.com/
Web: https://www.jlpconsultants.com/
Facebook: https://www.facebook.com/neosteam.labs.9/
YouTube: https://www.youtube.com/channel/UC5eRjrGn1CqkkGfZy0jxEdA
Twitter: https://twitter.com/labs_steam
Pinterest: https://www.pinterest.com/NeoSteamLabs/
Instagram: https://www.instagram.com/neosteamlabs/
Don Luc