
——
#DonLucElectronics #DonLuc #Synthesizer #Mozzi #Keyboard #ADSREnvelope #Arduino #AdafruitMETROM0Express #Project #Fritzing #Programming #Electronics #Microcontrollers #Consultant
——

——
——
——
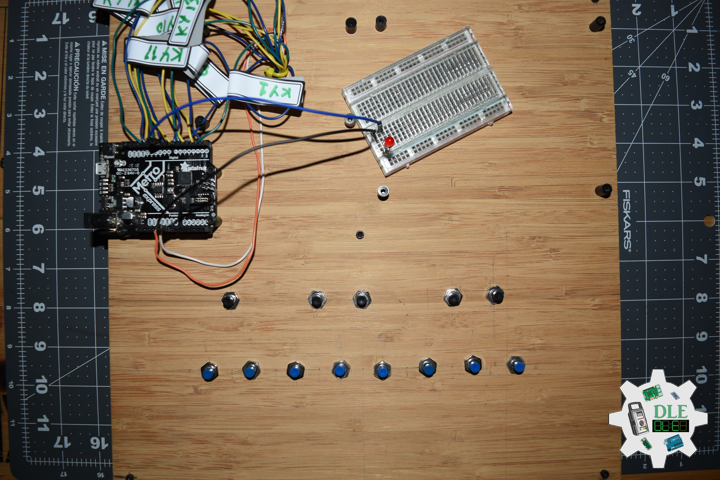
Momentary Button – Panel Mount
It’s your basic black or blue action button. This is a very useful, small, panel-mount momentary switch. It is a SPST N.O. with the threaded portion being 6.75 mm in diameter. This button is perfect for basic On/Off functions. Overall length including leads and has small solder lugs for connection. These momentary buttons are rated up to 0.5A and 250VAC.
Momentary button connect two points in a circuit when you press them. Turns on and off a light emitting LED. When the button is open there is no connection between the two legs of the button, so the pin is connected to ground, through the pull-down resistor, and we read a LOW. When the button is closed, it makes a connection between its two legs, connecting the pin to 5 volts, so that we read a HIGH.
You can also wire this circuit the opposite way, with a pullup resistor keeping the input HIGH, and going LOW when the button is pressed. If so, the behavior of the sketch will be reversed, with the LED normally on and turning off when you press the button.
DL2208Mk02
1 x Adafruit METRO M0 Express
8 x Momentary Button – Panel Mount (Blue)
5 x Momentary Button – Panel Mount (Black)
13 x 10K Ohm Resistor
1 x LED Red 5mm
1 x SparkFun Cerberus USB Cable
Adafruit METRO M0 Express
KY0 – 0
KY1 – 1
KY2 – 2
KY3 – 3
KY4 – 4
KY5 – 5
KY6 – 6
KY7 – 7
KY8 – 8
LEDR – 9
KY10 – 10
KY11 – 11
KY12 – 12
KY13 – 13
VIN – +5V
GND – GND
——
DL2208Mk02p.ino
/* ***** Don Luc Electronics © *****
Software Version Information
Project #22: Synthesizer - Momentary Button - Mk09
22-09
DL2208Mk02p.ino
1 x Adafruit METRO M0 Express
8 x Momentary Button - Panel Mount (Blue)
5 x Momentary Button - Panel Mount (Black)
13 x 1K Ohm Resistor
1 x LED Red 5mm
1 x SparkFun Cerberus USB Cable
*/

// Include the Library Code


// Simple Keyboard
// Minimum reading of the button that generates a note
//const int iKeyboard0 = 0;
const int iKeyboard1 = 1;
const int iKeyboard2 = 2;
const int iKeyboard3 = 3;
const int iKeyboard4 = 4;
const int iKeyboard5 = 5;
const int iKeyboard6 = 6;
const int iKeyboard7 = 7;
const int iKeyboard8 = 8;
const int iKeyboard10 = 10;
const int iKeyboard11 = 11;
const int iKeyboard12 = 12;
const int iKeyboard13 = 13;
// Button is pressed
int iB0 = 1;
int iB1 = 1;
int iB2 = 1;
int iB3 = 1;
int iB4 = 1;
int iB5 = 1;
int iB6 = 1;
int iB7 = 1;
int iB8 = 1;
int iB10 = 1;
int iB11 = 1;
int iB12 = 1;
int iB13 = 1;

// The number of the LED Red pin 9
const int iLedR =  9;

// Software Version Information
String sver = "22-09";

void loop() {

  // isKeyboard
  isKeyboard();

}
getKeyboard.ino
// getKeyboard
// setupKeyboard
void setupKeyboard() {

  // Initialize the button pin as an input
//  pinMode(iKeyboard0, INPUT_PULLUP);
  pinMode(iKeyboard1, INPUT_PULLUP);
  pinMode(iKeyboard2, INPUT_PULLUP);
  pinMode(iKeyboard3, INPUT_PULLUP);
  pinMode(iKeyboard4, INPUT_PULLUP);
  pinMode(iKeyboard5, INPUT_PULLUP);
  pinMode(iKeyboard6, INPUT_PULLUP);
  pinMode(iKeyboard7, INPUT_PULLUP);
  pinMode(iKeyboard8, INPUT_PULLUP);
  pinMode(iKeyboard10, INPUT_PULLUP);
  pinMode(iKeyboard11, INPUT_PULLUP);
  pinMode(iKeyboard12, INPUT_PULLUP);
  pinMode(iKeyboard13, INPUT_PULLUP);

}
// isKeyboard
void isKeyboard() {

/*
  // Read the state of the button value 0
  if ( digitalRead(iKeyboard0) == HIGH ) {

    // Button is pressed - pullup keeps pin high normally 0
    iB0 = iB0 + 1;
    // Turn LED Red on
    digitalWrite(iLedR, HIGH );

  }
  else
  {

    iB0 = iB0 - 1;
    // Turn LED Red off
    digitalWrite(iLedR, LOW );

  }
*/
  // Read the state of the button value 1
  if ( digitalRead(iKeyboard1) == HIGH ) {

    // Button is pressed - pullup keeps pin high normally 1
    iB1 = iB1 + 1;
    // Turn LED Red on
    digitalWrite(iLedR, HIGH );

  }
  else
  {

    iB1 = iB1 - 1;
    // Turn LED Red off
    digitalWrite(iLedR, LOW );

  }

  // Read the state of the button value 2
  if ( digitalRead(iKeyboard2) == HIGH ) {

    // Button is pressed - pullup keeps pin high normally 2
    iB2 = iB2 + 1;
    // Turn LED Red on
    digitalWrite(iLedR, HIGH );

  }
  else
  {

    iB2 = iB2 - 1;
    // Turn LED Red off
    digitalWrite(iLedR, LOW );

  }

  // Read the state of the button value 3
  if ( digitalRead(iKeyboard3) == HIGH ) {

    // Button is pressed - pullup keeps pin high normally 3
    iB3 = iB3 + 1;
    // Turn LED Red on
    digitalWrite(iLedR, HIGH );

  }
  else
  {

    iB3 = iB3 - 1;
    // Turn LED Red off
    digitalWrite(iLedR, LOW );

  }

  // Read the state of the button value 4
  if ( digitalRead(iKeyboard4) == HIGH ) {

    // Button is pressed - pullup keeps pin high normally 4
    iB4 = iB4 + 1;
    // Turn LED Red on
    digitalWrite(iLedR, HIGH );

  }
  else
  {

    iB4 = iB4 - 1;
    // Turn LED Red off
    digitalWrite(iLedR, LOW );

  }

  // Read the state of the button value 5
  if ( digitalRead(iKeyboard5) == HIGH ) {

    // Button is pressed - pullup keeps pin high normally 5
    iB5 = iB5 + 1;
    // Turn LED Red on
    digitalWrite(iLedR, HIGH );

  }
  else
  {

    iB5 = iB5 - 1;
    // Turn LED Red off
    digitalWrite(iLedR, LOW );

  }

  // Read the state of the button value 6
  if ( digitalRead(iKeyboard6) == HIGH ) {

    // Button is pressed - pullup keeps pin high normally 6
    iB6 = iB6 + 1;
    // Turn LED Red on
    digitalWrite(iLedR, HIGH );

  }
  else
  {

    iB6 = iB6 - 1;
    // Turn LED Red off
    digitalWrite(iLedR, LOW );

  }

  // Read the state of the button value 7
  if ( digitalRead(iKeyboard7) == HIGH ) {

    // Button is pressed - pullup keeps pin high normally 7
    iB7 = iB7 + 1;
    // Turn LED Red on
    digitalWrite(iLedR, HIGH );

  }
  else
  {

    iB7 = iB7 - 1;// Turn LED Red off
    digitalWrite(iLedR, LOW );

  }

  // Read the state of the button value 8
  if ( digitalRead(iKeyboard8) == HIGH ) {

    // Button is pressed - pullup keeps pin high normally 8
    iB8 = iB8 + 1;
    // Turn LED Red on
    digitalWrite(iLedR, HIGH );

  }
  else
  {

    iB8 = iB8 - 1;
    // Turn LED Red off
    digitalWrite(iLedR, LOW );

  }

  // Read the state of the button value 10
  if ( digitalRead(iKeyboard10) == HIGH ) {

    // Button is pressed - pullup keeps pin high normally 10
    iB10 = iB10 + 1;
    // Turn LED Red on
    digitalWrite(iLedR, HIGH );

  }
  else
  {

    iB10 = iB10 - 1;
    // Turn LED Red off
    digitalWrite(iLedR, LOW );

  }

  // Read the state of the button value 11
  if ( digitalRead(iKeyboard11) == HIGH ) {

    // Button is pressed - pullup keeps pin high normally 11
    iB11 = iB11 + 1;
    // Turn LED Red on
    digitalWrite(iLedR, HIGH );

  }
  else
  {

    iB11 = iB11 - 1;
    // Turn LED Red off
    digitalWrite(iLedR, LOW );

  }

  // Read the state of the button value 12
  if ( digitalRead(iKeyboard12) == HIGH ) {

    // Button is pressed - pullup keeps pin high normally 12
    iB12 = iB12 + 1;
    // Turn LED Red on
    digitalWrite(iLedR, HIGH );

  }
  else
  {

    iB12 = iB12 - 1;
    // Turn LED Red off
    digitalWrite(iLedR, LOW );

  }

  // Read the state of the button value 13
  if ( digitalRead(iKeyboard13) == HIGH ) {

    // Button is pressed - pullup keeps pin high normally 13
    iB13 = iB13 + 1;
    // Turn LED Red on
    digitalWrite(iLedR, HIGH );

  }
  else
  {

    iB13 = iB13 - 1;
    // Turn LED Red off
    digitalWrite(iLedR, LOW );

  }

}
setup.ino
// Setup
void setup() {

  // Setup Keyboard
  setupKeyboard();

  // Initialize the LED Red pin 9 as an output
  pinMode(iLedR, OUTPUT);

}
——
People can contact us: https://www.donluc.com/?page_id=1927
Technology Experience
- Single-Board Microcontrollers (PIC, Arduino, Raspberry Pi,Espressif, etc…)
- IoT
- Robotics
- Camera and Video Capture Receiver Stationary, Wheel/Tank and Underwater Vehicle
- Unmanned Vehicles Terrestrial and Marine
- Research & Development (R & D)
Instructor and E-Mentor
- IoT
- PIC Microcontrollers
- Arduino
- Raspberry Pi
- Espressif
- Robotics
Follow Us
J. Luc Paquin – Curriculum Vitae – 2022 English & Español
https://www.jlpconsultants.com/luc/
Web: https://www.donluc.com/
Web: https://www.jlpconsultants.com/
Facebook: https://www.facebook.com/neosteam.labs.9/
YouTube: https://www.youtube.com/channel/UC5eRjrGn1CqkkGfZy0jxEdA
Twitter: https://twitter.com/labs_steam
Pinterest: https://www.pinterest.com/NeoSteamLabs/
Instagram: https://www.instagram.com/neosteamlabs/
Don Luc