——
#DonLucElectronics #DonLuc #RadioFrequency #Moteino #Send #Receive #OpenLog #Display #FreeIMU #Magnetometer #Accelerometer #Gyroscope #Arduino #Project #Fritzing #Programming #Electronics #Microcontrollers #Consultant
——
——
——
——
SparkFun OpenLog
The SparkFun OpenLog is an open source data logger that works over a simple serial connection and supports microSD cards up to 32GB. The OpenLog can store or “Log” huge amounts of serial data and act as a black box of sorts to store all the serial data that your project generates, for scientific or debugging purposes.
The SparkFun OpenLog uses an ATmega328 running at 16MHz thanks to the onboard resonator. The OpenLog draws approximately 2-3mA in idle mode. During a full record OpenLog can draw 10 to 20mA depending on the microSD card being used.
All data logged by the OpenLog is stored on the microSD card. Any 512MB to 32GB microSD card should work. OpenLog supports both FAT16 and FAT32 SD formats.
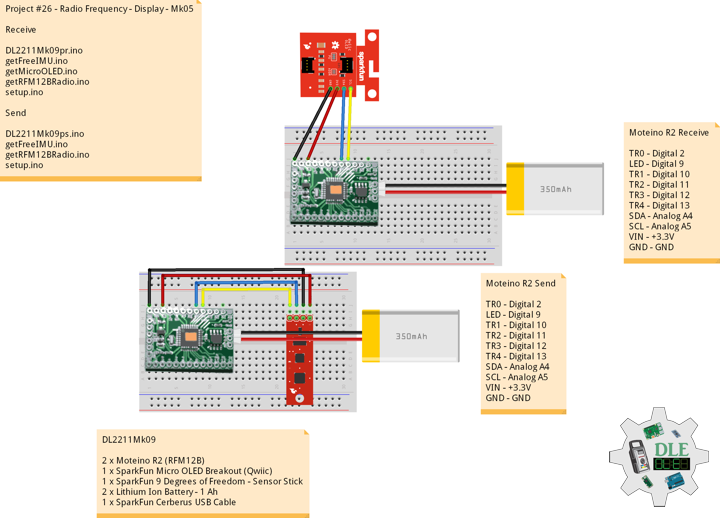
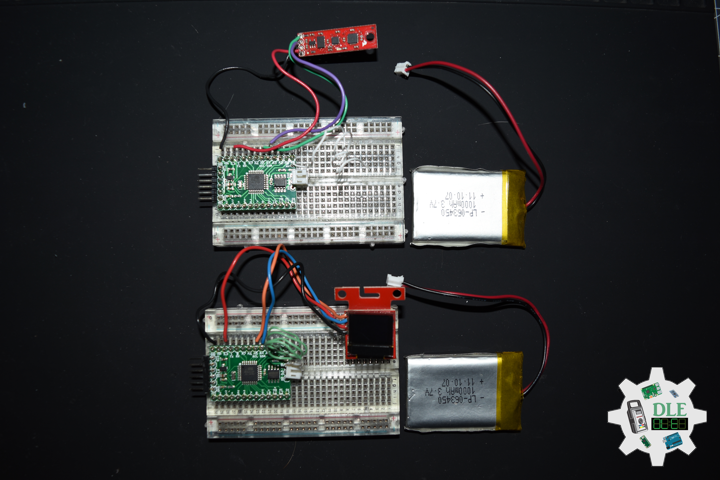
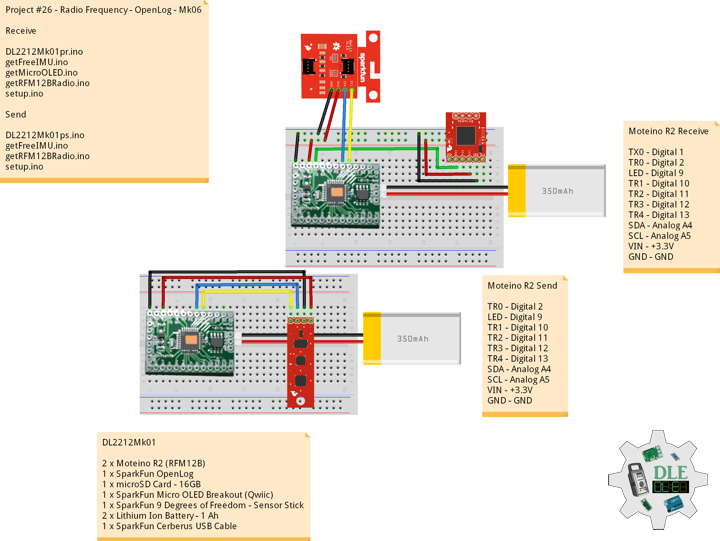
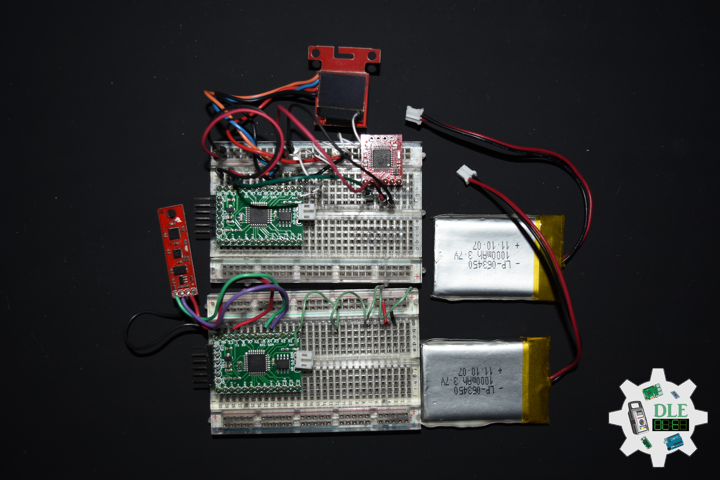
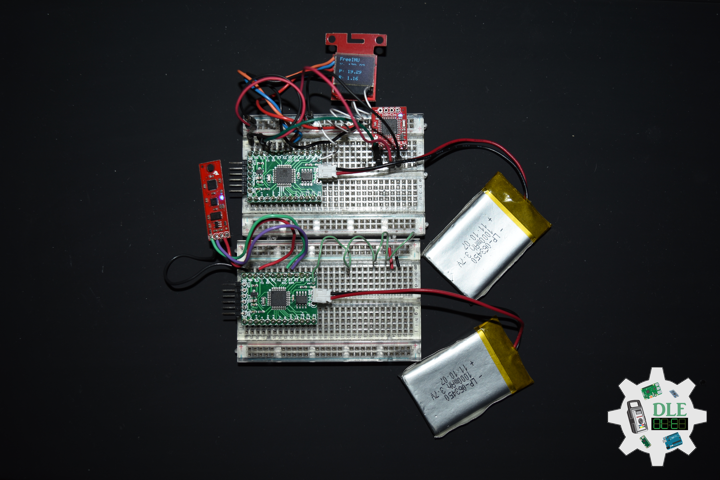
DL2212Mk01
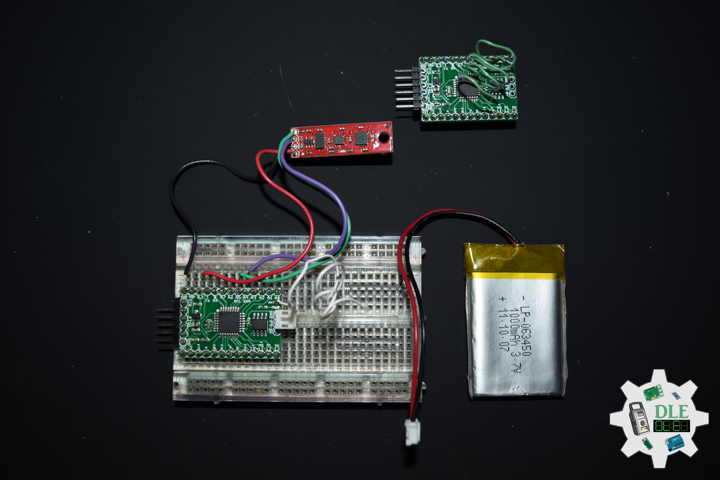
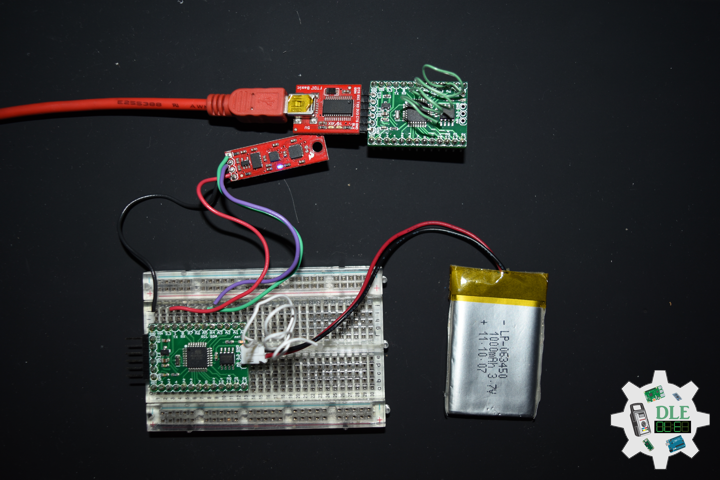
2 x Moteino R2 (RFM12B)
1 x SparkFun OpenLog
1 x microSD Card – 16GB
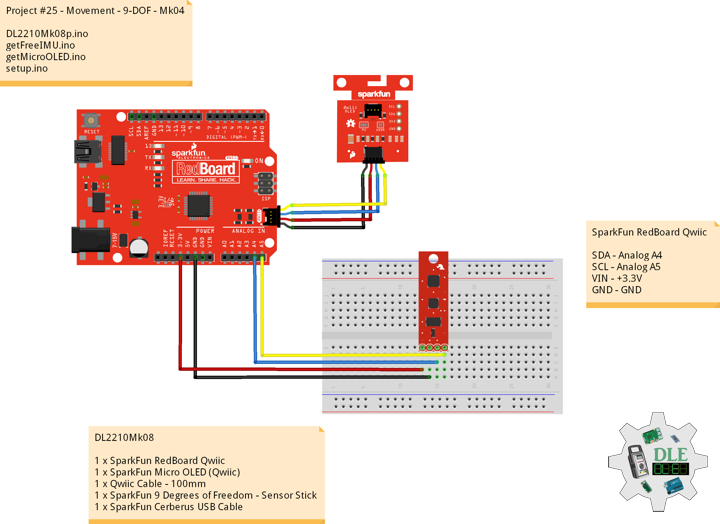
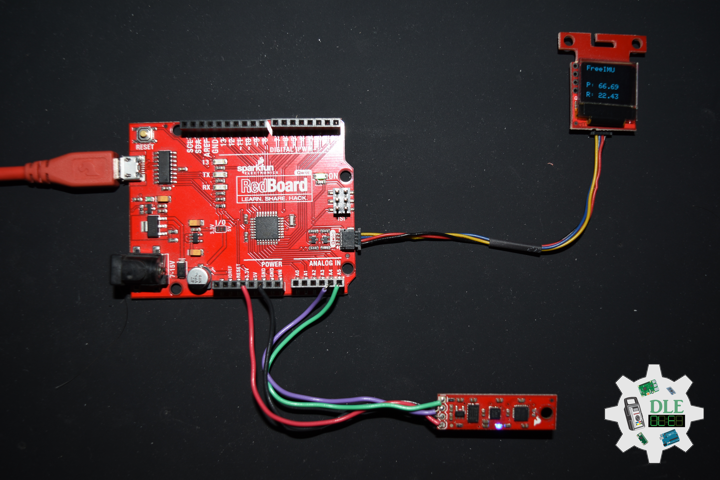
1 x SparkFun Micro OLED Breakout (Qwiic)
1 x SparkFun 9 Degrees of Freedom – Sensor Stick
2 x Lithium Ion Battery – 1 Ah
1 x SparkFun Cerberus USB Cable
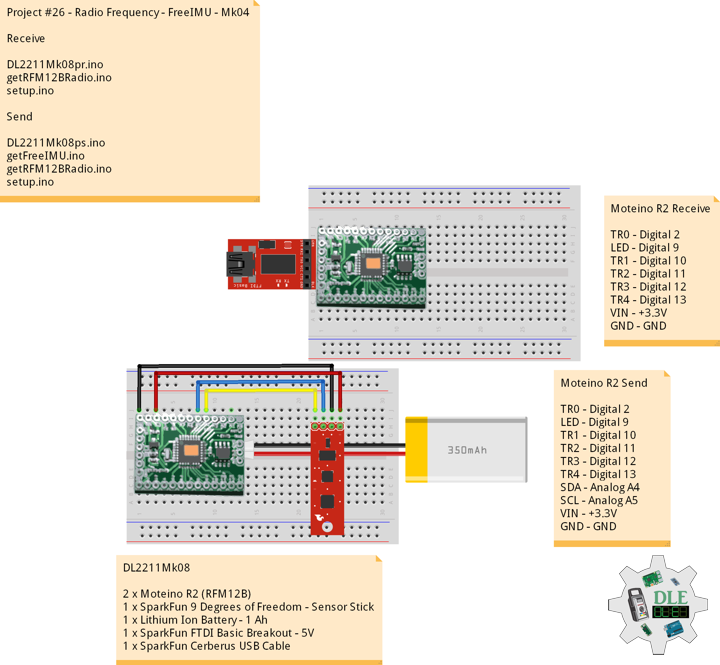
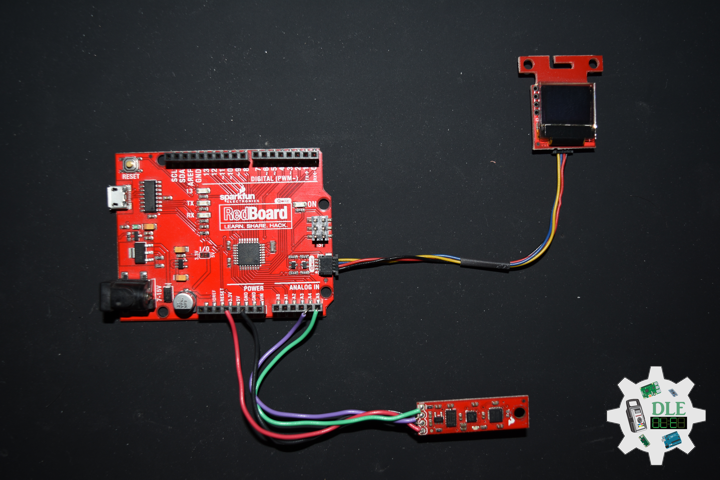
Moteino R2 (Receive)
TX0 – Digital 1
TR0 – Digital 2
LED – Digital 9
TR1 – Digital 10
TR2 – Digital 11
TR3 – Digital 12
TR4 – Digital 13
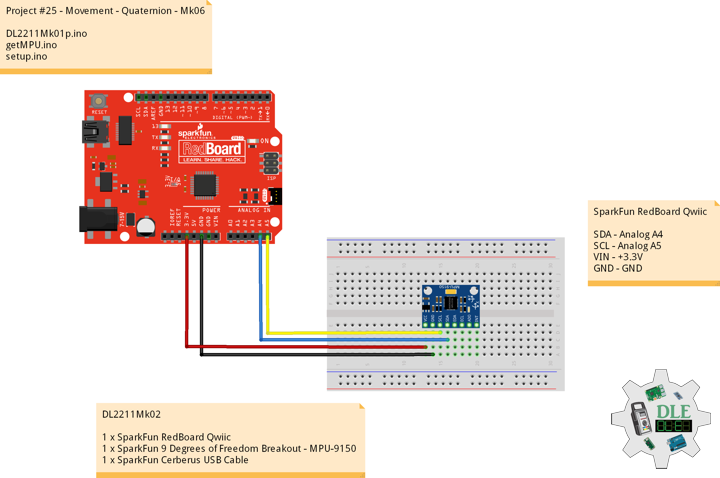
SDA – Analog A4
SCL – Analog A5
VIN – +3.3V
GND – GND
——
DL2212Mk01pr.ino
/* ***** Don Luc Electronics © *****
Software Version Information
Project #26 - Radio Frequency - OpenLog - Mk06
26-06
Receive
DL2212Mk01pr.ino
2 x Moteino R2 (RFM12B)
1 x SparkFun OpenLog
1 x microSD Card - 16GB
1 x SparkFun Micro OLED Breakout (Qwiic)
1 x SparkFun 9 Degrees of Freedom - Sensor Stick
2 x Lithium Ion Battery - 1Ah
1 x SparkFun Cerberus USB Cable
*/

// Include the Library Code
// RFM12B Radio
#include <RFM12B.h>
// Two Wire Interface (TWI/I2C)
#include <Wire.h>
// SparkFun Micro OLED
#include <SFE_MicroOLED.h>

// You will need to initialize the radio by telling it what ID
// it has and what network it's on
// The NodeID takes values from 1-127, 0 is reserved for sending
// broadcast messages (send to all nodes)
// The Network ID takes values from 0-255
// By default the SPI-SS line used is D10 on Atmega328.
// You can change it by calling .SetCS(pin) where pin can be {8,9,10}
// Network ID used for this unit
#define NODEID        1
// The network ID we are on
#define NETWORKID    99
// Serial
#define SERIAL_BAUD  115200

// Encryption is OPTIONAL
// to enable encryption you will need to:
// - provide a 16-byte encryption KEY (same on all nodes that talk encrypted)
// - to call .Encrypt(KEY) to start encrypting
// - to stop encrypting call .Encrypt(NULL)
uint8_t KEY[] = "ABCDABCDABCDABCD";

// Need an instance of the RFM12B Radio Module
RFM12B radio;

// Process Message
// Message
String msg = "";
int firstClosingBracket = 0;
// Yaw Pitch Roll
String sYaw = "";
String sPitch = "";
String sRoll = "";
float Yaw = 0;
float Pitch = 0;
float Roll = 0;

// LED
int iLED = 9;

// SparkFun Micro OLED
#define PIN_RESET 9
#define DC_JUMPER 1
// I2C declaration
MicroOLED oled(PIN_RESET, DC_JUMPER);

// Software Version Information
String sver = "26-06";

void loop() {

  // is RFM12B Radio
  isRFM12BRadio();

  // Micro OLED
  isMicroOLED();

}
getFreeIMU.ino
// FreeIMU
// isFreeIMU
void isFreeIMU(){

  // FreeIMU
  // IMU Yaw Pitch Roll
  // msg = "<IMU|1000|1000|1000|*";
  // msg = "<IMU|" + sYaw + "|" + sPitch + "|" + sRoll + "|*"
  firstClosingBracket = 0;
  // "<IMU|"
  firstClosingBracket = msg.indexOf('|');
  msg.remove(0, 5);
  // Yaw
  firstClosingBracket = msg.indexOf('|');
  sYaw = msg;
  sYaw.remove(firstClosingBracket);
  Yaw = sYaw.toFloat();
  // Pitch
  firstClosingBracket = firstClosingBracket + 1;
  msg.remove(0, firstClosingBracket );
  firstClosingBracket = msg.indexOf('|');
  sPitch = msg;
  sPitch.remove(firstClosingBracket);
  Pitch = sPitch.toFloat();
  // Roll
  firstClosingBracket = firstClosingBracket + 1;
  msg.remove(0, firstClosingBracket );
  firstClosingBracket = msg.indexOf('|');
  sRoll = msg;
  sRoll.remove(firstClosingBracket);
  Roll = sRoll.toFloat();

}
getMicroOLED.ino
// SparkFun Micro OLED
// Setup Micro OLED
void isSetupMicroOLED() {
// Initialize the OLED
oled.begin();
// Clear the display's internal memory
oled.clear(ALL);
// Display what's in the buffer (splashscreen)
oled.display();
// Delay 1000 ms
delay(1000);
// Clear the buffer.
oled.clear(PAGE);
}
// Micro OLED
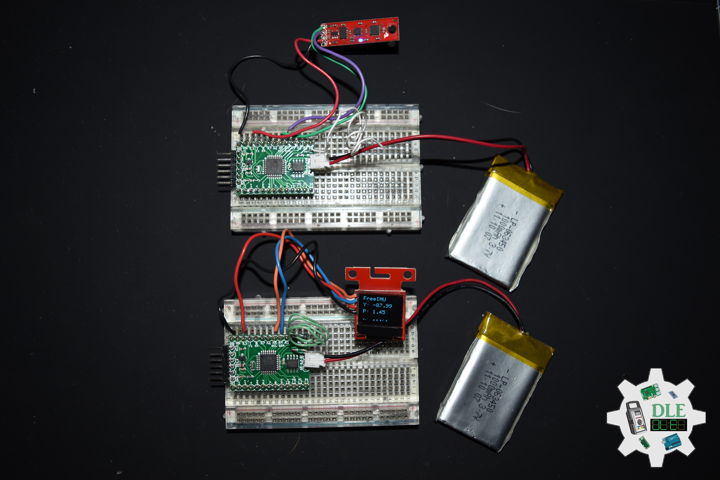
void isMicroOLED() {
// Text Display FreeIMU
// Clear the display
oled.clear(PAGE);
// Set cursor to top-left
oled.setCursor(0, 0);
// Set font to type 0
oled.setFontType(0);
// FreeIMU
oled.print("FreeIMU");
oled.setCursor(0, 12);
// Yaw
oled.print("Y: ");
oled.print(Yaw);
oled.setCursor(0, 25);
// Pitch
oled.print("P: ");
oled.print(Pitch);
oled.setCursor(0, 39);
// Roll
oled.print("R: ");
oled.print(Roll);
oled.display();
}
getRFM12BRadio.ino
// RFM12B Radio
void isSetupRFM12BRadio()
{

  // RFM12B Radio
  radio.Initialize(NODEID, RF12_433MHZ, NETWORKID);
  // Encryption
  radio.Encrypt(KEY);
  // Transmitting

}
// is RFM12 BRadio
void isRFM12BRadio()
{

  // Receive
  if (radio.ReceiveComplete())
  {

    // CRC Pass
    if (radio.CRCPass())
    {

      // Message
      msg = "";

      // Can also use radio.GetDataLen() if you don't like pointers
      for (byte i = 0; i < *radio.DataLen; i++)
      {

       //Serial.print((char)radio.Data[i]);
        msg = msg + (char)radio.Data[i];

      }

      // Serial
      Serial.println( msg );

      // Turn the LED on HIGH
      digitalWrite( iLED , HIGH);

      // FreeIMU
      // Yaw Pitch Roll
      isFreeIMU();

      // ACK Requested
      if (radio.ACKRequested())
      {

        // Send ACK
        radio.SendACK();

      }

      // Turn the LED on LOW
      digitalWrite( iLED , LOW);

    }
    else
    {

      // BAD-CRC

    }

  }

}
setup.ino
// Setup
void setup()
{

  // Serial
  Serial.begin(SERIAL_BAUD);

  // Give display time to power on
  delay(100);

  // Set up I2C bus
  Wire.begin();

  // Setup Micro OLED
  isSetupMicroOLED();

  // LED
  pinMode( iLED , OUTPUT);

  // RFM12B Radio
  isSetupRFM12BRadio();

}
——
Moteino R2 (Send)
TR0 – Digital 2
LED – Digital 9
TR1 – Digital 10
TR2 – Digital 11
TR3 – Digital 12
TR4 – Digital 13
SDA – Analog A4
SCL – Analog A5
VIN – +3.3V
GND – GND
——
DL2212Mk01ps.ino
/* ***** Don Luc Electronics © *****
Software Version Information
Project #26 - Radio Frequency - OpenLog - Mk06
26-06
Send
DL2212Mk01ps.ino
2 x Moteino R2 (RFM12B)
1 x SparkFun OpenLog
1 x microSD Card - 16GB
1 x SparkFun Micro OLED Breakout (Qwiic)
1 x SparkFun 9 Degrees of Freedom - Sensor Stick
2 x Lithium Ion Battery - 1Ah
1 x SparkFun Cerberus USB Cable
*/

// Include the Library Code
// RFM12B Radio
#include <RFM12B.h>
// Sleep
#include <avr/sleep.h>
// Two Wire Interface (TWI/I2C)
#include <Wire.h>
// Includes and variables for IMU integration
// Accelerometer
#include <ADXL345.h>
// Magnetometer
#include <HMC58X3.h>
// MEMS Gyroscope
#include <ITG3200.h>
// Debug
#include "DebugUtils.h"
// FreeIMU
#include <CommunicationUtils.h>
#include <FreeIMU.h>

// You will need to initialize the radio by telling it what ID
// it has and what network it's on
// The NodeID takes values from 1-127, 0 is reserved for sending
// broadcast messages (send to all nodes)
// The Network ID takes values from 0-255
// By default the SPI-SS line used is D10 on Atmega328.
// You can change it by calling .SetCS(pin) where pin can be {8,9,10}
// Network ID used for this unit
#define NODEID        2
// The network ID we are on
#define NETWORKID    99
// The node ID we're sending to
#define GATEWAYID     1
// # of ms to wait for an ack
#define ACK_TIME     50
// Serial
#define SERIAL_BAUD  115200

// Encryption is OPTIONAL
// to enable encryption you will need to:
// - provide a 16-byte encryption KEY (same on all nodes that talk encrypted)
// - to call .Encrypt(KEY) to start encrypting
// - to stop encrypting call .Encrypt(NULL)
uint8_t KEY[] = "ABCDABCDABCDABCD";

// Wait this many ms between sending packets
int interPacketDelay = 1000;
// Input
char input = 0;

// Need an instance of the RFM12B Radio Module
RFM12B radio;
// Send Size
byte sendSize = 0;
// Payload
char payload[100];
// Request ACK
bool requestACK = false;

// LED
int iLED = 9;

// Set the FreeIMU object
FreeIMU my3IMU = FreeIMU();

// Yaw Pitch Roll
String zzzzzz = "";
String sYaw = "";
String sPitch = "";
String sRoll = "";
float ypr[3];
float Yaw = 0;
float Pitch = 0;
float Roll = 0;

// Software Version Information
String sver = "26-06";

void loop()
{

  // isFreeIMU
  isFreeIMU();

  // is RFM12B Radio
  isRFM12BRadio();

  // Inter Packet Delay
  delay(interPacketDelay);

}
getFreeIMU.ino
// FreeIMU
// isFreeIMU
void isFreeIMU(){

  // FreeIMU
  // Yaw Pitch Roll
  my3IMU.getYawPitchRoll(ypr);
  // Yaw
  Yaw = ypr[0];
  // Pitch
  Pitch = ypr[1];
  // Roll
  Roll = ypr[2];

}
getRFM12BRadio.ino
// RFM12B Radio
void isSetupRFM12BRadio(){

  // RFM12B Radio
  radio.Initialize(NODEID, RF12_433MHZ, NETWORKID);
  // Encryption
  radio.Encrypt(KEY);
  // Sleep right away to save power
  radio.Sleep();
  // Transmitting
  Serial.println("Transmitting...\n\n");

}
// is RFM12 BRadio
void isRFM12BRadio(){

  // sYaw, sPitch, sRoll ""
  sYaw = "";
  sPitch = "";
  sRoll = "";

  // sYaw, sPitch, sRoll concat
  sYaw.concat(Yaw);
  sPitch.concat(Pitch);
  sRoll.concat(Roll);

  // zzzzzz ""
  zzzzzz = "";

  // zzzzzz = "<IMU|1000|1000|1000|*";
  // zzzzzz = "<IMU|" + sYaw + "|" + sPitch + "|" + sRoll + "|*"
  zzzzzz = "<IMU|" + sYaw + "|" + sPitch + "|" + sRoll + "|*";

  // sendSize Length
  sendSize = zzzzzz.length();

  // sendSize
  payload[sendSize];

  // sendSize, charAt
  for(byte i = 0; i < sendSize+1; i++){

    payload[i] = zzzzzz.charAt(i);

  }

  // payload
  Serial.print(payload);

  // Request ACK
  requestACK = sendSize;

  // Wakeup
  radio.Wakeup();

  // Turn the LED on HIGH
  digitalWrite( iLED , HIGH);

  // Send
  radio.Send(GATEWAYID, payload, sendSize, requestACK);

  // Request ACK
  if (requestACK)
  {

    Serial.print(" - waiting for ACK...");
    if (waitForAck()){

      Serial.print("Ok!");

    }
    else Serial.print("nothing...");

  }

  // Turn the LED on LOW
  digitalWrite( iLED , LOW);

  // Sleep
  radio.Sleep();

  // Serial
  Serial.println();

}
// Wait a few milliseconds for proper ACK, return true if received
static bool waitForAck(){

  // Now
  long now = millis();

  // ACK
  while (millis() - now <= ACK_TIME){


    if (radio.ACKReceived(GATEWAYID)){

      return true;

    }

  }

  return false;

}
setup.ino
// Setup
void setup(){

  // Serial
  Serial.begin(SERIAL_BAUD);

  // LED
  pinMode( iLED , OUTPUT);

  // Set up I2C bus
  Wire.begin();

  // RFM12B Radio
  isSetupRFM12BRadio();

  // Pause
  delay(5);
  // Initialize IMU
  my3IMU.init();
  // Pause
  delay(5);

}
——
People can contact us: https://www.donluc.com/?page_id=1927
Technology Experience
- Programming Language
- Single-Board Microcontrollers (PIC, Arduino, Raspberry Pi,Espressif, etc…)
- IoT
- Wireless (Radio Frequency, Bluetooth, WiFi, Etc…)
- Robotics
- Camera and Video Capture Receiver Stationary, Wheel/Tank and Underwater Vehicle
- Unmanned Vehicles Terrestrial and Marine
- Machine Learning
- RTOS
- Research & Development (R & D)
Instructor, E-Mentor, STEAM, and Arts-Based Training
- Programming Language
- IoT
- PIC Microcontrollers
- Arduino
- Raspberry Pi
- Espressif
- Robotics
Follow Us
Luc Paquin – Curriculum Vitae – 2023
https://www.donluc.com/luc/
Web: https://www.donluc.com/
Facebook: https://www.facebook.com/neosteam.labs.9/
YouTube: https://www.youtube.com/@thesass2063
Twitter: https://twitter.com/labs_steam
Pinterest: https://www.pinterest.com/NeoSteamLabs/
Instagram: https://www.instagram.com/neosteamlabs/
Don Luc