

Servo Motor
A servo motor is a rotary actuator or linear actuator that allows for precise control of angular or linear position, velocity and acceleration. It consists of a suitable motor coupled to a sensor for position feedback. It also requires a relatively sophisticated controller, often a dedicated module designed specifically for use with servo motors.
Servo motors have been around for a long time and are utilized in many applications. They are small in size but pack a big punch and are very energy-efficient. These features allow them to be used to operate remote-controlled or radio-controlled toy cars, robots and airplanes. Servo motors are also used in industrial applications, robotics, in-line manufacturing, pharmaceutics and food services.
Circuit
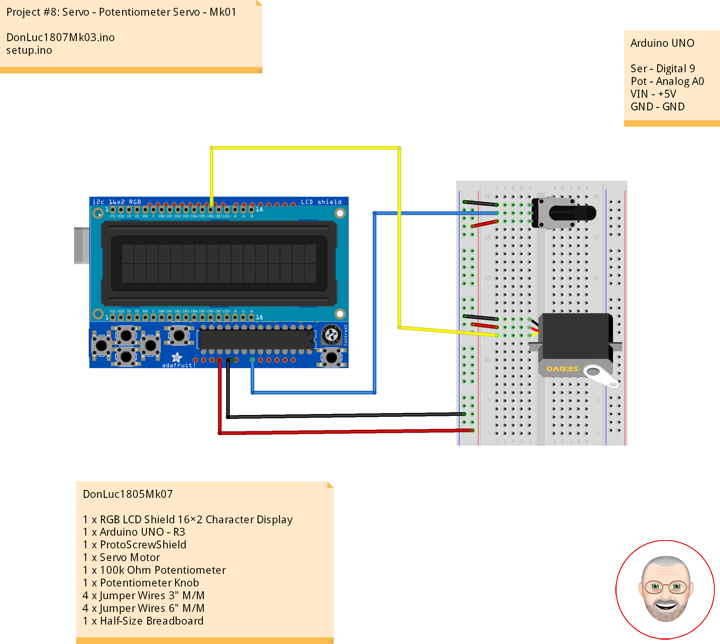
Servo motors have three wires: power, ground, and signal. The power wire is red, and should be connected to the 5V pin on the Arduino board. The ground wire is black and should be connected to a ground pin on the board. The signal pin is orange and should be connected to pin 9 on the board.
The potentiometer should be wired so that its two outer pins are connected to power (+5V) and ground, and its middle pin is connected to analog input 0 on the board.
DonLuc1805Mk07
1 x RGB LCD Shield 16×2 Character Display
1 x Arduino UNO – R3
1 x ProtoScrewShield
1 x Servo Motor
1 x 100k Ohm Potentiometer
1 x Potentiometer Knob
4 x Jumper Wires 3″ M/M
4 x Jumper Wires 6″ M/M
1 x Half-Size Breadboard
Arduino UNO
Ser – Digital 9
Pot – Analog A0
VIN – +5V
GND – GND
DonLuc1807Mk03.ino
// ***** Don Luc *****
// Software Version Information
// Project #8: Servo Motor - Potentiometer - Mk01
// 7-3
// DonLuc1807Mk03 7-3
// Servo Motor
// Potentiometer Servo
// include the library code:
#include <Adafruit_MCP23017.h>
#include <Adafruit_RGBLCDShield.h>
#include <Servo.h>
Adafruit_RGBLCDShield RGBLCDShield = Adafruit_RGBLCDShield();
#define GREEN 0x2
// Potentiometer Servo Motor
Servo isServo; // Create servo object to control a servo
int iPot1 = A0; // Analog Potentiometer 1
int iVal; // Variable - Analog Potentiometer 1
void loop() {
// Potentiometer Servo Motor
iVal = analogRead(iPot1); // Reads the value of the iPot1 (Value between 0 and 1023)
iVal = map(iVal, 0, 1023, 0, 180); // Scale it to use it with the isServo (Value between 0 and 180)
isServo.write(iVal); // isServo sets the servo position according to the scaled value
delay(15);
// Display
// Set the cursor to column 0, line 0
RGBLCDShield.setCursor(0,0);
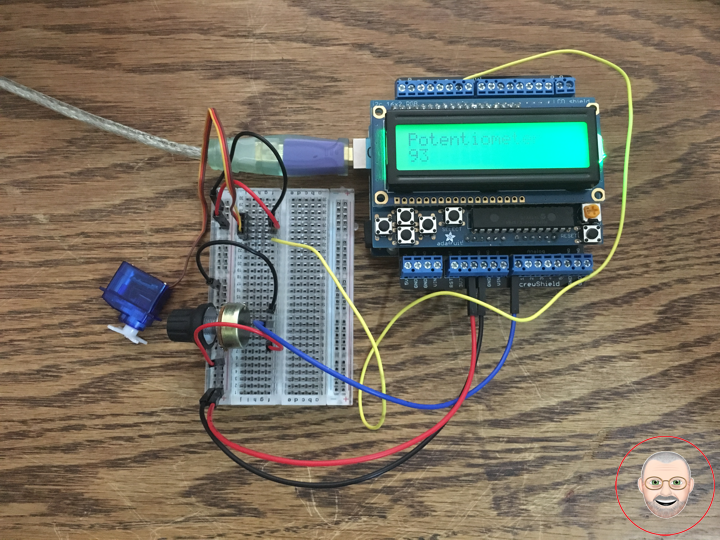
RGBLCDShield.print("Potentiometer"); // Potentiometer
// Set the cursor to column 0, line 1
RGBLCDShield.setCursor(0, 1);
RGBLCDShield.print(iVal); // Reads the value iVal
delay(500);
// Clear
RGBLCDShield.clear();
}
setup.ino
// Setup
void setup() {

  // set up the LCD's number of columns and rows:
  RGBLCDShield.begin(16, 2);
  RGBLCDShield.setBacklight(GREEN);

  // Display
  // Set the cursor to column 0, line 0
  RGBLCDShield.setCursor(0,0);
  RGBLCDShield.print("Don Luc");         // Don luc
  // Set the cursor to column 0, line 1
  RGBLCDShield.setCursor(0, 1);
  RGBLCDShield.print("Potentiometer");   // Potentiometer Servo Motor

  delay(5000);

  // Clear
  RGBLCDShield.clear();

  // Potentiometer Servo Motor
  isServo.attach(9);                     // Attaches the Servo on pin 9 to the Servo Object

}
Don Luc