Adafruit – Micro Lipo – USB LiIon/LiPoly Charger

Adafruit 1304 Mk01

Adafruit 1304 Mk02

Adafruit 1304 Mk03

Adafruit: 1304

Description

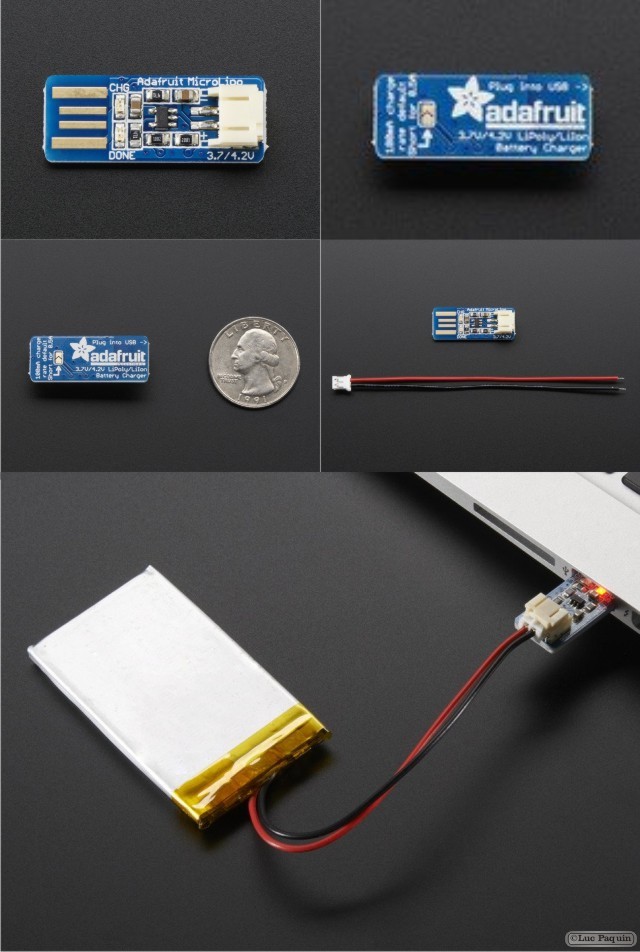
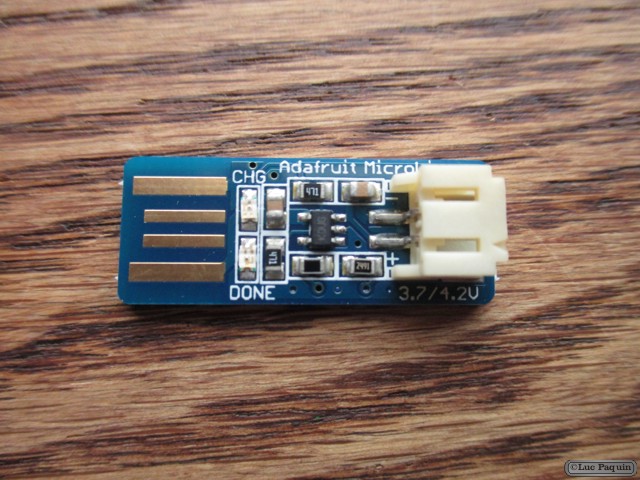
Oh so adorable, this is the tiniest little lipo charger, so handy you can keep it any project box! Its also easy to use. Simply plug in the gold plated contacts into any USB port and a 3.7V/4.2V lithium polymer or lithium ion rechargeable battery into the JST plug on the other end. There are two LEDs – one red and one green. While charging, the red LED is lit. When the battery is fully charged and ready for use, the green LED turns on. Seriously, it could not get more easy.

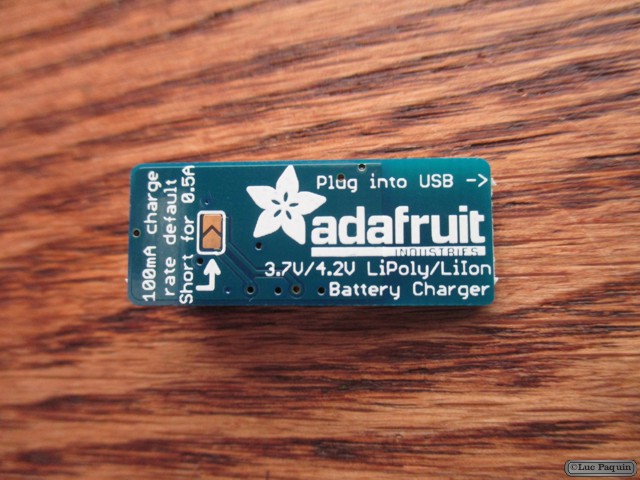
Charging is performed in three stages: first a preconditioning charge, then a constant-current fast charge and finally a constant-voltage trickle charge to keep the battery topped-up. The charge current is 100mA by default, so it will work with any size battery and USB port. If you want you can easily change it over to 500mA mode by soldering closed the jumper on the back, for when you’ll only be charging batteries with 500mAh size or larger.

For use with Adafruit LiPoly/LiIon batteries only! Other batteries may have different voltage, chemistry, polarity or pinout.

  • Comes assembled and tested with a free bonus JST cable!
  • 5V input via PCB-style USB connector
  • For charging single Lithium Ion/Lithium Polymer 3.7/4.2v batteries (not for older 3.6/4.1v cells)
  • 100mA charge current, adjustable to 500mA by soldering a jumper closed
  • Free 2-pin JST cable included!

Don Luc

Adafruit – Push-button Power Switch Breakout

Adafruit 1400 Mk01

Adafruit 1400 Mk02

Adafruit 1400 Mk03

Adafruit: 1400

Description

The Adafruit Push-button Power Switch is a tidy little design that lets you control a DC power source using an everyday tactile button. The breakout uses a latching analog circuit that is triggered by a push of the button. Press once to turn on, then press again to turn off. The circuit uses a 3A P-FET to connect and disconnect the IN pin to the OUT pin. Works great from 3V to 14VDC and up to 3A (although the FET gets a little toasty at continuous 3A draw) yet has only 0.5uA quiescent current draw.

Using it is easy: connect the power source to Ground and IN, then the load from Ground to OUT. We include a 12mm tactile switch that works well but you can solder in your own switch as well. Press the button (or short the button pins) to alternate between on or off. A on-board red LED will light up when active so you know its working. There’s a fourth KILL pin, which you can use to turn off the load and/or keep it off even if the button is pressed. When 1 or more volts is applied it will instantly turn off the FET. This allows your project to turn itself off.

Comes with a assembled & tested bread-board friendly breakout board with four mounting holes, a 12mm tactile button, and some 0.1″ male header you can solder to the board to plug it into a breadboard.

The power switch is an elegant way to control power to your project, but there are some things to keep in mind: since there is a pass FET, this is only for 3-14V DC voltages. This is not a mechanical switch so there is no air-gap isolation. There is a ‘body diode’ in the pass FET so if the load has a voltage on it that is higher than the input voltage, current will flow back to the input. There is built-in debouncing but very bouncy switches can be annoying as they will turn on and off fast instead of latching.

Technical Details

  • Dimensions: 20.51mm / 0.8″ x 17.75mm / 0.69″ x 2.66mm / 0.1″
  • Height with Switch: 8.69mm / 0.34″
  • Weight: 2.6g
  • MC14093 Datasheet (the NAND gate used) P-Channel Pass MOSFET

Don Luc

Adafruit – Stereo 3.7W Class D Audio Amplifier – MAX98306

Adafruit 987 Mk01

Adafruit 987 Mk02

Adafruit 987 Mk03

Adafruit 987 Mk04

Adafruit: 987

Description

This incredibly small stereo amplifier is surprisingly powerful – able to deliver 2 x 3.7W channels into 3 ohm impedance speakers. Inside the miniature chip is a class D controller, able to run from 2.7V-5.5VDC. Since the amp is a class D, its incredibly efficient (over 90% efficient when driving an speaker at over a Watt) – making it perfect for portable and battery-powered projects. It has built in thermal and over-current protection but we could barely tell it got hot. This board is a welcome upgrade to basic “LM386” amps!

The inputs of the amplifier go through 1.0uF capacitors, so they are fully ‘differential’ – if you don’t have differential outputs, simply tie the R- and L- to ground. The outputs are “Bridge Tied” – that means they connect directly to the outputs, no connection to ground. The output is a 360KHz square wave PWM that is then ‘averaged out’ by the speaker coil – the high frequencies are not heard. All the above means that you can’t connect the output into another amplifier, it should drive the speakers directly.

Comes with a fully assembled and tested breakout board with 1.0uF input capacitors. We also include header to plug it into a breadboard, 3.5mm screw-terminal blocks so you can easily attach/detach your speakers, and a 2×4 header + jumper to change the amplifier gain on the fly. You will be ready to rock in 15 minutes!

  • Output Power: 3.7W at 3O, 10% THD, 1.7W at 8O, 10% THD, with 5V Supply
  • Passes EMI limit unfiltered with up to 12 inches (30 cm) of speaker cable
  • High 83dB PSRR at 217Hz
  • Spread-Spectrum Modulation and Active Emissions Limiting
  • Five pin-selectable gains: 6dB, 9dB, 12dB, 15dB and 18dB. Select with a jumper or by setting the G and G’ breakout pins
  • Excellent click-and-pop suppression
  • Thermal and short-circuit/over-current protection
  • Low current draw: 2mA quiescent and 10uA in shutdown mode

Technical Details

Dimensions (without 0.1″ header):

  • Length: 28.25mm/1.11in
  • Width: 24.15mm/0.95in
  • Height: 3.03mm/0.12in
  • Weight: 2.33g

Don Luc

Adafruit – Breadboard-Friendly RGB Smart NeoPixel

Adafruit 1312 Mk01

Adafruit 1312 Mk02

Adafruit 1312 Mk03

Adafruit 1312 Mk04

Adafruit: 1312

Description

This is the easiest way possible to add small, bright RGB pixels to your project. We took the same technology from our Flora NeoPixels and made them breadboard friendly, with two rows of 3 x 0.1″ spaced header on each side for easy soldering, chaining and breadboarding. These ultra-bright LEDs have a constant-current driver cooked right into the LED package! The pixels are chainable – so you only need 1 pin/wire to control as many LEDs as you like.

These pixels have full 24-bit color ability with PWM taken care of by the controller chip. Since the LED is so bright, you need less current/power to get the effects you want. The driver is constant current so its OK if your battery power changes or fluctuates a little.

Each pixel draws as much as 60mA (all three RGB LEDs on for full brightness white). An Arduino can drive up to 500 pixels at 30 FPS (it will run out of RAM after that). Using ribbon cable you can string these up to 6″ apart (after that, you might get power droops and data corruption)

Each order comes with 4 individually controllable pixels. In the photos above we show the pixels with headers soldered on, but the pixels do not come with any headers.

Technical Details

  • Dimensions: 0.4″ x 0.5″ x 0.1″ / 10.2mm x 12.7mm x 2.5mm
  • 0.5″ (12.5mm) diameter circle PCB, 0.1″ (2.5mm) total thickness
  • 800 KHz speed protocol
  • Chainable design
  • 5-9VDC power (can run at 3.5V but color will be dimmed), constant current 18.5mA per LED (~55mA max total per pixel)

Don Luc