Arduino
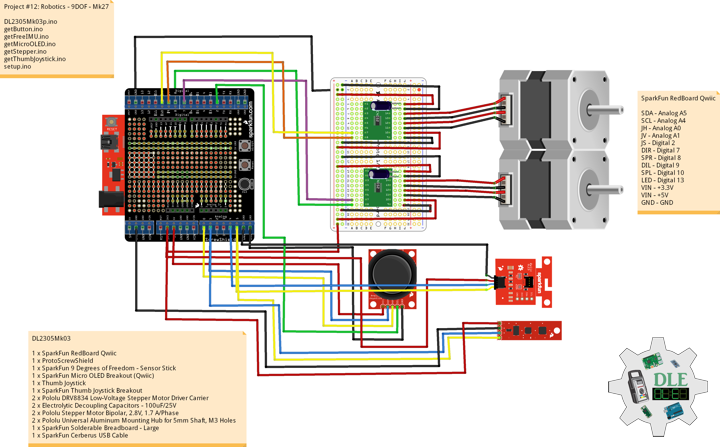
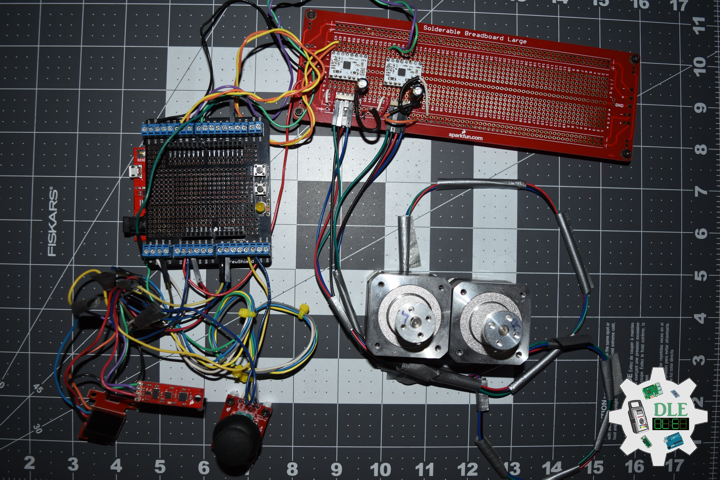
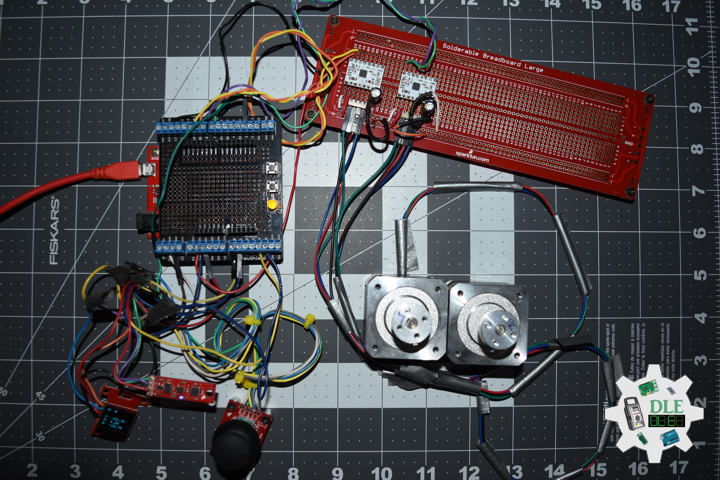
Project #12: Robotics – 9DOF – Mk27
——
#DonLucElectronics #DonLuc #Robotics #Magnetometer #Accelerometer #Gyroscope #MicroOLED # #Arduino #Project #Fritzing #Programming #Electronics #Microcontrollers #Consultant
——
——
——
——
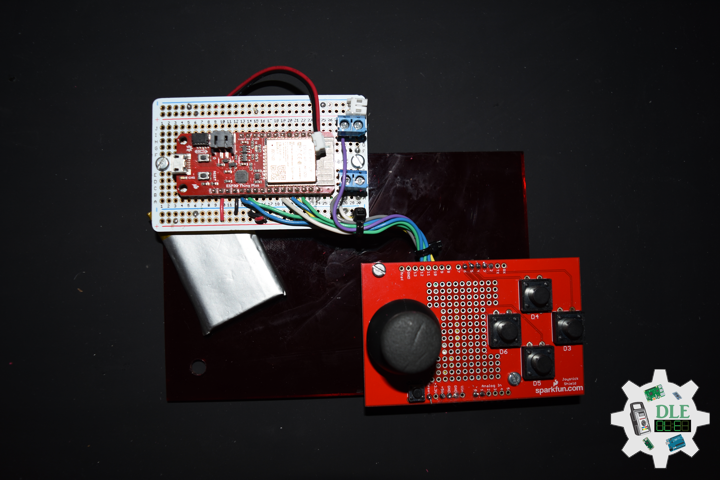
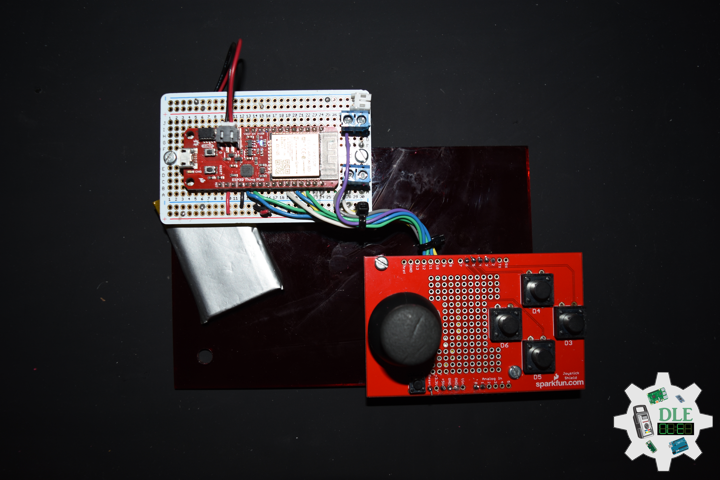
SparkFun 9 Degrees of Freedom – Sensor Stick
The SparkFun 9DOF Sensor Stick is a very small sensor board with 9 degrees of freedom. It includes the ADXL345 accelerometer, the HMC5883L magnetometer, and the ITG-3200 MEMS gyro. The “Stick” has a simple I2C interface and a mounting hole for attaching it to your project. Also, the board is a mere allowing it to be easily mounted in just about any application.
DL2305Mk03
1 x SparkFun RedBoard Qwiic
1 x ProtoScrewShield
1 x SparkFun 9 Degrees of Freedom – Sensor Stick
1 x SparkFun Micro OLED Breakout (Qwiic)
1 x Thumb Joystick
1 x SparkFun Thumb Joystick Breakout
2 x Pololu DRV8834 Low-Voltage Stepper Motor Driver Carrier
2 x Electrolytic Decoupling Capacitors – 100uF/25V
2 x Pololu Stepper Motor Bipolar, 2.8V, 1.7 A/Phase
2 x Pololu Universal Aluminum Mounting Hub for 5mm Shaft, M3 Holes
1 x SparkFun Solderable Breadboard – Large
1 x SparkFun Cerberus USB Cable
SparkFun RedBoard Qwiic
SDA – Analog A5
SCL – Analog A4
JH – Analog A0
JV – Analog A1
JS – Digital 2
DIR – Digital 7
SPR – Digital 8
DIL – Digital 9
SPL – Digital 10
LED – Digital 13
VIN – +3.3V
VIN – +5V
GND – GND
——
DL2305Mk03p.ino
/* ***** Don Luc Electronics © *****
Software Version Information
Project #12: Robotics - 9DOF - Mk27
12-27
DL2305Mk03p.ino
1 x SparkFun RedBoard Qwiic
1 x ProtoScrewShield
1 x SparkFun 9 Degrees of Freedom - Sensor Stick
1 x SparkFun Micro OLED Breakout (Qwiic)
1 x Thumb Joystick
1 x SparkFun Thumb Joystick Breakout
2 x Pololu DRV8834 Low-Voltage Stepper Motor Driver Carrier
2 x Electrolytic Decoupling Capacitors - 100uF/25V
2 x Pololu Stepper Motor Bipolar, 2.8V, 1.7 A/Phase
2 x Pololu Universal Aluminum Mounting Hub for 5mm Shaft, M3 Holes
1 x SparkFun Solderable Breadboard - Large
1 x SparkFun Cerberus USB Cable
*/

// Include the Library Code
// Arduino
#include <Arduino.h>
// DRV8834 Stepper Motor Driver
#include <BasicStepperDriver.h>
#include <MultiDriver.h>
// Wire communicate with I2C / TWI devices
#include <Wire.h>
// SparkFun Micro OLED
#include <SFE_MicroOLED.h>
// Accelerometer
#include <ADXL345.h>
// Magnetometer
#include <HMC58X3.h>
// MEMS Gyroscope
#include <ITG3200.h>
// Debug
#include "DebugUtils.h"
// FreeIMU
#include <CommunicationUtils.h>
#include <FreeIMU.h>

// DRV8834 Stepper Motor Driver
// Stepper motor steps per revolution.
// Most steppers are 200 steps or 1.8 degrees/step
#define MOTOR_STEPS 200
// Target RPM for X axis stepper motor
#define MOTOR_X_RPM 800
// Target RPM for Y axis stepper motor
#define MOTOR_Y_RPM 800
// Since microstepping is set externally,
// make sure this matches the selected mode
// If it doesn't, the motor will move at a
// different RPM than chosen
// 1=full step, 2=half step etc.
#define MICROSTEPS 1
// X Stepper motor
#define DIR_X 7
#define STEP_X 8
// Y Stepper motor
#define DIR_Y 9
#define STEP_Y 10
// BasicStepperDriver
BasicStepperDriver stepperX(MOTOR_STEPS, DIR_X, STEP_X);
BasicStepperDriver stepperY(MOTOR_STEPS, DIR_Y, STEP_Y);
// Pick one of the two controllers below
// each motor moves independently
MultiDriver controller(stepperX, stepperY);

// Joystick
#define JH A0
#define JV A1
#define JS 2

// Variable for reading the button
int JSState = 0;
// Adjusted Value
int adjustedValue = 0;
int adjustedValue2 = 0;

// LED Yellow
int iLED = 13;

// SparkFun Micro OLED
#define PIN_RESET 9
#define DC_JUMPER 1
// I2C declaration
MicroOLED oled(PIN_RESET, DC_JUMPER);

// Set the FreeIMU object
FreeIMU my3IMU = FreeIMU();

// Yaw Pitch Roll
float ypr[3];
float Yaw = 0;
float Pitch = 0;
float Roll = 0;

// Software Version Information
String sver = "12-27";

void loop() {

  // Button
  isButton();

  // Joystick
  isThumbJoystick();

  // Stepper
  isStepper();

  // isFreeIMU
  isFreeIMU();

  // Micro OLED
  isMicroOLED();

}
getButton.ino
// Button
// Button Setup
void isButtonSetup() {

  // Make the button line an input
  pinMode(JS, INPUT_PULLUP);
  // Initialize digital pin iLED as an output
  pinMode(iLED, OUTPUT);

}

// Button
void isButton(){

  // Read the state of the button
  JSState = digitalRead(JS);

  // Check if the button is pressed.
  // If it is, the JSState is HIGH:
  if (JSState == HIGH) {

    // Button
    // Turn the LED on HIGH
    digitalWrite(iLED, HIGH);

  } else {

    // Button
    // Turn the LED on LOW
    digitalWrite(iLED, LOW);

  }

}
getFreeIMU.ino
// FreeIMU
// isFreeIMUSetup
void isFreeIMUSetup(){

  // Pause
  delay(5);
  // Initialize IMU
  my3IMU.init();
  // Pause
  delay(5);

}
// isFreeIMU
void isFreeIMU(){

  // FreeIMU
  // Yaw Pitch Roll
  my3IMU.getYawPitchRoll(ypr);
  // Yaw
  Yaw = ypr[0];
  // Pitch
  Pitch = ypr[1];
  // Roll
  Roll = ypr[2];

}
getMicroOLED.ino
// SparkFun Micro OLED
// Micro OLED Setup
void isMicroOLEDSetup() {

  // Initialize the OLED
  oled.begin();
  // Clear the display's internal memory
  oled.clear(ALL);
  // Display what's in the buffer (Splash Screen SparkFun)
  oled.display();

  // Delay 1000 ms
  delay(1000);

  // Clear the buffer.
  oled.clear(PAGE);

}
// Micro OLED
void isMicroOLED() {

  // Text Display FreeIMU
  // Clear the display
  oled.clear(PAGE);
  // Set cursor to top-left
  oled.setCursor(0, 0);
  // Set font to type 0
  oled.setFontType(0);
  // Horizontal
  oled.print("H: ");
  oled.print( adjustedValue );
  // Vertical
  oled.setCursor(0, 11);
  oled.print("V: ");
  oled.print( adjustedValue2 );
  // Yaw
  oled.setCursor(0, 21);
  oled.print("Y: ");
  oled.print(Yaw);
  // Pitch
  oled.setCursor(0, 31);
  oled.print("P: ");
  oled.print(Pitch);
  // Roll
  oled.setCursor(0, 41);
  oled.print("R: ");
  oled.print(Roll);
  oled.display();

}
getStepper.ino
// Stepper
// isStepperSetup
void isStepperSetup() {

  // Set stepper target motors RPM.
  stepperX.begin(MOTOR_X_RPM, MICROSTEPS);
  stepperY.begin(MOTOR_Y_RPM, MICROSTEPS);

}
// Stepper
void isStepper() {

  // Stepper => Controller rotate
  controller.rotate(adjustedValue, adjustedValue2);

}
getThumbJoystick.ino
// Thumb Joystick
void isThumbJoystick() {

  // Joystick JH
  // Horizontal
  // Joystick Pot Values JH
  int potValue = analogRead(JH);
  int potValues = 0;
  // Adjusted Value
  potValues = map(potValue, 0, 1023, 1000, -1000);
  if (potValues > 300) {

    adjustedValue = potValues;

  } else if (potValues < -300) {

    adjustedValue = potValues;

  } else {

    adjustedValue = 0;

  }

  // Joystick JV
  // Vertical
  // Joystick Pot Values JV
  int potValue2 = analogRead(JV);
  int potValues2 = 0;
  // Adjusted Value2
  potValues2 = map(potValue2, 0, 1023, 1000, -1000);
  if (potValues2 > 300) {

    adjustedValue2 = potValues2;

  } else if (potValues2 < -300) {

    adjustedValue2 = potValues2;

  } else {

    adjustedValue2 = 0;

  }

}
setup.ino
// Setup
void setup()
{

  // Wire communicate with I2C / TWI devices
  Wire.begin();

  // Setup Micro OLED
  isMicroOLEDSetup();

  // isFreeIMUSetup
  isFreeIMUSetup();

  // Button Setup
  isButtonSetup();

  // DRV8834 Stepper Motor Driver
  isStepperSetup();

}
——
People can contact us: https://www.donluc.com/?page_id=1927
Technology Experience
- Programming Language
- Single-Board Microcontrollers (PIC, Arduino, Raspberry Pi,Espressif, etc…)
- IoT
- Wireless (Radio Frequency, Bluetooth, WiFi, Etc…)
- Robotics
- Camera and Video Capture Receiver Stationary, Wheel/Tank and Underwater Vehicle
- Unmanned Vehicles Terrestrial and Marine
- Machine Learning
- RTOS
- Research & Development (R & D)
Instructor, E-Mentor, STEAM, and Arts-Based Training
- Programming Language
- IoT
- PIC Microcontrollers
- Arduino
- Raspberry Pi
- Espressif
- Robotics
Follow Us
Luc Paquin – Curriculum Vitae – 2023
https://www.donluc.com/luc/
Web: https://www.donluc.com/
Facebook: https://www.facebook.com/neosteam.labs.9/
YouTube: https://www.youtube.com/@thesass2063
Twitter: https://twitter.com/labs_steam
Pinterest: https://www.pinterest.com/NeoSteamLabs/
Instagram: https://www.instagram.com/neosteamlabs/
Don Luc
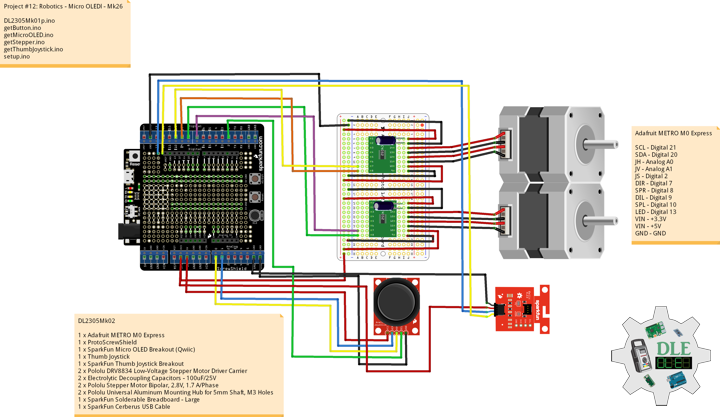
Project #12: Robotics – Micro OLED – Mk26
——
#DonLucElectronics #DonLuc #Robotics #MicroOLED #AdafruitMETROM0Express #Arduino #Project #Fritzing #Programming #Electronics #Microcontrollers #Consultant
——
——
——

——-
Micro OLED
Micro OLED displays are silicon-based OLED display that use a monocrystalline silicon wafer as the actively driven backplane, so it is easier to achieve high PPI (Pixel Density), a high degree of integration, and small size. This ensures they are easy to carry, have good anti-seismic performance, and have ultra-low power consumption.
DL2305Mk02
1 x Adafruit METRO M0 Express
1 x ProtoScrewShield
1 x SparkFun Micro OLED Breakout (Qwiic)
1 x Thumb Joystick
1 x SparkFun Thumb Joystick Breakout
2 x Pololu DRV8834 Low-Voltage Stepper Motor Driver Carrier
2 x Electrolytic Decoupling Capacitors – 100uF/25V
2 x Pololu Stepper Motor Bipolar, 2.8V, 1.7 A/Phase
2 x Pololu Universal Aluminum Mounting Hub for 5mm Shaft, M3 Holes
1 x SparkFun Solderable Breadboard – Large
1 x SparkFun Cerberus USB Cable
Adafruit METRO M0 Express
SCL – Digital 21
SDA – Digital 20
JH – Analog A0
JV – Analog A1
JS – Digital 2
DIR – Digital 7
SPR – Digital 8
DIL – Digital 9
SPL – Digital 10
LED – Digital 13
VIN – +3.3V
VIN – +5V
GND – GND
——
DL2305Mk02p.ino
/* ***** Don Luc Electronics © *****
Software Version Information
Project #12: Robotics - Micro OLED - Mk26
12-26
DL2305Mk02p.ino
1 x Adafruit METRO M0 Express
1 x ProtoScrewShield
1 x SparkFun Micro OLED Breakout (Qwiic)
1 x Thumb Joystick
1 x SparkFun Thumb Joystick Breakout
2 x Pololu DRV8834 Low-Voltage Stepper Motor Driver Carrier
2 x Electrolytic Decoupling Capacitors - 100uF/25V
2 x Pololu Stepper Motor Bipolar, 2.8V, 1.7 A/Phase
2 x Pololu Universal Aluminum Mounting Hub for 5mm Shaft, M3 Holes
1 x SparkFun Solderable Breadboard - Large
1 x SparkFun Cerberus USB Cable
*/

// Include the Library Code
// Arduino
#include <Arduino.h>
// DRV8834 Stepper Motor Driver
#include <BasicStepperDriver.h>
#include <MultiDriver.h>
// Wire communicate with I2C / TWI devices
#include <Wire.h>
// SparkFun Micro OLED
#include <SFE_MicroOLED.h>

// DRV8834 Stepper Motor Driver
// Stepper motor steps per revolution.
// Most steppers are 200 steps or 1.8 degrees/step
#define MOTOR_STEPS 200
// Target RPM for X axis stepper motor
#define MOTOR_X_RPM 800
// Target RPM for Y axis stepper motor
#define MOTOR_Y_RPM 800
// Since microstepping is set externally,
// make sure this matches the selected mode
// If it doesn't, the motor will move at a
// different RPM than chosen
// 1=full step, 2=half step etc.
#define MICROSTEPS 1
// X Stepper motor
#define DIR_X 7
#define STEP_X 8
// Y Stepper motor
#define DIR_Y 9
#define STEP_Y 10
// BasicStepperDriver
BasicStepperDriver stepperX(MOTOR_STEPS, DIR_X, STEP_X);
BasicStepperDriver stepperY(MOTOR_STEPS, DIR_Y, STEP_Y);
// Pick one of the two controllers below
// each motor moves independently
MultiDriver controller(stepperX, stepperY);

// Joystick
#define JH A0
#define JV A1
#define JS 2

// Variable for reading the button
int JSState = 0;
// Adjusted Value
int adjustedValue = 0;
int adjustedValue2 = 0;

// LED Yellow
int iLED = 13;

// SparkFun Micro OLED
#define PIN_RESET 9
#define DC_JUMPER 1
// I2C declaration
MicroOLED oled(PIN_RESET, DC_JUMPER);

// Software Version Information
String sver = "12-26";

void loop() {

  // Button
  isButton();

  // Joystick
  isThumbJoystick();

  // Stepper
  isStepper();

  // Micro OLED
  isMicroOLED();

}
getButton.ino
// Button
// Button Setup
void isButtonSetup() {

  // Make the button line an input
  pinMode(JS, INPUT_PULLUP);
  // Initialize digital pin iLED as an output
  pinMode(iLED, OUTPUT);

}

// Button
void isButton(){

  // Read the state of the button
  JSState = digitalRead(JS);

  // Check if the button is pressed.
  // If it is, the JSState is HIGH:
  if (JSState == HIGH) {

    // Button
    // Turn the LED on HIGH
    digitalWrite(iLED, HIGH);

  } else {

    // Button
    // Turn the LED on LOW
    digitalWrite(iLED, LOW);

  }

}
getMicroOLED.ino
// SparkFun Micro OLED
// Setup Micro OLED
void isMicroOLEDSetup() {

  // Initialize the OLED
  oled.begin();
  // Clear the display's internal memory
  oled.clear(ALL);
  // Display what's in the buffer (Splash Screen SparkFun)
  oled.display();

  // Delay 1000 ms
  delay(1000);

  // Clear the buffer.
  oled.clear(PAGE);

}
// Micro OLED
void isMicroOLED() {

  // Text Display FreeIMU
  // Clear the display
  oled.clear(PAGE);
  // Set cursor to top-left
  oled.setCursor(0, 0);
  // Set font to type 0
  oled.setFontType(0);
  // Horizontal
  oled.print("Horizontal");
  // Horizontal
  oled.setCursor(0, 13);
  oled.print( adjustedValue );
  // Vertical
  oled.setCursor(0, 24);
  oled.print("Vertical");
  // Vertical
  oled.setCursor(0, 37);
  oled.print( adjustedValue2 );
  oled.display();

}
getStepper.ino
// Stepper
// isStepperSetup
void isStepperSetup() {

  // Set stepper target motors RPM.
  stepperX.begin(MOTOR_X_RPM, MICROSTEPS);
  stepperY.begin(MOTOR_Y_RPM, MICROSTEPS);

}
// Stepper
void isStepper() {

  // Stepper => Controller rotate
  controller.rotate(adjustedValue, adjustedValue2);

}
getThumbJoystick.ino
// Thumb Joystick
void isThumbJoystick() {

  // Joystick JH
  // Horizontal
  // Joystick Pot Values JH
  int potValue = analogRead(JH);
  int potValues = 0;
  // Adjusted Value
  potValues = map(potValue, 0, 1023, 1000, -1000);
  if (potValues > 300) {

    adjustedValue = potValues;

  } else if (potValues < -300) {

    adjustedValue = potValues;

  } else {

    adjustedValue = 0;

  }

  // Joystick JV
  // Vertical
  // Joystick Pot Values JV
  int potValue2 = analogRead(JV);
  int potValues2 = 0;
  // Adjusted Value2
  potValues2 = map(potValue2, 0, 1023, 1000, -1000);
  if (potValues2 > 300) {

    adjustedValue2 = potValues2;

  } else if (potValues2 < -300) {

    adjustedValue2 = potValues2;

  } else {

    adjustedValue2 = 0;

  }

}
setup.ino
// Setup
void setup()
{

  // Wire communicate with I2C / TWI devices
  Wire.begin();

  // Setup Micro OLED
  isMicroOLEDSetup();

  // Button Setup
  isButtonSetup();

  // DRV8834 Stepper Motor Driver
  isStepperSetup();

}
——
People can contact us: https://www.donluc.com/?page_id=1927
Technology Experience
- Programming Language
- Single-Board Microcontrollers (PIC, Arduino, Raspberry Pi,Espressif, etc…)
- IoT
- Wireless (Radio Frequency, Bluetooth, WiFi, Etc…)
- Robotics
- Camera and Video Capture Receiver Stationary, Wheel/Tank and Underwater Vehicle
- Unmanned Vehicles Terrestrial and Marine
- Machine Learning
- RTOS
- Research & Development (R & D)
Instructor, E-Mentor, STEAM, and Arts-Based Training
- Programming Language
- IoT
- PIC Microcontrollers
- Arduino
- Raspberry Pi
- Espressif
- Robotics
Follow Us
Luc Paquin – Curriculum Vitae – 2023
https://www.donluc.com/luc/
Web: https://www.donluc.com/
Facebook: https://www.facebook.com/neosteam.labs.9/
YouTube: https://www.youtube.com/@thesass2063
Twitter: https://twitter.com/labs_steam
Pinterest: https://www.pinterest.com/NeoSteamLabs/
Instagram: https://www.instagram.com/neosteamlabs/
Don Luc
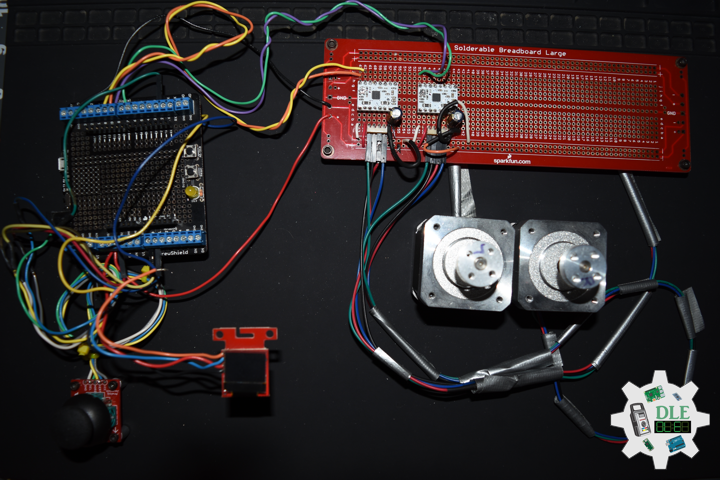
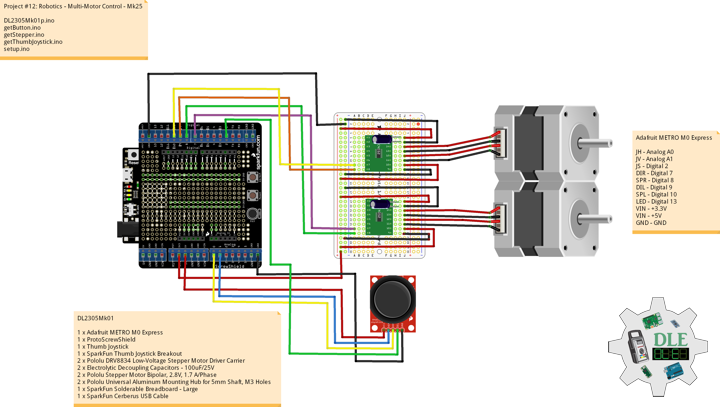
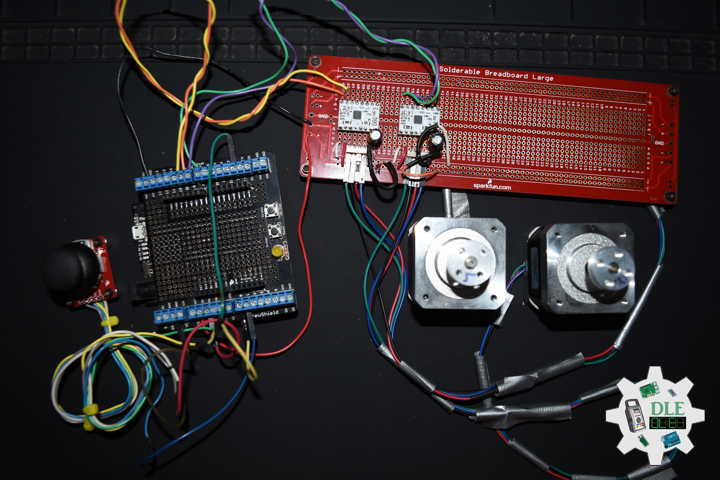
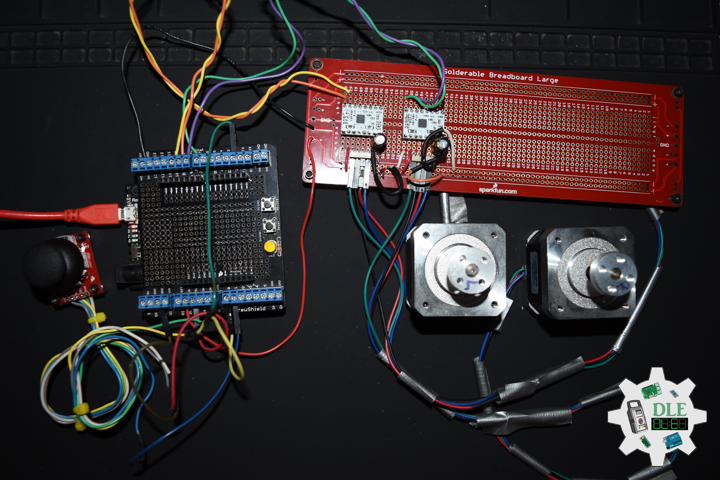
Project #12: Robotics – Multi-Motor Control – Mk25
——
#DonLucElectronics #DonLuc #Robotics #MultiMotorControl #AdafruitMETROM0Express #Arduino #Project #Fritzing #Programming #Electronics #Microcontrollers #Consultant
——
——
——
——
Multi-Motor Control
In order to synchronize the multi-motor system, a novel method for this system based on embedded control terminal. A controller of the strategy with the function of synchronous control is also completed. According to the requirements of this system, a distributed control structure which based on Hierarchical Approach is chosen. The hardware platform of this structure is composed of embedded control terminal motor could be driven independently. The experiment results verified that the multi-motor system is reliable, the control strategy is rational applied this multi-motor system has better dynamic response and higher reliability.
DL2305Mk01
1 x Adafruit METRO M0 Express
1 x ProtoScrewShield
1 x Thumb Joystick
1 x SparkFun Thumb Joystick Breakout
2 x Pololu DRV8834 Low-Voltage Stepper Motor Driver Carrier
2 x Electrolytic Decoupling Capacitors – 100uF/25V
2 x Pololu Stepper Motor Bipolar, 2.8V, 1.7 A/Phase
2 x Pololu Universal Aluminum Mounting Hub for 5mm Shaft, M3 Holes
1 x SparkFun Solderable Breadboard – Large
1 x SparkFun Cerberus USB Cable
Adafruit METRO M0 Express
JH – Analog A0
JV – Analog A1
JS – Digital 2
DIR – Digital 7
SPR – Digital 8
DIL – Digital 9
SPL – Digital 10
LED – Digital 13
VIN – +3.3V
VIN – +5V
GND – GND
——
DL2305Mk01p.ino
/* ***** Don Luc Electronics © *****
Software Version Information
Project #12: Robotics - Multi-Motor Control - Mk25
12-25
DL2305Mk01p.ino
1 x Adafruit METRO M0 Express
1 x ProtoScrewShield
1 x Thumb Joystick
1 x SparkFun Thumb Joystick Breakout
2 x Pololu DRV8834 Low-Voltage Stepper Motor Driver Carrier
2 x Electrolytic Decoupling Capacitors - 100uF/25V
2 x Pololu Stepper Motor Bipolar, 2.8V, 1.7 A/Phase
2 x Pololu Universal Aluminum Mounting Hub for 5mm Shaft, M3 Holes
1 x SparkFun Solderable Breadboard - Large
1 x SparkFun Cerberus USB Cable
*/

// Include the Library Code
// Arduino
#include <Arduino.h>
// DRV8834 Stepper Motor Driver
#include <BasicStepperDriver.h>
#include <MultiDriver.h>

// DRV8834 Stepper Motor Driver
// Stepper motor steps per revolution.
// Most steppers are 200 steps or 1.8 degrees/step
#define MOTOR_STEPS 200
// Target RPM for X axis stepper motor
#define MOTOR_X_RPM 800
// Target RPM for Y axis stepper motor
#define MOTOR_Y_RPM 800
// Since microstepping is set externally,
// make sure this matches the selected mode
// If it doesn't, the motor will move at a
// different RPM than chosen
// 1=full step, 2=half step etc.
#define MICROSTEPS 1
// X Stepper motor
#define DIR_X 7
#define STEP_X 8
// Y Stepper motor
#define DIR_Y 9
#define STEP_Y 10
// BasicStepperDriver
BasicStepperDriver stepperX(MOTOR_STEPS, DIR_X, STEP_X);
BasicStepperDriver stepperY(MOTOR_STEPS, DIR_Y, STEP_Y);
// Pick one of the two controllers below
// each motor moves independently
MultiDriver controller(stepperX, stepperY);

// Joystick
#define JH A0
#define JV A1
#define JS 2

// Variable for reading the button
int JSState = 0;
// Adjusted Value
int adjustedValue = 0;
int adjustedValue2 = 0;

// LED Yellow
int iLED = 13;

// Software Version Information
String sver = "12-25";

void loop() {

  // Button
  isButton();

  // Joystick
  isThumbJoystick();

  // Stepper
  isStepper();

}
getButton.ino
// Button
// Button Setup
void isButtonSetup() {

  // Make the button line an input
  pinMode(JS, INPUT_PULLUP);
  // Initialize digital pin iLED as an output
  pinMode(iLED, OUTPUT);

}

// Button
void isButton(){

  // Read the state of the button
  JSState = digitalRead(JS);

  // Check if the button is pressed.
  // If it is, the JSState is HIGH:
  if (JSState == HIGH) {

    // Button
    // Turn the LED on HIGH
    digitalWrite(iLED, HIGH);

  } else {

    // Button
    // Turn the LED on LOW
    digitalWrite(iLED, LOW);

  }

}
getStepper.ino
// Stepper
// isStepperSetup
void isStepperSetup() {

  // Set stepper target motors RPM.
  stepperX.begin(MOTOR_X_RPM, MICROSTEPS);
  stepperY.begin(MOTOR_Y_RPM, MICROSTEPS);

}
// Stepper
void isStepper() {

  // Stepper => Controller rotate
  controller.rotate(adjustedValue, adjustedValue2);

}
getThumbJoystick.ino
// Thumb Joystick
void isThumbJoystick() {

  // Joystick JH
  // Horizontal
  // Joystick Pot Values JH
  int potValue = analogRead(JH);
  int potValues = 0;
  // Adjusted Value
  potValues = map(potValue, 0, 1023, 1000, -1000);
  if (potValues > 300) {

    adjustedValue = potValues;

  } else if (potValues < -300) {

    adjustedValue = potValues;

  } else {

    adjustedValue = 0;

  }

  // Joystick JV
  // Vertical
  // Joystick Pot Values JV
  int potValue2 = analogRead(JV);
  int potValues2 = 0;
  // Adjusted Value2
  potValues2 = map(potValue2, 0, 1023, 1000, -1000);
  if (potValues2 > 300) {

    adjustedValue2 = potValues2;

  } else if (potValues2 < -300) {

    adjustedValue2 = potValues2;

  } else {

    adjustedValue2 = 0;

  }

}
setup.ino
// Setup
void setup()
{

  // Button Setup
  isButtonSetup();

  // DRV8834 Stepper Motor Driver
  isStepperSetup();

}
——
People can contact us: https://www.donluc.com/?page_id=1927
Technology Experience
- Programming Language
- Single-Board Microcontrollers (PIC, Arduino, Raspberry Pi,Espressif, etc…)
- IoT
- Wireless (Radio Frequency, Bluetooth, WiFi, Etc…)
- Robotics
- Camera and Video Capture Receiver Stationary, Wheel/Tank and Underwater Vehicle
- Unmanned Vehicles Terrestrial and Marine
- Machine Learning
- RTOS
- Research & Development (R & D)
Instructor, E-Mentor, STEAM, and Arts-Based Training
- Programming Language
- IoT
- PIC Microcontrollers
- Arduino
- Raspberry Pi
- Espressif
- Robotics
Follow Us
Luc Paquin – Curriculum Vitae – 2023
https://www.donluc.com/luc/
Web: https://www.donluc.com/
Facebook: https://www.facebook.com/neosteam.labs.9/
YouTube: https://www.youtube.com/@thesass2063
Twitter: https://twitter.com/labs_steam
Pinterest: https://www.pinterest.com/NeoSteamLabs/
Instagram: https://www.instagram.com/neosteamlabs/
Don Luc
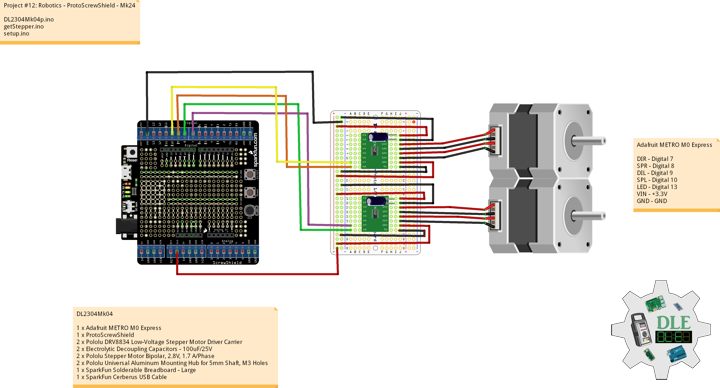
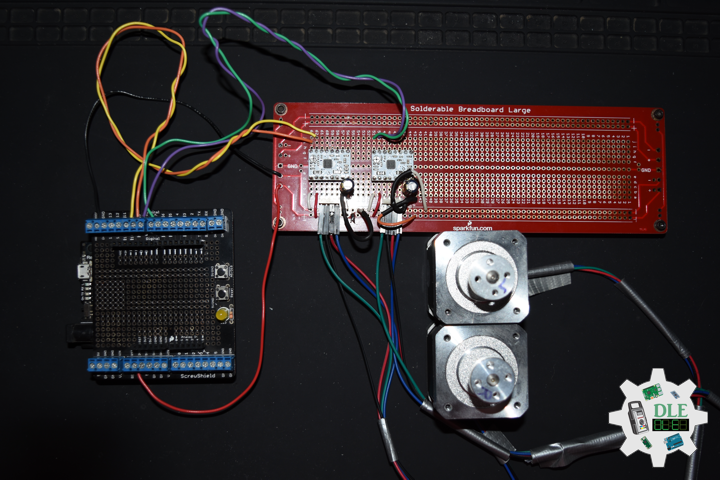
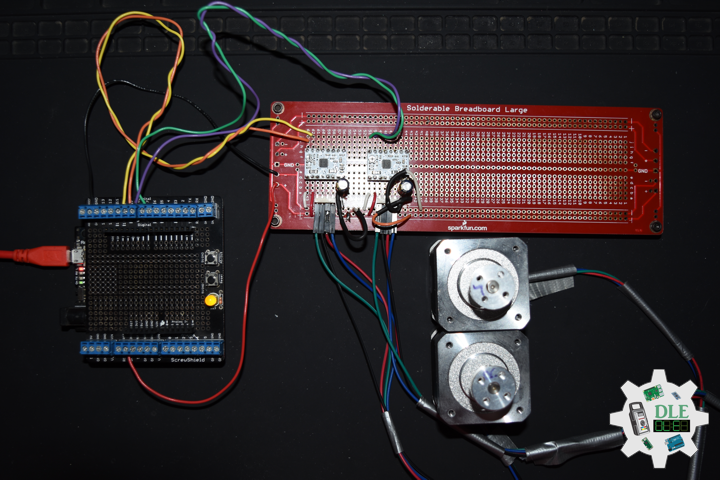
Project #12: Robotics – ProtoScrewShield – Mk24
——
#DonLucElectronics #DonLuc #Robotics #AdafruitMETROM0Express #Arduino #Project #Fritzing #Programming #Electronics #Microcontrollers #Consultant
——
——
——
——
ProtoScrewShield
The ProtoScrewShield extends all pins of the Arduino out to 3.5mm pitch screw terminals. It also has a lot of the utility provided including: a large prototyping space of both connected and unconnected 0.1″ spaced through-holes, a couple 5V and GND busses, a reset button, general use push button, and a 5mm yellow LED. This product includes all the parts shown and comes in kit form and must be soldered together by the end user.
DL2304Mk04
1 x Adafruit METRO M0 Express
1 x ProtoScrewShield
2 x Pololu DRV8834 Low-Voltage Stepper Motor Driver Carrier
2 x Electrolytic Decoupling Capacitors – 100uF/25V
2 x Pololu Stepper Motor Bipolar, 2.8V, 1.7 A/Phase
2 x Pololu Universal Aluminum Mounting Hub for 5mm Shaft, M3 Holes
1 x SparkFun Solderable Breadboard – Large
1 x SparkFun Cerberus USB Cable
Adafruit METRO M0 Express
DIR – Digital 7
SPR – Digital 8
DIL – Digital 9
SPL – Digital 10
LED – LED_BUILTIN
VIN – +3.3V
GND – GND
——
DL2304Mk04p.ino
/* ***** Don Luc Electronics © *****
Software Version Information
Project #12: Robotics - ProtoScrewShield - Mk24
12-24
DL2304Mk04p.ino
1 x Adafruit METRO M0 Express
1 x ProtoScrewShield
2 x Pololu DRV8834 Low-Voltage Stepper Motor Driver Carrier
2 x Electrolytic Decoupling Capacitors - 100uF/25V
2 x Pololu Stepper Motor Bipolar, 2.8V, 1.7 A/Phase
2 x Pololu Universal Aluminum Mounting Hub for 5mm Shaft, M3 Holes
1 x SparkFun Solderable Breadboard - Large
1 x SparkFun Cerberus USB Cable
*/

// Include the Library Code
// Arduino
#include <Arduino.h>
// DRV8834 Stepper Motor Driver
#include <BasicStepperDriver.h>
#include <MultiDriver.h>

// DRV8834 Stepper Motor Driver
// Stepper motor steps per revolution.
// Most steppers are 200 steps or 1.8 degrees/step
#define MOTOR_STEPS 200
// Target RPM for X axis stepper motor
#define MOTOR_X_RPM 800
// Target RPM for Y axis stepper motor
#define MOTOR_Y_RPM 800
// Since microstepping is set externally,
// make sure this matches the selected mode
// If it doesn't, the motor will move at a
// different RPM than chosen
// 1=full step, 2=half step etc.
#define MICROSTEPS 1
// X Stepper motor
#define DIR_X 7
#define STEP_X 8
// Y Stepper motor
#define DIR_Y 9
#define STEP_Y 10
// BasicStepperDriver
BasicStepperDriver stepperX(MOTOR_STEPS, DIR_X, STEP_X);
BasicStepperDriver stepperY(MOTOR_STEPS, DIR_Y, STEP_Y);
// Pick one of the two controllers below
// each motor moves independently
MultiDriver controller(stepperX, stepperY);

// LED Yellow
int iLED = 13;

// Software Version Information
String sver = "12-24";

void loop() {

  // Stepper
  isStepper();

}
getStepper.ino
// Stepper
// isStepperSetup
void isStepperSetup() {

  // Set stepper target motors RPM.
  stepperX.begin(MOTOR_X_RPM, MICROSTEPS);
  stepperY.begin(MOTOR_Y_RPM, MICROSTEPS);

}
// Stepper
void isStepper() {

  // Stepper => Controller rotate
  controller.rotate(360, 360);

}
setup.ino
// Setup
void setup()
{

  // Initialize digital pin iLED as an output.
  pinMode(iLED, OUTPUT);
  // Turn the LED on HIGH
  digitalWrite(iLED, HIGH);

  // DRV8834 Stepper Motor Driver
  isStepperSetup();

}
——
People can contact us: https://www.donluc.com/?page_id=1927
Technology Experience
- Programming Language
- Single-Board Microcontrollers (PIC, Arduino, Raspberry Pi,Espressif, etc…)
- IoT
- Wireless (Radio Frequency, Bluetooth, WiFi, Etc…)
- Robotics
- Camera and Video Capture Receiver Stationary, Wheel/Tank and Underwater Vehicle
- Unmanned Vehicles Terrestrial and Marine
- Machine Learning
- RTOS
- Research & Development (R & D)
Instructor, E-Mentor, STEAM, and Arts-Based Training
- Programming Language
- IoT
- PIC Microcontrollers
- Arduino
- Raspberry Pi
- Espressif
- Robotics
Follow Us
Luc Paquin – Curriculum Vitae – 2023
https://www.donluc.com/luc/
Web: https://www.donluc.com/
Facebook: https://www.facebook.com/neosteam.labs.9/
YouTube: https://www.youtube.com/@thesass2063
Twitter: https://twitter.com/labs_steam
Pinterest: https://www.pinterest.com/NeoSteamLabs/
Instagram: https://www.instagram.com/neosteamlabs/
Don Luc
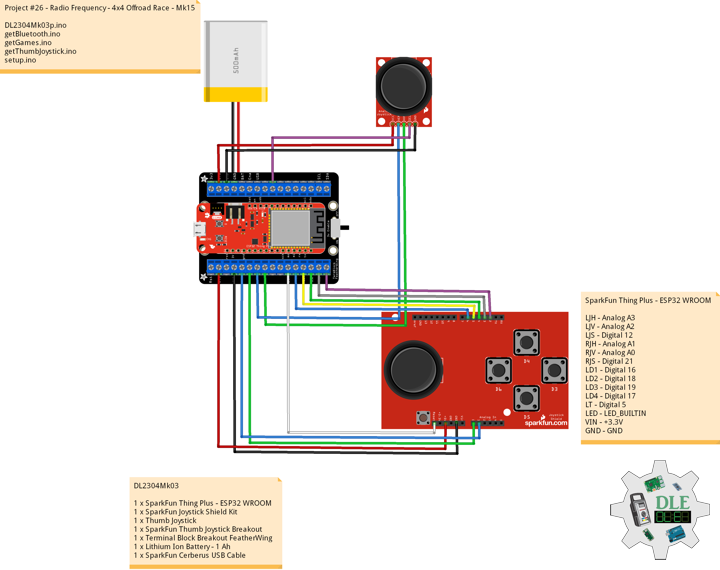
Project #26 – Radio Frequency – 4×4 Offroad Race – Mk15
——
#DonLucElectronics #DonLuc #RadioFrequency #Bluetooth #Games #Gamepad #ESP32 #Arduino #Project #Fritzing #Programming #Electronics #Microcontrollers #Consultant
——
——

——

——
4×4 Offroad Race
3D off-road racing game. Powerful off-road vehicles, trails and routes running on dirt roads, extreme weather conditions and violent opponents, all that we call 4×4 Offroad Race. You will be able to experience the most powerful four-wheel drive vehicles. You have to overcome terrible roads, do jumps over bumps and potholes and knock opponents off the track to win all the races.
DL2304Mk03
1 x SparkFun Thing Plus – ESP32 WROOM
1 x SparkFun Joystick Shield Kit
1 x Thumb Joystick
1 x SparkFun Thumb Joystick Breakout
1 x Terminal Block Breakout FeatherWing
1 x Lithium Ion Battery – 1 Ah
1 x SparkFun Cerberus USB Cable
SparkFun Thing Plus – ESP32 WROOM
LJH – Analog A3
LJV – Analog A2
LJS – Digital 12
RJH – Analog A1
RJV – Analog A0
RJS – Digital 21
LD1 – Digital 16
LD2 – Digital 18
LD3 – Digital 19
LD4 – Digital 17
LT – Digital 5
LED – LED_BUILTIN
VIN – +3.3V
GND – GND
——
DL2304Mk03p.ino
/* ***** Don Luc Electronics © *****
Software Version Information
Project #26 - Radio Frequency - 4x4 Offroad Race - Mk15
26-15
DL2304Mk03p.ino
1 x SparkFun Thing Plus - ESP32 WROOM
1 x SparkFun Joystick Shield Kit
1 x Thumb Joystick
1 x SparkFun Thumb Joystick Breakout
1 x Terminal Block Breakout FeatherWing
1 x Lithium Ion Battery - 1 Ah
1 x SparkFun Cerberus USB Cable
*/

// Include the Library Code
// Arduino
#include <Arduino.h>
// ESP32 BLE Gamepad
#include <BleGamepad.h>

// ESP32 BLE Gamepad
BleGamepad bleGamepad;

// Left Joystick
#define LJH A3
#define LJV A2
#define LJS 12

// Right Joystick
#define RJH A0
#define RJV A1
#define RJS 21

// D-pad
#define LD1 19
#define LD2 17
#define LD3 18
#define LD4 16

// LT
#define LT 5

// Previous Button State
int previousButton1State = HIGH;
int previousButton2State = HIGH;
int previousButton3State = HIGH;
int previousButton4State = HIGH;
int previousButton5State = HIGH;
int previousButton6State = HIGH;
int previousButton7State = HIGH;

// Number of pot samples to take (to smooth the values)
const int numberOfPotSamples = 5;
// Delay in milliseconds between pot samples
const int delayBetweenSamples = 2;
// Additional delay in milliseconds between HID reports
const int delayBetweenHIDReports = 5;
// Delay in milliseconds between button press
const int debounceDelay = 10;

// Software Version Information
String sver = "26-15";

void loop() {

  // Bluetooth Serial (ESP32SPP)
  isBluetooth();

}
getBluetooth.ino
// Bluetooth
// isBluetooth
void isBluetooth() {

  // ESP32 BLE Gamepad
  if(bleGamepad.isConnected())
  {

    // Button
    isButton();

    // Joystick
    isThumbJoystick();

  }

}
getGames.ino
// Games
// Set Inputs
void setInputs() {

  // Make the button line an input
  pinMode(LJS, INPUT_PULLUP);
  pinMode(RJS, INPUT_PULLUP);
  pinMode(LD1, INPUT_PULLUP);
  pinMode(LD2, INPUT_PULLUP);
  pinMode(LD3, INPUT_PULLUP);
  pinMode(LD4, INPUT_PULLUP);
  pinMode(LT, INPUT_PULLUP);
  // Initialize digital pin LED_BUILTIN as an output.
  pinMode(LED_BUILTIN, OUTPUT);
  // Turn the LED on HIGH
  digitalWrite(LED_BUILTIN, HIGH);

}

// Button
void isButton(){

  // Button1 State LD1
  int currentButton1State = digitalRead(LD1);
  if (currentButton1State != previousButton1State)
  {
    if (currentButton1State == LOW)
    {
      bleGamepad.press(BUTTON_1);
    }
    else
    {
      bleGamepad.release(BUTTON_1);
    }
  }
  previousButton1State = currentButton1State;
  // Button2 State LD2
  int currentButton2State = digitalRead(LD2);

  if (currentButton2State != previousButton2State)
  {
    if (currentButton2State == LOW)
    {
      bleGamepad.press(BUTTON_2);
    }
    else
    {
      bleGamepad.release(BUTTON_2);
    }
  }
  previousButton2State = currentButton2State;

  // Button3 State LD3
  int currentButton3State = digitalRead(LD3);
  if (currentButton3State != previousButton3State)
  {
    if (currentButton3State == LOW)
    {
      bleGamepad.press(BUTTON_3);
    }
    else
    {
      bleGamepad.release(BUTTON_3);
    }
  }
  previousButton3State = currentButton3State;

  // Button4 State LD4
  int currentButton4State = digitalRead(LD4);
  if (currentButton4State != previousButton4State)
  {
    if (currentButton4State == LOW)
    {
      bleGamepad.press(BUTTON_4);
    }
    else
    {
      bleGamepad.release(BUTTON_4);
    }
  }
  previousButton4State = currentButton4State;

  // Button5 State LJS
  int currentButton5State = digitalRead(LJS);
  if (currentButton5State != previousButton5State)
  {
    if (currentButton5State == LOW)
    {
      bleGamepad.press(BUTTON_5);
    }
    else
    {
      bleGamepad.release(BUTTON_5);
    }
  }
  previousButton5State = currentButton5State;

  // Button6 State RJS
  int currentButton6State = digitalRead(RJS);
  if (currentButton6State != previousButton6State)
  {
    if (currentButton6State == LOW)
    {
      bleGamepad.press(BUTTON_6);
    }
    else
    {
      bleGamepad.release(BUTTON_6);
    }
  }
  previousButton6State = currentButton6State;

  // Button7 State LT
  int currentButton7State = digitalRead(LT);
  if (currentButton7State != previousButton7State)
  {
    if (currentButton7State == LOW)
    {
      bleGamepad.press(BUTTON_7);
    }
    else
    {
      bleGamepad.release(BUTTON_7);
    }
  }
  previousButton7State = currentButton7State;

}
getThumbJoystick.ino
// Thumb Joystick
void isThumbJoystick() {

  // Joystick LJH
  // Joystick Pot Values LJH
  int potValues[numberOfPotSamples];
  for (int i = 0 ; i < numberOfPotSamples ; i++) {

    potValues[i] = analogRead(LJH);
    delay(delayBetweenSamples);

  }
  int potValue = 0;
  for (int i = 0 ; i < numberOfPotSamples ; i++) {

    potValue += potValues[i];

  }
  // Value / Pot Samples
  potValue = potValue / numberOfPotSamples;
  // Adjusted Value
  int adjustedValue = map(potValue, 0, 4095, 32737, 0);

  // Joystick LJV
  // Joystick Pot Values LJV
  int potValues2[numberOfPotSamples];
  for (int i = 0 ; i < numberOfPotSamples ; i++) {

    potValues2[i] = analogRead(LJV);
    delay(delayBetweenSamples);

  }
  int potValue2 = 0;
  for (int i = 0 ; i < numberOfPotSamples ; i++) {

    potValue2 += potValues2[i];

  }
  // Value2 / Pot Samples
  potValue2 = potValue2 / numberOfPotSamples;
  // Adjusted Value2
  int adjustedValue2 = map(potValue2, 0, 4095, 32737, 0);

  // Joystick RJH
  // Joystick Pot Values RJH
  int potValues3[numberOfPotSamples];
  for (int i = 0 ; i < numberOfPotSamples ; i++) {

    potValues3[i] = analogRead(RJH);
    delay(delayBetweenSamples);

  }
  int potValue3 = 0;
  for (int i = 0 ; i < numberOfPotSamples ; i++) {

      potValue3 += potValues3[i];

  }
  // Value3 / Pot Samples
  potValue3 = potValue3 / numberOfPotSamples;
  // Adjusted Value3
  int adjustedValue3 = map(potValue3, 0, 4095, 32737, 0);

  // Joystick RJV
  // Joystick Pot Values RJV
  int potValues4[numberOfPotSamples];
  for (int i = 0 ; i < numberOfPotSamples ; i++) {

    potValues4[i] = analogRead(RJV);
    delay(delayBetweenSamples);

  }
  int potValue4 = 0;
  for (int i = 0 ; i < numberOfPotSamples ; i++) {

      potValue4 += potValues4[i];

  }
  // Value4 / Pot Samples
  potValue4 = potValue4 / numberOfPotSamples;
  // Adjusted Value4
  int adjustedValue4 = map(potValue4, 0, 4095, 0, 32737);

  //bleGamepad.setAxes(adjustedValue, adjustedValue2, 0, 0, adjustedValue3, adjustedValue4, DPAD_CENTERED);
  bleGamepad.setAxes(adjustedValue, adjustedValue2, adjustedValue4, 0, adjustedValue3, 0, DPAD_CENTERED);
  delay(delayBetweenHIDReports);

  // D-pad
  // LD1
  if (digitalRead(LD1) == LOW){

    bleGamepad.setAxes(adjustedValue, adjustedValue2, adjustedValue4, 0, adjustedValue3, 0, DPAD_UP);

  }
  // LD2
  if (digitalRead(LD2) == LOW){

    bleGamepad.setAxes(adjustedValue, adjustedValue2, adjustedValue4, 0, adjustedValue3, 0, DPAD_LEFT);

  }
  // LD3
  if (digitalRead(LD3) == LOW){

    bleGamepad.setAxes(adjustedValue, adjustedValue2, adjustedValue4, 0, adjustedValue3, 0, DPAD_DOWN);

  }
  // LD4
  if (digitalRead(LD4) == LOW){

    bleGamepad.setAxes(adjustedValue, adjustedValue2, adjustedValue4, 0, adjustedValue3, 0, DPAD_RIGHT);

  }

}
setup.ino
// Setup
void setup()
{

  // Set Inputs
  setInputs();

  // ESP32 BLE Gamepad
  bleGamepad.begin();

}
——
People can contact us: https://www.donluc.com/?page_id=1927
Technology Experience
- Programming Language
- Single-Board Microcontrollers (PIC, Arduino, Raspberry Pi,Espressif, etc…)
- IoT
- Wireless (Radio Frequency, Bluetooth, WiFi, Etc…)
- Robotics
- Camera and Video Capture Receiver Stationary, Wheel/Tank and Underwater Vehicle
- Unmanned Vehicles Terrestrial and Marine
- Machine Learning
- RTOS
- Research & Development (R & D)
Instructor, E-Mentor, STEAM, and Arts-Based Training
- Programming Language
- IoT
- PIC Microcontrollers
- Arduino
- Raspberry Pi
- Espressif
- Robotics
Follow Us
Luc Paquin – Curriculum Vitae – 2023
https://www.donluc.com/luc/
Web: https://www.donluc.com/
Facebook: https://www.facebook.com/neosteam.labs.9/
YouTube: https://www.youtube.com/@thesass2063
Twitter: https://twitter.com/labs_steam
Pinterest: https://www.pinterest.com/NeoSteamLabs/
Instagram: https://www.instagram.com/neosteamlabs/
Don Luc
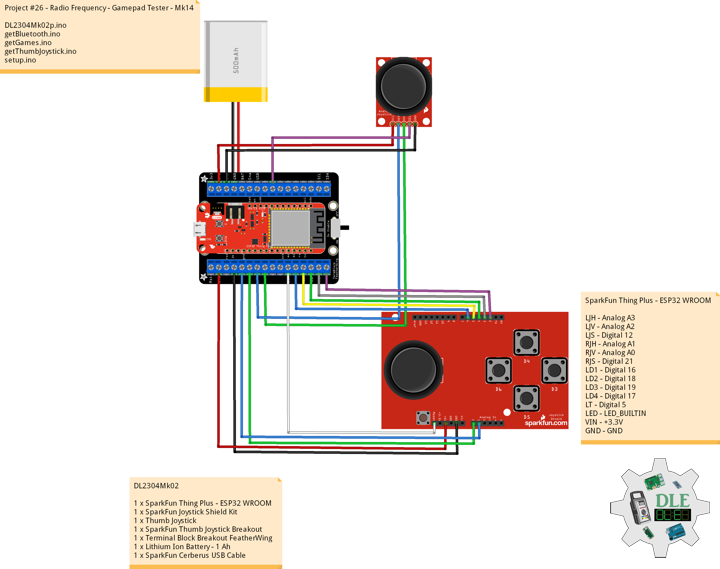
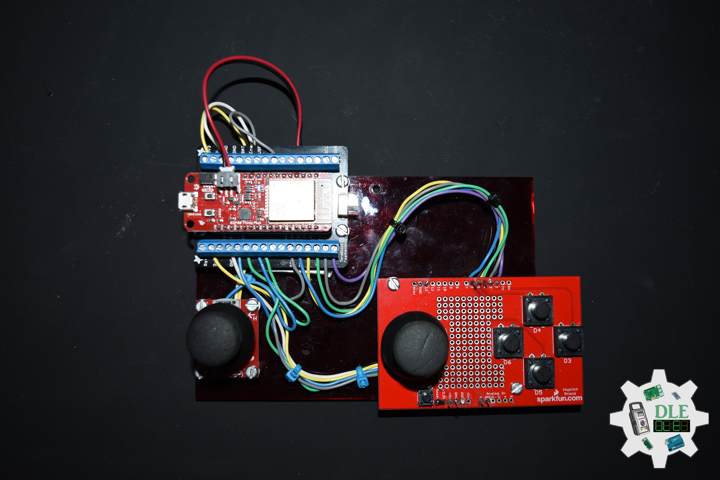
Project #26 – Radio Frequency – Gamepad Tester – Mk14
——
#DonLucElectronics #DonLuc #RadioFrequency #Bluetooth #JoystickTest #Gamepad #ESP32 #Arduino #Project #Fritzing #Programming #Electronics #Microcontrollers #Consultant
——
——

——
——
Controller & Gamepad Tester
You can begin testing your controller or gamepad by pressing a button or moving one of the analog sticks on your gamepad. When you press a button or move an analog stick, the illustration above should light up or display the movement of your analog stick. When we detect movement or button presses, the “Controller Detected” message will show up with your controller’s name in it. If you have multiple controllers or gamepads connected, then please try them one by one. Even though the illustration represents an Xbox controller, the test also works with other similar controllers.
DL2304Mk02
1 x SparkFun Thing Plus – ESP32 WROOM
1 x SparkFun Joystick Shield Kit
1 x Thumb Joystick
1 x SparkFun Thumb Joystick Breakout
1 x Terminal Block Breakout FeatherWing
1 x Lithium Ion Battery – 1 Ah
1 x SparkFun Cerberus USB Cable
SparkFun Thing Plus – ESP32 WROOM
LJH – Analog A3
LJV – Analog A2
LJS – Digital 12
RJH – Analog A1
RJV – Analog A0
RJS – Digital 21
LD1 – Digital 16
LD2 – Digital 18
LD3 – Digital 19
LD4 – Digital 17
LT – Digital 5
LED – LED_BUILTIN
VIN – +3.3V
GND – GND
——
DL2304Mk02p.ino
/* ***** Don Luc Electronics © *****
Software Version Information
Project #26 - Radio Frequency -  - Mk14
26-14
DL2304Mk02p.ino
1 x SparkFun Thing Plus - ESP32 WROOM
1 x SparkFun Joystick Shield Kit
1 x Thumb Joystick
1 x SparkFun Thumb Joystick Breakout
1 x Terminal Block Breakout FeatherWing
1 x Lithium Ion Battery - 1 Ah
1 x SparkFun Cerberus USB Cable
*/

// Include the Library Code
// Arduino
#include <Arduino.h>
// ESP32 BLE Gamepad
#include <BleGamepad.h>

// ESP32 BLE Gamepad
BleGamepad bleGamepad;

// Left Joystick
#define LJH A3
#define LJV A2
#define LJS 12

// Right Joystick
#define RJH A0
#define RJV A1
#define RJS 21

// D-pad
#define LD1 19
#define LD2 17
#define LD3 18
#define LD4 16

// LT
#define LT 5

// Previous Button State
int previousButton1State = HIGH;
int previousButton2State = HIGH;
int previousButton3State = HIGH;
int previousButton4State = HIGH;
int previousButton5State = HIGH;
int previousButton6State = HIGH;
int previousButton7State = HIGH;

// Number of pot samples to take (to smooth the values)
const int numberOfPotSamples = 5;
// Delay in milliseconds between pot samples
const int delayBetweenSamples = 2;
// Additional delay in milliseconds between HID reports
const int delayBetweenHIDReports = 5;
// Delay in milliseconds between button press
const int debounceDelay = 10;

// Software Version Information
String sver = "26-14";

void loop() {

  // Bluetooth Serial (ESP32SPP)
  isBluetooth();

}
getBluetooth.ino
// Bluetooth
// isBluetooth
void isBluetooth() {

  // ESP32 BLE Gamepad
  if(bleGamepad.isConnected())
  {

    // Button
    isButton();

    // Joystick
    isThumbJoystick();

  }

}
getGames.ino
// Games
// Set Inputs
void setInputs() {

  // Make the button line an input
  pinMode(LJS, INPUT_PULLUP);
  pinMode(RJS, INPUT_PULLUP);
  pinMode(LD1, INPUT_PULLUP);
  pinMode(LD2, INPUT_PULLUP);
  pinMode(LD3, INPUT_PULLUP);
  pinMode(LD4, INPUT_PULLUP);
  pinMode(LT, INPUT_PULLUP);
  // Initialize digital pin LED_BUILTIN as an output.
  pinMode(LED_BUILTIN, OUTPUT);
  // Turn the LED on HIGH
  digitalWrite(LED_BUILTIN, HIGH);

}

// Button
void isButton(){

  // Button1 State LD1
  int currentButton1State = digitalRead(LD1);
  if (currentButton1State != previousButton1State)
  {
    if (currentButton1State == LOW)
    {
      bleGamepad.press(BUTTON_1);
    }
    else
    {
      bleGamepad.release(BUTTON_1);
    }
  }
  previousButton1State = currentButton1State;
  // Button2 State LD2
  int currentButton2State = digitalRead(LD2);

  if (currentButton2State != previousButton2State)
  {
    if (currentButton2State == LOW)
    {
      bleGamepad.press(BUTTON_2);
    }
    else
    {
      bleGamepad.release(BUTTON_2);
    }
  }
  previousButton2State = currentButton2State;

  // Button3 State LD3
  int currentButton3State = digitalRead(LD3);
  if (currentButton3State != previousButton3State)
  {
    if (currentButton3State == LOW)
    {
      bleGamepad.press(BUTTON_3);
    }
    else
    {
      bleGamepad.release(BUTTON_3);
    }
  }
  previousButton3State = currentButton3State;

  // Button4 State LD4
  int currentButton4State = digitalRead(LD4);
  if (currentButton4State != previousButton4State)
  {
    if (currentButton4State == LOW)
    {
      bleGamepad.press(BUTTON_4);
    }
    else
    {
      bleGamepad.release(BUTTON_4);
    }
  }
  previousButton4State = currentButton4State;

  // Button5 State LJS
  int currentButton5State = digitalRead(LJS);
  if (currentButton5State != previousButton5State)
  {
    if (currentButton5State == LOW)
    {
      bleGamepad.press(BUTTON_5);
    }
    else
    {
      bleGamepad.release(BUTTON_5);
    }
  }
  previousButton5State = currentButton5State;

  // Button6 State RJS
  int currentButton6State = digitalRead(RJS);
  if (currentButton6State != previousButton6State)
  {
    if (currentButton6State == LOW)
    {
      bleGamepad.press(BUTTON_6);
    }
    else
    {
      bleGamepad.release(BUTTON_6);
    }
  }
  previousButton6State = currentButton6State;

  // Button7 State LT
  int currentButton7State = digitalRead(LT);
  if (currentButton7State != previousButton7State)
  {
    if (currentButton7State == LOW)
    {
      bleGamepad.press(BUTTON_7);
    }
    else
    {
      bleGamepad.release(BUTTON_7);
    }
  }
  previousButton7State = currentButton7State;

}
getThumbJoystick.ino
// Thumb Joystick
void isThumbJoystick() {

  // Joystick LJH
  // Joystick Pot Values LJH
  int potValues[numberOfPotSamples];
  for (int i = 0 ; i < numberOfPotSamples ; i++) {

    potValues[i] = analogRead(LJH);
    delay(delayBetweenSamples);

  }
  int potValue = 0;
  for (int i = 0 ; i < numberOfPotSamples ; i++) {

    potValue += potValues[i];

  }
  // Value / Pot Samples
  potValue = potValue / numberOfPotSamples;
  // Adjusted Value
  int adjustedValue = map(potValue, 0, 4095, 32737, 0);

  // Joystick LJV
  // Joystick Pot Values LJV
  int potValues2[numberOfPotSamples];
  for (int i = 0 ; i < numberOfPotSamples ; i++) {

    potValues2[i] = analogRead(LJV);
    delay(delayBetweenSamples);

  }
  int potValue2 = 0;
  for (int i = 0 ; i < numberOfPotSamples ; i++) {

    potValue2 += potValues2[i];

  }
  // Value2 / Pot Samples
  potValue2 = potValue2 / numberOfPotSamples;
  // Adjusted Value2
  int adjustedValue2 = map(potValue2, 0, 4095, 32737, 0);

  // Joystick RJH
  // Joystick Pot Values RJH
  int potValues3[numberOfPotSamples];
  for (int i = 0 ; i < numberOfPotSamples ; i++) {

    potValues3[i] = analogRead(RJH);
    delay(delayBetweenSamples);

  }
  int potValue3 = 0;
  for (int i = 0 ; i < numberOfPotSamples ; i++) {

      potValue3 += potValues3[i];

  }
  // Value3 / Pot Samples
  potValue3 = potValue3 / numberOfPotSamples;
  // Adjusted Value3
  int adjustedValue3 = map(potValue3, 0, 4095, 32737, 0);
  Serial.print(" RJH: ");
  Serial.println(potValue3);

  // Joystick RJV
  // Joystick Pot Values RJV
  int potValues4[numberOfPotSamples];
  for (int i = 0 ; i < numberOfPotSamples ; i++) {

    potValues4[i] = analogRead(RJV);
    delay(delayBetweenSamples);

  }
  int potValue4 = 0;
  for (int i = 0 ; i < numberOfPotSamples ; i++) {

      potValue4 += potValues4[i];

  }
  // Value4 / Pot Samples
  potValue4 = potValue4 / numberOfPotSamples;
  // Adjusted Value4
  int adjustedValue4 = map(potValue4, 0, 4095, 0, 32737);
  Serial.print(" RJV: ");
  Serial.println(potValue4);

  //bleGamepad.setAxes(adjustedValue, adjustedValue2, 0, 0, adjustedValue3, adjustedValue4, DPAD_CENTERED);
  bleGamepad.setAxes(adjustedValue, adjustedValue2, adjustedValue4, 0, adjustedValue3, 0, DPAD_CENTERED);
  delay(delayBetweenHIDReports);

  // D-pad
  // LD1
  if (digitalRead(LD1) == LOW){

    bleGamepad.setAxes(adjustedValue, adjustedValue2, adjustedValue4, 0, adjustedValue3, 0, DPAD_UP);

  }
  // LD2
  if (digitalRead(LD2) == LOW){

    bleGamepad.setAxes(adjustedValue, adjustedValue2, adjustedValue4, 0, adjustedValue3, 0, DPAD_LEFT);

  }
  // LD3
  if (digitalRead(LD3) == LOW){

    bleGamepad.setAxes(adjustedValue, adjustedValue2, adjustedValue4, 0, adjustedValue3, 0, DPAD_DOWN);

  }
  // LD4
  if (digitalRead(LD4) == LOW){

    bleGamepad.setAxes(adjustedValue, adjustedValue2, adjustedValue4, 0, adjustedValue3, 0, DPAD_RIGHT);

  }

}
setup.ino
// Setup
void setup()
{

  // Serial
  Serial.begin(115200);

  // Set Inputs
  setInputs();

  // ESP32 BLE Gamepad
  bleGamepad.begin();

}
——
People can contact us: https://www.donluc.com/?page_id=1927
Technology Experience
- Programming Language
- Single-Board Microcontrollers (PIC, Arduino, Raspberry Pi,Espressif, etc…)
- IoT
- Wireless (Radio Frequency, Bluetooth, WiFi, Etc…)
- Robotics
- Camera and Video Capture Receiver Stationary, Wheel/Tank and Underwater Vehicle
- Unmanned Vehicles Terrestrial and Marine
- Machine Learning
- RTOS
- Research & Development (R & D)
Instructor, E-Mentor, STEAM, and Arts-Based Training
- Programming Language
- IoT
- PIC Microcontrollers
- Arduino
- Raspberry Pi
- Espressif
- Robotics
Follow Us
Luc Paquin – Curriculum Vitae – 2023
https://www.donluc.com/luc/
Web: https://www.donluc.com/
Facebook: https://www.facebook.com/neosteam.labs.9/
YouTube: https://www.youtube.com/@thesass2063
Twitter: https://twitter.com/labs_steam
Pinterest: https://www.pinterest.com/NeoSteamLabs/
Instagram: https://www.instagram.com/neosteamlabs/
Don Luc
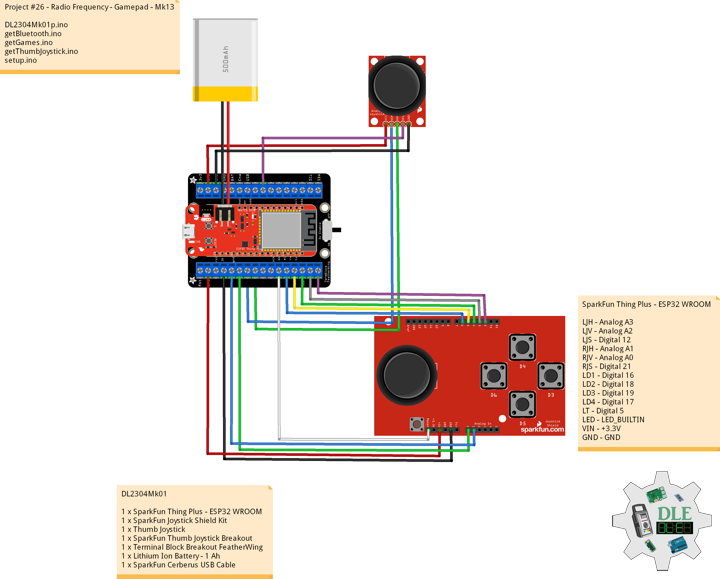
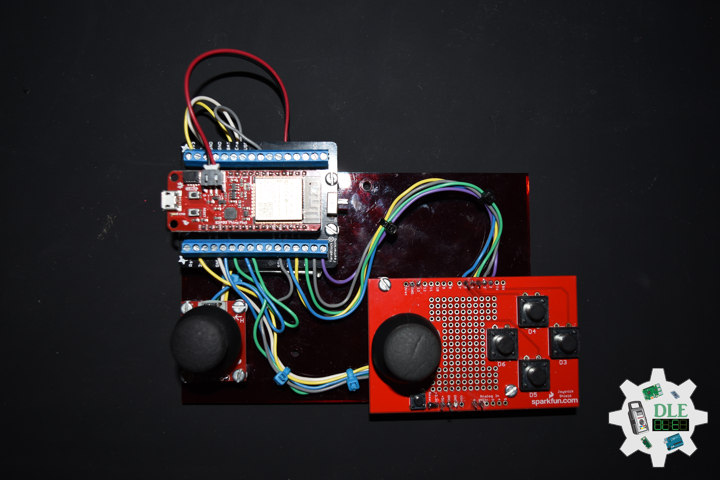
Project #26 – Radio Frequency – Joystick Test Application – Mk13
——
#DonLucElectronics #DonLuc #RadioFrequency #Bluetooth #JoystickTest #Gamepad #ESP32 #Arduino #Project #Fritzing #Programming #Electronics #Microcontrollers #Consultant
——
——
——

——
Joystick Test Application
While experimenting with making my own controllers recently, I needed a nice visual way of testing them in Windows. As you can see it’s pretty simple and just shows a visual representation of each axis, POV and button. Currently it supports Joysticks with 8 axes, 4 POV and up to 128 buttons. I haven’t had a chance to test it with over 32 buttons so I would be interested to here from anyone who has such a device. It should work on XP upwards but I have only tested it on Windows 10 64 bit. You just need Net framework 3 and DirectX 9 to run it.
DL2304Mk01
1 x SparkFun Thing Plus – ESP32 WROOM
1 x SparkFun Joystick Shield Kit
1 x Thumb Joystick
1 x SparkFun Thumb Joystick Breakout
1 x Terminal Block Breakout FeatherWing
1 x Lithium Ion Battery – 1 Ah
1 x SparkFun Cerberus USB Cable
SparkFun Thing Plus – ESP32 WROOM
LJH – Analog A3
LJV – Analog A2
LJS – Digital 12
RJH – Analog A1
RJV – Analog A0
RJS – Digital 21
LD1 – Digital 16
LD2 – Digital 18
LD3 – Digital 19
LD4 – Digital 17
LT – Digital 5
LED – LED_BUILTIN
VIN – +3.3V
GND – GND
——
DL2304Mk01p.ino
/* ***** Don Luc Electronics © *****
Software Version Information
Project #26 - Radio Frequency - Joystick Test Application - Mk13
26-13
DL2304Mk01p.ino
1 x SparkFun Thing Plus - ESP32 WROOM
1 x SparkFun Joystick Shield Kit
1 x Thumb Joystick
1 x SparkFun Thumb Joystick Breakout
1 x Terminal Block Breakout FeatherWing
1 x Lithium Ion Battery - 1 Ah
1 x SparkFun Cerberus USB Cable
*/

// Include the Library Code
// Arduino
#include <Arduino.h>
// ESP32 BLE Gamepad
#include <BleGamepad.h>

// ESP32 BLE Gamepad
BleGamepad bleGamepad;

// Left Joystick
#define LJH A3
#define LJV A2
#define LJS 12

// Right Joystick
#define RJH A1
#define RJV A0
#define RJS 21

// D-pad
#define LD1 16
#define LD2 18
#define LD3 19
#define LD4 17

// LT
#define LT 5

// Previous Button State
int previousButton1State = HIGH;
int previousButton2State = HIGH;
int previousButton3State = HIGH;
int previousButton4State = HIGH;
int previousButton5State = HIGH;
int previousButton6State = HIGH;
int previousButton7State = HIGH;

// Number of pot samples to take (to smooth the values)
const int numberOfPotSamples = 5;
// Delay in milliseconds between pot samples
const int delayBetweenSamples = 2;
// Additional delay in milliseconds between HID reports
const int delayBetweenHIDReports = 5;
// Delay in milliseconds between button press
const int debounceDelay = 10;

// Software Version Information
String sver = "26-13";

void loop() {

  // Bluetooth Serial (ESP32SPP)
  isBluetooth();

}
getBluetooth.ino
// Bluetooth
// isBluetooth
void isBluetooth() {

  // ESP32 BLE Gamepad
  if(bleGamepad.isConnected())
  {

    // Button
    isButton();

    // Joystick
    isThumbJoystick();

  }

}
getGames.ino
// Games
// Set Inputs
void setInputs() {

  // Make the button line an input
  pinMode(LJS, INPUT_PULLUP);
  pinMode(RJS, INPUT_PULLUP);
  pinMode(LD1, INPUT_PULLUP);
  pinMode(LD2, INPUT_PULLUP);
  pinMode(LD3, INPUT_PULLUP);
  pinMode(LD4, INPUT_PULLUP);
  pinMode(LT, INPUT_PULLUP);
  // Initialize digital pin LED_BUILTIN as an output.
  pinMode(LED_BUILTIN, OUTPUT);
  // Turn the LED on HIGH
  digitalWrite(LED_BUILTIN, HIGH);

}

// Button
void isButton(){

  // Button1 State LD1
  int currentButton1State = digitalRead(LD1);
  if (currentButton1State != previousButton1State)
  {
    if (currentButton1State == LOW)
    {
      bleGamepad.press(BUTTON_1);
    }
    else
    {
      bleGamepad.release(BUTTON_1);
    }
  }
  previousButton1State = currentButton1State;
  // Button2 State LD2
  int currentButton2State = digitalRead(LD2);

  if (currentButton2State != previousButton2State)
  {
    if (currentButton2State == LOW)
    {
      bleGamepad.press(BUTTON_2);
    }
    else
    {
      bleGamepad.release(BUTTON_2);
    }
  }
  previousButton2State = currentButton2State;

  // Button3 State LD3
  int currentButton3State = digitalRead(LD3);
  if (currentButton3State != previousButton3State)
  {
    if (currentButton3State == LOW)
    {
      bleGamepad.press(BUTTON_3);
    }
    else
    {
      bleGamepad.release(BUTTON_3);
    }
  }
  previousButton3State = currentButton3State;

  // Button4 State LD4
  int currentButton4State = digitalRead(LD4);
  if (currentButton4State != previousButton4State)
  {
    if (currentButton4State == LOW)
    {
      bleGamepad.press(BUTTON_4);
    }
    else
    {
      bleGamepad.release(BUTTON_4);
    }
  }
  previousButton4State = currentButton4State;

  // Button5 State LJS
  int currentButton5State = digitalRead(LJS);
  if (currentButton5State != previousButton5State)
  {
    if (currentButton5State == LOW)
    {
      bleGamepad.press(BUTTON_5);
    }
    else
    {
      bleGamepad.release(BUTTON_5);
    }
  }
  previousButton5State = currentButton5State;

  // Button6 State RJS
  int currentButton6State = digitalRead(RJS);
  if (currentButton6State != previousButton6State)
  {
    if (currentButton6State == LOW)
    {
      bleGamepad.press(BUTTON_6);
    }
    else
    {
      bleGamepad.release(BUTTON_6);
    }
  }
  previousButton6State = currentButton6State;

  // Button7 State LT
  int currentButton7State = digitalRead(LT);
  if (currentButton7State != previousButton7State)
  {
    if (currentButton7State == LOW)
    {
      bleGamepad.press(BUTTON_7);
    }
    else
    {
      bleGamepad.release(BUTTON_7);
    }
  }
  previousButton7State = currentButton7State;

}
getThumbJoystick.ino
// Thumb Joystick
void isThumbJoystick() {

  // Joystick LJH
  // Joystick Pot Values LJH
  int potValues[numberOfPotSamples];
  for (int i = 0 ; i < numberOfPotSamples ; i++) {

    potValues[i] = analogRead(LJH);
    delay(delayBetweenSamples);

  }
  int potValue = 0;
  for (int i = 0 ; i < numberOfPotSamples ; i++) {

    potValue += potValues[i];

  }
  // Value / Pot Samples
  potValue = potValue / numberOfPotSamples;
  // Adjusted Value
  int adjustedValue = map(potValue, 0, 4095, 32737, 0);

  // Joystick LJV
  // Joystick Pot Values LJV
  int potValues2[numberOfPotSamples];
  for (int i = 0 ; i < numberOfPotSamples ; i++) {

    potValues2[i] = analogRead(LJV);
    delay(delayBetweenSamples);

  }
  int potValue2 = 0;
  for (int i = 0 ; i < numberOfPotSamples ; i++) {

    potValue2 += potValues2[i];

  }
  // Value2 / Pot Samples
  potValue2 = potValue2 / numberOfPotSamples;
  // Adjusted Value2
  int adjustedValue2 = map(potValue2, 0, 4095, 32737, 0);

  // Joystick RJH
  // Joystick Pot Values RJH
  int potValues3[numberOfPotSamples];
  for (int i = 0 ; i < numberOfPotSamples ; i++) {

    potValues3[i] = analogRead(RJH);
    delay(delayBetweenSamples);

  }
  int potValue3 = 0;
  for (int i = 0 ; i < numberOfPotSamples ; i++) {

      potValue3 += potValues3[i];

  }
  // Value3 / Pot Samples
  potValue3 = potValue3 / numberOfPotSamples;
  // Adjusted Value3
  int adjustedValue3 = map(potValue3, 0, 4095, 32737, 0);

  // Joystick RJV
  // Joystick Pot Values RJV
  int potValues4[numberOfPotSamples];
  for (int i = 0 ; i < numberOfPotSamples ; i++) {

    potValues4[i] = analogRead(RJV);
    delay(delayBetweenSamples);

  }
  int potValue4 = 0;
  for (int i = 0 ; i < numberOfPotSamples ; i++) {

      potValue4 += potValues4[i];

  }
  // Value4 / Pot Samples
  potValue4 = potValue4 / numberOfPotSamples;
  // Adjusted Value4
  int adjustedValue4 = map(potValue4, 0, 4095, 32737, 0);

  bleGamepad.setAxes(adjustedValue, adjustedValue2, 0, 0, adjustedValue3, adjustedValue4, DPAD_CENTERED);
  delay(delayBetweenHIDReports);

  // D-pad
  // LD1
  if (digitalRead(LD1) == LOW){

    bleGamepad.setAxes(adjustedValue, adjustedValue2, 0, 0, adjustedValue3, adjustedValue4, DPAD_UP);

  }
  // LD2
  if (digitalRead(LD2) == LOW){

    bleGamepad.setAxes(adjustedValue, adjustedValue2, 0, 0, adjustedValue3, adjustedValue4, DPAD_LEFT);

  }
  // LD3
  if (digitalRead(LD3) == LOW){

    bleGamepad.setAxes(adjustedValue, adjustedValue2, 0, 0, adjustedValue3, adjustedValue4, DPAD_DOWN);

  }
  // LD4
  if (digitalRead(LD4) == LOW){

    bleGamepad.setAxes(adjustedValue, adjustedValue2, 0, 0, adjustedValue3, adjustedValue4, DPAD_RIGHT);

  }

}
setup.ino
// Setup
void setup()
{

  // Set Inputs
  setInputs();

  // ESP32 BLE Gamepad
  bleGamepad.begin();

}
——
People can contact us: https://www.donluc.com/?page_id=1927
Technology Experience
- Programming Language
- Single-Board Microcontrollers (PIC, Arduino, Raspberry Pi,Espressif, etc…)
- IoT
- Wireless (Radio Frequency, Bluetooth, WiFi, Etc…)
- Robotics
- Camera and Video Capture Receiver Stationary, Wheel/Tank and Underwater Vehicle
- Unmanned Vehicles Terrestrial and Marine
- Machine Learning
- RTOS
- Research & Development (R & D)
Instructor, E-Mentor, STEAM, and Arts-Based Training
- Programming Language
- IoT
- PIC Microcontrollers
- Arduino
- Raspberry Pi
- Espressif
- Robotics
Follow Us
Luc Paquin – Curriculum Vitae – 2023
https://www.donluc.com/luc/
Web: https://www.donluc.com/
Facebook: https://www.facebook.com/neosteam.labs.9/
YouTube: https://www.youtube.com/@thesass2063
Twitter: https://twitter.com/labs_steam
Pinterest: https://www.pinterest.com/NeoSteamLabs/
Instagram: https://www.instagram.com/neosteamlabs/
Don Luc
Project #26 – Radio Frequency – Gamepad – Mk12
——
#DonLucElectronics #DonLuc #RadioFrequency #Bluetooth #Gamepad #SparkFunThingPlusESP32WROOM #Arduino #Project #Fritzing #Programming #Electronics #Microcontrollers #Consultant
——

——

——
Gamepad
A gamepad is a type of video game controller held in two hands, where the fingers are used to provide input. They are typically the main input device for video game consoles. Gamepads generally feature a set of buttons handled with the right thumb and a direction controller handled with the left. The direction controller has traditionally been a four-way digital cross, also named a joypad, or alternatively a D-pad, and never called arrow keys, but most modern controllers additionally feature one or more analog sticks.
DL2303Mk03
1 x SparkFun Thing Plus – ESP32 WROOM
1 x SparkFun Joystick Shield Kit
1 x Thumb Joystick
1 x SparkFun Thumb Joystick Breakout
1 x Terminal Block Breakout FeatherWing
1 x SparkFun Cerberus USB Cable
SparkFun Thing Plus – ESP32 WROOM
LJH – Analog A3
LJV – Analog A2
LJS – Digital 12
RJH – Analog A1
RJV – Analog A0
RJS – Digital 21
LD1 – Digital 16
LD2 – Digital 18
LD3 – Digital 19
LD4 – Digital 17
LT – Digital 5
LED – LED_BUILTIN
VIN – +3.3V
GND – GND
——
DL2303Mk03p.ino
/* ***** Don Luc Electronics © *****
Software Version Information
Project #26 - Radio Frequency - Gamepad - Mk12
26-12
DL2303Mk03p.ino
1 x SparkFun Thing Plus - ESP32 WROOM
1 x SparkFun Joystick Shield Kit
1 x Thumb Joystick
1 x SparkFun Thumb Joystick Breakout
1 x Terminal Block Breakout FeatherWing
1 x SparkFun Cerberus USB Cable
*/

// Include the Library Code
// Arduino
#include <Arduino.h>
// ESP32 BLE Gamepad
#include <BleGamepad.h>

// ESP32 BLE Gamepad
BleGamepad bleGamepad;

// Left Joystick
#define LJH A3
#define LJV A2
#define LJS 12

// Right Joystick
#define RJH A1
#define RJV A0
#define RJS 21

// D-pad
#define LD1 16
#define LD2 18
#define LD3 19
#define LD4 17

// LT
#define LT 5

// Number of pot samples to take (to smooth the values)
const int numberOfPotSamples = 5;
// Delay in milliseconds between pot samples
const int delayBetweenSamples = 2;
// Additional delay in milliseconds between HID reports
const int delayBetweenHIDReports = 5;
// Delay in milliseconds between button press
const int debounceDelay = 10;

// Software Version Information
String sver = "26-12";

void loop() {

  // Bluetooth Serial (ESP32SPP)
  isBluetooth();

  // Delay
  delay(500);

}
getBluetooth.ino
// Bluetooth
// isBluetooth
void isBluetooth() {

  // ESP32 BLE Gamepad
  if(bleGamepad.isConnected())
  {

    // Button
    isButton();

    // Joystick
    isThumbJoystick();

    // Serial
    Serial.println(" *");

  }

}
getGames.ino
// Games
// Set Inputs
void setInputs() {

  // Make the button line an input
  pinMode(LJS, INPUT_PULLUP);
  pinMode(RJS, INPUT_PULLUP);
  pinMode(LD1, INPUT_PULLUP);
  pinMode(LD2, INPUT_PULLUP);
  pinMode(LD3, INPUT_PULLUP);
  pinMode(LD4, INPUT_PULLUP);
  pinMode(LT, INPUT_PULLUP);

  // Initialize digital pin LED_BUILTIN as an output.
  pinMode(LED_BUILTIN, OUTPUT);
  // Turn the LED on HIGH
  digitalWrite(LED_BUILTIN, HIGH);

}

// Button
void isButton(){

  // Left Joystick
  if (digitalRead(LJS) == LOW) {

    bleGamepad.press(LJS);
    delay(debounceDelay);
    bleGamepad.release(LJS);
    Serial.print(" LJS");

  }

  // Right Joystick
  if (digitalRead(RJS) == LOW) {

    bleGamepad.press(RJS);
    delay(debounceDelay);
    bleGamepad.release(RJS);
    Serial.print(" RJS");

  }

  // LT
  if (digitalRead(LT) == LOW) {

    bleGamepad.press(LT);
    delay(debounceDelay);
    bleGamepad.release(LT);
    Serial.print(" LT");

  }

}
getThumbJoystick.ino
// Thumb Joystick
void isThumbJoystick() {

  // Joystick LJH
  // Joystick Pot Values LJH
  int potValues[numberOfPotSamples];
  for (int i = 0 ; i < numberOfPotSamples ; i++) {

    potValues[i] = analogRead(LJH);
    delay(delayBetweenSamples);

  }
  int potValue = 0;
  for (int i = 0 ; i < numberOfPotSamples ; i++) {

    potValue += potValues[i];

  }
  // Value / Pot Samples
  potValue = potValue / numberOfPotSamples;
  // Serial
  Serial.print(" LJH: ");
  Serial.print(potValue);
  // Adjusted Value
  int adjustedValue = map(potValue, 0, 4095, 127, -127);

  // Joystick LJV
  // Joystick Pot Values LJV
  int potValues2[numberOfPotSamples];
  for (int i = 0 ; i < numberOfPotSamples ; i++) {

    potValues2[i] = analogRead(LJV);
    delay(delayBetweenSamples);

  }
  int potValue2 = 0;
  for (int i = 0 ; i < numberOfPotSamples ; i++) {

    potValue2 += potValues2[i];

  }
  // Value2 / Pot Samples
  potValue2 = potValue2 / numberOfPotSamples;
  // Serial
  Serial.print(" LJV: ");
  Serial.print(potValue2);
  // Adjusted Value2
  int adjustedValue2 = map(potValue2, 0, 4095, 127, -127);

  // Joystick RJH
  // Joystick Pot Values RJH
  int potValues3[numberOfPotSamples];
  for (int i = 0 ; i < numberOfPotSamples ; i++) {

    potValues3[i] = analogRead(RJH);
    delay(delayBetweenSamples);

  }
  int potValue3 = 0;
  for (int i = 0 ; i < numberOfPotSamples ; i++) {

      potValue3 += potValues3[i];

  }
  // Value3 / Pot Samples
  potValue3 = potValue3 / numberOfPotSamples;
  // Serial
  Serial.print(" RJH: ");
  Serial.print(potValue3);
  // Adjusted Value3
  int adjustedValue3 = map(potValue3, 0, 4095, 255, 0);

  // Joystick RJV
  // Joystick Pot Values RJV
  int potValues4[numberOfPotSamples];
  for (int i = 0 ; i < numberOfPotSamples ; i++) {

    potValues4[i] = analogRead(RJV);
    delay(delayBetweenSamples);

  }
  int potValue4 = 0;
  for (int i = 0 ; i < numberOfPotSamples ; i++) {

      potValue4 += potValues4[i];

  }
  // Value4 / Pot Samples
  potValue4 = potValue4 / numberOfPotSamples;
  // Serial
  Serial.print(" RJV: ");
  Serial.print(potValue4);
  // Adjusted Value4
  int adjustedValue4 = map(potValue4, 0, 4095, 255, 0);

  bleGamepad.setAxes(adjustedValue, adjustedValue2, 0, 0, adjustedValue3, adjustedValue4, DPAD_CENTERED);
  delay(delayBetweenHIDReports);

  // D-pad
  // LD1
  if (digitalRead(LD1) == LOW){

    bleGamepad.setAxes(adjustedValue, adjustedValue2, 0, 0, adjustedValue3, adjustedValue4, DPAD_UP);
    Serial.print(" DPAD_UP");

  }

  // LD2
  if (digitalRead(LD2) == LOW){

    bleGamepad.setAxes(adjustedValue, adjustedValue2, 0, 0, adjustedValue3, adjustedValue4, DPAD_LEFT);
    Serial.print(" DPAD_LEFT");

  }

  // LD3
  if (digitalRead(LD3) == LOW){

    bleGamepad.setAxes(adjustedValue, adjustedValue2, 0, 0, adjustedValue3, adjustedValue4, DPAD_DOWN);
    Serial.print(" DPAD_DOWN");

  }

  // LD4
  if (digitalRead(LD4) == LOW){

    bleGamepad.setAxes(adjustedValue, adjustedValue2, 0, 0, adjustedValue3, adjustedValue4, DPAD_RIGHT);
    Serial.print(" DPAD_RIGHT");

  }

}
setup.ino
// Setup
void setup()
{

  // Serial
  Serial.begin(115200);
  Serial.println("Starting BLE work!");

  // Set Inputs
  setInputs();

  // ESP32 BLE Gamepad
  bleGamepad.begin();

}
——
People can contact us: https://www.donluc.com/?page_id=1927
Technology Experience
- Programming Language
- Single-Board Microcontrollers (PIC, Arduino, Raspberry Pi,Espressif, etc…)
- IoT
- Wireless (Radio Frequency, Bluetooth, WiFi, Etc…)
- Robotics
- Camera and Video Capture Receiver Stationary, Wheel/Tank and Underwater Vehicle
- Unmanned Vehicles Terrestrial and Marine
- Machine Learning
- RTOS
- Research & Development (R & D)
Instructor, E-Mentor, STEAM, and Arts-Based Training
- Programming Language
- IoT
- PIC Microcontrollers
- Arduino
- Raspberry Pi
- Espressif
- Robotics
Follow Us
Luc Paquin – Curriculum Vitae – 2023
https://www.donluc.com/luc/
Web: https://www.donluc.com/
Facebook: https://www.facebook.com/neosteam.labs.9/
YouTube: https://www.youtube.com/@thesass2063
Twitter: https://twitter.com/labs_steam
Pinterest: https://www.pinterest.com/NeoSteamLabs/
Instagram: https://www.instagram.com/neosteamlabs/
Don Luc
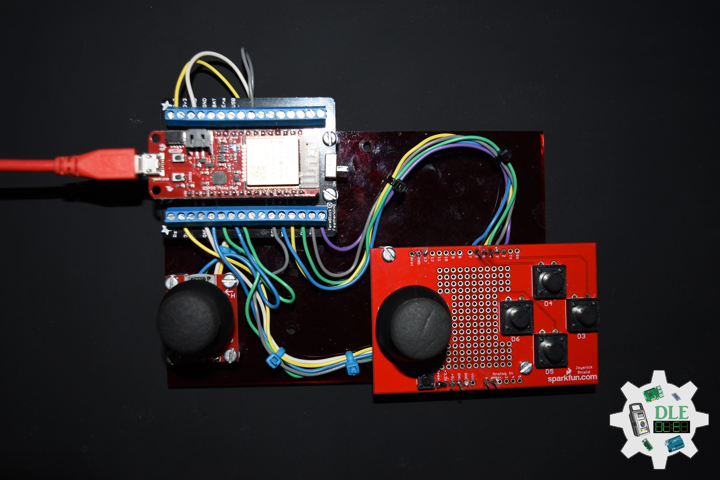
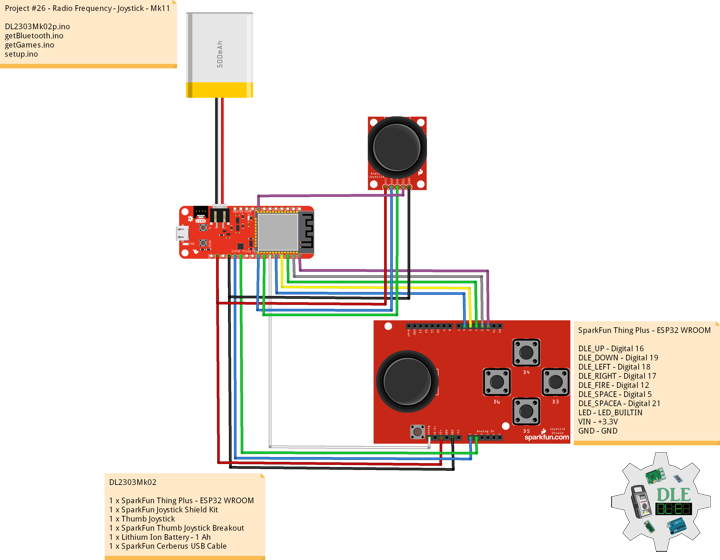
Project #26 – Radio Frequency – Joystick – Mk11
——
#DonLucElectronics #DonLuc #RadioFrequency #Bluetooth #Joystick #SparkFunJoystickShield #SparkFunThingPlusESP32WROOM #Arduino #Project #Fritzing #Programming #Electronics #Microcontrollers #Consultant
——
——

——
——
Thumb Joystick
This is a joystick very similar to the “Analog” joysticks on PS2 controllers. Directional movements are simply two potentiometers, one for each axis. Pots are ~10k each. This joystick also has a select button that is actuated when the joystick is pressed down. This is the breakout board for the thumb joystick SparkFun Thumb Joystick Breakout.
DL2303Mk02
1 x SparkFun Thing Plus – ESP32 WROOM
1 x SparkFun Joystick Shield Kit
1 x Thumb Joystick
1 x SparkFun Thumb Joystick Breakout
1 x Lithium Ion Battery – 1 Ah
1 x SparkFun Cerberus USB Cable
SparkFun Thing Plus – ESP32 WROOM
DLE_UP – Digital 16
DLE_DOWN – Digital 19
DLE_LEFT – Digital 18
DLE_RIGHT – Digital 17
DLE_FIRE – Digital 12
DLE_SPACE – Digital 5
DLE_SPACEA – Digital 21
LED – LED_BUILTIN
VIN – +3.3V
GND – GND
——
DL2303Mk02p.ino
/* ***** Don Luc Electronics © *****
Software Version Information
Project #26 - Radio Frequency - Joystick - Mk11
26-11
DL2303Mk02p.ino
1 x SparkFun Thing Plus - ESP32 WROOM
1 x SparkFun Joystick Shield Kit
1 x Thumb Joystick
1 x SparkFun Thumb Joystick Breakout
1 x Lithium Ion Battery - 1 Ah
1 x SparkFun Cerberus USB Cable
*/

// Include the Library Code
// ESP32 BLE Keyboard - NIMBLE
#define USE_NIMBLE
#include <BleKeyboard.h>

// ESP32 BLE Keyboard
BleKeyboard bleKeyboard;

// Game Controller Buttons
#define DLE_UP 16
#define DLE_DOWN 19
#define DLE_LEFT 18
#define DLE_RIGHT 17
#define DLE_FIRE 12
#define DLE_SPACE 5
#define DLE_SPACEA 21

// Button
bool keyStates[7] = {false, false, false, false, false, false, false};
int keyPins[7] = {DLE_UP, DLE_DOWN, DLE_LEFT, DLE_RIGHT, DLE_SPACEA, DLE_SPACE, DLE_FIRE};
uint8_t keyCodes[7] = {KEY_UP_ARROW, KEY_DOWN_ARROW, KEY_LEFT_ARROW, KEY_RIGHT_ARROW, ' ', ' ', KEY_LEFT_CTRL};

// Connect Notification Sent
bool connectNotificationSent = false;

// Software Version Information
String sver = "26-11";

void loop() {

  // Bluetooth Serial (ESP32SPP)
  isBluetooth();

}
getBluetooth.ino
// Bluetooth
// isBluetooth
void isBluetooth() {

  // Counter
  int counter;

  // ESP32 BLE Keyboard
  if(bleKeyboard.isConnected()) {

    // Connect Notification Sent
    if (!connectNotificationSent) {

      connectNotificationSent = true;

    }

    // Button
    for(counter = 0; counter < 7; counter ++){

      handleButton(counter);

    }

  }

}
getGames.ino
// Games
// Set Inputs
void setInputs() {

  // Make the button line an input
  pinMode(DLE_UP, INPUT_PULLUP);
  pinMode(DLE_DOWN, INPUT_PULLUP);
  pinMode(DLE_LEFT, INPUT_PULLUP);
  pinMode(DLE_RIGHT, INPUT_PULLUP);
  pinMode(DLE_FIRE, INPUT_PULLUP);
  pinMode(DLE_SPACE, INPUT_PULLUP);
  pinMode(DLE_SPACEA, INPUT_PULLUP);
  // Initialize digital pin LED_BUILTIN as an output.
  pinMode(LED_BUILTIN, OUTPUT);
  // Turn the LED on HIGH
  digitalWrite(LED_BUILTIN, HIGH);

}

// Handle Button
void handleButton(int keyIndex){

  // Handle the button press
  if (!digitalRead(keyPins[keyIndex])){

    // Button pressed
    if (!keyStates[keyIndex]){

      // Key not currently pressed
      keyStates[keyIndex] = true;
      bleKeyboard.press(keyCodes[keyIndex]);

    }

  } else {

    // Button not pressed
    if (keyStates[keyIndex]){

      // Key currently pressed
      keyStates[keyIndex] = false;
      bleKeyboard.release(keyCodes[keyIndex]);

    }
  }

}
setup.ino
// Setup
void setup()
{

  // Set Inputs
  setInputs();

  // ESP32 BLE Keyboard
  bleKeyboard.begin();

}
——
People can contact us: https://www.donluc.com/?page_id=1927
Technology Experience
- Programming Language
- Single-Board Microcontrollers (PIC, Arduino, Raspberry Pi,Espressif, etc…)
- IoT
- Wireless (Radio Frequency, Bluetooth, WiFi, Etc…)
- Robotics
- Camera and Video Capture Receiver Stationary, Wheel/Tank and Underwater Vehicle
- Unmanned Vehicles Terrestrial and Marine
- Machine Learning
- RTOS
- Research & Development (R & D)
Instructor, E-Mentor, STEAM, and Arts-Based Training
- Programming Language
- IoT
- PIC Microcontrollers
- Arduino
- Raspberry Pi
- Espressif
- Robotics
Follow Us
Luc Paquin – Curriculum Vitae – 2023
https://www.donluc.com/luc/
Web: https://www.donluc.com/
Facebook: https://www.facebook.com/neosteam.labs.9/
YouTube: https://www.youtube.com/@thesass2063
Twitter: https://twitter.com/labs_steam
Pinterest: https://www.pinterest.com/NeoSteamLabs/
Instagram: https://www.instagram.com/neosteamlabs/
Don Luc
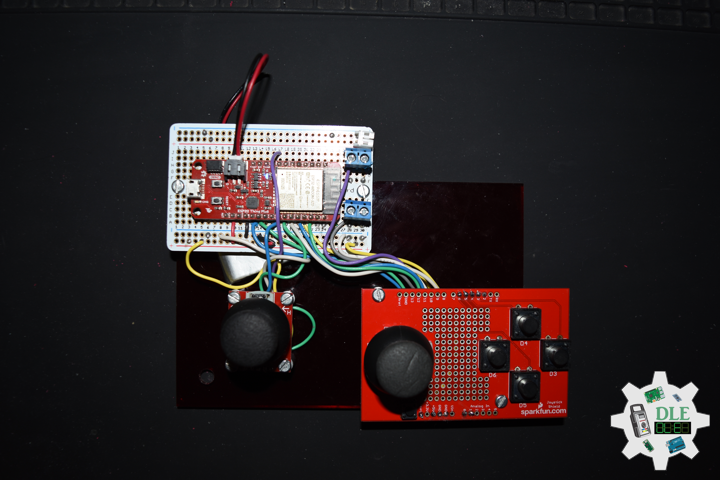
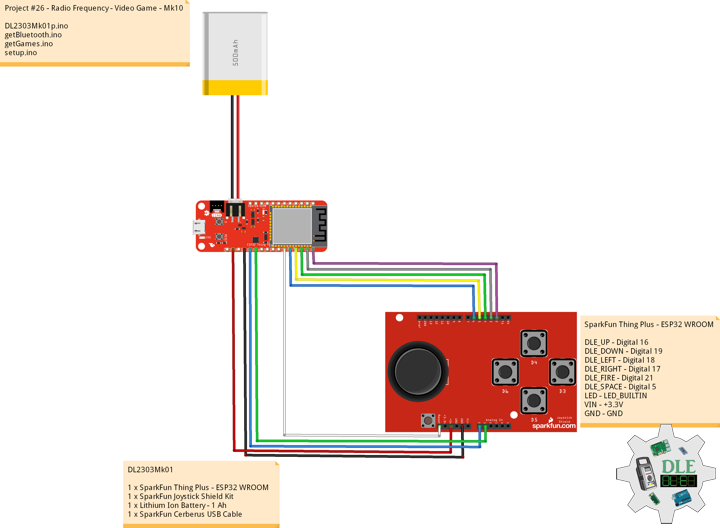
Project #26 – Radio Frequency – Video Game – Mk10
——
#DonLucElectronics #DonLuc #RadioFrequency #Bluetooth #SparkFunJoystickShield #SparkFunThingPlusESP32WROOM #Arduino #Project #Fritzing #Programming #Electronics #Microcontrollers #Consultant
——
——
——
——
LaunchBox
LaunchBox was originally built as an attractive frontend for DOSBox, but has long since expanded to support both modern PC games and emulated console platforms. LaunchBox aims to be the one-stop shop for gaming on your computer, for both modern and historical games.
LaunchBox includes automated import processes for everything from modern Steam games to GOG classics, ROM files, MS-DOS games, and so much more. Box art and metadata is automatically downloaded from the LaunchBox Games Database, with excellent coverage for your games.
Doom (Video Game MS-DOS)
Doom is a video game series and media franchise created by John Carmack, John Romero, Adrian Carmack, Kevin Cloud, and Tom Hall. The focuses on the exploits of an unnamed space marine operating under the auspices of the Union Aerospace Corporation, who fights hordes of demons and the undead in order to save Earth from an apocalyptic invasion.
The original Doom is considered one of the first pioneering first-person shooter games, introducing to IBM-compatible computers features such as 3D graphics, third-dimension spatiality, networked multiplayer gameplay, and support for player-created modifications with the Doom WAD format.
DL2303Mk01
1 x SparkFun Thing Plus – ESP32 WROOM
1 x SparkFun Joystick Shield Kit
1 x Lithium Ion Battery – 1 Ah
1 x SparkFun Cerberus USB Cable
SparkFun Thing Plus – ESP32 WROOM
DLE_UP – Digital 16
DLE_DOWN – Digital 19
DLE_LEFT – Digital 18
DLE_RIGHT – Digital 17
DLE_FIRE – Digital 21
DLE_SPACE – Digital 5
LED – LED_BUILTIN
VIN – +3.3V
GND – GND
——
DL2303Mk01p.ino
/* ***** Don Luc Electronics © *****
Software Version Information
Project #26 - Radio Frequency - Video Game - Mk10
26-10
DL2301Mk01p.ino
1 x SparkFun Thing Plus - ESP32 WROOM
1 x SparkFun Joystick Shield Kit
1 x Lithium Ion Battery - 1 Ah
1 x SparkFun Cerberus USB Cable
*/

// Include the Library Code
// ESP32 BLE Keyboard - NIMBLE
#define USE_NIMBLE
#include <BleKeyboard.h>

// ESP32 BLE Keyboard
BleKeyboard bleKeyboard;

// Game Controller Buttons
#define DLE_UP 16
#define DLE_DOWN 19
#define DLE_LEFT 18
#define DLE_RIGHT 17
#define DLE_FIRE 21
#define DLE_SPACE 5

// Button
bool keyStates[6] = {false, false, false, false, false, false};
int keyPins[6] = {DLE_UP, DLE_DOWN, DLE_LEFT, DLE_RIGHT, DLE_FIRE, DLE_SPACE};
uint8_t keyCodes[6] = {KEY_UP_ARROW, KEY_DOWN_ARROW, KEY_LEFT_ARROW, KEY_RIGHT_ARROW, KEY_LEFT_CTRL, ' '};

// Connect Notification Sent
bool connectNotificationSent = false;

// Software Version Information
String sver = "26-10";

void loop() {

  // Bluetooth Serial (ESP32SPP)
  isBluetooth();

}
getBluetooth.ino
// Bluetooth
// isBluetooth
void isBluetooth() {

  // Counter
  int counter;

  // ESP32 BLE Keyboard
  if(bleKeyboard.isConnected()) {

    // Connect Notification Sent
    if (!connectNotificationSent) {

      connectNotificationSent = true;

    }

    // Button
    for(counter = 0; counter < 6; counter ++){

      handleButton(counter);

    }

  }

}
getGames.ino
// Games
// Set Inputs
void setInputs() {

  // Make the button line an input
  pinMode(DLE_UP, INPUT_PULLUP);
  pinMode(DLE_DOWN, INPUT_PULLUP);
  pinMode(DLE_LEFT, INPUT_PULLUP);
  pinMode(DLE_RIGHT, INPUT_PULLUP);
  pinMode(DLE_FIRE, INPUT_PULLUP);
  pinMode(DLE_SPACE, INPUT_PULLUP);
  // Initialize digital pin LED_BUILTIN as an output.
  pinMode(LED_BUILTIN, OUTPUT);
  // Turn the LED on HIGH
  digitalWrite(LED_BUILTIN, HIGH);

}

// Handle Button
void handleButton(int keyIndex){

  // Handle the button press
  if (!digitalRead(keyPins[keyIndex])){

    // Button pressed
    if (!keyStates[keyIndex]){

      // Key not currently pressed
      keyStates[keyIndex] = true;
      bleKeyboard.press(keyCodes[keyIndex]);

    }

  }
  else {

    // Button not pressed
    if (keyStates[keyIndex]){

      // Key currently pressed
      keyStates[keyIndex] = false;
      bleKeyboard.release(keyCodes[keyIndex]);

    }
  }

}
setup.ino
// Setup
void setup()
{

  // Set Inputs
  setInputs();

  // ESP32 BLE Keyboard
  bleKeyboard.begin();

}
——
People can contact us: https://www.donluc.com/?page_id=1927
Technology Experience
- Programming Language
- Single-Board Microcontrollers (PIC, Arduino, Raspberry Pi,Espressif, etc…)
- IoT
- Wireless (Radio Frequency, Bluetooth, WiFi, Etc…)
- Robotics
- Camera and Video Capture Receiver Stationary, Wheel/Tank and Underwater Vehicle
- Unmanned Vehicles Terrestrial and Marine
- Machine Learning
- RTOS
- Research & Development (R & D)
Instructor, E-Mentor, STEAM, and Arts-Based Training
- Programming Language
- IoT
- PIC Microcontrollers
- Arduino
- Raspberry Pi
- Espressif
- Robotics
Follow Us
Luc Paquin – Curriculum Vitae – 2023
https://www.donluc.com/luc/
Web: https://www.donluc.com/
Facebook: https://www.facebook.com/neosteam.labs.9/
YouTube: https://www.youtube.com/@thesass2063
Twitter: https://twitter.com/labs_steam
Pinterest: https://www.pinterest.com/NeoSteamLabs/
Instagram: https://www.instagram.com/neosteamlabs/
Don Luc