Arduino
Arduino
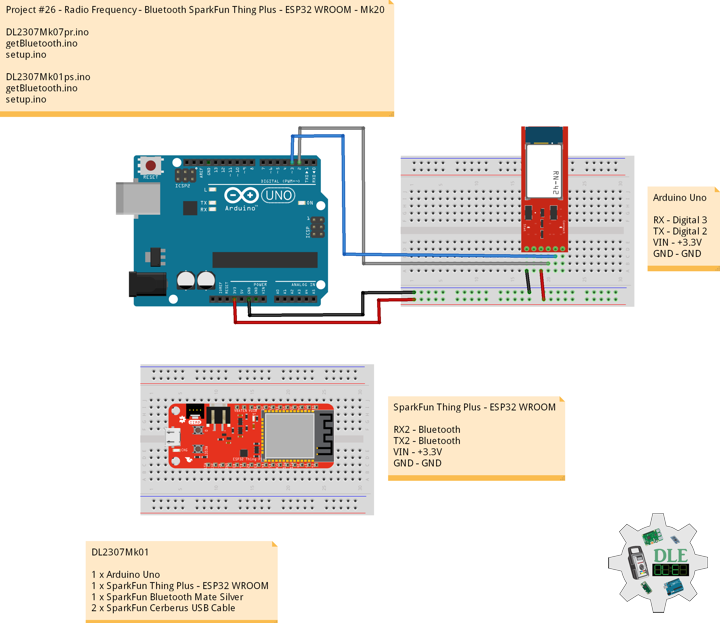
Project #26 – Radio Frequency – Bluetooth SparkFun Thing Plus – ESP32 WROOM – Mk20
——
#DonLucElectronics #DonLuc #RadioFrequency #Bluetooth #SparkFun #Arduino #Project #Fritzing #Programming #Electronics #Microcontrollers #Consultant
——
——
——

——
SparkFun Thing Plus – ESP32 WROOM
The SparkFun ESP32 Thing Plus is the next step to get started with Espressif IoT ideations while still enjoying all the amenities of the original ESP32 Thing. Espressif’s ESP32 WROOM is a powerful WiFi and Bluetooth MCU module that targets a wide variety of applications. At the core of this module is the ESP32-D0WDQ6 chip which is designed to be both scalable and adaptive. To make the Thing Plus even easier to use, we’ve moved a few pins around to make the board Feather compatible and it utilizes our handy Qwiic Connect System which means no soldering or shields are required to connect it to the rest of your system.
The ESP32 Thing plus integrates a rich set of peripherals, ranging from capacitive touch sensors, SD card interface, Ethernet, high-speed SPI, UART, I2S and I2C. Thanks to the onboard ESP32 WROOM module, the SparkFun Thing Plus features 16MB of flash memory, 520kB of internal SRAM, an integrated 802.11 BGN WiFi transceiver and dual-mode Bluetooth capabilities, and a JST connector to plug in a LiPo battery.
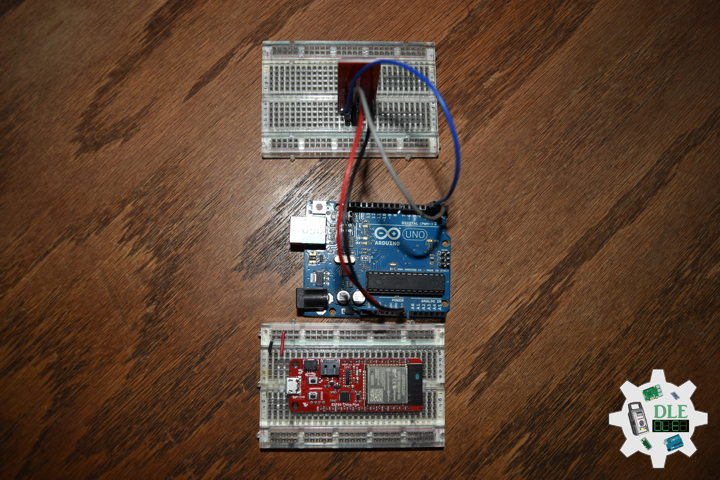
DL2307Mk01
1 x Arduino Uno
1 x SparkFun Thing Plus – ESP32 WROOM
1 x SparkFun Bluetooth Mate Silver
2 x SparkFun Cerberus USB Cable
Arduino Uno
RX – Digital 3
TX – Digital 2
VIN – +3.3V
GND – GND
——
DL2307Mk01pr.ino
/* ***** Don Luc Electronics © *****
Software Version Information
Project #26 - Radio Frequency - Bluetooth SparkFun Thing Plus - ESP32 WROOM - Mk20
26-20
DL2307Mk01pr.ino
1 x Arduino Uno
1 x SparkFun Thing Plus - ESP32 WROOM
2 x SparkFun Bluetooth Mate Silver
2 x SparkFun Cerberus USB Cable
*/

// Include the Library Code
// Software Serial
#include <SoftwareSerial.h>

// Software Serial
// TX-O pin of bluetooth mate, Arduino D2
int bluetoothTx = 2;
// RX-I pin of bluetooth mate, Arduino D3
int bluetoothRx = 3;
// Bluetooth
SoftwareSerial bluetooth(bluetoothTx, bluetoothRx);

// Software Version Information
String sver = "26-20";

void loop() {

  // isBluetooth
  isBluetooth();

}
getBluetooth.ino
// Bluetooth
// Setup Bluetooth
void isSetupBluetooth(){

  // Setup Bluetooth
  // Begin the serial monitor at 9600bps
  Serial.begin(9600);
  // Bluetooth
  // The Bluetooth Mate defaults to 115200bps
  bluetooth.begin(115200);

  // Print three times individually
  bluetooth.print("$");
  bluetooth.print("$");
  bluetooth.print("$");
  // Enter command mode
  // Short delay, wait for the Mate to send back CMD
  delay(100);
  // Temporarily Change the baudrate to 9600, no parity
  bluetooth.println("U,9600,N");
  // 115200 can be too fast at times for NewSoftSerial to relay the data reliably
  // Start bluetooth serial at 9600
  bluetooth.begin(9600);

}
// isBluetooth
void isBluetooth() {

  // If the bluetooth sent any characters
  if(bluetooth.available())
  {

    // Send any characters the bluetooth prints to the serial monitor
    Serial.print((char)bluetooth.read());

  }
  // If stuff was typed in the serial monitor
  if(Serial.available())
  {

    // Send any characters the Serial monitor prints to the bluetooth
    bluetooth.print((char)Serial.read());

  }

}
setup.ino
// Setup
void setup()
{

  // Setup Bluetooth
  isSetupBluetooth();

}
——
SparkFun Thing Plus – ESP32 WROOM
RX2 – Bluetooth
TX2 – Bluetooth
VIN – +3.3V
GND – GND
——
DL2307Mk01ps.ino
/* ***** Don Luc Electronics © *****
Software Version Information
Project #26 - Radio Frequency - Bluetooth SparkFun Thing Plus - ESP32 WROOM  - Mk20
26-20
DL2307Mk01pr.ino
1 x Arduino Uno
1 x SparkFun Thing Plus - ESP32 WROOM
2 x SparkFun Bluetooth Mate Silver
2 x SparkFun Cerberus USB Cable
*/

// Include the Library Code
// Bluetooth Serial
#include "BluetoothSerial.h"
#if !defined(CONFIG_BT_ENABLED) || !defined(CONFIG_BLUEDROID_ENABLED)
#error Bluetooth is not enabled! Please run `make menuconfig` to and enable it
#endif

// Bluetooth Serial
BluetoothSerial SerialBT;

// Software Version Information
String sver = "26-20";

void loop() {

  // isBluetooth
  isBluetooth();

}
getBluetooth.ino
// Bluetooth
// Setup Bluetooth
void isSetupBluetooth(){

  // Serial Begin
  Serial.begin(9600);

  // Bluetooth device name
  SerialBT.begin("DL2307Mk01ps");

  // Serial
  Serial.println("The device started, now you can pair it with bluetooth!");

}
// isBluetooth
void isBluetooth() {

  // If stuff was typed in the serial monitor
  if (Serial.available()) {

    // Send any characters the Serial monitor prints to the bluetooth
    SerialBT.write(Serial.read());

  }
  // If the bluetooth sent any characters
  if (SerialBT.available()) {

    // Send any characters the bluetooth prints to the serial monitor
    Serial.write(SerialBT.read());

  }
  // Delay
  delay(20);

}
setup.ino
// Setup
void setup()
{

  // Setup Bluetooth
  isSetupBluetooth();

}
——
People can contact us: https://www.donluc.com/?page_id=1927
Technology Experience
- Programming Language
- Single-Board Microcontrollers (PIC, Arduino, Raspberry Pi,Espressif, etc…)
- IoT
- Wireless (Radio Frequency, Bluetooth, WiFi, Etc…)
- Robotics
- Camera and Video Capture Receiver Stationary, Wheel/Tank and Underwater Vehicle
- Unmanned Vehicles Terrestrial and Marine
- Machine Learning
- RTOS
- Research & Development (R & D)
Instructor, E-Mentor, STEAM, and Arts-Based Training
- Programming Language
- IoT
- PIC Microcontrollers
- Arduino
- Raspberry Pi
- Espressif
- Robotics
Follow Us
Luc Paquin – Curriculum Vitae – 2023
https://www.donluc.com/luc/
Web: https://www.donluc.com/
Facebook: https://www.facebook.com/neosteam.labs.9/
YouTube: https://www.youtube.com/@thesass2063
Twitter: https://twitter.com/labs_steam
Pinterest: https://www.pinterest.com/NeoSteamLabs/
Instagram: https://www.instagram.com/neosteamlabs/
Don Luc
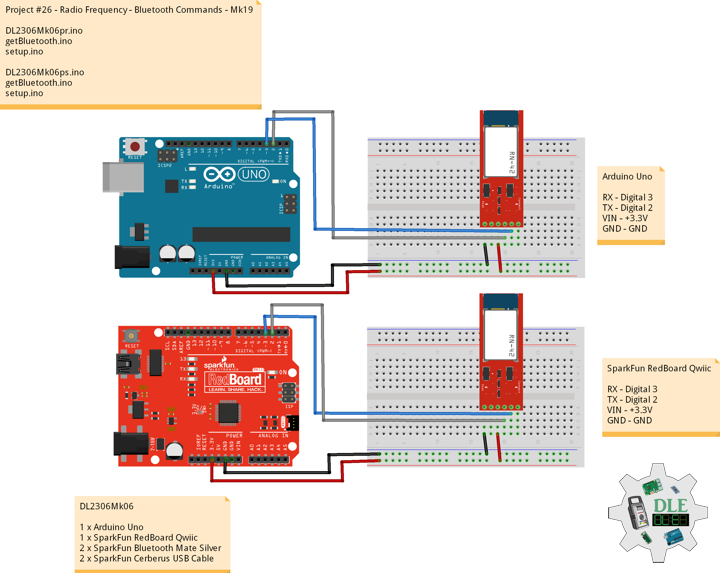
Project #26 – Radio Frequency – Bluetooth Commands – Mk19
——
#DonLucElectronics #DonLuc #RadioFrequency #Bluetooth #Arduino #Project #Fritzing #Programming #Electronics #Microcontrollers #Consultant
——
——
——
——
ACTION Commands
Begin by sending the inquiry scan command: I,
If the modem finds any modules, you can try sending the connect command: C,
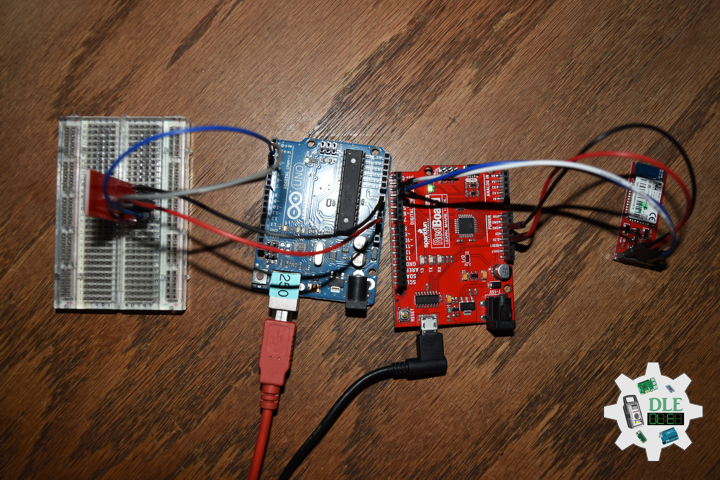
< to connect to one of them. The modem in the example above found one devices in range, by sending the C,0006664FAE18 command, we can attempt to connect to one of them. After sending the connect command, the device will respond with "TRYING", which will be followed by either "CONNECT failed" or the connection will be successful. After a successful connection we immediately enter data mode, and the modem becomes a pipeline. Any characters sent from one Bluetooth device will be sent to the other, and vice-versa. DL2306Mk061 x Arduino Uno
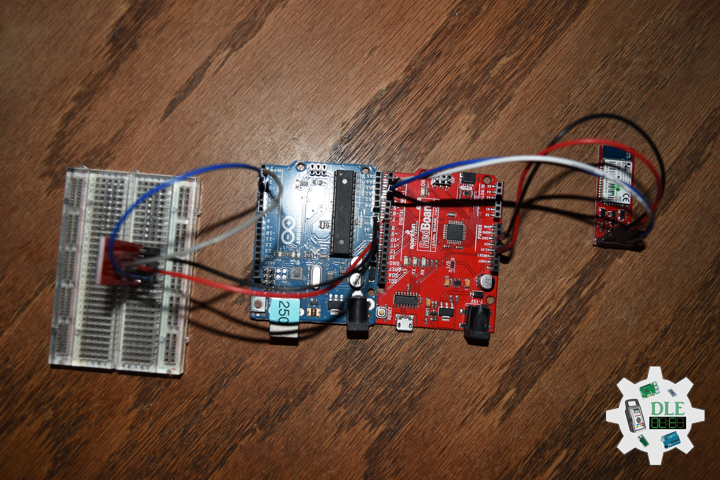
1 x SparkFun RedBoard Qwiic
2 x SparkFun Bluetooth Mate Silver
2 x SparkFun Cerberus USB Cable
Arduino Uno
RX – Digital 3
TX – Digital 2
VIN – +3.3V
GND – GND
——
DL2306Mk06pr.ino
/* ***** Don Luc Electronics © *****
Software Version Information
Project #26 - Radio Frequency - Bluetooth Commands - Mk19
26-19
DL2306Mk03pr.ino
1 x Arduino Uno
1 x SparkFun RedBoard Qwiic
2 x SparkFun Bluetooth Mate Silver
2 x SparkFun Cerberus USB Cable
*/

// Include the Library Code
// Software Serial
#include <SoftwareSerial.h>

// Software Serial
// TX-O pin of bluetooth mate, Arduino D2
int bluetoothTx = 2;
// RX-I pin of bluetooth mate, Arduino D3
int bluetoothRx = 3;
// Bluetooth
SoftwareSerial bluetooth(bluetoothTx, bluetoothRx);
// BTA
//String BTA = "0006664FDC9E";

// Software Version Information
String sver = "26-19";

void loop() {

  // isBluetooth
  isBluetooth();

}
getBluetooth.ino
// Bluetooth
// Setup Bluetooth
void isSetupBluetooth(){

  // Setup Bluetooth
  // Begin the serial monitor at 9600bps
  Serial.begin(9600);
  // Bluetooth
  // The Bluetooth Mate defaults to 115200bps
  bluetooth.begin(115200);
  // Print three times individually
  bluetooth.print("$");
  bluetooth.print("$");
  bluetooth.print("$");
  // Enter command mode
  // Short delay, wait for the Mate to send back CMD
  delay(100);
  // Temporarily Change the baudrate to 9600, no parity
  bluetooth.println("U,9600,N");
  // 115200 can be too fast at times for NewSoftSerial to relay the data reliably
  // Start bluetooth serial at 9600
  bluetooth.begin(9600);

}
// isBluetooth
void isBluetooth() {

  // If the bluetooth sent any characters
  if(bluetooth.available())
  {

    // Send any characters the bluetooth prints to the serial monitor
    Serial.print((char)bluetooth.read());

  }
  // If stuff was typed in the serial monitor
  if(Serial.available())
  {

    // Send any characters the Serial monitor prints to the bluetooth
    bluetooth.print((char)Serial.read());

  }

}
setup.ino
// Setup
void setup()
{

  // Setup Bluetooth
  isSetupBluetooth();

}
——
SparkFun RedBoard Qwiic
RX – Digital 3
TX – Digital 2
VIN – +3.3V
GND – GND
——
DL2306Mk06ps.ino
/* ***** Don Luc Electronics © *****
Software Version Information
Project #26 - Radio Frequency - Bluetooth Commands - Mk19
26-19
DL2306Mk03ps.ino
1 x Arduino Uno
1 x SparkFun RedBoard Qwiic
2 x SparkFun Bluetooth Mate Silver
2 x SparkFun Cerberus USB Cable
*/

// Include the Library Code
// Software Serial
#include <SoftwareSerial.h>

// Software Serial
// TX-O pin of bluetooth mate, Arduino D2
int bluetoothTx = 2;
// RX-I pin of bluetooth mate, Arduino D3
int bluetoothRx = 3;
// Bluetooth
SoftwareSerial bluetooth(bluetoothTx, bluetoothRx);
// BTA
//String BTA = "0006664FAE18";

// Software Version Information
String sver = "26-19";

void loop() {

  // isBluetooth
  isBluetooth();

}
getBluetooth.ino
// Bluetooth
// Setup Bluetooth
void isSetupBluetooth(){

  // Setup Bluetooth
  // Begin the serial monitor at 9600bps
  Serial.begin(9600);
  // Bluetooth
  // The Bluetooth Mate defaults to 115200bps
  bluetooth.begin(115200);
  // Print three times individually
  bluetooth.print("$");
  bluetooth.print("$");
  bluetooth.print("$");
  // Enter command mode
  // Short delay, wait for the Mate to send back CMD
  delay(100);
  // Temporarily Change the baudrate to 9600, no parity
  bluetooth.println("U,9600,N");
  // 115200 can be too fast at times for NewSoftSerial to relay the data reliably
  // Start bluetooth serial at 9600
  bluetooth.begin(9600);

}
// isBluetooth
void isBluetooth() {

  // If the bluetooth sent any characters
  if(bluetooth.available())
  {

    // Send any characters the bluetooth prints to the serial monitor
    Serial.print((char)bluetooth.read());

  }
  // If stuff was typed in the serial monitor
  if(Serial.available())
  {

    // Send any characters the Serial monitor prints to the bluetooth
    bluetooth.print((char)Serial.read());

  }

}
setup.ino
// Setup
void setup()
{

  // Setup Bluetooth
  isSetupBluetooth();

}
——
People can contact us: https://www.donluc.com/?page_id=1927
Technology Experience
- Programming Language
- Single-Board Microcontrollers (PIC, Arduino, Raspberry Pi,Espressif, etc…)
- IoT
- Wireless (Radio Frequency, Bluetooth, WiFi, Etc…)
- Robotics
- Camera and Video Capture Receiver Stationary, Wheel/Tank and Underwater Vehicle
- Unmanned Vehicles Terrestrial and Marine
- Machine Learning
- RTOS
- Research & Development (R & D)
Instructor, E-Mentor, STEAM, and Arts-Based Training
- Programming Language
- IoT
- PIC Microcontrollers
- Arduino
- Raspberry Pi
- Espressif
- Robotics
Follow Us
Luc Paquin – Curriculum Vitae – 2023
https://www.donluc.com/luc/
Web: https://www.donluc.com/
Facebook: https://www.facebook.com/neosteam.labs.9/
YouTube: https://www.youtube.com/@thesass2063
Twitter: https://twitter.com/labs_steam
Pinterest: https://www.pinterest.com/NeoSteamLabs/
Instagram: https://www.instagram.com/neosteamlabs/
Don Luc
Project #26 – Radio Frequency – Bluetooth Moteino – Mk18
——
#DonLucElectronics #DonLuc #RadioFrequency #Bluetooth #Accelerometer #Magnetometer #Gyroscope #Arduino #Project #Fritzing #Programming #Electronics #Microcontrollers #Consultant
——
——
——
——
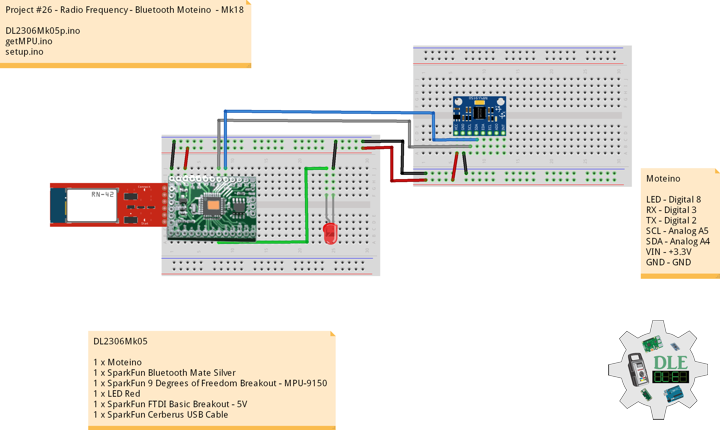
Moteino
Moteino began as a low power wireless Arduino compatible development platform based on the popular ATmega328p chip used in the Arduino UNO. Moteinos are compatible and can communicate with any other Arduino or development platform that uses the popular HopeRF RFM69 or LoRa transceivers, or even the older RFM12B. Moteino also comes with an optional SPI flash memory chip for wireless programming, or data logging. Moteino was designed to be a compact, highly customizable and affordable development platform, suitable for IoT, home automation and long range wireless projects.
Moteino in RFM12B to rebuild suggests doing as new without completely replacing. I decided to stripped down at RFM12B and rebuild in Bluetooth.
DL2306Mk05
1 x Moteino
1 x SparkFun Bluetooth Mate Silver
1 x SparkFun 9 Degrees of Freedom Breakout – MPU-9150
1 x LED Red
1 x SparkFun FTDI Basic Breakout – 5V
1 x SparkFun Cerberus USB Cable
Moteino
LED – Digital 8
RX – Digital 3
TX – Digital 2
SDA – Analog A4
SCL – Analog A5
VIN – +3.3V
GND – GND
——
DL2306Mk05p.ino
/* ***** Don Luc Electronics © *****
Software Version Information
Project #26 - Radio Frequency - Bluetooth Moteino - Mk18
26-18
DL2306Mk05p.ino
1 x Moteino
1 x SparkFun Bluetooth Mate Silver
1 x SparkFun 9 Degrees of Freedom Breakout - MPU-9150
1 x LED Red
1 x SparkFun FTDI Basic Breakout - 5V
1 x SparkFun Cerberus USB Cable
*/

// Include the Library Code
// Software Serial
#include <SoftwareSerial.h>
// Two Wire Interface (TWI/I2C)
#include <Wire.h>
// I2CDev I2C utilities
#include "I2Cdev.h"
// MPU9150Lib 9-axis fusion
#include "MPU9150Lib.h"
// CalLib magnetometer and accelerometer calibration
#include "CalLib.h"
// Motion Driver InvenSense Embedded SDK v5.1
#include <dmpKey.h>
#include <dmpmap.h>
#include <inv_mpu.h>
#include <inv_mpu_dmp_motion_driver.h>
// EEPROM Magnetometer and Accelerometer data is stored
#include <EEPROM.h>

// the MPU object
MPU9150Lib MPU;
//  MPU_UPDATE_RATE defines the rate (in Hz)
// at which the MPU updates the sensor data and DMP output
#define MPU_UPDATE_RATE  (20)
//  MAG_UPDATE_RATE defines the rate (in Hz) at which the
// MPU updates the magnetometer data
//  MAG_UPDATE_RATE should be less than or equal to the MPU_UPDATE_RATE
#define MAG_UPDATE_RATE  (10)
//  MPU_MAG_MIX defines the influence that the magnetometer has on the yaw output.
//  The magnetometer itself is quite noisy so some mixing with the gyro yaw can help
//  significantly. Some example values are defined below:
// Just use gyro yaw
#define  MPU_MAG_MIX_GYRO_ONLY          0
// Just use magnetometer and no gyro yaw
#define  MPU_MAG_MIX_MAG_ONLY           1
// A good mix value
#define  MPU_MAG_MIX_GYRO_AND_MAG       10
// mainly gyros with a bit of mag correction
#define  MPU_MAG_MIX_GYRO_AND_SOME_MAG  50
//  MPU_LPF_RATE is the low pas filter rate and can be between 5 and 188Hz
#define MPU_LPF_RATE   5

// This is our earth frame gravity vector - quaternions and vectors
MPUQuaternion gravity;

// Quaternion Result
float Quaternion_X = 0.0;
float Quaternion_Y = 0.0;
float Quaternion_Z = 0.0;

//  SERIAL_PORT_SPEED defines the speed to use for the debug serial port
#define  SERIAL_PORT_SPEED  115200

// Software Serial
// TX-O pin of bluetooth mate, Arduino D2
int bluetoothTx = 2;
// RX-I pin of bluetooth mate, Arduino D3
int bluetoothRx = 3;
// Bluetooth
SoftwareSerial bluetooth(bluetoothTx, bluetoothRx);
// BTA
String BTA = "0006664FAE18";

// LED Red
int iLedRed = 8;

// Variable to calculate frequency
unsigned long curr = 0;
unsigned long last = 0;
unsigned long freq;

// Software Version Information
String sver = "26-18";

void loop() {

  // MPU
  isMPU();

}
getMPU.ino
// MPU
// Setup MPU
void isSetupMPU() {

  // MPU
  MPU.init(MPU_UPDATE_RATE, MPU_MAG_MIX_GYRO_AND_MAG, MAG_UPDATE_RATE, MPU_LPF_RATE);     // start the MPU

  // Set up the initial gravity vector for quaternion rotation
  // Max value down the z axis
  gravity[QUAT_W] = 0;
  gravity[QUAT_X] = 0;
  gravity[QUAT_Y] = 0;
  gravity[QUAT_Z] = SENSOR_RANGE;

}
// MPU
void isMPU() {

  // Quaternion
  // This is our body frame gravity vector
  MPUQuaternion rotatedGravity;
  // This is the conjugate of the fused quaternion
  MPUQuaternion fusedConjugate;
  // Used in the rotation
  MPUQuaternion qTemp;
  // The accelerations
  MPUVector3 result;

  // Get the latest data
  if (MPU.read()) {

    // Need this for the rotation
    MPUQuaternionConjugate(MPU.m_fusedQuaternion, fusedConjugate);

    // Rotate the gravity vector into the body frame
    MPUQuaternionMultiply(gravity, MPU.m_fusedQuaternion, qTemp);
    MPUQuaternionMultiply(fusedConjugate, qTemp, rotatedGravity);

    // Now subtract rotated gravity from the body accels to get real accelerations.
    // Note that signs are reversed to get +ve acceleration results
    // in the conventional axes.
    // Quaternion Result
    Quaternion_X = -(MPU.m_calAccel[VEC3_X] - rotatedGravity[QUAT_X]);
    Quaternion_Y = -(MPU.m_calAccel[VEC3_Y] - rotatedGravity[QUAT_Y]);
    Quaternion_Z = -(MPU.m_calAccel[VEC3_Z] - rotatedGravity[QUAT_Z]);

    // Variable to calculate frequency
    curr = micros();
    freq = curr - last;
    last = curr;
    // Bluetooth
    Serial.print( "Blue|" + BTA + "|" );
    Serial.print( Quaternion_X );
    Serial.print( "|" );
    Serial.print( Quaternion_Y );
    Serial.print( "|" );
    Serial.print( Quaternion_Z );
    Serial.print( "|" );
    Serial.print( freq );
    Serial.println( "|*" );
    // Send any characters the Serial monitor prints to the bluetooth
    bluetooth.print((char)Serial.read());

  }

}
setup.ino
// Setup
void setup()
{

  // Serial
  Serial.begin(SERIAL_PORT_SPEED);

  // Bluetooth
  // The Bluetooth Mate defaults to 115200bps
  bluetooth.begin(115200);

  // LED Red
  pinMode(iLedRed, OUTPUT);
  digitalWrite(iLedRed, HIGH);

  // Give display time to power on
  delay(100);

  // Wire communicate with I2C / TWI devices
  Wire.begin();

  // Pause
  delay(50);

  // Setup MPU
  isSetupMPU();

}
——
People can contact us: https://www.donluc.com/?page_id=1927
Technology Experience
- Programming Language
- Single-Board Microcontrollers (PIC, Arduino, Raspberry Pi,Espressif, etc…)
- IoT
- Wireless (Radio Frequency, Bluetooth, WiFi, Etc…)
- Robotics
- Camera and Video Capture Receiver Stationary, Wheel/Tank and Underwater Vehicle
- Unmanned Vehicles Terrestrial and Marine
- Machine Learning
- RTOS
- Research & Development (R & D)
Instructor, E-Mentor, STEAM, and Arts-Based Training
- Programming Language
- IoT
- PIC Microcontrollers
- Arduino
- Raspberry Pi
- Espressif
- Robotics
Follow Us
Luc Paquin – Curriculum Vitae – 2023
https://www.donluc.com/luc/
Web: https://www.donluc.com/
Facebook: https://www.facebook.com/neosteam.labs.9/
YouTube: https://www.youtube.com/@thesass2063
Twitter: https://twitter.com/labs_steam
Pinterest: https://www.pinterest.com/NeoSteamLabs/
Instagram: https://www.instagram.com/neosteamlabs/
Don Luc
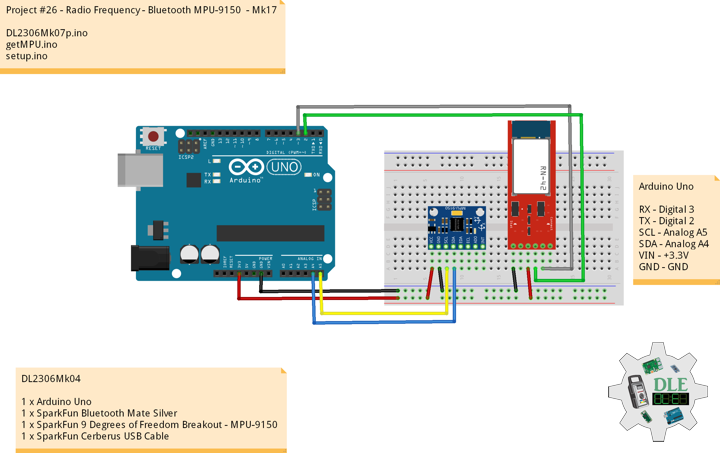
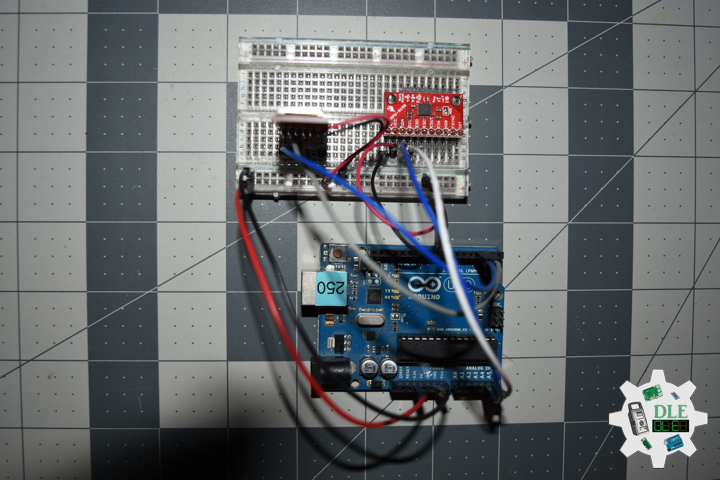
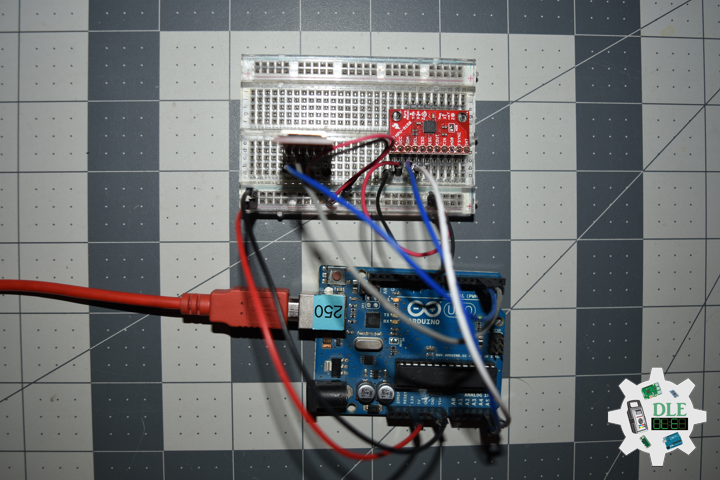
Project #26 – Radio Frequency – Bluetooth MPU-9150 – Mk17
——
#DonLucElectronics #DonLuc #RadioFrequency #Bluetooth #Accelerometer #Magnetometer #Gyroscope #Arduino #Project #Fritzing #Programming #Electronics #Microcontrollers #Consultant
——
——
——
——
MPU-9150
MotionInterface is becoming a “Must-Have” function being adopted by smartphone and tablet manufacturers due to the enormous value it adds to the end user experience. In smartphones, it finds use in applications such as gesture commands for applications and phone control, enhanced gaming, augmented reality, panoramic photo capture and viewing, and pedestrian and vehicle navigation. With its ability to precisely and accurately track user motions, MotionTracking technology can convert handsets and tablets into powerful 3D intelligent devices that can be used in applications ranging from health and fitness monitoring to location-based services. Key requirements for MotionInterface enabled devices are small package size, low power consumption, high accuracy and repeatability, high shock tolerance, and application specific performance programmability, all at a low consumer price point.
DL2306Mk04
1 x Arduino Uno
1 x SparkFun Bluetooth Mate Silver
1 x SparkFun 9 Degrees of Freedom Breakout – MPU-9150
1 x SparkFun Cerberus USB Cable
Arduino Uno
RX – Digital 3
TX – Digital 2
SDA – Analog A4
SCL – Analog A5
VIN – +3.3V
GND – GND
——
DL2306Mk04p.ino
/* ***** Don Luc Electronics © *****
Software Version Information
Project #26 - Radio Frequency - Bluetooth MPU-9150 - Mk17
26-17
DL2306Mk07p.ino
1 x Arduino Uno
1 x SparkFun Bluetooth Mate Silver
1 x SparkFun 9 Degrees of Freedom Breakout - MPU-9150
1 x SparkFun Cerberus USB Cable
*/

// Include the Library Code
// Software Serial
#include <SoftwareSerial.h>
// Two Wire Interface (TWI/I2C)
#include <Wire.h>
// I2CDev I2C utilities
#include "I2Cdev.h"
// MPU9150Lib 9-axis fusion
#include "MPU9150Lib.h"
// CalLib magnetometer and accelerometer calibration
#include "CalLib.h"
// Motion Driver InvenSense Embedded SDK v5.1
#include <dmpKey.h>
#include <dmpmap.h>
#include <inv_mpu.h>
#include <inv_mpu_dmp_motion_driver.h>
// EEPROM Magnetometer and Accelerometer data is stored
#include <EEPROM.h>

// the MPU object
MPU9150Lib MPU;
//  MPU_UPDATE_RATE defines the rate (in Hz)
// at which the MPU updates the sensor data and DMP output
#define MPU_UPDATE_RATE  (20)
//  MAG_UPDATE_RATE defines the rate (in Hz) at which the
// MPU updates the magnetometer data
//  MAG_UPDATE_RATE should be less than or equal to the MPU_UPDATE_RATE
#define MAG_UPDATE_RATE  (10)
//  MPU_MAG_MIX defines the influence that the magnetometer has on the yaw output.
//  The magnetometer itself is quite noisy so some mixing with the gyro yaw can help
//  significantly. Some example values are defined below:
// Just use gyro yaw
#define  MPU_MAG_MIX_GYRO_ONLY          0
// Just use magnetometer and no gyro yaw
#define  MPU_MAG_MIX_MAG_ONLY           1
// A good mix value
#define  MPU_MAG_MIX_GYRO_AND_MAG       10
// mainly gyros with a bit of mag correction
#define  MPU_MAG_MIX_GYRO_AND_SOME_MAG  50
//  MPU_LPF_RATE is the low pas filter rate and can be between 5 and 188Hz
#define MPU_LPF_RATE   5

// This is our earth frame gravity vector - quaternions and vectors
MPUQuaternion gravity;

// Quaternion Result
float Quaternion_X = 0.0;
float Quaternion_Y = 0.0;
float Quaternion_Z = 0.0;

//  SERIAL_PORT_SPEED defines the speed to use for the debug serial port
#define  SERIAL_PORT_SPEED  115200

// Software Serial
// TX-O pin of bluetooth mate, Arduino D2
int bluetoothTx = 2;
// RX-I pin of bluetooth mate, Arduino D3
int bluetoothRx = 3;
// Bluetooth
SoftwareSerial bluetooth(bluetoothTx, bluetoothRx);
// BTA
String BTA = "0006664FDC9E";

// Variable to calculate frequency
unsigned long curr = 0;
unsigned long last = 0;
unsigned long freq;

// Software Version Information
String sver = "26-17";

void loop() {

  // MPU
  isMPU();

}
getMPU.ino
// MPU
// Setup MPU
void isSetupMPU() {

  // MPU
  MPU.init(MPU_UPDATE_RATE, MPU_MAG_MIX_GYRO_AND_MAG, MAG_UPDATE_RATE, MPU_LPF_RATE);     // start the MPU

  // Set up the initial gravity vector for quaternion rotation
  // Max value down the z axis
  gravity[QUAT_W] = 0;
  gravity[QUAT_X] = 0;
  gravity[QUAT_Y] = 0;
  gravity[QUAT_Z] = SENSOR_RANGE;

}
// MPU
void isMPU() {

  // Quaternion
  // This is our body frame gravity vector
  MPUQuaternion rotatedGravity;
  // This is the conjugate of the fused quaternion
  MPUQuaternion fusedConjugate;
  // Used in the rotation
  MPUQuaternion qTemp;
  // The accelerations
  MPUVector3 result;

  // Get the latest data
  if (MPU.read()) {

    // Need this for the rotation
    MPUQuaternionConjugate(MPU.m_fusedQuaternion, fusedConjugate);

    // Rotate the gravity vector into the body frame
    MPUQuaternionMultiply(gravity, MPU.m_fusedQuaternion, qTemp);
    MPUQuaternionMultiply(fusedConjugate, qTemp, rotatedGravity);

    // Now subtract rotated gravity from the body accels to get real accelerations.
    // Note that signs are reversed to get +ve acceleration results
    // in the conventional axes.
    // Quaternion Result
    Quaternion_X = -(MPU.m_calAccel[VEC3_X] - rotatedGravity[QUAT_X]);
    Quaternion_Y = -(MPU.m_calAccel[VEC3_Y] - rotatedGravity[QUAT_Y]);
    Quaternion_Z = -(MPU.m_calAccel[VEC3_Z] - rotatedGravity[QUAT_Z]);

    // Variable to calculate frequency
    curr = micros();
    freq = curr - last;
    last = curr;
    // Bluetooth
    Serial.print( "Blue|" + BTA + "|" );
    Serial.print( Quaternion_X );
    Serial.print( "|" );
    Serial.print( Quaternion_Y );
    Serial.print( "|" );
    Serial.print( Quaternion_Z );
    Serial.print( "|" );
    Serial.print( freq );
    Serial.println( "|*" );
    // Send any characters the Serial monitor prints to the bluetooth
    bluetooth.print((char)Serial.read());

  }

}
setup.ino
// Setup
void setup()
{

  // Serial
  Serial.begin(SERIAL_PORT_SPEED);

  // Bluetooth
  // The Bluetooth Mate defaults to 115200bps
  bluetooth.begin(115200);

  // Give display time to power on
  delay(100);

  // Wire communicate with I2C / TWI devices
  Wire.begin();

  // Pause
  delay(50);

  // Setup MPU
  isSetupMPU();

}
——
People can contact us: https://www.donluc.com/?page_id=1927
Technology Experience
- Programming Language
- Single-Board Microcontrollers (PIC, Arduino, Raspberry Pi,Espressif, etc…)
- IoT
- Wireless (Radio Frequency, Bluetooth, WiFi, Etc…)
- Robotics
- Camera and Video Capture Receiver Stationary, Wheel/Tank and Underwater Vehicle
- Unmanned Vehicles Terrestrial and Marine
- Machine Learning
- RTOS
- Research & Development (R & D)
Instructor, E-Mentor, STEAM, and Arts-Based Training
- Programming Language
- IoT
- PIC Microcontrollers
- Arduino
- Raspberry Pi
- Espressif
- Robotics
Follow Us
Luc Paquin – Curriculum Vitae – 2023
https://www.donluc.com/luc/
Web: https://www.donluc.com/
Facebook: https://www.facebook.com/neosteam.labs.9/
YouTube: https://www.youtube.com/@thesass2063
Twitter: https://twitter.com/labs_steam
Pinterest: https://www.pinterest.com/NeoSteamLabs/
Instagram: https://www.instagram.com/neosteamlabs/
Don Luc
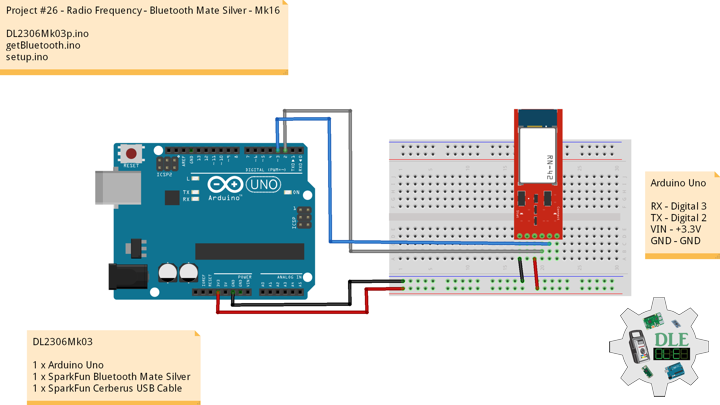
Project #26 – Radio Frequency – Bluetooth Mate Silver – Mk16
——
#DonLucElectronics #DonLuc #RadioFrequency #Bluetooth #Arduino #Project #Fritzing #Programming #Electronics #Microcontrollers #Consultant
——
——
——
——
SparkFun Bluetooth Mate Silver
The Bluetooth Mate is very similar to our BlueSMiRF modem, but it is designed specifically to be used with our Arduino Pros and LilyPad Arduinos. These modems work as a serial (RX/TX) pipe, and are a great wireless replacement for serial cables. Any serial stream from 2400 to 115200bps can be passed seamlessly from your computer to your target.
Bluetooth Mate has the same pin out as the FTDI Basic, and is meant to plug directly into an Arduino Pro, Pro Mini, or LilyPad Mainboard. Because we’ve arranged the pins to do this, you cannot directly plug the Bluetooth Mate to an FTDI Basic board.
The RN-42 is perfect for short range, battery powered applications. The RN-42 uses only 26uA in sleep mode while still being discoverable and connectable. Multiple user configurable power modes allow the user to dial in the lowest power profile for a given application. The Bluetooth Mate has on-board voltage regulators, so it can be powered from any 3.3 to 6VDC power supply. We’ve got level shifting all set up so the RX and TX pins on the remote unit are 3-6VDC tolerant.
DL2306Mk03
1 x Arduino Uno
1 x SparkFun Bluetooth Mate Silver
1 x SparkFun Cerberus USB Cable
Arduino Uno
RX – Digital 3
TX – Digital 2
VIN – +3.3V
GND – GND
——
DL2306Mk03p.ino
/* ***** Don Luc Electronics © *****
Software Version Information
Project #26 - Radio Frequency - Bluetooth Mate Silver - Mk16
26-16
DL2306Mk03p.ino
1 x Arduino Uno
1 x SparkFun Bluetooth Mate Silver
1 x SparkFun Cerberus USB Cable
*/

// Include the Library Code
// Software Serial
#include <SoftwareSerial.h>

// Software Serial
// TX-O pin of bluetooth mate, Arduino D2
int bluetoothTx = 2;
// RX-I pin of bluetooth mate, Arduino D3
int bluetoothRx = 3;
// Bluetooth
SoftwareSerial bluetooth(bluetoothTx, bluetoothRx);
// BTA
//String BTA = "0006664FDC9E";

// Software Version Information
String sver = "26-16";

void loop() {

  // isBluetooth
  isBluetooth();

}
getBluetooth.ino
// Bluetooth
// Setup Bluetooth
void isSetupBluetooth(){

  // Setup Bluetooth
  // Begin the serial monitor at 9600bps
  Serial.begin(9600);
  // Bluetooth
  // The Bluetooth Mate defaults to 115200bps
  bluetooth.begin(115200);
  // Print three times individually
  bluetooth.print("$");
  bluetooth.print("$");
  bluetooth.print("$");
  // Enter command mode
  // Short delay, wait for the Mate to send back CMD
  delay(100);
  // Temporarily Change the baudrate to 9600, no parity
  bluetooth.println("U,9600,N");
  // 115200 can be too fast at times for NewSoftSerial to relay the data reliably
  // Start bluetooth serial at 9600
  bluetooth.begin(9600);

}
// isBluetooth
void isBluetooth() {

  // If the bluetooth sent any characters
  if(bluetooth.available())
  {

    // Send any characters the bluetooth prints to the serial monitor
    Serial.print((char)bluetooth.read());

  }
  // If stuff was typed in the serial monitor
  if(Serial.available())
  {

    // Send any characters the Serial monitor prints to the bluetooth
    bluetooth.print((char)Serial.read());

  }

}
setup.ino
// Setup
void setup()
{

  // Setup Bluetooth
  isSetupBluetooth();

}
——
People can contact us: https://www.donluc.com/?page_id=1927
Technology Experience
- Programming Language
- Single-Board Microcontrollers (PIC, Arduino, Raspberry Pi,Espressif, etc…)
- IoT
- Wireless (Radio Frequency, Bluetooth, WiFi, Etc…)
- Robotics
- Camera and Video Capture Receiver Stationary, Wheel/Tank and Underwater Vehicle
- Unmanned Vehicles Terrestrial and Marine
- Machine Learning
- RTOS
- Research & Development (R & D)
Instructor, E-Mentor, STEAM, and Arts-Based Training
- Programming Language
- IoT
- PIC Microcontrollers
- Arduino
- Raspberry Pi
- Espressif
- Robotics
Follow Us
Luc Paquin – Curriculum Vitae – 2023
https://www.donluc.com/luc/
Web: https://www.donluc.com/
Facebook: https://www.facebook.com/neosteam.labs.9/
YouTube: https://www.youtube.com/@thesass2063
Twitter: https://twitter.com/labs_steam
Pinterest: https://www.pinterest.com/NeoSteamLabs/
Instagram: https://www.instagram.com/neosteamlabs/
Don Luc
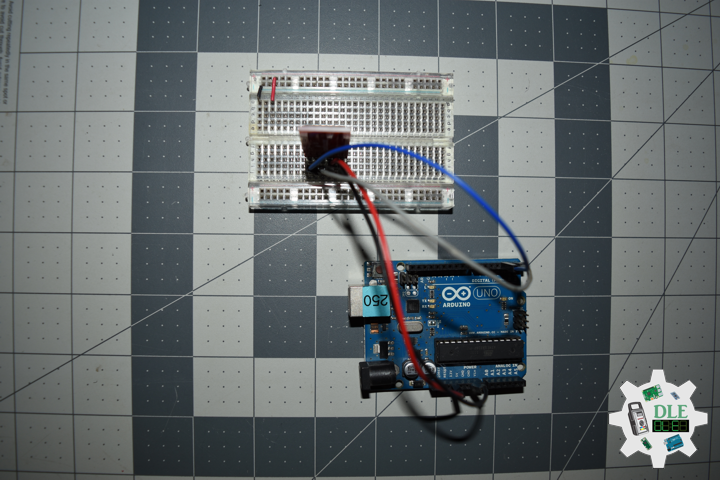
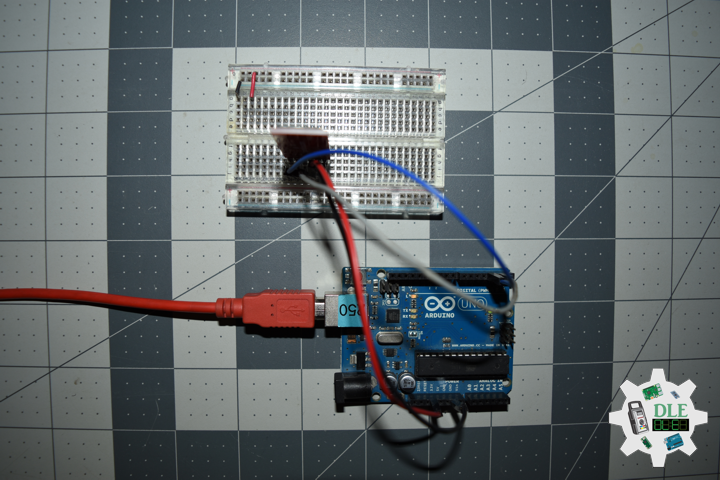
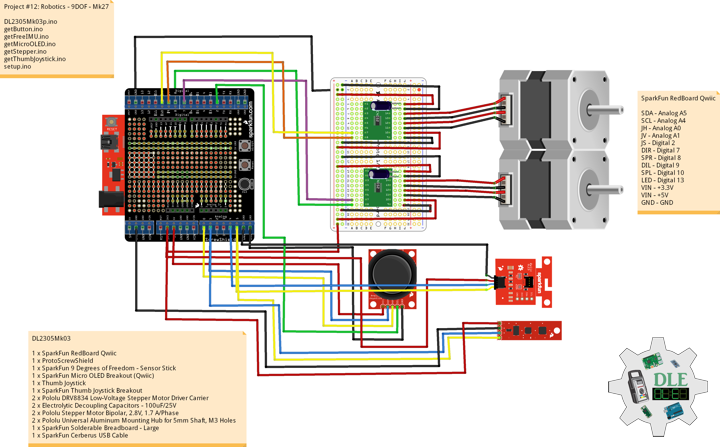
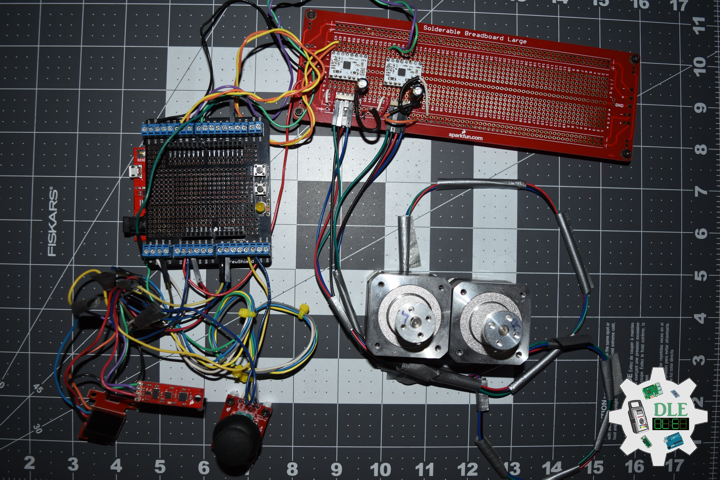
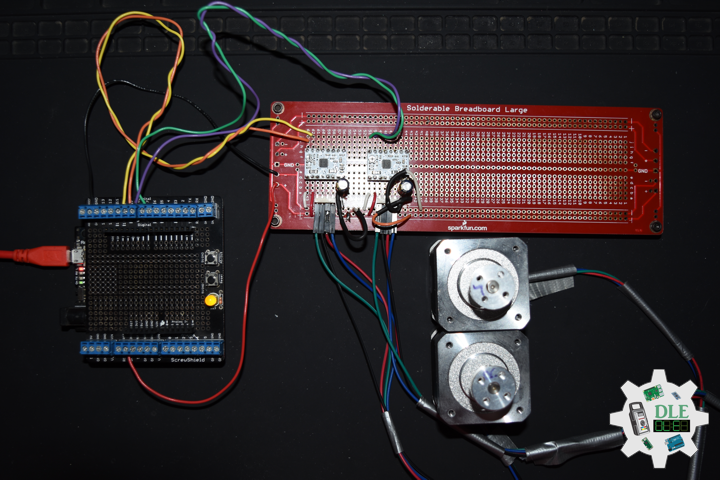
Project #12: Robotics – 9DOF – Mk27
——
#DonLucElectronics #DonLuc #Robotics #Magnetometer #Accelerometer #Gyroscope #MicroOLED # #Arduino #Project #Fritzing #Programming #Electronics #Microcontrollers #Consultant
——
——
——
——
SparkFun 9 Degrees of Freedom – Sensor Stick
The SparkFun 9DOF Sensor Stick is a very small sensor board with 9 degrees of freedom. It includes the ADXL345 accelerometer, the HMC5883L magnetometer, and the ITG-3200 MEMS gyro. The “Stick” has a simple I2C interface and a mounting hole for attaching it to your project. Also, the board is a mere allowing it to be easily mounted in just about any application.
DL2305Mk03
1 x SparkFun RedBoard Qwiic
1 x ProtoScrewShield
1 x SparkFun 9 Degrees of Freedom – Sensor Stick
1 x SparkFun Micro OLED Breakout (Qwiic)
1 x Thumb Joystick
1 x SparkFun Thumb Joystick Breakout
2 x Pololu DRV8834 Low-Voltage Stepper Motor Driver Carrier
2 x Electrolytic Decoupling Capacitors – 100uF/25V
2 x Pololu Stepper Motor Bipolar, 2.8V, 1.7 A/Phase
2 x Pololu Universal Aluminum Mounting Hub for 5mm Shaft, M3 Holes
1 x SparkFun Solderable Breadboard – Large
1 x SparkFun Cerberus USB Cable
SparkFun RedBoard Qwiic
SDA – Analog A5
SCL – Analog A4
JH – Analog A0
JV – Analog A1
JS – Digital 2
DIR – Digital 7
SPR – Digital 8
DIL – Digital 9
SPL – Digital 10
LED – Digital 13
VIN – +3.3V
VIN – +5V
GND – GND
——
DL2305Mk03p.ino
/* ***** Don Luc Electronics © *****
Software Version Information
Project #12: Robotics - 9DOF - Mk27
12-27
DL2305Mk03p.ino
1 x SparkFun RedBoard Qwiic
1 x ProtoScrewShield
1 x SparkFun 9 Degrees of Freedom - Sensor Stick
1 x SparkFun Micro OLED Breakout (Qwiic)
1 x Thumb Joystick
1 x SparkFun Thumb Joystick Breakout
2 x Pololu DRV8834 Low-Voltage Stepper Motor Driver Carrier
2 x Electrolytic Decoupling Capacitors - 100uF/25V
2 x Pololu Stepper Motor Bipolar, 2.8V, 1.7 A/Phase
2 x Pololu Universal Aluminum Mounting Hub for 5mm Shaft, M3 Holes
1 x SparkFun Solderable Breadboard - Large
1 x SparkFun Cerberus USB Cable
*/

// Include the Library Code
// Arduino
#include <Arduino.h>
// DRV8834 Stepper Motor Driver
#include <BasicStepperDriver.h>
#include <MultiDriver.h>
// Wire communicate with I2C / TWI devices
#include <Wire.h>
// SparkFun Micro OLED
#include <SFE_MicroOLED.h>
// Accelerometer
#include <ADXL345.h>
// Magnetometer
#include <HMC58X3.h>
// MEMS Gyroscope
#include <ITG3200.h>
// Debug
#include "DebugUtils.h"
// FreeIMU
#include <CommunicationUtils.h>
#include <FreeIMU.h>

// DRV8834 Stepper Motor Driver
// Stepper motor steps per revolution.
// Most steppers are 200 steps or 1.8 degrees/step
#define MOTOR_STEPS 200
// Target RPM for X axis stepper motor
#define MOTOR_X_RPM 800
// Target RPM for Y axis stepper motor
#define MOTOR_Y_RPM 800
// Since microstepping is set externally,
// make sure this matches the selected mode
// If it doesn't, the motor will move at a
// different RPM than chosen
// 1=full step, 2=half step etc.
#define MICROSTEPS 1
// X Stepper motor
#define DIR_X 7
#define STEP_X 8
// Y Stepper motor
#define DIR_Y 9
#define STEP_Y 10
// BasicStepperDriver
BasicStepperDriver stepperX(MOTOR_STEPS, DIR_X, STEP_X);
BasicStepperDriver stepperY(MOTOR_STEPS, DIR_Y, STEP_Y);
// Pick one of the two controllers below
// each motor moves independently
MultiDriver controller(stepperX, stepperY);

// Joystick
#define JH A0
#define JV A1
#define JS 2

// Variable for reading the button
int JSState = 0;
// Adjusted Value
int adjustedValue = 0;
int adjustedValue2 = 0;

// LED Yellow
int iLED = 13;

// SparkFun Micro OLED
#define PIN_RESET 9
#define DC_JUMPER 1
// I2C declaration
MicroOLED oled(PIN_RESET, DC_JUMPER);

// Set the FreeIMU object
FreeIMU my3IMU = FreeIMU();

// Yaw Pitch Roll
float ypr[3];
float Yaw = 0;
float Pitch = 0;
float Roll = 0;

// Software Version Information
String sver = "12-27";

void loop() {

  // Button
  isButton();

  // Joystick
  isThumbJoystick();

  // Stepper
  isStepper();

  // isFreeIMU
  isFreeIMU();

  // Micro OLED
  isMicroOLED();

}
getButton.ino
// Button
// Button Setup
void isButtonSetup() {

  // Make the button line an input
  pinMode(JS, INPUT_PULLUP);
  // Initialize digital pin iLED as an output
  pinMode(iLED, OUTPUT);

}

// Button
void isButton(){

  // Read the state of the button
  JSState = digitalRead(JS);

  // Check if the button is pressed.
  // If it is, the JSState is HIGH:
  if (JSState == HIGH) {

    // Button
    // Turn the LED on HIGH
    digitalWrite(iLED, HIGH);

  } else {

    // Button
    // Turn the LED on LOW
    digitalWrite(iLED, LOW);

  }

}
getFreeIMU.ino
// FreeIMU
// isFreeIMUSetup
void isFreeIMUSetup(){

  // Pause
  delay(5);
  // Initialize IMU
  my3IMU.init();
  // Pause
  delay(5);

}
// isFreeIMU
void isFreeIMU(){

  // FreeIMU
  // Yaw Pitch Roll
  my3IMU.getYawPitchRoll(ypr);
  // Yaw
  Yaw = ypr[0];
  // Pitch
  Pitch = ypr[1];
  // Roll
  Roll = ypr[2];

}
getMicroOLED.ino
// SparkFun Micro OLED
// Micro OLED Setup
void isMicroOLEDSetup() {

  // Initialize the OLED
  oled.begin();
  // Clear the display's internal memory
  oled.clear(ALL);
  // Display what's in the buffer (Splash Screen SparkFun)
  oled.display();

  // Delay 1000 ms
  delay(1000);

  // Clear the buffer.
  oled.clear(PAGE);

}
// Micro OLED
void isMicroOLED() {

  // Text Display FreeIMU
  // Clear the display
  oled.clear(PAGE);
  // Set cursor to top-left
  oled.setCursor(0, 0);
  // Set font to type 0
  oled.setFontType(0);
  // Horizontal
  oled.print("H: ");
  oled.print( adjustedValue );
  // Vertical
  oled.setCursor(0, 11);
  oled.print("V: ");
  oled.print( adjustedValue2 );
  // Yaw
  oled.setCursor(0, 21);
  oled.print("Y: ");
  oled.print(Yaw);
  // Pitch
  oled.setCursor(0, 31);
  oled.print("P: ");
  oled.print(Pitch);
  // Roll
  oled.setCursor(0, 41);
  oled.print("R: ");
  oled.print(Roll);
  oled.display();

}
getStepper.ino
// Stepper
// isStepperSetup
void isStepperSetup() {

  // Set stepper target motors RPM.
  stepperX.begin(MOTOR_X_RPM, MICROSTEPS);
  stepperY.begin(MOTOR_Y_RPM, MICROSTEPS);

}
// Stepper
void isStepper() {

  // Stepper => Controller rotate
  controller.rotate(adjustedValue, adjustedValue2);

}
getThumbJoystick.ino
// Thumb Joystick
void isThumbJoystick() {

  // Joystick JH
  // Horizontal
  // Joystick Pot Values JH
  int potValue = analogRead(JH);
  int potValues = 0;
  // Adjusted Value
  potValues = map(potValue, 0, 1023, 1000, -1000);
  if (potValues > 300) {

    adjustedValue = potValues;

  } else if (potValues < -300) {

    adjustedValue = potValues;

  } else {

    adjustedValue = 0;

  }

  // Joystick JV
  // Vertical
  // Joystick Pot Values JV
  int potValue2 = analogRead(JV);
  int potValues2 = 0;
  // Adjusted Value2
  potValues2 = map(potValue2, 0, 1023, 1000, -1000);
  if (potValues2 > 300) {

    adjustedValue2 = potValues2;

  } else if (potValues2 < -300) {

    adjustedValue2 = potValues2;

  } else {

    adjustedValue2 = 0;

  }

}
setup.ino
// Setup
void setup()
{

  // Wire communicate with I2C / TWI devices
  Wire.begin();

  // Setup Micro OLED
  isMicroOLEDSetup();

  // isFreeIMUSetup
  isFreeIMUSetup();

  // Button Setup
  isButtonSetup();

  // DRV8834 Stepper Motor Driver
  isStepperSetup();

}
——
People can contact us: https://www.donluc.com/?page_id=1927
Technology Experience
- Programming Language
- Single-Board Microcontrollers (PIC, Arduino, Raspberry Pi,Espressif, etc…)
- IoT
- Wireless (Radio Frequency, Bluetooth, WiFi, Etc…)
- Robotics
- Camera and Video Capture Receiver Stationary, Wheel/Tank and Underwater Vehicle
- Unmanned Vehicles Terrestrial and Marine
- Machine Learning
- RTOS
- Research & Development (R & D)
Instructor, E-Mentor, STEAM, and Arts-Based Training
- Programming Language
- IoT
- PIC Microcontrollers
- Arduino
- Raspberry Pi
- Espressif
- Robotics
Follow Us
Luc Paquin – Curriculum Vitae – 2023
https://www.donluc.com/luc/
Web: https://www.donluc.com/
Facebook: https://www.facebook.com/neosteam.labs.9/
YouTube: https://www.youtube.com/@thesass2063
Twitter: https://twitter.com/labs_steam
Pinterest: https://www.pinterest.com/NeoSteamLabs/
Instagram: https://www.instagram.com/neosteamlabs/
Don Luc
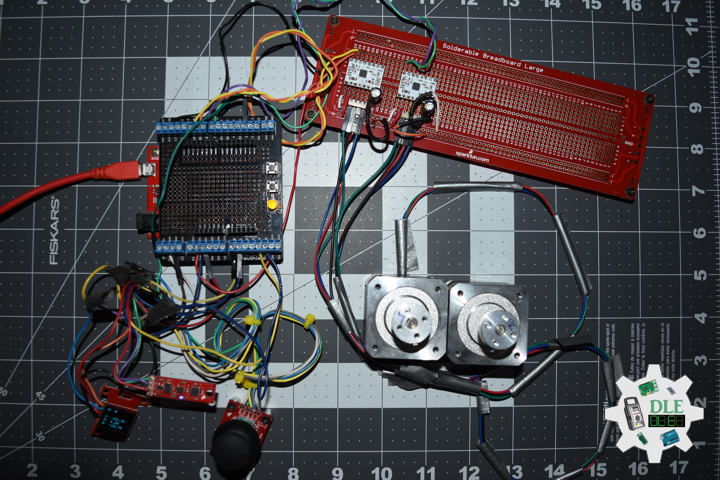
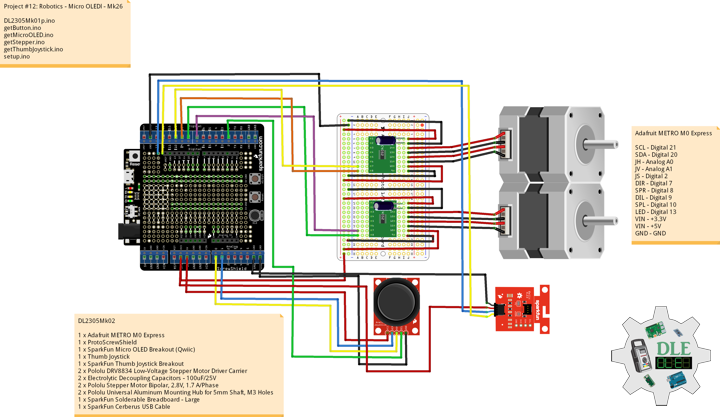
Project #12: Robotics – Micro OLED – Mk26
——
#DonLucElectronics #DonLuc #Robotics #MicroOLED #AdafruitMETROM0Express #Arduino #Project #Fritzing #Programming #Electronics #Microcontrollers #Consultant
——
——
——

——-
Micro OLED
Micro OLED displays are silicon-based OLED display that use a monocrystalline silicon wafer as the actively driven backplane, so it is easier to achieve high PPI (Pixel Density), a high degree of integration, and small size. This ensures they are easy to carry, have good anti-seismic performance, and have ultra-low power consumption.
DL2305Mk02
1 x Adafruit METRO M0 Express
1 x ProtoScrewShield
1 x SparkFun Micro OLED Breakout (Qwiic)
1 x Thumb Joystick
1 x SparkFun Thumb Joystick Breakout
2 x Pololu DRV8834 Low-Voltage Stepper Motor Driver Carrier
2 x Electrolytic Decoupling Capacitors – 100uF/25V
2 x Pololu Stepper Motor Bipolar, 2.8V, 1.7 A/Phase
2 x Pololu Universal Aluminum Mounting Hub for 5mm Shaft, M3 Holes
1 x SparkFun Solderable Breadboard – Large
1 x SparkFun Cerberus USB Cable
Adafruit METRO M0 Express
SCL – Digital 21
SDA – Digital 20
JH – Analog A0
JV – Analog A1
JS – Digital 2
DIR – Digital 7
SPR – Digital 8
DIL – Digital 9
SPL – Digital 10
LED – Digital 13
VIN – +3.3V
VIN – +5V
GND – GND
——
DL2305Mk02p.ino
/* ***** Don Luc Electronics © *****
Software Version Information
Project #12: Robotics - Micro OLED - Mk26
12-26
DL2305Mk02p.ino
1 x Adafruit METRO M0 Express
1 x ProtoScrewShield
1 x SparkFun Micro OLED Breakout (Qwiic)
1 x Thumb Joystick
1 x SparkFun Thumb Joystick Breakout
2 x Pololu DRV8834 Low-Voltage Stepper Motor Driver Carrier
2 x Electrolytic Decoupling Capacitors - 100uF/25V
2 x Pololu Stepper Motor Bipolar, 2.8V, 1.7 A/Phase
2 x Pololu Universal Aluminum Mounting Hub for 5mm Shaft, M3 Holes
1 x SparkFun Solderable Breadboard - Large
1 x SparkFun Cerberus USB Cable
*/

// Include the Library Code
// Arduino
#include <Arduino.h>
// DRV8834 Stepper Motor Driver
#include <BasicStepperDriver.h>
#include <MultiDriver.h>
// Wire communicate with I2C / TWI devices
#include <Wire.h>
// SparkFun Micro OLED
#include <SFE_MicroOLED.h>

// DRV8834 Stepper Motor Driver
// Stepper motor steps per revolution.
// Most steppers are 200 steps or 1.8 degrees/step
#define MOTOR_STEPS 200
// Target RPM for X axis stepper motor
#define MOTOR_X_RPM 800
// Target RPM for Y axis stepper motor
#define MOTOR_Y_RPM 800
// Since microstepping is set externally,
// make sure this matches the selected mode
// If it doesn't, the motor will move at a
// different RPM than chosen
// 1=full step, 2=half step etc.
#define MICROSTEPS 1
// X Stepper motor
#define DIR_X 7
#define STEP_X 8
// Y Stepper motor
#define DIR_Y 9
#define STEP_Y 10
// BasicStepperDriver
BasicStepperDriver stepperX(MOTOR_STEPS, DIR_X, STEP_X);
BasicStepperDriver stepperY(MOTOR_STEPS, DIR_Y, STEP_Y);
// Pick one of the two controllers below
// each motor moves independently
MultiDriver controller(stepperX, stepperY);

// Joystick
#define JH A0
#define JV A1
#define JS 2

// Variable for reading the button
int JSState = 0;
// Adjusted Value
int adjustedValue = 0;
int adjustedValue2 = 0;

// LED Yellow
int iLED = 13;

// SparkFun Micro OLED
#define PIN_RESET 9
#define DC_JUMPER 1
// I2C declaration
MicroOLED oled(PIN_RESET, DC_JUMPER);

// Software Version Information
String sver = "12-26";

void loop() {

  // Button
  isButton();

  // Joystick
  isThumbJoystick();

  // Stepper
  isStepper();

  // Micro OLED
  isMicroOLED();

}
getButton.ino
// Button
// Button Setup
void isButtonSetup() {

  // Make the button line an input
  pinMode(JS, INPUT_PULLUP);
  // Initialize digital pin iLED as an output
  pinMode(iLED, OUTPUT);

}

// Button
void isButton(){

  // Read the state of the button
  JSState = digitalRead(JS);

  // Check if the button is pressed.
  // If it is, the JSState is HIGH:
  if (JSState == HIGH) {

    // Button
    // Turn the LED on HIGH
    digitalWrite(iLED, HIGH);

  } else {

    // Button
    // Turn the LED on LOW
    digitalWrite(iLED, LOW);

  }

}
getMicroOLED.ino
// SparkFun Micro OLED
// Setup Micro OLED
void isMicroOLEDSetup() {

  // Initialize the OLED
  oled.begin();
  // Clear the display's internal memory
  oled.clear(ALL);
  // Display what's in the buffer (Splash Screen SparkFun)
  oled.display();

  // Delay 1000 ms
  delay(1000);

  // Clear the buffer.
  oled.clear(PAGE);

}
// Micro OLED
void isMicroOLED() {

  // Text Display FreeIMU
  // Clear the display
  oled.clear(PAGE);
  // Set cursor to top-left
  oled.setCursor(0, 0);
  // Set font to type 0
  oled.setFontType(0);
  // Horizontal
  oled.print("Horizontal");
  // Horizontal
  oled.setCursor(0, 13);
  oled.print( adjustedValue );
  // Vertical
  oled.setCursor(0, 24);
  oled.print("Vertical");
  // Vertical
  oled.setCursor(0, 37);
  oled.print( adjustedValue2 );
  oled.display();

}
getStepper.ino
// Stepper
// isStepperSetup
void isStepperSetup() {

  // Set stepper target motors RPM.
  stepperX.begin(MOTOR_X_RPM, MICROSTEPS);
  stepperY.begin(MOTOR_Y_RPM, MICROSTEPS);

}
// Stepper
void isStepper() {

  // Stepper => Controller rotate
  controller.rotate(adjustedValue, adjustedValue2);

}
getThumbJoystick.ino
// Thumb Joystick
void isThumbJoystick() {

  // Joystick JH
  // Horizontal
  // Joystick Pot Values JH
  int potValue = analogRead(JH);
  int potValues = 0;
  // Adjusted Value
  potValues = map(potValue, 0, 1023, 1000, -1000);
  if (potValues > 300) {

    adjustedValue = potValues;

  } else if (potValues < -300) {

    adjustedValue = potValues;

  } else {

    adjustedValue = 0;

  }

  // Joystick JV
  // Vertical
  // Joystick Pot Values JV
  int potValue2 = analogRead(JV);
  int potValues2 = 0;
  // Adjusted Value2
  potValues2 = map(potValue2, 0, 1023, 1000, -1000);
  if (potValues2 > 300) {

    adjustedValue2 = potValues2;

  } else if (potValues2 < -300) {

    adjustedValue2 = potValues2;

  } else {

    adjustedValue2 = 0;

  }

}
setup.ino
// Setup
void setup()
{

  // Wire communicate with I2C / TWI devices
  Wire.begin();

  // Setup Micro OLED
  isMicroOLEDSetup();

  // Button Setup
  isButtonSetup();

  // DRV8834 Stepper Motor Driver
  isStepperSetup();

}
——
People can contact us: https://www.donluc.com/?page_id=1927
Technology Experience
- Programming Language
- Single-Board Microcontrollers (PIC, Arduino, Raspberry Pi,Espressif, etc…)
- IoT
- Wireless (Radio Frequency, Bluetooth, WiFi, Etc…)
- Robotics
- Camera and Video Capture Receiver Stationary, Wheel/Tank and Underwater Vehicle
- Unmanned Vehicles Terrestrial and Marine
- Machine Learning
- RTOS
- Research & Development (R & D)
Instructor, E-Mentor, STEAM, and Arts-Based Training
- Programming Language
- IoT
- PIC Microcontrollers
- Arduino
- Raspberry Pi
- Espressif
- Robotics
Follow Us
Luc Paquin – Curriculum Vitae – 2023
https://www.donluc.com/luc/
Web: https://www.donluc.com/
Facebook: https://www.facebook.com/neosteam.labs.9/
YouTube: https://www.youtube.com/@thesass2063
Twitter: https://twitter.com/labs_steam
Pinterest: https://www.pinterest.com/NeoSteamLabs/
Instagram: https://www.instagram.com/neosteamlabs/
Don Luc
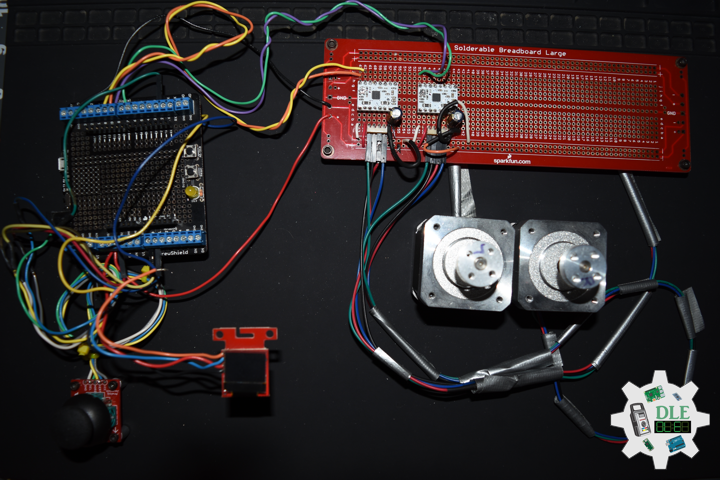
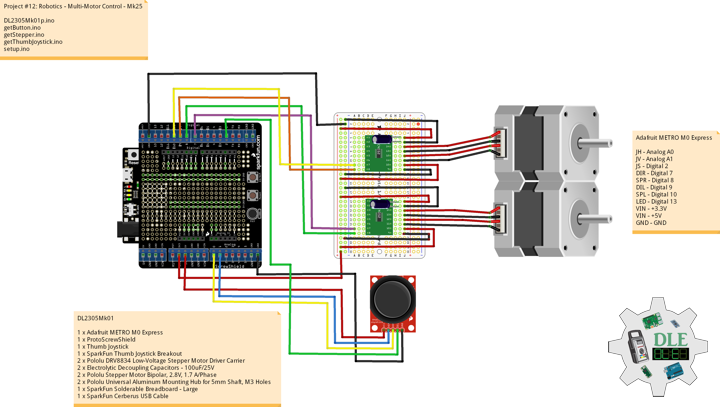
Project #12: Robotics – Multi-Motor Control – Mk25
——
#DonLucElectronics #DonLuc #Robotics #MultiMotorControl #AdafruitMETROM0Express #Arduino #Project #Fritzing #Programming #Electronics #Microcontrollers #Consultant
——
——
——
——
Multi-Motor Control
In order to synchronize the multi-motor system, a novel method for this system based on embedded control terminal. A controller of the strategy with the function of synchronous control is also completed. According to the requirements of this system, a distributed control structure which based on Hierarchical Approach is chosen. The hardware platform of this structure is composed of embedded control terminal motor could be driven independently. The experiment results verified that the multi-motor system is reliable, the control strategy is rational applied this multi-motor system has better dynamic response and higher reliability.
DL2305Mk01
1 x Adafruit METRO M0 Express
1 x ProtoScrewShield
1 x Thumb Joystick
1 x SparkFun Thumb Joystick Breakout
2 x Pololu DRV8834 Low-Voltage Stepper Motor Driver Carrier
2 x Electrolytic Decoupling Capacitors – 100uF/25V
2 x Pololu Stepper Motor Bipolar, 2.8V, 1.7 A/Phase
2 x Pololu Universal Aluminum Mounting Hub for 5mm Shaft, M3 Holes
1 x SparkFun Solderable Breadboard – Large
1 x SparkFun Cerberus USB Cable
Adafruit METRO M0 Express
JH – Analog A0
JV – Analog A1
JS – Digital 2
DIR – Digital 7
SPR – Digital 8
DIL – Digital 9
SPL – Digital 10
LED – Digital 13
VIN – +3.3V
VIN – +5V
GND – GND
——
DL2305Mk01p.ino
/* ***** Don Luc Electronics © *****
Software Version Information
Project #12: Robotics - Multi-Motor Control - Mk25
12-25
DL2305Mk01p.ino
1 x Adafruit METRO M0 Express
1 x ProtoScrewShield
1 x Thumb Joystick
1 x SparkFun Thumb Joystick Breakout
2 x Pololu DRV8834 Low-Voltage Stepper Motor Driver Carrier
2 x Electrolytic Decoupling Capacitors - 100uF/25V
2 x Pololu Stepper Motor Bipolar, 2.8V, 1.7 A/Phase
2 x Pololu Universal Aluminum Mounting Hub for 5mm Shaft, M3 Holes
1 x SparkFun Solderable Breadboard - Large
1 x SparkFun Cerberus USB Cable
*/

// Include the Library Code
// Arduino
#include <Arduino.h>
// DRV8834 Stepper Motor Driver
#include <BasicStepperDriver.h>
#include <MultiDriver.h>

// DRV8834 Stepper Motor Driver
// Stepper motor steps per revolution.
// Most steppers are 200 steps or 1.8 degrees/step
#define MOTOR_STEPS 200
// Target RPM for X axis stepper motor
#define MOTOR_X_RPM 800
// Target RPM for Y axis stepper motor
#define MOTOR_Y_RPM 800
// Since microstepping is set externally,
// make sure this matches the selected mode
// If it doesn't, the motor will move at a
// different RPM than chosen
// 1=full step, 2=half step etc.
#define MICROSTEPS 1
// X Stepper motor
#define DIR_X 7
#define STEP_X 8
// Y Stepper motor
#define DIR_Y 9
#define STEP_Y 10
// BasicStepperDriver
BasicStepperDriver stepperX(MOTOR_STEPS, DIR_X, STEP_X);
BasicStepperDriver stepperY(MOTOR_STEPS, DIR_Y, STEP_Y);
// Pick one of the two controllers below
// each motor moves independently
MultiDriver controller(stepperX, stepperY);

// Joystick
#define JH A0
#define JV A1
#define JS 2

// Variable for reading the button
int JSState = 0;
// Adjusted Value
int adjustedValue = 0;
int adjustedValue2 = 0;

// LED Yellow
int iLED = 13;

// Software Version Information
String sver = "12-25";

void loop() {

  // Button
  isButton();

  // Joystick
  isThumbJoystick();

  // Stepper
  isStepper();

}
getButton.ino
// Button
// Button Setup
void isButtonSetup() {

  // Make the button line an input
  pinMode(JS, INPUT_PULLUP);
  // Initialize digital pin iLED as an output
  pinMode(iLED, OUTPUT);

}

// Button
void isButton(){

  // Read the state of the button
  JSState = digitalRead(JS);

  // Check if the button is pressed.
  // If it is, the JSState is HIGH:
  if (JSState == HIGH) {

    // Button
    // Turn the LED on HIGH
    digitalWrite(iLED, HIGH);

  } else {

    // Button
    // Turn the LED on LOW
    digitalWrite(iLED, LOW);

  }

}
getStepper.ino
// Stepper
// isStepperSetup
void isStepperSetup() {

  // Set stepper target motors RPM.
  stepperX.begin(MOTOR_X_RPM, MICROSTEPS);
  stepperY.begin(MOTOR_Y_RPM, MICROSTEPS);

}
// Stepper
void isStepper() {

  // Stepper => Controller rotate
  controller.rotate(adjustedValue, adjustedValue2);

}
getThumbJoystick.ino
// Thumb Joystick
void isThumbJoystick() {

  // Joystick JH
  // Horizontal
  // Joystick Pot Values JH
  int potValue = analogRead(JH);
  int potValues = 0;
  // Adjusted Value
  potValues = map(potValue, 0, 1023, 1000, -1000);
  if (potValues > 300) {

    adjustedValue = potValues;

  } else if (potValues < -300) {

    adjustedValue = potValues;

  } else {

    adjustedValue = 0;

  }

  // Joystick JV
  // Vertical
  // Joystick Pot Values JV
  int potValue2 = analogRead(JV);
  int potValues2 = 0;
  // Adjusted Value2
  potValues2 = map(potValue2, 0, 1023, 1000, -1000);
  if (potValues2 > 300) {

    adjustedValue2 = potValues2;

  } else if (potValues2 < -300) {

    adjustedValue2 = potValues2;

  } else {

    adjustedValue2 = 0;

  }

}
setup.ino
// Setup
void setup()
{

  // Button Setup
  isButtonSetup();

  // DRV8834 Stepper Motor Driver
  isStepperSetup();

}
——
People can contact us: https://www.donluc.com/?page_id=1927
Technology Experience
- Programming Language
- Single-Board Microcontrollers (PIC, Arduino, Raspberry Pi,Espressif, etc…)
- IoT
- Wireless (Radio Frequency, Bluetooth, WiFi, Etc…)
- Robotics
- Camera and Video Capture Receiver Stationary, Wheel/Tank and Underwater Vehicle
- Unmanned Vehicles Terrestrial and Marine
- Machine Learning
- RTOS
- Research & Development (R & D)
Instructor, E-Mentor, STEAM, and Arts-Based Training
- Programming Language
- IoT
- PIC Microcontrollers
- Arduino
- Raspberry Pi
- Espressif
- Robotics
Follow Us
Luc Paquin – Curriculum Vitae – 2023
https://www.donluc.com/luc/
Web: https://www.donluc.com/
Facebook: https://www.facebook.com/neosteam.labs.9/
YouTube: https://www.youtube.com/@thesass2063
Twitter: https://twitter.com/labs_steam
Pinterest: https://www.pinterest.com/NeoSteamLabs/
Instagram: https://www.instagram.com/neosteamlabs/
Don Luc
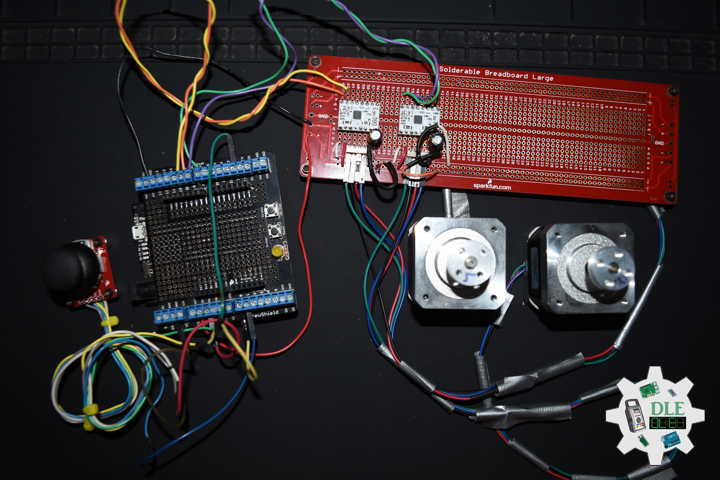
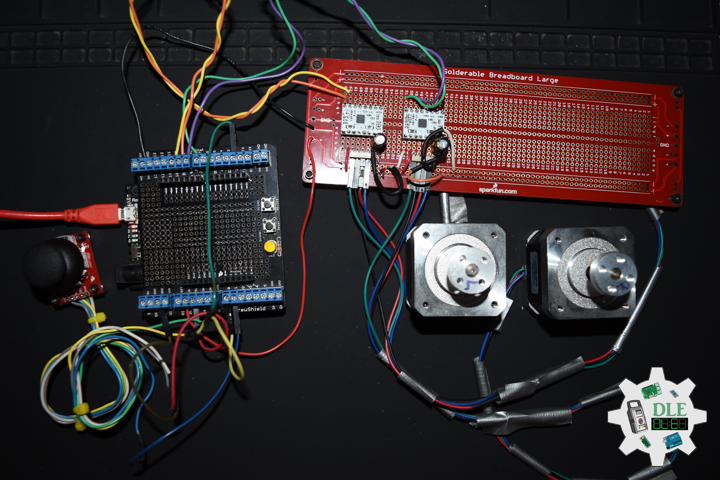
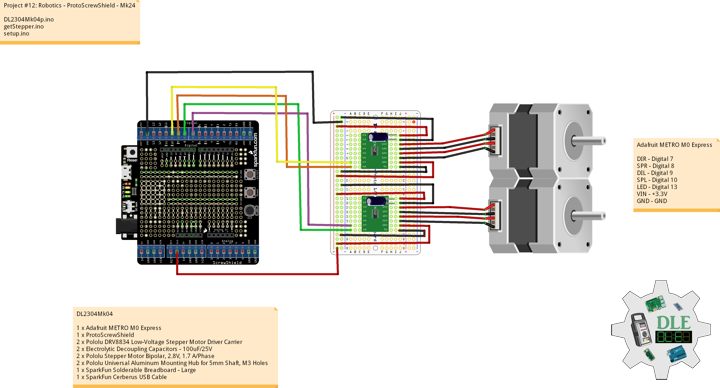
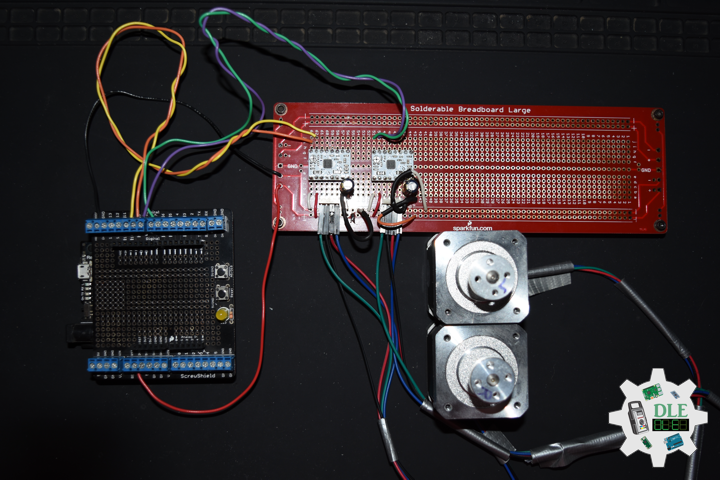
Project #12: Robotics – ProtoScrewShield – Mk24
——
#DonLucElectronics #DonLuc #Robotics #AdafruitMETROM0Express #Arduino #Project #Fritzing #Programming #Electronics #Microcontrollers #Consultant
——
——
——
——
ProtoScrewShield
The ProtoScrewShield extends all pins of the Arduino out to 3.5mm pitch screw terminals. It also has a lot of the utility provided including: a large prototyping space of both connected and unconnected 0.1″ spaced through-holes, a couple 5V and GND busses, a reset button, general use push button, and a 5mm yellow LED. This product includes all the parts shown and comes in kit form and must be soldered together by the end user.
DL2304Mk04
1 x Adafruit METRO M0 Express
1 x ProtoScrewShield
2 x Pololu DRV8834 Low-Voltage Stepper Motor Driver Carrier
2 x Electrolytic Decoupling Capacitors – 100uF/25V
2 x Pololu Stepper Motor Bipolar, 2.8V, 1.7 A/Phase
2 x Pololu Universal Aluminum Mounting Hub for 5mm Shaft, M3 Holes
1 x SparkFun Solderable Breadboard – Large
1 x SparkFun Cerberus USB Cable
Adafruit METRO M0 Express
DIR – Digital 7
SPR – Digital 8
DIL – Digital 9
SPL – Digital 10
LED – LED_BUILTIN
VIN – +3.3V
GND – GND
——
DL2304Mk04p.ino
/* ***** Don Luc Electronics © *****
Software Version Information
Project #12: Robotics - ProtoScrewShield - Mk24
12-24
DL2304Mk04p.ino
1 x Adafruit METRO M0 Express
1 x ProtoScrewShield
2 x Pololu DRV8834 Low-Voltage Stepper Motor Driver Carrier
2 x Electrolytic Decoupling Capacitors - 100uF/25V
2 x Pololu Stepper Motor Bipolar, 2.8V, 1.7 A/Phase
2 x Pololu Universal Aluminum Mounting Hub for 5mm Shaft, M3 Holes
1 x SparkFun Solderable Breadboard - Large
1 x SparkFun Cerberus USB Cable
*/

// Include the Library Code
// Arduino
#include <Arduino.h>
// DRV8834 Stepper Motor Driver
#include <BasicStepperDriver.h>
#include <MultiDriver.h>

// DRV8834 Stepper Motor Driver
// Stepper motor steps per revolution.
// Most steppers are 200 steps or 1.8 degrees/step
#define MOTOR_STEPS 200
// Target RPM for X axis stepper motor
#define MOTOR_X_RPM 800
// Target RPM for Y axis stepper motor
#define MOTOR_Y_RPM 800
// Since microstepping is set externally,
// make sure this matches the selected mode
// If it doesn't, the motor will move at a
// different RPM than chosen
// 1=full step, 2=half step etc.
#define MICROSTEPS 1
// X Stepper motor
#define DIR_X 7
#define STEP_X 8
// Y Stepper motor
#define DIR_Y 9
#define STEP_Y 10
// BasicStepperDriver
BasicStepperDriver stepperX(MOTOR_STEPS, DIR_X, STEP_X);
BasicStepperDriver stepperY(MOTOR_STEPS, DIR_Y, STEP_Y);
// Pick one of the two controllers below
// each motor moves independently
MultiDriver controller(stepperX, stepperY);

// LED Yellow
int iLED = 13;

// Software Version Information
String sver = "12-24";

void loop() {

  // Stepper
  isStepper();

}
getStepper.ino
// Stepper
// isStepperSetup
void isStepperSetup() {

  // Set stepper target motors RPM.
  stepperX.begin(MOTOR_X_RPM, MICROSTEPS);
  stepperY.begin(MOTOR_Y_RPM, MICROSTEPS);

}
// Stepper
void isStepper() {

  // Stepper => Controller rotate
  controller.rotate(360, 360);

}
setup.ino
// Setup
void setup()
{

  // Initialize digital pin iLED as an output.
  pinMode(iLED, OUTPUT);
  // Turn the LED on HIGH
  digitalWrite(iLED, HIGH);

  // DRV8834 Stepper Motor Driver
  isStepperSetup();

}
——
People can contact us: https://www.donluc.com/?page_id=1927
Technology Experience
- Programming Language
- Single-Board Microcontrollers (PIC, Arduino, Raspberry Pi,Espressif, etc…)
- IoT
- Wireless (Radio Frequency, Bluetooth, WiFi, Etc…)
- Robotics
- Camera and Video Capture Receiver Stationary, Wheel/Tank and Underwater Vehicle
- Unmanned Vehicles Terrestrial and Marine
- Machine Learning
- RTOS
- Research & Development (R & D)
Instructor, E-Mentor, STEAM, and Arts-Based Training
- Programming Language
- IoT
- PIC Microcontrollers
- Arduino
- Raspberry Pi
- Espressif
- Robotics
Follow Us
Luc Paquin – Curriculum Vitae – 2023
https://www.donluc.com/luc/
Web: https://www.donluc.com/
Facebook: https://www.facebook.com/neosteam.labs.9/
YouTube: https://www.youtube.com/@thesass2063
Twitter: https://twitter.com/labs_steam
Pinterest: https://www.pinterest.com/NeoSteamLabs/
Instagram: https://www.instagram.com/neosteamlabs/
Don Luc
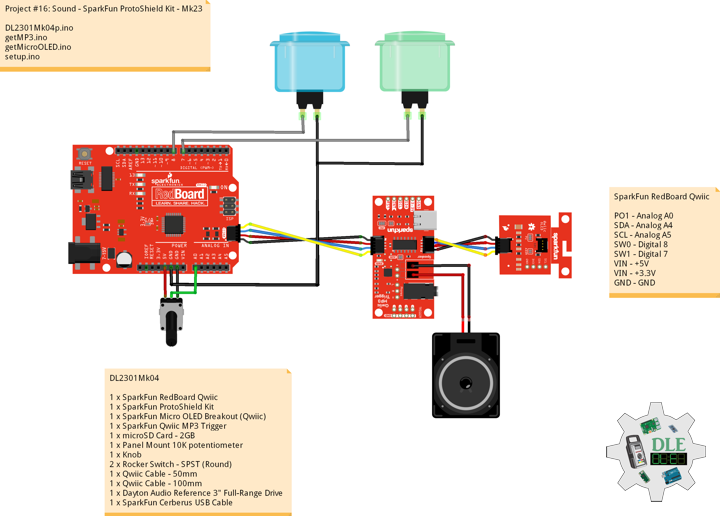
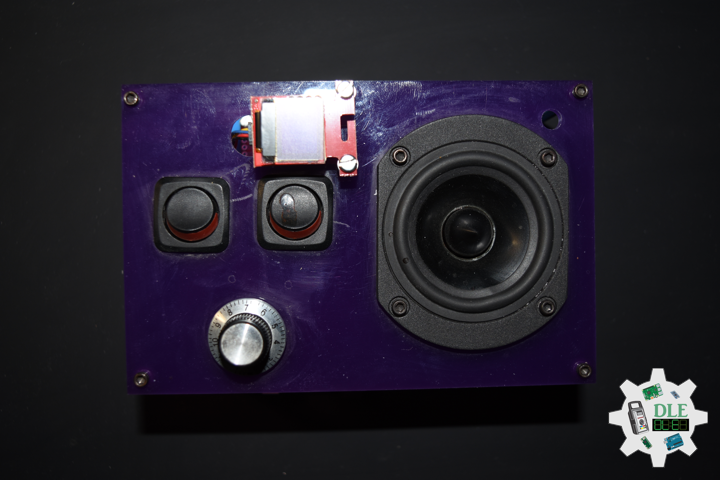
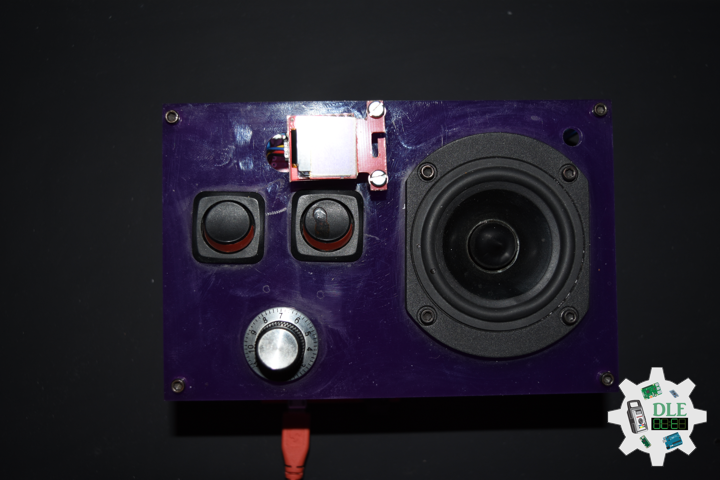
Project #16: Sound – SparkFun ProtoShield Kit – Mk23
——
#DonLucElectronics #DonLuc #Sound #Arduino #MicroOLED #ProtoShield #SparkFunQwiicMP3 #SparkFunRedBoardQwiic #Project #Programming #Electronics #Microcontrollers #Consultant
——
——
——
——
SparkFun ProtoShield Kit
The SparkFun ProtoShield Kit lets you customize your own Arduino shield using whatever circuit you can come up with and then test it to make sure everything is working the way it should. The SparkFun ProtoShield Kit is based off the Arduino R3’s footprint that allows you to easily incorporate it with favorite Arduino-based device.
One of our favorite features with this version of the ProtoShield Kit is the solderable-like breadboard prototyping area. Half of this area was designed with a breadboard in mind. On the underside of the shield you will be able to see open jumper pads between each through hole to make a connection like a breadboard. Once you add a component, simply add a solder jumper between holes to make a connection. For those that prefer the standard prototyping pads.
DL2301Mk04
1 x SparkFun RedBoard Qwiic
1 x SparkFun ProtoShield Kit
1 x SparkFun Micro OLED Breakout (Qwiic)
1 x SparkFun Qwiic MP3 Trigger
1 x microSD Card – 2GB
1 x Panel Mount 10K potentiometer
1 x Knob
2 x Rocker Switch – SPST (Round)
1 x Qwiic Cable – 50mm
1 x Qwiic Cable – 100mm
1 x Dayton Audio Reference 3″ Full-Range Drive
1 x SparkFun Cerberus USB Cable
——
SparkFun RedBoard Qwiic
PO1 – Analog A0
SDA – Analog A4
SCL – Analog A5
SW0 – Digital 8
SW1 – Digital 7
VIN – +5V
VIN – +3.3V
GND – GND
——
DL2301Mk04p.ino
/* ***** Don Luc Electronics © *****
Software Version Information
#16 - Sound - SparkFun ProtoShield Kit - Mk23
16-04
DL2301Mk04p.ino
1 x SparkFun RedBoard Qwiic
1 x SparkFun ProtoShield Kit
1 x SparkFun Micro OLED Breakout (Qwiic)
1 x SparkFun Qwiic MP3 Trigger
1 x microSD Card - 2GB
1 x Panel Mount 10K potentiometer
1 x Knob
2 x Rocker Switch - SPST (Round)
1 x Qwiic Cable - 50mm
1 x Qwiic Cable - 100mm
1 x Dayton Audio Reference 3" Full-Range Drive
1 x SparkFun Cerberus USB Cable
*/

// Include the Library Code
// Wire communicate with I2C / TWI devices
#include <Wire.h>
// SparkFun MP3 Trigger
#include "SparkFun_Qwiic_MP3_Trigger_Arduino_Library.h"
// SparkFun Micro OLED
#include <SFE_MicroOLED.h>

// SparkFun MP3 Trigger
MP3TRIGGER mp3;
int iSongCount = 0;
int x = 0;

// Volume
int iVolume = A0;
int iVolumeLevel = 0;

// EQ Setting Normal
byte bEQSetting = 0;

// Play Next
const int iPlayNext = 8;
// Variable for reading the iPlayNext status
int iPlayNextState = 0;

// Play Previous
const int iPlayPrevious = 7;
// Variable for reading the iPlayPrevious status
int iPlayPreviousState = 0;

// SparkFun Micro OLED
#define PIN_RESET 9
#define DC_JUMPER 1
// I2C declaration
MicroOLED oled(PIN_RESET, DC_JUMPER);

// iLED ProtoShield
int iLED = 13;

// Software Version Information
String sver = "16-23";

void loop()
{

  // SparkFun MP3 Trigger
  if (mp3.isPlaying() == false) {

    if ( x > iSongCount ) {

      x = 0;

    } else {

      x = x + 1;

    }

    // Play Track
    mp3.playTrack( x );

  } else {

    // Volume
    isVolume();

    // Play Next
    isPlayNext();

    // Play Previous
    isPlayPrevious();

  }

  // Micro OLED
  isMicroOLED();

}
getMP3.ino
// MP3
// Setup MP3
void isSetupMP3(){

  // Check to see if Qwiic MP3 is present on the bus
  if (mp3.begin() == false)
  {

    // Qwiic MP3 failed to respond. Please check wiring and possibly the I2C address. Freezing...
    while (1);

  }

  if (mp3.hasCard() == false)
  {

    // Qwiic MP3 is missing its SD card. Freezing...
    while (1);

  }

  // Song Count
  iSongCount = mp3.getSongCount();

  // EQ Setting
  // 0 Normal
  // 1 Pop
  // 2 Rock
  // 3 Jazz
  // 4 Classic
  // 5 Bass
  bEQSetting = 5;
  bEQSetting = mp3.getEQ();

  // Initialize the iPlayNext
  pinMode( iPlayNext, INPUT);

  // Initialize the iPlayPrevious
  pinMode( iPlayPrevious, INPUT);

}
// Volume
void isVolume() {

  // Volume
  iVolumeLevel = analogRead( iVolume );
  // (0-1023 for 10 bits or 0-4095 for 12 bits)
  iVolumeLevel = map(iVolumeLevel, 0, 1023, 0, 10);

  // Volume can be 0 (off) to 31 (max)
  // Volume can be 0 (off) to 10 (Breakfast)
  mp3.setVolume( iVolumeLevel );

}
// Play Next
void isPlayNext() {

  // Read the state of the iPlayNext value
  iPlayNextState = digitalRead( iPlayNext );

  if ( iPlayNextState == HIGH ) {

    mp3.stop();

    if ( x > iSongCount ) {

      x = 0;

    } else {

      x = x + 1;

    }

    // Play Track
    mp3.playTrack( x );

  }

}
// Play Previous
void isPlayPrevious() {

  // Read the state of the iPlayPrevious value
  iPlayPreviousState = digitalRead( iPlayPrevious );

  if ( iPlayPreviousState == HIGH ) {

    mp3.stop();

    if ( x > iSongCount ) {

      x = 0;

    } else {

      x = x - 1;

    }

    // Play Track
    mp3.playTrack( x );

  }

}
getMicroOLED.ino
// SparkFun Micro OLED
// Setup Micro OLED
void isSetupMicroOLED() {

  // Initialize the OLED
  oled.begin();
  // Clear the display's internal memory
  oled.clear(ALL);
  // Display what's in the buffer (splashscreen)
  oled.display();

  // Delay 1000 ms
  delay(1000);

  // Clear the buffer.
  oled.clear(PAGE);

}
// Micro OLED
void isMicroOLED() {

  // Text Display FreeIMU
  // Clear the display
  oled.clear(PAGE);
  // Set cursor to top-left
  oled.setCursor(0, 0);
  // Set font to type 0
  oled.setFontType(0);
  // Song
  oled.print("Song");
  // Song Name
  oled.setCursor(0, 13);
  String songName = mp3.getSongName();
  oled.print( songName );
  // Song Count
  oled.setCursor(0, 24);
  oled.print("Song Count");
  // Song Count
  oled.setCursor(0, 37);
  iSongCount = mp3.getSongCount();
  oled.print( iSongCount );
  oled.display();

}
setup.ino
// Setup
void setup()
{

  // Initialize digital pin iLED ProtoShield as an output
  pinMode(iLED, OUTPUT);
  // Turn the LED on (HIGH is the voltage level)
  digitalWrite(iLED, HIGH);

  // Wire communicate with I2C / TWI devices
  Wire.begin();

  // SparkFun MP3 Trigger Setup
  isSetupMP3();

  // Setup Micro OLED
  isSetupMicroOLED();

}
——
People can contact us: https://www.donluc.com/?page_id=1927
Technology Experience
- Programming Language
- Single-Board Microcontrollers (PIC, Arduino, Raspberry Pi,Espressif, etc…)
- IoT
- Wireless (Radio Frequency, Bluetooth, WiFi, Etc…)
- Robotics
- Camera and Video Capture Receiver Stationary, Wheel/Tank and Underwater Vehicle
- Unmanned Vehicles Terrestrial and Marine
- Machine Learning
- RTOS
- Research & Development (R & D)
Instructor, E-Mentor, STEAM, and Arts-Based Training
- Programming Language
- IoT
- PIC Microcontrollers
- Arduino
- Raspberry Pi
- Espressif
- Robotics
Follow Us
Luc Paquin – Curriculum Vitae – 2023
https://www.donluc.com/luc/
Web: https://www.donluc.com/
Facebook: https://www.facebook.com/neosteam.labs.9/
YouTube: https://www.youtube.com/@thesass2063
Twitter: https://twitter.com/labs_steam
Pinterest: https://www.pinterest.com/NeoSteamLabs/
Instagram: https://www.instagram.com/neosteamlabs/
Don Luc