Microcontrollers
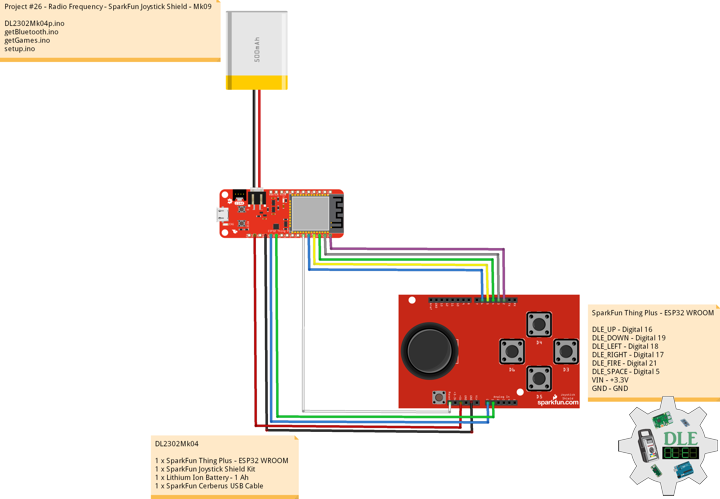
Project #26 – Radio Frequency – SparkFun Joystick Shield – Mk09
——
#DonLucElectronics #DonLuc #RadioFrequency #Bluetooth #SparkFunJoystickShield #SparkFunThingPlusESP32WROOM #Arduino #Project #Fritzing #Programming #Electronics #Microcontrollers #Consultant
——
——
——
——
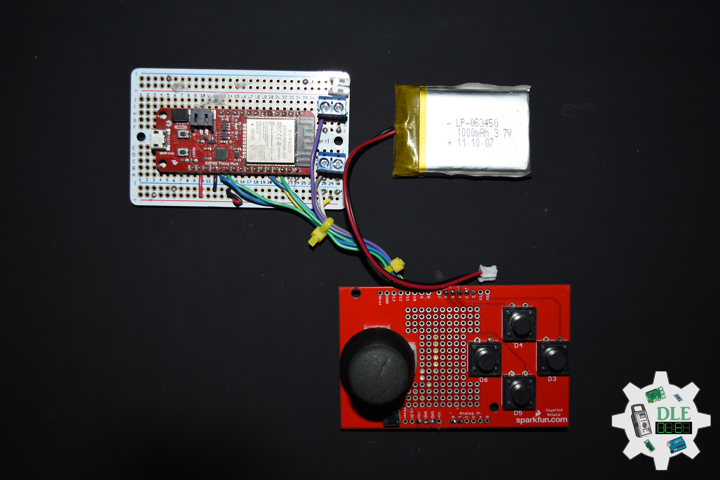
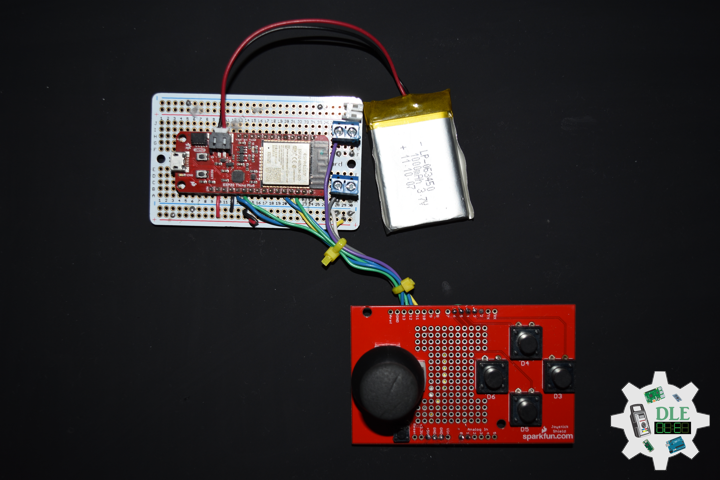
SparkFun Joystick Shield Kit
The SparkFun Joystick Shield Kit contains all the parts you need to enable your Arduino with a joystick. The shield sits on top of your Arduino and turns it into a simple controller. Five momentary push buttons and a two-axis thumb joystick gives your Arduino functionality on the level of old Nintendo controllers. Soldering is required, but it’s relatively easy and requires minimal tools. We even have a step by step guide.
The momentary push buttons are connected to Arduino digital pins 2-6; when pressed they will pull the pin low. Vertical movement of the joystick will produce a proportional analog voltage on analog pin 0, likewise, horizontal movement of the joystick can be tracked on analog pin 1.
DL2302Mk04
1 x SparkFun Thing Plus – ESP32 WROOM
1 x SparkFun Joystick Shield Kit
1 x Lithium Ion Battery – 1 Ah
1 x SparkFun Cerberus USB Cable
SparkFun Thing Plus – ESP32 WROOM
DLE_UP – Digital 16
DLE_DOWN – Digital 19
DLE_LEFT – Digital 18
DLE_RIGHT – Digital 17
DLE_FIRE – Digital 21
DLE_SPACE – Digital 5
VIN – +3.3V
GND – GND
——
DL2302Mk04p.ino
/* ***** Don Luc Electronics © *****
Software Version Information
Project #26 - Radio Frequency - SparkFun Joystick Shield - Mk09
26-09
DL2301Mk01p.ino
1 x SparkFun Thing Plus - ESP32 WROOM
1 x SparkFun Joystick Shield Kit
1 x Lithium Ion Battery - 1 Ah
1 x SparkFun Cerberus USB Cable
*/

// Include the Library Code
// ESP32 BLE Keyboard - NIMBLE
#define USE_NIMBLE
#include <BleKeyboard.h>

// ESP32 BLE Keyboard
BleKeyboard bleKeyboard;

// Game Controller Buttons
#define DLE_UP 16
#define DLE_DOWN 19
#define DLE_LEFT 18
#define DLE_RIGHT 17
#define DLE_FIRE 21
#define DLE_SPACE 5

// Button
bool keyStates[6] = {false, false, false, false, false, false};
int keyPins[6] = {DLE_UP, DLE_DOWN, DLE_LEFT, DLE_RIGHT, DLE_FIRE, DLE_SPACE};
uint8_t keyCodes[6] = {'w', 'x', 'a', 'd', 'y', ' '};

// Connect Notification Sent
bool connectNotificationSent = false;

// Software Version Information
String sver = "26-09";

void loop() {

  // Bluetooth Serial (ESP32SPP)
  isBluetooth();

}
getBluetooth.ino
// Bluetooth
// isBluetooth
void isBluetooth() {

  // Counter
  int counter;

  // ESP32 BLE Keyboard
  if(bleKeyboard.isConnected()) {

    // Connect Notification Sent
    if (!connectNotificationSent) {

      connectNotificationSent = true;

    }

    // Button
    for(counter = 0; counter < 6; counter ++){

      handleButton(counter);

    }

  }

}
getGames.ino
// Games
// Set Inputs
void setInputs() {

  // Make the button line an input
  pinMode(DLE_UP, INPUT_PULLUP);
  pinMode(DLE_DOWN, INPUT_PULLUP);
  pinMode(DLE_LEFT, INPUT_PULLUP);
  pinMode(DLE_RIGHT, INPUT_PULLUP);
  pinMode(DLE_FIRE, INPUT_PULLUP);
  pinMode(DLE_SPACE, INPUT_PULLUP);

}

// Handle Button
void handleButton(int keyIndex){

  // Handle the button press
  if (!digitalRead(keyPins[keyIndex])){

    // Button pressed
    if (!keyStates[keyIndex]){

      // Key not currently pressed
      keyStates[keyIndex] = true;
      bleKeyboard.press(keyCodes[keyIndex]);

    }

  }
  else {

    // Button not pressed
    if (keyStates[keyIndex]){

      // Key currently pressed
      keyStates[keyIndex] = false;
      bleKeyboard.release(keyCodes[keyIndex]);

    }
  }

}
setup.ino
// Setup
void setup()
{

  // Set Inputs
  setInputs();

  // ESP32 BLE Keyboard
  bleKeyboard.begin();

}
——
People can contact us: https://www.donluc.com/?page_id=1927
Technology Experience
- Programming Language
- Single-Board Microcontrollers (PIC, Arduino, Raspberry Pi,Espressif, etc…)
- IoT
- Wireless (Radio Frequency, Bluetooth, WiFi, Etc…)
- Robotics
- Camera and Video Capture Receiver Stationary, Wheel/Tank and Underwater Vehicle
- Unmanned Vehicles Terrestrial and Marine
- Machine Learning
- RTOS
- Research & Development (R & D)
Instructor, E-Mentor, STEAM, and Arts-Based Training
- Programming Language
- IoT
- PIC Microcontrollers
- Arduino
- Raspberry Pi
- Espressif
- Robotics
Follow Us
Luc Paquin – Curriculum Vitae – 2023
https://www.donluc.com/luc/
Web: https://www.donluc.com/
Facebook: https://www.facebook.com/neosteam.labs.9/
YouTube: https://www.youtube.com/@thesass2063
Twitter: https://twitter.com/labs_steam
Pinterest: https://www.pinterest.com/NeoSteamLabs/
Instagram: https://www.instagram.com/neosteamlabs/
Don Luc
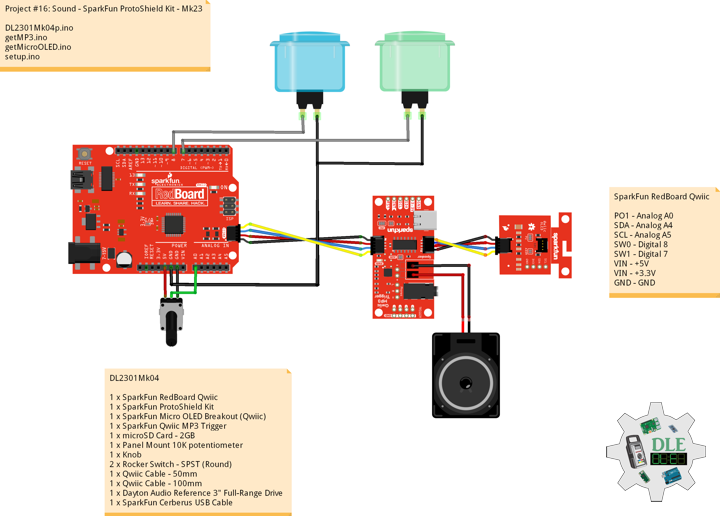
Project #16: Sound – SparkFun ProtoShield Kit – Mk23
——
#DonLucElectronics #DonLuc #Sound #Arduino #MicroOLED #ProtoShield #SparkFunQwiicMP3 #SparkFunRedBoardQwiic #Project #Programming #Electronics #Microcontrollers #Consultant
——
——
——
——
SparkFun ProtoShield Kit
The SparkFun ProtoShield Kit lets you customize your own Arduino shield using whatever circuit you can come up with and then test it to make sure everything is working the way it should. The SparkFun ProtoShield Kit is based off the Arduino R3’s footprint that allows you to easily incorporate it with favorite Arduino-based device.
One of our favorite features with this version of the ProtoShield Kit is the solderable-like breadboard prototyping area. Half of this area was designed with a breadboard in mind. On the underside of the shield you will be able to see open jumper pads between each through hole to make a connection like a breadboard. Once you add a component, simply add a solder jumper between holes to make a connection. For those that prefer the standard prototyping pads.
DL2301Mk04
1 x SparkFun RedBoard Qwiic
1 x SparkFun ProtoShield Kit
1 x SparkFun Micro OLED Breakout (Qwiic)
1 x SparkFun Qwiic MP3 Trigger
1 x microSD Card – 2GB
1 x Panel Mount 10K potentiometer
1 x Knob
2 x Rocker Switch – SPST (Round)
1 x Qwiic Cable – 50mm
1 x Qwiic Cable – 100mm
1 x Dayton Audio Reference 3″ Full-Range Drive
1 x SparkFun Cerberus USB Cable
——
SparkFun RedBoard Qwiic
PO1 – Analog A0
SDA – Analog A4
SCL – Analog A5
SW0 – Digital 8
SW1 – Digital 7
VIN – +5V
VIN – +3.3V
GND – GND
——
DL2301Mk04p.ino
/* ***** Don Luc Electronics © *****
Software Version Information
#16 - Sound - SparkFun ProtoShield Kit - Mk23
16-04
DL2301Mk04p.ino
1 x SparkFun RedBoard Qwiic
1 x SparkFun ProtoShield Kit
1 x SparkFun Micro OLED Breakout (Qwiic)
1 x SparkFun Qwiic MP3 Trigger
1 x microSD Card - 2GB
1 x Panel Mount 10K potentiometer
1 x Knob
2 x Rocker Switch - SPST (Round)
1 x Qwiic Cable - 50mm
1 x Qwiic Cable - 100mm
1 x Dayton Audio Reference 3" Full-Range Drive
1 x SparkFun Cerberus USB Cable
*/

// Include the Library Code
// Wire communicate with I2C / TWI devices
#include <Wire.h>
// SparkFun MP3 Trigger
#include "SparkFun_Qwiic_MP3_Trigger_Arduino_Library.h"
// SparkFun Micro OLED
#include <SFE_MicroOLED.h>

// SparkFun MP3 Trigger
MP3TRIGGER mp3;
int iSongCount = 0;
int x = 0;

// Volume
int iVolume = A0;
int iVolumeLevel = 0;

// EQ Setting Normal
byte bEQSetting = 0;

// Play Next
const int iPlayNext = 8;
// Variable for reading the iPlayNext status
int iPlayNextState = 0;

// Play Previous
const int iPlayPrevious = 7;
// Variable for reading the iPlayPrevious status
int iPlayPreviousState = 0;

// SparkFun Micro OLED
#define PIN_RESET 9
#define DC_JUMPER 1
// I2C declaration
MicroOLED oled(PIN_RESET, DC_JUMPER);

// iLED ProtoShield
int iLED = 13;

// Software Version Information
String sver = "16-23";

void loop()
{

  // SparkFun MP3 Trigger
  if (mp3.isPlaying() == false) {

    if ( x > iSongCount ) {

      x = 0;

    } else {

      x = x + 1;

    }

    // Play Track
    mp3.playTrack( x );

  } else {

    // Volume
    isVolume();

    // Play Next
    isPlayNext();

    // Play Previous
    isPlayPrevious();

  }

  // Micro OLED
  isMicroOLED();

}
getMP3.ino
// MP3
// Setup MP3
void isSetupMP3(){

  // Check to see if Qwiic MP3 is present on the bus
  if (mp3.begin() == false)
  {

    // Qwiic MP3 failed to respond. Please check wiring and possibly the I2C address. Freezing...
    while (1);

  }

  if (mp3.hasCard() == false)
  {

    // Qwiic MP3 is missing its SD card. Freezing...
    while (1);

  }

  // Song Count
  iSongCount = mp3.getSongCount();

  // EQ Setting
  // 0 Normal
  // 1 Pop
  // 2 Rock
  // 3 Jazz
  // 4 Classic
  // 5 Bass
  bEQSetting = 5;
  bEQSetting = mp3.getEQ();

  // Initialize the iPlayNext
  pinMode( iPlayNext, INPUT);

  // Initialize the iPlayPrevious
  pinMode( iPlayPrevious, INPUT);

}
// Volume
void isVolume() {

  // Volume
  iVolumeLevel = analogRead( iVolume );
  // (0-1023 for 10 bits or 0-4095 for 12 bits)
  iVolumeLevel = map(iVolumeLevel, 0, 1023, 0, 10);

  // Volume can be 0 (off) to 31 (max)
  // Volume can be 0 (off) to 10 (Breakfast)
  mp3.setVolume( iVolumeLevel );

}
// Play Next
void isPlayNext() {

  // Read the state of the iPlayNext value
  iPlayNextState = digitalRead( iPlayNext );

  if ( iPlayNextState == HIGH ) {

    mp3.stop();

    if ( x > iSongCount ) {

      x = 0;

    } else {

      x = x + 1;

    }

    // Play Track
    mp3.playTrack( x );

  }

}
// Play Previous
void isPlayPrevious() {

  // Read the state of the iPlayPrevious value
  iPlayPreviousState = digitalRead( iPlayPrevious );

  if ( iPlayPreviousState == HIGH ) {

    mp3.stop();

    if ( x > iSongCount ) {

      x = 0;

    } else {

      x = x - 1;

    }

    // Play Track
    mp3.playTrack( x );

  }

}
getMicroOLED.ino
// SparkFun Micro OLED
// Setup Micro OLED
void isSetupMicroOLED() {

  // Initialize the OLED
  oled.begin();
  // Clear the display's internal memory
  oled.clear(ALL);
  // Display what's in the buffer (splashscreen)
  oled.display();

  // Delay 1000 ms
  delay(1000);

  // Clear the buffer.
  oled.clear(PAGE);

}
// Micro OLED
void isMicroOLED() {

  // Text Display FreeIMU
  // Clear the display
  oled.clear(PAGE);
  // Set cursor to top-left
  oled.setCursor(0, 0);
  // Set font to type 0
  oled.setFontType(0);
  // Song
  oled.print("Song");
  // Song Name
  oled.setCursor(0, 13);
  String songName = mp3.getSongName();
  oled.print( songName );
  // Song Count
  oled.setCursor(0, 24);
  oled.print("Song Count");
  // Song Count
  oled.setCursor(0, 37);
  iSongCount = mp3.getSongCount();
  oled.print( iSongCount );
  oled.display();

}
setup.ino
// Setup
void setup()
{

  // Initialize digital pin iLED ProtoShield as an output
  pinMode(iLED, OUTPUT);
  // Turn the LED on (HIGH is the voltage level)
  digitalWrite(iLED, HIGH);

  // Wire communicate with I2C / TWI devices
  Wire.begin();

  // SparkFun MP3 Trigger Setup
  isSetupMP3();

  // Setup Micro OLED
  isSetupMicroOLED();

}
——
People can contact us: https://www.donluc.com/?page_id=1927
Technology Experience
- Programming Language
- Single-Board Microcontrollers (PIC, Arduino, Raspberry Pi,Espressif, etc…)
- IoT
- Wireless (Radio Frequency, Bluetooth, WiFi, Etc…)
- Robotics
- Camera and Video Capture Receiver Stationary, Wheel/Tank and Underwater Vehicle
- Unmanned Vehicles Terrestrial and Marine
- Machine Learning
- RTOS
- Research & Development (R & D)
Instructor, E-Mentor, STEAM, and Arts-Based Training
- Programming Language
- IoT
- PIC Microcontrollers
- Arduino
- Raspberry Pi
- Espressif
- Robotics
Follow Us
Luc Paquin – Curriculum Vitae – 2023
https://www.donluc.com/luc/
Web: https://www.donluc.com/
Facebook: https://www.facebook.com/neosteam.labs.9/
YouTube: https://www.youtube.com/@thesass2063
Twitter: https://twitter.com/labs_steam
Pinterest: https://www.pinterest.com/NeoSteamLabs/
Instagram: https://www.instagram.com/neosteamlabs/
Don Luc
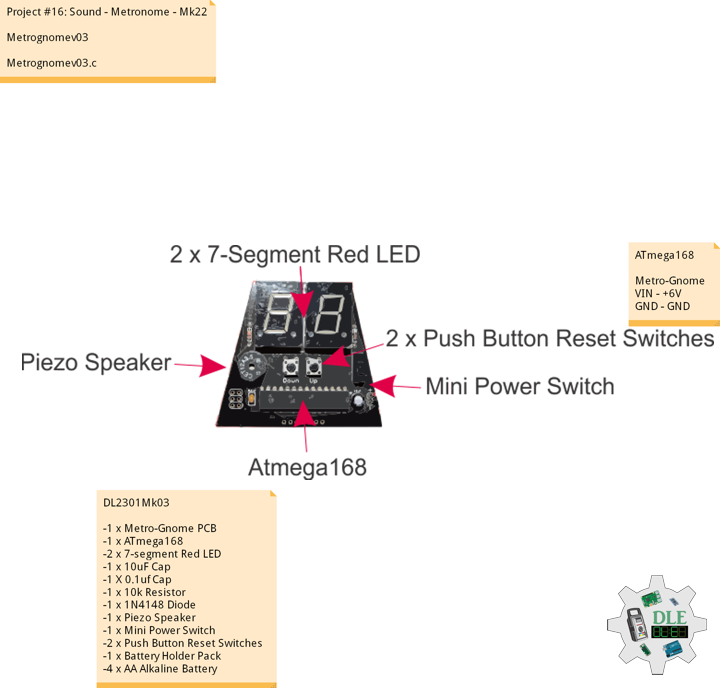
Project #16: Sound – Metronome – Mk22
——
#DonLucElectronics #DonLuc #Sound #Metronome #Project #Fritzing #Programming #Electronics #Microcontrollers #Consultant
——
——
——
——
Metronome
A metronome is a device that produces an audible click or other sound at a regular interval that can be set by the user, typically in Beats Per Minute (BPM). Metronomes may include synchronized visual motion. Musicians use the device to practise playing to a regular pulse. In the 20th century, electronic metronomes and software metronomes were invented.
Musicians practise with metronomes to improve their timing, especially the ability to stick to a regular tempo. Metronome practice helps internalize a clear sense of timing and tempo. Composers and conductors often use a metronome as a standard tempo reference, and may play, sing, or conduct to the metronome. The metronome is used by composers to derive beats per minute if they want to indicate that in a composition. Conductors use a metronome to note their preferred tempo in each section.
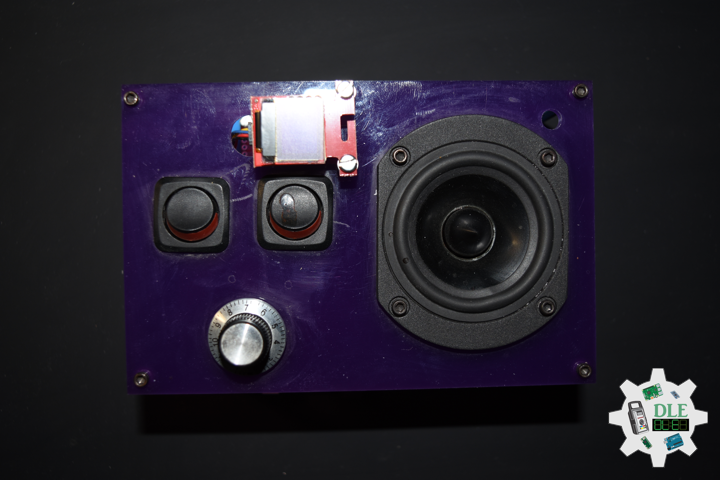
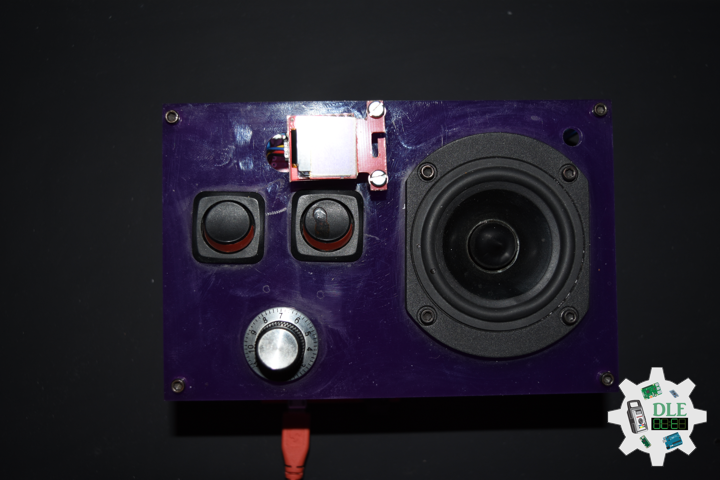
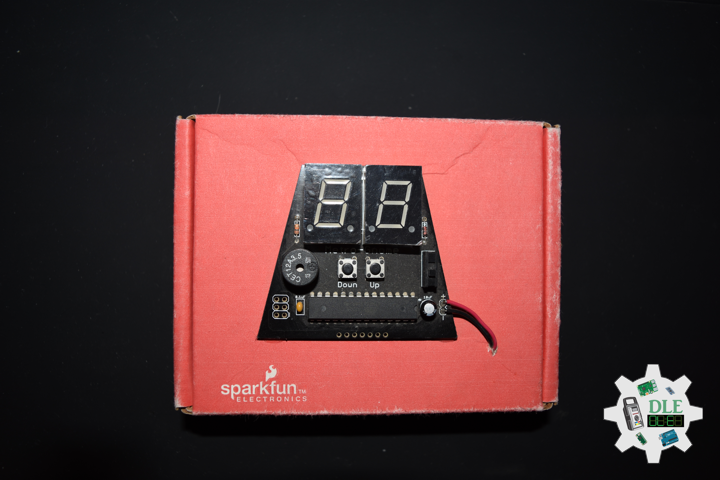
SparkFun Metro-Gnome
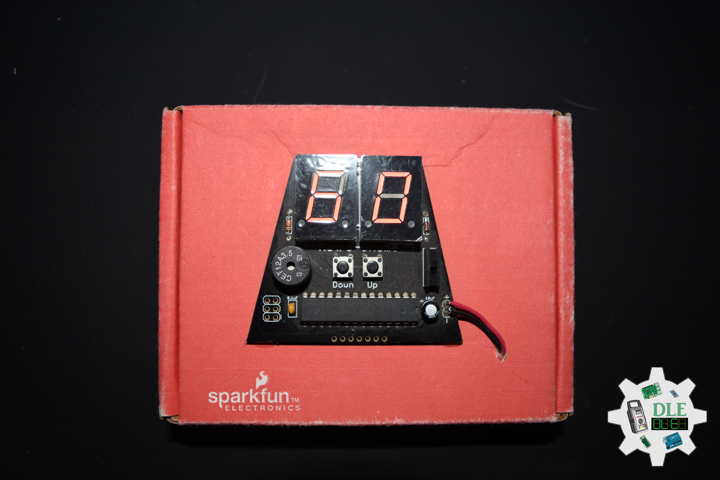
The SparkFun Metro-Gnome is a basic digital metronome used to keep time during music practice. This is a basic kit that goes together in 15-20 minutes for people learning to solder, and 5-10 minutes for those with a bit of experience.
DL2301Mk03
-1 x Metro-Gnome PCB
-1 x ATmega168
-2 x 7-Segment Red LED
-1 x 10uF Capacitor
-1 X 0.1uf Capacitor
-1 x 10k Resistor
-1 x 1N4148 Diode
-1 x Piezo Speaker
-1 x Mini Power Switch
-2 x Push Button Reset Switches
-1 x Battery Holder Pack
-4 x AA Alkaline Battery
ATmega168
Metro-Gnome
VIN – +6V
GND – GND
——
Metrognomev03
Metrognomev03.c
// Metronome-v03

#define F_CPU 1024000	// Adjust this to get the clock more precise

#include <avr/io.h>
#include <util/delay.h>
#include <avr/interrupt.h>

#define BUZZER1 	1
#define BUZZER1_PORT	PORTB
#define BUZZER2		2
#define BUZZER2_PORT	PORTB

#define sbi(port_name, pin_number)   (port_name |= 1<<pin_number)
#define cbi(port_name, pin_number)   ((port_name) &= (uint8_t)~(1 << pin_number))

uint16_t countUp = F_CPU/1024;		// Dividing clock by 1024
uint16_t speed = 60;		// Program initially runs at 60 BPM
uint8_t leftDisplay = 6;		// Initialize output to show 60 BPM
uint8_t rightDisplay = 0;

void ioinit();
void display(int digit, int number);

// Interrupt Timer 1 makes the buzzer tick at proper intervals
ISR(TIMER1_COMPA_vect)
{
	int buzzPeriod = 100;
	uint32_t buzzLength = 1000;

	while(1)
    {
		//Subtract the buzzPeriod from the overall length
		if(buzzPeriod > buzzLength) break;
		buzzLength -= buzzPeriod;

		if(buzzPeriod > buzzLength) break;
		buzzLength -= buzzPeriod;

		//Toggle the buzzer at various speeds
		PINB = 0b00000010;
		_delay_us(buzzPeriod);

		PINB = 0b00000100;
		_delay_us(buzzPeriod);
    }
}

// Interrupt Timer 2 checks for button presses
ISR(TIMER0_COMPA_vect)
{
	// Check down button
    if( (PINB & (1<<4)) == 0)
	{
		if (speed == 1)		// If speed = 1 go up to 299
		{
			speed = 299;
			rightDisplay = 9;
			leftDisplay = 9;
		}
		else if ((rightDisplay == 0) && (leftDisplay == 0))
		{
			rightDisplay = 9;
			leftDisplay = 9;
			speed--;
		}
		else if (rightDisplay == 0)
		{
			rightDisplay = 9;
			leftDisplay--;
			speed--;
		}
		else
		{
			rightDisplay--;
			speed--;
		}
		// Reset counter and adjust compare register
		TCNT1 = 0x00;
		OCR1A = (countUp*60)/speed;
	}
	// Check up button
	if((PINB & (1<<5)) == 0)
	{
		if (speed == 299)
		{
			speed = 1;
			rightDisplay = 1;
			leftDisplay = 0;
		}
		else if ((rightDisplay == 9) && (leftDisplay == 9))
		{
			rightDisplay = 0;
			leftDisplay = 0;
			speed++;
		}
		else if (rightDisplay == 9)
		{
			rightDisplay = 0;
			leftDisplay++;
			speed++;
		}
		else
		{
			rightDisplay++;
			speed++;
		}
		// Reset counter and adjust compare register
		TCNT1 = 0x00;
		OCR1A = (countUp*60)/speed;
	}
}

int main()
{
	int flag = 0;

	ioinit();

	while(1)	// Main loop PWM's the two displays at 1kHz
	{
		if (flag == 0)
		{
			cbi(PORTC, 1);	// Turn right display off
			display(0, leftDisplay);	// Output to left display
			flag = 1;
		}
		else
		{
			cbi(PORTC, 0);	// Turn left display off
			display(1, rightDisplay);	// Output to right display
			flag = 0;
		}
		_delay_us(10);
		PORTD = 0xFF;
		cbi(PORTC, 0);
		cbi(PORTC, 1);
		_delay_us(30);
	}

	return 0;
}

void ioinit()
{
	// set PORTB for Buzzer and buttons
	DDRB = DDRB | 0b00110110;
	PORTB = PORTB | 0b00110000;
	// set PORTC for DIGI select
	DDRC = 0b0000011;
	PINC = 0b0000011;
	// set PORTD for display
	DDRD = 0b11111111;

	// Set 16-bit Timer 1 for clicking
	TCCR1A = 0x00;
	TCCR1B = (_BV(WGM12) | _BV(CS12) | _BV(CS10));	// Divide clock by 1024, CTC mode
	OCR1A = (countUp*60)/speed;	// Set top of counter
	TIMSK1 = _BV(OCIE1A);	// Enable OCR1A interrupt

	// Set Timer 0 to check button press
	TCCR0A = _BV(WGM01);
	TCCR0B = _BV(CS00) | _BV(CS02);
	OCR0A = 100;		// OCCR0A can be adjusted to change the button debounce time
	TIMSK0 = _BV(OCIE0A);

	sei();	// Enable interrupts
}

// This will output the corresponding
// 'number' to digit 0 (left) or 1 (right)
void display(int digit, int number)
{
	//cbi(PORTC, digit);	// Ties display to ground

	if (digit == 0)
		sbi(PORTC, 0);	// Ties display to ground
	else if (digit == 1)
		sbi(PORTC, 1);

	switch(number)	// Set PIND, display pins, to correct output
	{
		case 0:
			PORTD = 0b11000000;
			break;
		case 1:
			PORTD = 0b11111001;
			break;
		case 2:
			PORTD = 0b10100100;
			break;
		case 3:
			PORTD = 0b10110000;
			break;
		case 4:
			PORTD = 0b10011001;
			break;
		case 5:
			PORTD = 0b10010010;
			break;
		case 6:
			PORTD = 0b10000010;
			break;
		case 7:
			PORTD = 0b11111000;
			break;
		case 8:
			PORTD = 0b10000000;
			break;
		case 9:
			PORTD = 0b10010000;
			break;
	}
	// Turn decimal point on if above 100 & 200
	if ((digit == 0) && (speed >= 200))
		cbi(PORTD, 7);
	if ((digit == 1) && (speed >= 100))
		cbi(PORTD, 7);
}
——
People can contact us: https://www.donluc.com/?page_id=1927
Technology Experience
- Programming Language
- Single-Board Microcontrollers (PIC, Arduino, Raspberry Pi,Espressif, etc…)
- IoT
- Wireless (Radio Frequency, Bluetooth, WiFi, Etc…)
- Robotics
- Camera and Video Capture Receiver Stationary, Wheel/Tank and Underwater Vehicle
- Unmanned Vehicles Terrestrial and Marine
- Machine Learning
- RTOS
- Research & Development (R & D)
Instructor, E-Mentor, STEAM, and Arts-Based Training
- Programming Language
- IoT
- PIC Microcontrollers
- Arduino
- Raspberry Pi
- Espressif
- Robotics
Follow Us
Luc Paquin – Curriculum Vitae – 2023
https://www.donluc.com/luc/
Web: https://www.donluc.com/
Facebook: https://www.facebook.com/neosteam.labs.9/
YouTube: https://www.youtube.com/@thesass2063
Twitter: https://twitter.com/labs_steam
Pinterest: https://www.pinterest.com/NeoSteamLabs/
Instagram: https://www.instagram.com/neosteamlabs/
Don Luc
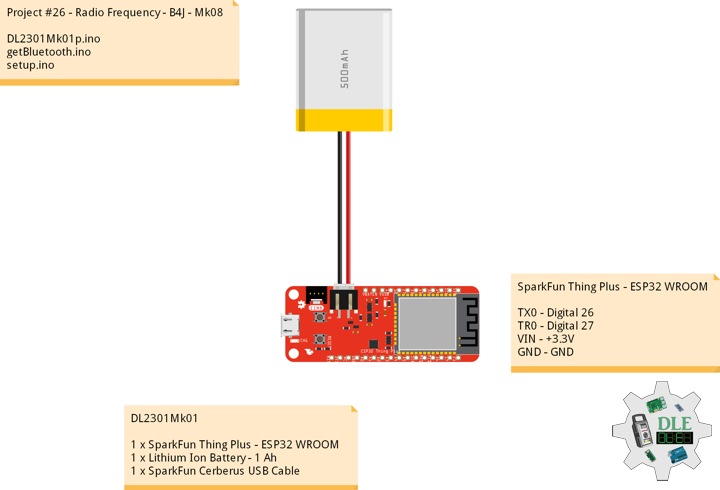
Project #26 – Radio Frequency – B4J – Mk08
——
#DonLucElectronics #DonLuc #RadioFrequency #B4J #Bluetooth #SparkFunThingPlusESP32WROOM #Arduino #Project #Fritzing #Programming #Electronics #Microcontrollers #Consultant
——
——
——
——
B4J
RAD development tool for cross platform desktop, server and IoT solutions. B4J is a 100% free development tool for desktop, server and IoT solutions. With B4J you can easily create desktop applications, console programs and server solutions. B4J apps can run on Windows, Mac, Linux and ARM boards such as Raspberry Pi. The compiled apps are standalone, without any external dependencies.
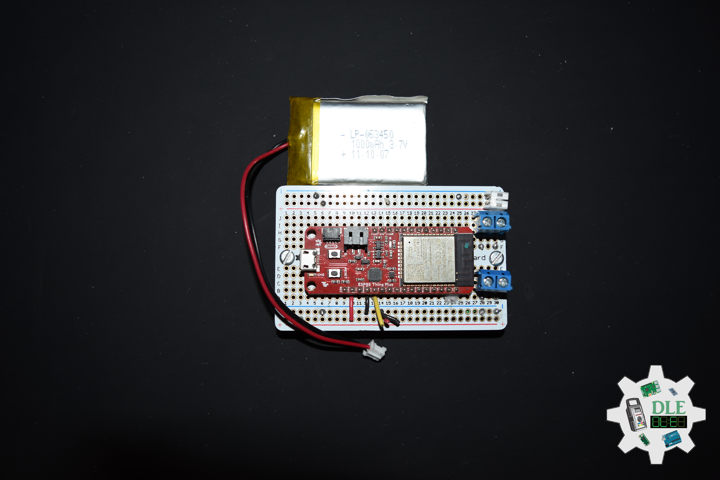
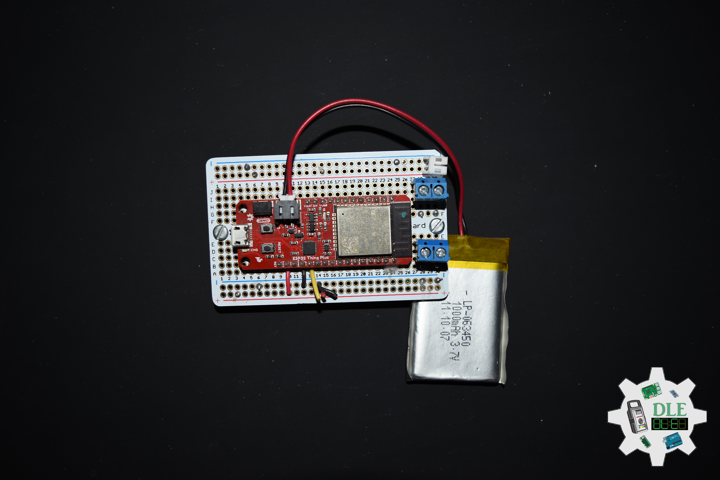
DL2301Mk01
1 x SparkFun Thing Plus – ESP32 WROOM
1 x Lithium Ion Battery – 1 Ah
1 x SparkFun Cerberus USB Cable
SparkFun Thing Plus – ESP32 WROOM
TX0 – Digital 26
TR0 – Digital 27
VIN – +3.3V
GND – GND
DL2301Mk01p.ino
/* ***** Don Luc Electronics © *****
Software Version Information
Project #26 - Radio Frequency - B4J - Mk08
26-08
DL2301Mk01p.ino
1 x SparkFun Thing Plus - ESP32 WROOM
1 x GPS Receiver - GP-20U7 (56 Channel)
1 x Lithium Ion Battery - 1 Ah
1 x SparkFun Cerberus USB Cable
*/

// Include the Library Code
// Bluetooth Serial (ESP32SPP)
#include "BluetoothSerial.h"

// Bluetooth Serial (ESP32SPP)
BluetoothSerial SerialBT;

// Software Version Information
String sver = "26-08";

void loop() {

  // Bluetooth Serial (ESP32SPP)
  isBluetooth();

}
getBluetooth.ino
// Bluetooth
// isBluetooth
void isBluetooth() {

  // Input
  byte inputFromOtherSide;

  // Bluetooth Serial (ESP32SPP)
  if (SerialBT.available()) {

    // Input Read
    inputFromOtherSide = SerialBT.read();
    // Write
    SerialBT.write(inputFromOtherSide);

  }

}
setup.ino
// Setup
void setup()
{

  // Bluetooth Serial (ESP32SPP)
  SerialBT.begin("DLE");

  // Delay
  delay(1000);

}
——
B4J – Bluetooth
Bluetooth.b4j
#Region  Project Attributes

	' Form Width and Form Height
	#MainFormWidth: 600
	#MainFormHeight: 400

#End Region

Sub Process_Globals

	'Java OpenJDK 11
	Private fx As JFX
	' MainForm => Form
	Private MainForm As Form
	' Button
	Private btnConnect As Button
	Private btnSearch As Button
	Private btnSend As Button
	' List View
	Private ListView1 As ListView
	' Text Field
	Private txtInput As TextField
	' Text Area
	Private txtLog As TextArea

	' Bluetooth
	Private bt As Bluetooth
	' Async Streams
	Private astream As AsyncStreams
	' Boolean
	Private connected As Boolean
	Private searchingForDevices As Boolean
	' Bluetooth Connection
	Private currentConnection As BluetoothConnection

	' Map
	Private foundDevices As Map
	' Button
	Private btnDisconnect As Button
	' Label
	Private lblConnectionState As Label
	Private lblSearchState As Label
	' Image View
	Private ImageView1 As ImageView

End Sub

Sub AppStart (Form1 As Form, Args() As String)

	' App Start => MainForm = Form1
	MainForm = Form1
	MainForm.SetFormStyle("UNIFIED")
	' Load the layout file.
	MainForm.RootPane.LoadLayout("1")
	' Show
	MainForm.Show
	' Bluetooth
	bt.Initialize("bt")
	foundDevices.Initialize
	If bt.IsEnabled Then
		bt.Listen
	End If
	' Update State
	UpdateState

End Sub

Private Sub UpdateState

	' Update State
	If bt.IsEnabled = False Then

		' No Bluetooth
		lblSearchState.Text = "Bluetooth not available"
		For Each n As Node In MainForm.RootPane
			n.Enabled = False
		Next

	Else

		' Bluetooth
		' Button
		btnSearch.Enabled = Not(searchingForDevices)
		btnConnect.Enabled = Not(connected) And ListView1.SelectedIndex > -1
		txtInput.Enabled = connected
		btnSend.Enabled = connected
		btnDisconnect.Enabled = connected

		' State => Connected or Disconnected
		Dim state As String
		If connected Then
			state = "Connected: " & currentConnection.Name
		Else
			state = "Disconnected"
		End If
		' Label
		lblConnectionState.Text = state
		lblSearchState.Text = "Searching..."
		lblSearchState.Visible = searchingForDevices

	End If

End Sub


Private Sub btnSearch_Action

	' Button
	' Search Boolean
	Dim res As Boolean = bt.StartDiscovery
	If res Then

		' Searching For Devices
		searchingForDevices = True
		' List View
		ListView1.Items.Clear
		' Update State
		UpdateState

	Else

		' Error
		Log("Error starting discovery")

	End If

End Sub

Private Sub bt_DeviceFound (Name As String, MacAddress As String)

	' Button
	' Device Found => Description
	Dim description As String = Name & ": " & MacAddress
	' List View
	ListView1.Items.Add(description)
	' Found Devices
	foundDevices.Put(description, MacAddress)

End Sub

Private Sub bt_DiscoveryFinished

	' Button
	' Discovery Finished
	searchingForDevices = False
	' Update State
	UpdateState

End Sub

Private Sub btnConnect_Action

	' Button
	' Connect
	Dim address As String = foundDevices.Get(ListView1.SelectedItem)
	' Bluetooth
	bt.Connect(address)

End Sub

Private Sub bt_Connected (Success As Boolean, connection As BluetoothConnection)

	' Button
	Log($"Connected, success=${Success}"$)
	' Success
	If Success Then

		' Connection
		currentConnection = connection
		connected = True
		' AStream
		If astream.IsInitialized Then astream.Close
		astream.InitializePrefix(connection.InputStream, True, connection.OutputStream, "AStream")

	End If
	' Bluetooth Listen
	bt.Listen
	' Update State
	UpdateState

End Sub

Sub AStream_NewData (Buffer() As Byte)

	' AStream New Data
	' You => Arduino
	LogMessage("You", BytesToString(Buffer, 0, Buffer.Length, "UTF8"))

End Sub


Sub AStream_Error

	' AStream Error
	connected = False
	' Update State
	UpdateState

End Sub

Sub AStream_Terminated

	' AStream Terminated
	AStream_Error

End Sub

Private Sub txtInput_Action

	' Button Send
	btnSend_Action

End Sub

Private Sub btnSend_Action

	' Button Send
	If txtInput.Text.Length > 0 Then

		' AStream
		' Me => B4J
		LogMessage("Me", txtInput.Text)
		' AStream Write
		astream.Write(txtInput.Text.GetBytes("utf8"))
		txtInput.Text = ""

	End If

End Sub

Private Sub LogMessage(From As String, Msg As String)

	' Log Message
	txtLog.Text = txtLog.Text & From & ": " & Msg & CRLF
	txtLog.SetSelection(txtLog.Text.Length, txtLog.Text.Length)

End Sub

Private Sub ListView1_SelectedIndexChanged(Index As Int)

	' Update State
	UpdateState

End Sub

Private Sub btnDisconnect_Action

	' Bluetooth Disconnect
	currentConnection.Disconnect
	' AStream Close
	If astream.IsInitialized Then astream.Close
	connected = False
	' Update State
	UpdateState

End Sub
——
People can contact us: https://www.donluc.com/?page_id=1927
Technology Experience
- Programming Language
- Single-Board Microcontrollers (PIC, Arduino, Raspberry Pi,Espressif, etc…)
- IoT
- Wireless (Radio Frequency, Bluetooth, WiFi, Etc…)
- Robotics
- Camera and Video Capture Receiver Stationary, Wheel/Tank and Underwater Vehicle
- Unmanned Vehicles Terrestrial and Marine
- Machine Learning
- RTOS
- Research & Development (R & D)
Instructor, E-Mentor, STEAM, and Arts-Based Training
- Programming Language
- IoT
- PIC Microcontrollers
- Arduino
- Raspberry Pi
- Espressif
- Robotics
Follow Us
Luc Paquin – Curriculum Vitae – 2022
https://www.donluc.com/luc/
Web: https://www.donluc.com/
Facebook: https://www.facebook.com/neosteam.labs.9/
YouTube: https://www.youtube.com/@thesass2063
Twitter: https://twitter.com/labs_steam
Pinterest: https://www.pinterest.com/NeoSteamLabs/
Instagram: https://www.instagram.com/neosteamlabs/
Don Luc
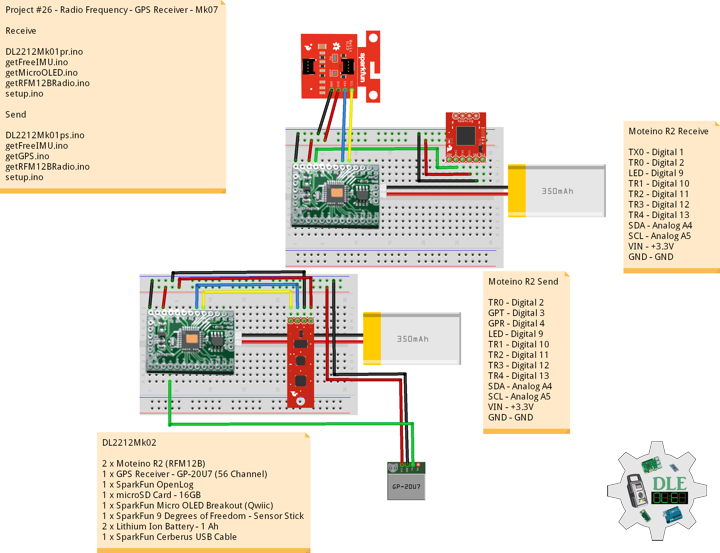
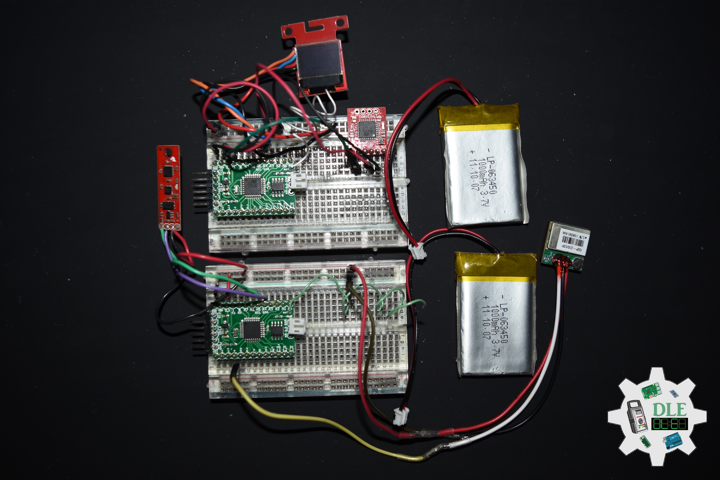
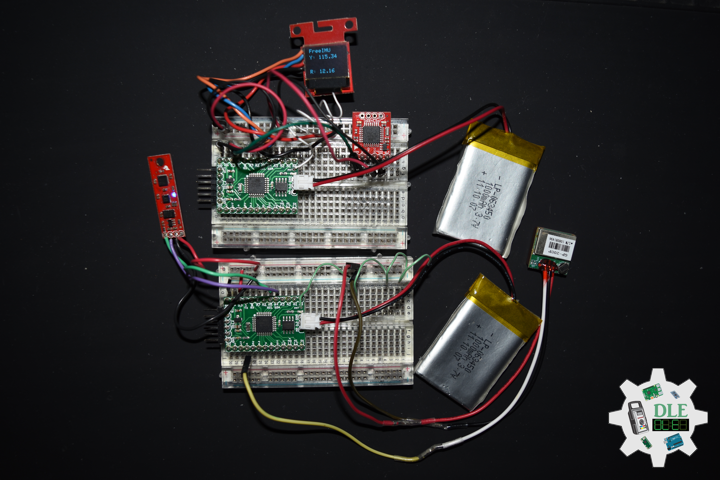
Project #26 – Radio Frequency – GPS Receiver – Mk07
——
#DonLucElectronics #DonLuc #RadioFrequency #Moteino #Send #Receive #GPSReceiver #OpenLog #Display #FreeIMU #Magnetometer #Accelerometer #Gyroscope #Arduino #Project #Fritzing #Programming #Electronics #Microcontrollers #Consultant
——
——
——
——
GPS Receiver – GP-20U7 (56 Channel)
The GP-20U7 is a compact GPS receiver with a built-in high performances all-in-one GPS chipset. The GP-20U7 accurately provides position, velocity, and time readings as well possessing high sensitivity and tracking capabilities. Thanks to the low power consumption this receiver requires, the GP-20U7 is ideal for portable applications such as tablet PCs, smart phones, and other devices requiring positioning capability.
This 56-channel GPS module, that supports a standard NMEA-0183 and uBlox 7 protocol, has low power consumption of 40mA@3.3V (Max), an antenna on board, and -162dBm tracking sensitivity. With 56 channels in search mode and 22 channels “All-In-View” tracking, the GP-20U7 is quite the work horse for its size.
DL2212Mk02
2 x Moteino R2 (RFM12B)
1 x GPS Receiver – GP-20U7 (56 Channel)
1 x SparkFun OpenLog
1 x microSD Card – 16GB
1 x SparkFun Micro OLED Breakout (Qwiic)
1 x SparkFun 9 Degrees of Freedom – Sensor Stick
2 x Lithium Ion Battery – 1 Ah
1 x SparkFun Cerberus USB Cable
Moteino R2 (Receive)
TX0 – Digital 1
TR0 – Digital 2
LED – Digital 9
TR1 – Digital 10
TR2 – Digital 11
TR3 – Digital 12
TR4 – Digital 13
SDA – Analog A4
SCL – Analog A5
VIN – +3.3V
GND – GND
——
DL2212Mk02pr.ino
/* ***** Don Luc Electronics © *****
Software Version Information
Project #26 - Radio Frequency - GPS Receiver - Mk07
26-07
Receive
DL2212Mk02pr.ino
2 x Moteino R2 (RFM12B)
1 x GPS Receiver - GP-20U7 (56 Channel)
1 x SparkFun OpenLog
1 x microSD Card - 16GB
1 x SparkFun Micro OLED Breakout (Qwiic)
1 x SparkFun 9 Degrees of Freedom - Sensor Stick
2 x Lithium Ion Battery - 1Ah
1 x SparkFun Cerberus USB Cable
*/

// Include the Library Code
// RFM12B Radio
#include <RFM12B.h>
// Two Wire Interface (TWI/I2C)
#include <Wire.h>
// SparkFun Micro OLED
#include <SFE_MicroOLED.h>

// You will need to initialize the radio by telling it what ID
// it has and what network it's on
// The NodeID takes values from 1-127, 0 is reserved for sending
// broadcast messages (send to all nodes)
// The Network ID takes values from 0-255
// By default the SPI-SS line used is D10 on Atmega328.
// You can change it by calling .SetCS(pin) where pin can be {8,9,10}
// Network ID used for this unit
#define NODEID        1
// The network ID we are on
#define NETWORKID    99
// Serial
#define SERIAL_BAUD  115200

// Encryption is OPTIONAL
// to enable encryption you will need to:
// - provide a 16-byte encryption KEY (same on all nodes that talk encrypted)
// - to call .Encrypt(KEY) to start encrypting
// - to stop encrypting call .Encrypt(NULL)
uint8_t KEY[] = "ABCDABCDABCDABCD";

// Need an instance of the RFM12B Radio Module
RFM12B radio;

// Process Message
// Message
String msg = "";
int firstClosingBracket = 0;
// Yaw Pitch Roll
String sYaw = "";
String sPitch = "";
String sRoll = "";
float Yaw = 0;
float Pitch = 0;
float Roll = 0;

// LED
int iLED = 9;

// SparkFun Micro OLED
#define PIN_RESET 9
#define DC_JUMPER 1
// I2C declaration
MicroOLED oled(PIN_RESET, DC_JUMPER);

// Software Version Information
String sver = "26-07";

void loop() {

  // is RFM12B Radio
  isRFM12BRadio();

  // Micro OLED
  isMicroOLED();

}
getFreeIMU.ino
// FreeIMU
// isFreeIMU
void isFreeIMU(){

  // FreeIMU
  // msg = "<IMU|Yaw|Pitch|Roll|GPS Status|Latitude|Longitude|Date|Time|*"
  // msg = "<IMU|" + sYaw + "|" + sPitch + "|" + sRoll + "|" + GPSSt
  // + "|" + TargetLat + "|" TargetLon + "|" + TargetDat +"|" + TargetTim + "|*"
  firstClosingBracket = 0;
  // "<IMU|"
  firstClosingBracket = msg.indexOf('|');
  msg.remove(0, 5);
  // Yaw
  firstClosingBracket = msg.indexOf('|');
  sYaw = msg;
  sYaw.remove(firstClosingBracket);
  Yaw = sYaw.toFloat();
  // Pitch
  firstClosingBracket = firstClosingBracket + 1;
  msg.remove(0, firstClosingBracket );
  firstClosingBracket = msg.indexOf('|');
  sPitch = msg;
  sPitch.remove(firstClosingBracket);
  Pitch = sPitch.toFloat();
  // Roll
  firstClosingBracket = firstClosingBracket + 1;
  msg.remove(0, firstClosingBracket );
  firstClosingBracket = msg.indexOf('|');
  sRoll = msg;
  sRoll.remove(firstClosingBracket);
  Roll = sRoll.toFloat();

}
getMicroOLED.ino
// SparkFun Micro OLED
// Setup Micro OLED
void isSetupMicroOLED() {

  // Initialize the OLED
  oled.begin();
  // Clear the display's internal memory
  oled.clear(ALL);
  // Display what's in the buffer (splashscreen)
  oled.display();

  // Delay 1000 ms
  delay(1000);

  // Clear the buffer.
  oled.clear(PAGE);

}
// Micro OLED
void isMicroOLED() {

  // Text Display FreeIMU
  // Clear the display
  oled.clear(PAGE);
  // Set cursor to top-left
  oled.setCursor(0, 0);
  // Set font to type 0
  oled.setFontType(0);
  // FreeIMU
  oled.print("FreeIMU");
  oled.setCursor(0, 12);
  // Yaw
  oled.print("Y: ");
  oled.print(Yaw);
  oled.setCursor(0, 25);
  // Pitch
  oled.print("P: ");
  oled.print(Pitch);
  oled.setCursor(0, 39);
  // Roll
  oled.print("R: ");
  oled.print(Roll);
  oled.display();

}
getRFM12BRadio.ino
// RFM12B Radio
void isSetupRFM12BRadio()
{

  // RFM12B Radio
  radio.Initialize(NODEID, RF12_433MHZ, NETWORKID);
  // Encryption
  radio.Encrypt(KEY);
  // Transmitting

}
// is RFM12 BRadio
void isRFM12BRadio()
{

  // Receive
  if (radio.ReceiveComplete())
  {

    // CRC Pass
    if (radio.CRCPass())
    {

      // Message
      msg = "";

      // Can also use radio.GetDataLen() if you don't like pointers
      for (byte i = 0; i < *radio.DataLen; i++)
      {

       //Serial.print((char)radio.Data[i]);
        msg = msg + (char)radio.Data[i];

      }

      // Serial
      Serial.println( msg );

      // Turn the LED on HIGH
      digitalWrite( iLED , HIGH);

      // FreeIMU
      // Yaw Pitch Roll
      isFreeIMU();

      // ACK Requested
      if (radio.ACKRequested())
      {

        // Send ACK
        radio.SendACK();

      }

      // Turn the LED on LOW
      digitalWrite( iLED , LOW);

    }
    else
    {

      // BAD-CRC

    }

  }

}
setup.ino
// Setup
void setup()
{

  // Serial
  Serial.begin(SERIAL_BAUD);

  // Give display time to power on
  delay(100);

  // Set up I2C bus
  Wire.begin();

  // Setup Micro OLED
  isSetupMicroOLED();

  // LED
  pinMode( iLED , OUTPUT);

  // RFM12B Radio
  isSetupRFM12BRadio();

}
——
Moteino R2 (Send)
TR0 – Digital 2
GPT – Digital 3
GPR – Digital 4
LED – Digital 9
TR1 – Digital 10
TR2 – Digital 11
TR3 – Digital 12
TR4 – Digital 13
SDA – Analog A4
SCL – Analog A5
VIN – +3.3V
GND – GND
——
DL2212Mk02ps.ino
/* ***** Don Luc Electronics © *****
Software Version Information
Project #26 - Radio Frequency - GPS Receiver - Mk07
26-07
Send
DL2212Mk02ps.ino
2 x Moteino R2 (RFM12B)
1 x GPS Receiver - GP-20U7 (56 Channel)
1 x SparkFun OpenLog
1 x microSD Card - 16GB
1 x SparkFun Micro OLED Breakout (Qwiic)
1 x SparkFun 9 Degrees of Freedom - Sensor Stick
2 x Lithium Ion Battery - 1Ah
1 x SparkFun Cerberus USB Cable
*/

// Include the Library Code
// RFM12B Radio
#include <RFM12B.h>
// Sleep
#include <avr/sleep.h>
// Two Wire Interface (TWI/I2C)
#include <Wire.h>
// Includes and variables for IMU integration
// Accelerometer
#include <ADXL345.h>
// Magnetometer
#include <HMC58X3.h>
// MEMS Gyroscope
#include <ITG3200.h>
// Debug
#include "DebugUtils.h"
// FreeIMU
#include <CommunicationUtils.h>
#include <FreeIMU.h>
// GPS Receiver
#include <TinyGPS++.h>
// Software Serial
#include <SoftwareSerial.h>

// You will need to initialize the radio by telling it what ID
// it has and what network it's on
// The NodeID takes values from 1-127, 0 is reserved for sending
// broadcast messages (send to all nodes)
// The Network ID takes values from 0-255
// By default the SPI-SS line used is D10 on Atmega328.
// You can change it by calling .SetCS(pin) where pin can be {8,9,10}
// Network ID used for this unit
#define NODEID        2
// The network ID we are on
#define NETWORKID    99
// The node ID we're sending to
#define GATEWAYID     1
// # of ms to wait for an ack
#define ACK_TIME     50
// Serial
#define SERIAL_BAUD  115200

// Encryption is OPTIONAL
// to enable encryption you will need to:
// - provide a 16-byte encryption KEY (same on all nodes that talk encrypted)
// - to call .Encrypt(KEY) to start encrypting
// - to stop encrypting call .Encrypt(NULL)
uint8_t KEY[] = "ABCDABCDABCDABCD";

// Wait this many ms between sending packets
int interPacketDelay = 1000;
// Input
char input = 0;

// Need an instance of the RFM12B Radio Module
RFM12B radio;
// Send Size
byte sendSize = 0;
// Payload
char payload[100];
// Request ACK
bool requestACK = false;

// LED
int iLED = 9;

// Set the FreeIMU object
FreeIMU my3IMU = FreeIMU();

// Yaw Pitch Roll
String zzzzzz = "";
String sYaw = "";
String sPitch = "";
String sRoll = "";
float ypr[3];
float Yaw = 0;
float Pitch = 0;
float Roll = 0;

// GPS Receiver
#define gpsRXPIN 4
// This one is unused and doesnt have a conection
#define gpsTXPIN 3
// The TinyGPS++ object
TinyGPSPlus gps;
// Latitude
float TargetLat;
String sLat = "";
// Longitude
float TargetLon;
String sLon = "";
// GPS Date, Time
// GPS Date
String TargetDat;
// GPS Time
String TargetTim;
// GPS Status
String GPSSt = "";

// The serial connection to the GPS device
SoftwareSerial tGPS(gpsRXPIN, gpsTXPIN);

// Software Version Information
String sver = "26-07";

void loop()
{

  // isGPS
  isGPS();

  // isFreeIMU
  isFreeIMU();

  // is RFM12B Radio
  isRFM12BRadio();

  // Inter Packet Delay
  delay(interPacketDelay);

}
getFreeIMU.ino
// FreeIMU
// isFreeIMU
void isFreeIMU(){

  // FreeIMU
  // Yaw Pitch Roll
  my3IMU.getYawPitchRoll(ypr);
  // Yaw
  Yaw = ypr[0];
  // Pitch
  Pitch = ypr[1];
  // Roll
  Roll = ypr[2];

}
getGPS.ino
// GPS Receiver
// Setup GPS
void setupGPS() {

  // Setup GPS
  tGPS.begin( 9600 );

}
// isGPS
void isGPS(){

  // Receives NEMA data from GPS receiver
  // This sketch displays information every time a new sentence is correctly encoded
  while ( tGPS.available() > 0)

    if (gps.encode( tGPS.read() ))
    {

       // GPS Vector Pointer Target
       displayInfo();
       // GPS Date, Time
       displayDTS();

    }

  if (millis() > 5000 && gps.charsProcessed() < 10)
  {

     while(true);

  }

}
// GPS Vector Pointer Target
void displayInfo(){

  // Location
  if (gps.location.isValid())
  {

     // Latitude
     TargetLat = gps.location.lat();
     // Longitude
     TargetLon = gps.location.lng();
     // GPS Status 2
     GPSSt = "Yes";

  }
  else
  {

     // GPS Status 0
     GPSSt = "No";

  }

}
// GPS Date, Time
void displayDTS(){

  // Date
  TargetDat = "";
  if (gps.date.isValid())
  {

     // Date
     // Year
     TargetDat += String(gps.date.year(), DEC);
     TargetDat += "/";
     // Month
     TargetDat += String(gps.date.month(), DEC);
     TargetDat += "/";
     // Day
     TargetDat += String(gps.date.day(), DEC);

  }

  // Time
  TargetTim = "";
  if (gps.time.isValid())
  {

     // Time
     // Hour
     TargetTim += String(gps.time.hour(), DEC);
     TargetTim += ":";
     // Minute
     TargetTim += String(gps.time.minute(), DEC);
     TargetTim += ":";
     // Secound
     TargetTim += String(gps.time.second(), DEC);

  }

}
getRFM12BRadio.ino
// RFM12B Radio
void isSetupRFM12BRadio(){

  // RFM12B Radio
  radio.Initialize(NODEID, RF12_433MHZ, NETWORKID);
  // Encryption
  radio.Encrypt(KEY);
  // Sleep right away to save power
  radio.Sleep();
  // Transmitting
  Serial.println("Transmitting...\n\n");

}
// is RFM12 BRadio
void isRFM12BRadio(){

  // sYaw, sPitch, sRoll ""
  sYaw = "";
  sPitch = "";
  sRoll = "";
  // Latitude and Longitude
  sLat = "";
  sLon = "";

  // sYaw, sPitch, sRoll concat
  sYaw.concat(Yaw);
  sPitch.concat(Pitch);
  sRoll.concat(Roll);

  // Latitude and Longitude
  sLat.concat( TargetLat );
  sLon.concat( TargetLon );

  // zzzzzz ""
  zzzzzz = "";

  // zzzzzz = "<IMU|Yaw|Pitch|Roll|GPS Status|Latitude|Longitude|Date|Time|*"
  // zzzzzz = "<IMU|" + sYaw + "|" + sPitch + "|" + sRoll + "|" + GPSSt
  // + "|" + TargetLat + "|" TargetLon + "|" + TargetDat +"|" + TargetTim + "|*"
  zzzzzz = "<IMU|" + sYaw + "|" + sPitch + "|" + sRoll + "|" + GPSSt + "|"
  + sLat + "|" + sLon + "|" + TargetDat + "|" + TargetTim + "|*";

  // sendSize Length
  sendSize = zzzzzz.length();

  // sendSize
  payload[sendSize];

  // sendSize, charAt
  for(byte i = 0; i < sendSize+1; i++){

    payload[i] = zzzzzz.charAt(i);

  }

  // payload
  Serial.print(payload);

  // Request ACK
  requestACK = sendSize;

  // Wakeup
  radio.Wakeup();

  // Turn the LED on HIGH
  digitalWrite( iLED , HIGH);

  // Send
  radio.Send(GATEWAYID, payload, sendSize, requestACK);

  // Request ACK
  if (requestACK)
  {

    Serial.print(" - waiting for ACK...");
    if (waitForAck()){

      Serial.print("Ok!");

    }
    else Serial.print("nothing...");

  }

  // Turn the LED on LOW
  digitalWrite( iLED , LOW);

  // Sleep
  radio.Sleep();

  // Serial
  Serial.println();

}
// Wait a few milliseconds for proper ACK, return true if received
static bool waitForAck(){

  // Now
  long now = millis();

  // ACK
  while (millis() - now <= ACK_TIME){


    if (radio.ACKReceived(GATEWAYID)){

      return true;

    }

  }

  return false;

}
setup.ino
// Setup
void setup(){

  // Serial
  Serial.begin(SERIAL_BAUD);

  // GPS Receiver
  // Setup GPS
  setupGPS();

  // LED
  pinMode( iLED , OUTPUT);

  // Set up I2C bus
  Wire.begin();

  // RFM12B Radio
  isSetupRFM12BRadio();

  // Pause
  delay(5);
  // Initialize IMU
  my3IMU.init();
  // Pause
  delay(5);

}
——
People can contact us: https://www.donluc.com/?page_id=1927
Technology Experience
- Programming Language
- Single-Board Microcontrollers (PIC, Arduino, Raspberry Pi,Espressif, etc…)
- IoT
- Wireless (Radio Frequency, Bluetooth, WiFi, Etc…)
- Robotics
- Camera and Video Capture Receiver Stationary, Wheel/Tank and Underwater Vehicle
- Unmanned Vehicles Terrestrial and Marine
- Machine Learning
- RTOS
- Research & Development (R & D)
Instructor, E-Mentor, STEAM, and Arts-Based Training
- Programming Language
- IoT
- PIC Microcontrollers
- Arduino
- Raspberry Pi
- Espressif
- Robotics
Follow Us
Luc Paquin – Curriculum Vitae – 2023
https://www.donluc.com/luc/
Web: https://www.donluc.com/
Facebook: https://www.facebook.com/neosteam.labs.9/
YouTube: https://www.youtube.com/@thesass2063
Twitter: https://twitter.com/labs_steam
Pinterest: https://www.pinterest.com/NeoSteamLabs/
Instagram: https://www.instagram.com/neosteamlabs/
Don Luc
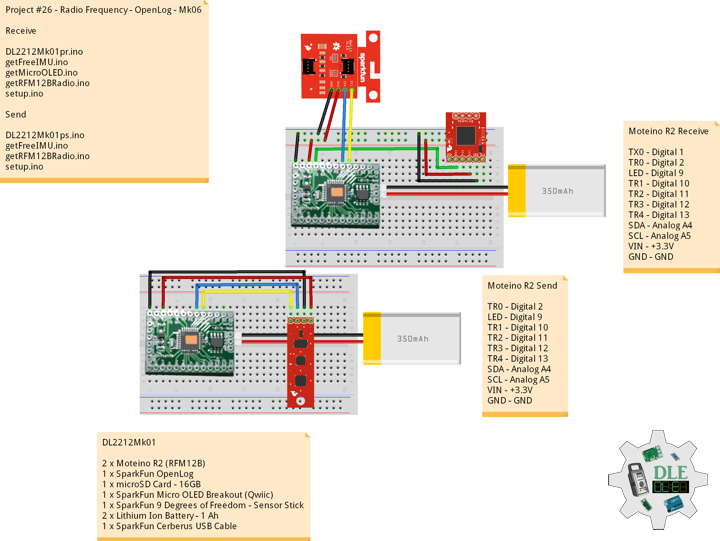
Project #26 – Radio Frequency – OpenLog – Mk06
——
#DonLucElectronics #DonLuc #RadioFrequency #Moteino #Send #Receive #OpenLog #Display #FreeIMU #Magnetometer #Accelerometer #Gyroscope #Arduino #Project #Fritzing #Programming #Electronics #Microcontrollers #Consultant
——
——
——
——
SparkFun OpenLog
The SparkFun OpenLog is an open source data logger that works over a simple serial connection and supports microSD cards up to 32GB. The OpenLog can store or “Log” huge amounts of serial data and act as a black box of sorts to store all the serial data that your project generates, for scientific or debugging purposes.
The SparkFun OpenLog uses an ATmega328 running at 16MHz thanks to the onboard resonator. The OpenLog draws approximately 2-3mA in idle mode. During a full record OpenLog can draw 10 to 20mA depending on the microSD card being used.
All data logged by the OpenLog is stored on the microSD card. Any 512MB to 32GB microSD card should work. OpenLog supports both FAT16 and FAT32 SD formats.
DL2212Mk01
2 x Moteino R2 (RFM12B)
1 x SparkFun OpenLog
1 x microSD Card – 16GB
1 x SparkFun Micro OLED Breakout (Qwiic)
1 x SparkFun 9 Degrees of Freedom – Sensor Stick
2 x Lithium Ion Battery – 1 Ah
1 x SparkFun Cerberus USB Cable
Moteino R2 (Receive)
TX0 – Digital 1
TR0 – Digital 2
LED – Digital 9
TR1 – Digital 10
TR2 – Digital 11
TR3 – Digital 12
TR4 – Digital 13
SDA – Analog A4
SCL – Analog A5
VIN – +3.3V
GND – GND
——
DL2212Mk01pr.ino
/* ***** Don Luc Electronics © *****
Software Version Information
Project #26 - Radio Frequency - OpenLog - Mk06
26-06
Receive
DL2212Mk01pr.ino
2 x Moteino R2 (RFM12B)
1 x SparkFun OpenLog
1 x microSD Card - 16GB
1 x SparkFun Micro OLED Breakout (Qwiic)
1 x SparkFun 9 Degrees of Freedom - Sensor Stick
2 x Lithium Ion Battery - 1Ah
1 x SparkFun Cerberus USB Cable
*/

// Include the Library Code
// RFM12B Radio
#include <RFM12B.h>
// Two Wire Interface (TWI/I2C)
#include <Wire.h>
// SparkFun Micro OLED
#include <SFE_MicroOLED.h>

// You will need to initialize the radio by telling it what ID
// it has and what network it's on
// The NodeID takes values from 1-127, 0 is reserved for sending
// broadcast messages (send to all nodes)
// The Network ID takes values from 0-255
// By default the SPI-SS line used is D10 on Atmega328.
// You can change it by calling .SetCS(pin) where pin can be {8,9,10}
// Network ID used for this unit
#define NODEID        1
// The network ID we are on
#define NETWORKID    99
// Serial
#define SERIAL_BAUD  115200

// Encryption is OPTIONAL
// to enable encryption you will need to:
// - provide a 16-byte encryption KEY (same on all nodes that talk encrypted)
// - to call .Encrypt(KEY) to start encrypting
// - to stop encrypting call .Encrypt(NULL)
uint8_t KEY[] = "ABCDABCDABCDABCD";

// Need an instance of the RFM12B Radio Module
RFM12B radio;

// Process Message
// Message
String msg = "";
int firstClosingBracket = 0;
// Yaw Pitch Roll
String sYaw = "";
String sPitch = "";
String sRoll = "";
float Yaw = 0;
float Pitch = 0;
float Roll = 0;

// LED
int iLED = 9;

// SparkFun Micro OLED
#define PIN_RESET 9
#define DC_JUMPER 1
// I2C declaration
MicroOLED oled(PIN_RESET, DC_JUMPER);

// Software Version Information
String sver = "26-06";

void loop() {

  // is RFM12B Radio
  isRFM12BRadio();

  // Micro OLED
  isMicroOLED();

}
getFreeIMU.ino
// FreeIMU
// isFreeIMU
void isFreeIMU(){

  // FreeIMU
  // IMU Yaw Pitch Roll
  // msg = "<IMU|1000|1000|1000|*";
  // msg = "<IMU|" + sYaw + "|" + sPitch + "|" + sRoll + "|*"
  firstClosingBracket = 0;
  // "<IMU|"
  firstClosingBracket = msg.indexOf('|');
  msg.remove(0, 5);
  // Yaw
  firstClosingBracket = msg.indexOf('|');
  sYaw = msg;
  sYaw.remove(firstClosingBracket);
  Yaw = sYaw.toFloat();
  // Pitch
  firstClosingBracket = firstClosingBracket + 1;
  msg.remove(0, firstClosingBracket );
  firstClosingBracket = msg.indexOf('|');
  sPitch = msg;
  sPitch.remove(firstClosingBracket);
  Pitch = sPitch.toFloat();
  // Roll
  firstClosingBracket = firstClosingBracket + 1;
  msg.remove(0, firstClosingBracket );
  firstClosingBracket = msg.indexOf('|');
  sRoll = msg;
  sRoll.remove(firstClosingBracket);
  Roll = sRoll.toFloat();

}
getMicroOLED.ino
// SparkFun Micro OLED
// Setup Micro OLED
void isSetupMicroOLED() {

  // Initialize the OLED
  oled.begin();
  // Clear the display's internal memory
  oled.clear(ALL);
  // Display what's in the buffer (splashscreen)
  oled.display();

  // Delay 1000 ms
  delay(1000);

  // Clear the buffer.
  oled.clear(PAGE);

}
// Micro OLED
void isMicroOLED() {

  // Text Display FreeIMU
  // Clear the display
  oled.clear(PAGE);
  // Set cursor to top-left
  oled.setCursor(0, 0);
  // Set font to type 0
  oled.setFontType(0);
  // FreeIMU
  oled.print("FreeIMU");
  oled.setCursor(0, 12);
  // Yaw
  oled.print("Y: ");
  oled.print(Yaw);
  oled.setCursor(0, 25);
  // Pitch
  oled.print("P: ");
  oled.print(Pitch);
  oled.setCursor(0, 39);
  // Roll
  oled.print("R: ");
  oled.print(Roll);
  oled.display();

}
getRFM12BRadio.ino
// RFM12B Radio
void isSetupRFM12BRadio()
{

  // RFM12B Radio
  radio.Initialize(NODEID, RF12_433MHZ, NETWORKID);
  // Encryption
  radio.Encrypt(KEY);
  // Transmitting

}
// is RFM12 BRadio
void isRFM12BRadio()
{

  // Receive
  if (radio.ReceiveComplete())
  {

    // CRC Pass
    if (radio.CRCPass())
    {

      // Message
      msg = "";

      // Can also use radio.GetDataLen() if you don't like pointers
      for (byte i = 0; i < *radio.DataLen; i++)
      {

       //Serial.print((char)radio.Data[i]);
        msg = msg + (char)radio.Data[i];

      }

      // Serial
      Serial.println( msg );

      // Turn the LED on HIGH
      digitalWrite( iLED , HIGH);

      // FreeIMU
      // Yaw Pitch Roll
      isFreeIMU();

      // ACK Requested
      if (radio.ACKRequested())
      {

        // Send ACK
        radio.SendACK();

      }

      // Turn the LED on LOW
      digitalWrite( iLED , LOW);

    }
    else
    {

      // BAD-CRC

    }

  }

}
setup.ino
// Setup
void setup()
{

  // Serial
  Serial.begin(SERIAL_BAUD);

  // Give display time to power on
  delay(100);

  // Set up I2C bus
  Wire.begin();

  // Setup Micro OLED
  isSetupMicroOLED();

  // LED
  pinMode( iLED , OUTPUT);

  // RFM12B Radio
  isSetupRFM12BRadio();

}
——
Moteino R2 (Send)
TR0 – Digital 2
LED – Digital 9
TR1 – Digital 10
TR2 – Digital 11
TR3 – Digital 12
TR4 – Digital 13
SDA – Analog A4
SCL – Analog A5
VIN – +3.3V
GND – GND
——
DL2212Mk01ps.ino
/* ***** Don Luc Electronics © *****
Software Version Information
Project #26 - Radio Frequency - OpenLog - Mk06
26-06
Send
DL2212Mk01ps.ino
2 x Moteino R2 (RFM12B)
1 x SparkFun OpenLog
1 x microSD Card - 16GB
1 x SparkFun Micro OLED Breakout (Qwiic)
1 x SparkFun 9 Degrees of Freedom - Sensor Stick
2 x Lithium Ion Battery - 1Ah
1 x SparkFun Cerberus USB Cable
*/

// Include the Library Code
// RFM12B Radio
#include <RFM12B.h>
// Sleep
#include <avr/sleep.h>
// Two Wire Interface (TWI/I2C)
#include <Wire.h>
// Includes and variables for IMU integration
// Accelerometer
#include <ADXL345.h>
// Magnetometer
#include <HMC58X3.h>
// MEMS Gyroscope
#include <ITG3200.h>
// Debug
#include "DebugUtils.h"
// FreeIMU
#include <CommunicationUtils.h>
#include <FreeIMU.h>

// You will need to initialize the radio by telling it what ID
// it has and what network it's on
// The NodeID takes values from 1-127, 0 is reserved for sending
// broadcast messages (send to all nodes)
// The Network ID takes values from 0-255
// By default the SPI-SS line used is D10 on Atmega328.
// You can change it by calling .SetCS(pin) where pin can be {8,9,10}
// Network ID used for this unit
#define NODEID        2
// The network ID we are on
#define NETWORKID    99
// The node ID we're sending to
#define GATEWAYID     1
// # of ms to wait for an ack
#define ACK_TIME     50
// Serial
#define SERIAL_BAUD  115200

// Encryption is OPTIONAL
// to enable encryption you will need to:
// - provide a 16-byte encryption KEY (same on all nodes that talk encrypted)
// - to call .Encrypt(KEY) to start encrypting
// - to stop encrypting call .Encrypt(NULL)
uint8_t KEY[] = "ABCDABCDABCDABCD";

// Wait this many ms between sending packets
int interPacketDelay = 1000;
// Input
char input = 0;

// Need an instance of the RFM12B Radio Module
RFM12B radio;
// Send Size
byte sendSize = 0;
// Payload
char payload[100];
// Request ACK
bool requestACK = false;

// LED
int iLED = 9;

// Set the FreeIMU object
FreeIMU my3IMU = FreeIMU();

// Yaw Pitch Roll
String zzzzzz = "";
String sYaw = "";
String sPitch = "";
String sRoll = "";
float ypr[3];
float Yaw = 0;
float Pitch = 0;
float Roll = 0;

// Software Version Information
String sver = "26-06";

void loop()
{

  // isFreeIMU
  isFreeIMU();

  // is RFM12B Radio
  isRFM12BRadio();

  // Inter Packet Delay
  delay(interPacketDelay);

}
getFreeIMU.ino
// FreeIMU
// isFreeIMU
void isFreeIMU(){

  // FreeIMU
  // Yaw Pitch Roll
  my3IMU.getYawPitchRoll(ypr);
  // Yaw
  Yaw = ypr[0];
  // Pitch
  Pitch = ypr[1];
  // Roll
  Roll = ypr[2];

}
getRFM12BRadio.ino
// RFM12B Radio
void isSetupRFM12BRadio(){

  // RFM12B Radio
  radio.Initialize(NODEID, RF12_433MHZ, NETWORKID);
  // Encryption
  radio.Encrypt(KEY);
  // Sleep right away to save power
  radio.Sleep();
  // Transmitting
  Serial.println("Transmitting...\n\n");

}
// is RFM12 BRadio
void isRFM12BRadio(){

  // sYaw, sPitch, sRoll ""
  sYaw = "";
  sPitch = "";
  sRoll = "";

  // sYaw, sPitch, sRoll concat
  sYaw.concat(Yaw);
  sPitch.concat(Pitch);
  sRoll.concat(Roll);

  // zzzzzz ""
  zzzzzz = "";

  // zzzzzz = "<IMU|1000|1000|1000|*";
  // zzzzzz = "<IMU|" + sYaw + "|" + sPitch + "|" + sRoll + "|*"
  zzzzzz = "<IMU|" + sYaw + "|" + sPitch + "|" + sRoll + "|*";

  // sendSize Length
  sendSize = zzzzzz.length();

  // sendSize
  payload[sendSize];

  // sendSize, charAt
  for(byte i = 0; i < sendSize+1; i++){

    payload[i] = zzzzzz.charAt(i);

  }

  // payload
  Serial.print(payload);

  // Request ACK
  requestACK = sendSize;

  // Wakeup
  radio.Wakeup();

  // Turn the LED on HIGH
  digitalWrite( iLED , HIGH);

  // Send
  radio.Send(GATEWAYID, payload, sendSize, requestACK);

  // Request ACK
  if (requestACK)
  {

    Serial.print(" - waiting for ACK...");
    if (waitForAck()){

      Serial.print("Ok!");

    }
    else Serial.print("nothing...");

  }

  // Turn the LED on LOW
  digitalWrite( iLED , LOW);

  // Sleep
  radio.Sleep();

  // Serial
  Serial.println();

}
// Wait a few milliseconds for proper ACK, return true if received
static bool waitForAck(){

  // Now
  long now = millis();

  // ACK
  while (millis() - now <= ACK_TIME){


    if (radio.ACKReceived(GATEWAYID)){

      return true;

    }

  }

  return false;

}
setup.ino
// Setup
void setup(){

  // Serial
  Serial.begin(SERIAL_BAUD);

  // LED
  pinMode( iLED , OUTPUT);

  // Set up I2C bus
  Wire.begin();

  // RFM12B Radio
  isSetupRFM12BRadio();

  // Pause
  delay(5);
  // Initialize IMU
  my3IMU.init();
  // Pause
  delay(5);

}
——
People can contact us: https://www.donluc.com/?page_id=1927
Technology Experience
- Programming Language
- Single-Board Microcontrollers (PIC, Arduino, Raspberry Pi,Espressif, etc…)
- IoT
- Wireless (Radio Frequency, Bluetooth, WiFi, Etc…)
- Robotics
- Camera and Video Capture Receiver Stationary, Wheel/Tank and Underwater Vehicle
- Unmanned Vehicles Terrestrial and Marine
- Machine Learning
- RTOS
- Research & Development (R & D)
Instructor, E-Mentor, STEAM, and Arts-Based Training
- Programming Language
- IoT
- PIC Microcontrollers
- Arduino
- Raspberry Pi
- Espressif
- Robotics
Follow Us
Luc Paquin – Curriculum Vitae – 2023
https://www.donluc.com/luc/
Web: https://www.donluc.com/
Facebook: https://www.facebook.com/neosteam.labs.9/
YouTube: https://www.youtube.com/@thesass2063
Twitter: https://twitter.com/labs_steam
Pinterest: https://www.pinterest.com/NeoSteamLabs/
Instagram: https://www.instagram.com/neosteamlabs/
Don Luc
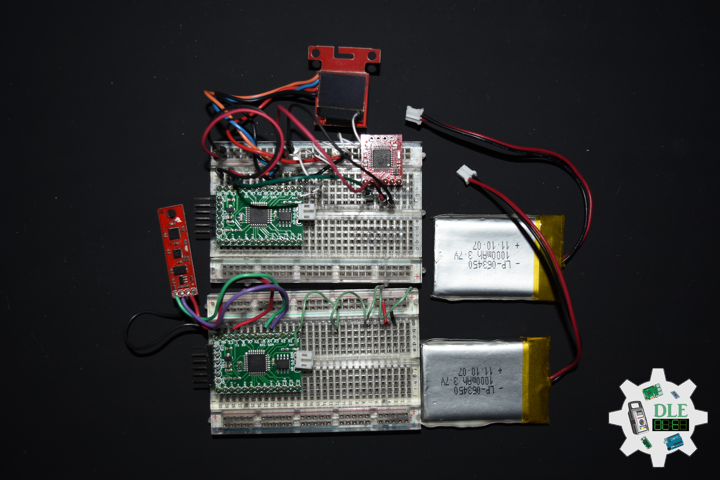
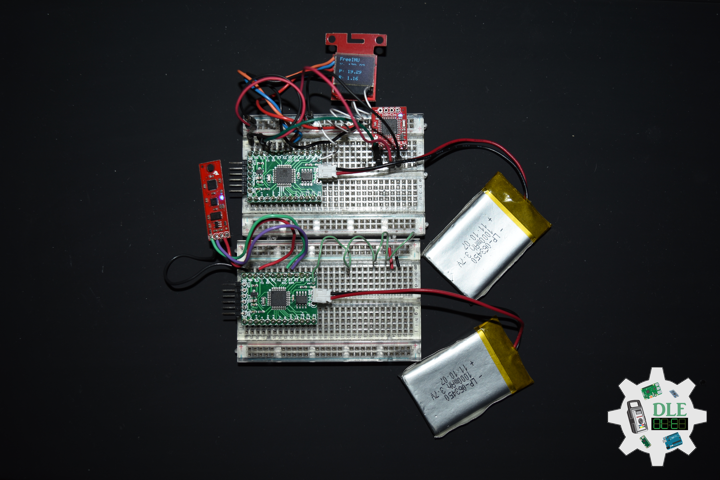
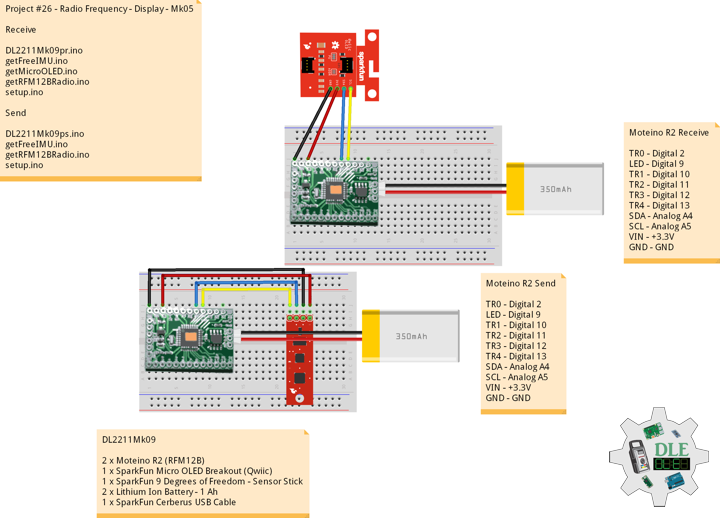
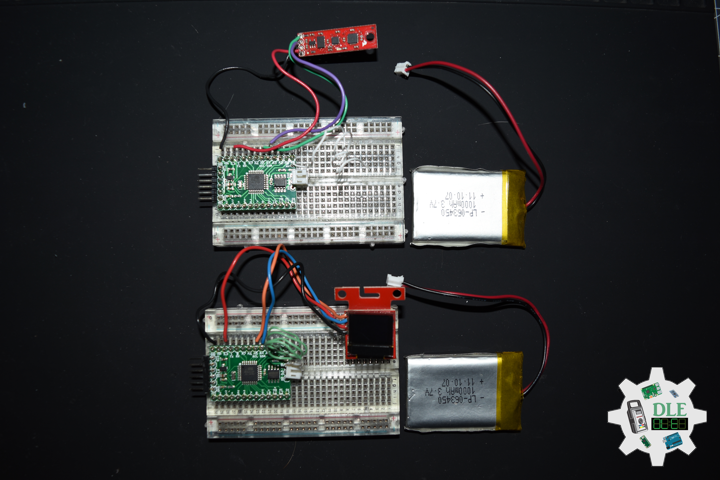
Project #26 – Radio Frequency – Display – Mk05
——
#DonLucElectronics #DonLuc #RadioFrequency #Moteino #Send #Receive #Display #FreeIMU #Magnetometer #Accelerometer #Gyroscope #Arduino #Project #Fritzing #Programming #Electronics #Microcontrollers #Consultant
——
——
——
——
SparkFun Micro OLED Breakout
The SparkFun Qwiic Micro OLED Breakout is a Qwiic-enabled version of our popular Micro OLED display. The small monochrome, blue-on-black OLED screen presents incredibly clear images for your viewing pleasure. It’s the OLED display is crisp, and you can fit a deceivingly large amount of graphics on there. This breakout is perfect for adding graphics to your next project and displaying diagnostic information without resorting to a serial output, all with the ease of use of our own Qwiic Connect System.
This version of the Micro OLED Breakout is exactly the size of its non-Qwiic sibling, featuring a screen that is 64 pixels wide and 48 pixels tall and measuring 0.66″ across. But it has also been equipped with two Qwiic connectors, making it ideal for I2C operations. We’ve also added two mounting holes and a convenient Qwiic cable holder incorporated into a detachable tab on the board that can be easily removed thanks to a v-scored edge.
DL2211Mk09
2 x Moteino R2 (RFM12B)
1 x SparkFun Micro OLED Breakout (Qwiic)
1 x SparkFun 9 Degrees of Freedom – Sensor Stick
2 x Lithium Ion Battery – 1 Ah
1 x SparkFun Cerberus USB Cable
Moteino R2 (Receive)
TR0 – Digital 2
LED – Digital 9
TR1 – Digital 10
TR2 – Digital 11
TR3 – Digital 12
TR4 – Digital 13
SDA – Analog A4
SCL – Analog A5
VIN – +3.3V
GND – GND
——
DL2211Mk09pr.ino
/* ***** Don Luc Electronics © *****
Software Version Information
Project #26 - Radio Frequency - Display - Mk05
26-05
Receive
DL2211Mk09pr.ino
2 x Moteino R2 (RFM12B)
1 x SparkFun Micro OLED Breakout (Qwiic)
1 x SparkFun 9 Degrees of Freedom - Sensor Stick
2 x Lithium Ion Battery - 1Ah
1 x SparkFun Cerberus USB Cable
*/

// Include the Library Code
// RFM12B Radio
#include <RFM12B.h>
// Two Wire Interface (TWI/I2C)
#include <Wire.h>
// SparkFun Micro OLED
#include <SFE_MicroOLED.h>

// You will need to initialize the radio by telling it what ID
// it has and what network it's on
// The NodeID takes values from 1-127, 0 is reserved for sending
// broadcast messages (send to all nodes)
// The Network ID takes values from 0-255
// By default the SPI-SS line used is D10 on Atmega328.
// You can change it by calling .SetCS(pin) where pin can be {8,9,10}
// Network ID used for this unit
#define NODEID        1
// The network ID we are on
#define NETWORKID    99
// Serial
#define SERIAL_BAUD  115200

// Encryption is OPTIONAL
// to enable encryption you will need to:
// - provide a 16-byte encryption KEY (same on all nodes that talk encrypted)
// - to call .Encrypt(KEY) to start encrypting
// - to stop encrypting call .Encrypt(NULL)
uint8_t KEY[] = "ABCDABCDABCDABCD";

// Need an instance of the RFM12B Radio Module
RFM12B radio;

// Process Message
// Message
String msg = "";
int firstClosingBracket = 0;
// Yaw Pitch Roll
String sYaw = "";
String sPitch = "";
String sRoll = "";
float Yaw = 0;
float Pitch = 0;
float Roll = 0;

// LED
int iLED = 9;

// SparkFun Micro OLED
#define PIN_RESET 9
#define DC_JUMPER 1
// I2C declaration
MicroOLED oled(PIN_RESET, DC_JUMPER);

// Software Version Information
String sver = "26-05";

void loop() {

  // is RFM12B Radio
  isRFM12BRadio();

  // Micro OLED
  isMicroOLED();

}
getFreeIMU.ino
// FreeIMU
// isFreeIMU
void isFreeIMU(){

  // FreeIMU
  // IMU Yaw Pitch Roll
  // msg = "<IMU|1000|1000|1000|*";
  // msg = "<IMU|" + sYaw + "|" + sPitch + "|" + sRoll + "|*"
  firstClosingBracket = 0;
  // "<IMU|"
  firstClosingBracket = msg.indexOf('|');
  msg.remove(0, 5);
  // Yaw
  firstClosingBracket = msg.indexOf('|');
  sYaw = msg;
  sYaw.remove(firstClosingBracket);
  Yaw = sYaw.toFloat();
  // Pitch
  firstClosingBracket = firstClosingBracket + 1;
  msg.remove(0, firstClosingBracket );
  firstClosingBracket = msg.indexOf('|');
  sPitch = msg;
  sPitch.remove(firstClosingBracket);
  Pitch = sPitch.toFloat();
  // Roll
  firstClosingBracket = firstClosingBracket + 1;
  msg.remove(0, firstClosingBracket );
  firstClosingBracket = msg.indexOf('|');
  sRoll = msg;
  sRoll.remove(firstClosingBracket);
  Roll = sRoll.toFloat();

}
getMicroOLED.ino
// SparkFun Micro OLED
// Setup Micro OLED
void isSetupMicroOLED() {

  // Initialize the OLED
  oled.begin();
  // Clear the display's internal memory
  oled.clear(ALL);
  // Display what's in the buffer (splashscreen)
  oled.display();

  // Delay 1000 ms
  delay(1000);

  // Clear the buffer.
  oled.clear(PAGE);

}
// Micro OLED
void isMicroOLED() {

  // Text Display FreeIMU
  // Clear the display
  oled.clear(PAGE);
  // Set cursor to top-left
  oled.setCursor(0, 0);
  // Set font to type 0
  oled.setFontType(0);
  // FreeIMU
  oled.print("FreeIMU");
  oled.setCursor(0, 12);
  // Yaw
  oled.print("Y: ");
  oled.print(Yaw);
  oled.setCursor(0, 25);
  // Pitch
  oled.print("P: ");
  oled.print(Pitch);
  oled.setCursor(0, 39);
  // Roll
  oled.print("R: ");
  oled.print(Roll);
  oled.display();

}
getRFM12BRadio.ino
// RFM12B Radio
void isSetupRFM12BRadio()
{

  // RFM12B Radio
  radio.Initialize(NODEID, RF12_433MHZ, NETWORKID);
  // Encryption
  radio.Encrypt(KEY);
  // Transmitting
  Serial.println("Listening...");

}
// is RFM12 BRadio
void isRFM12BRadio()
{

  // Receive
  if (radio.ReceiveComplete())
  {

    // CRC Pass
    if (radio.CRCPass())
    {

      // Serial
      Serial.print('[');
      Serial.print(radio.GetSender());
      Serial.print("] ");

      // Message
      msg = "";

      // Can also use radio.GetDataLen() if you don't like pointers
      for (byte i = 0; i < *radio.DataLen; i++)
      {

        Serial.print((char)radio.Data[i]);
        msg = msg + (char)radio.Data[i];

      }

      // Turn the LED on HIGH
      digitalWrite( iLED , HIGH);

      // FreeIMU
      // Yaw Pitch Roll
      isFreeIMU();

      // ACK Requested
      if (radio.ACKRequested())
      {

        // Send ACK
        radio.SendACK();
        Serial.print(" - ACK Sent");

      }

      // Turn the LED on LOW
      digitalWrite( iLED , LOW);

    }
    else
    {

      // BAD-CRC
      Serial.print("BAD-CRC");

    }

    // Serial
    Serial.println();

  }

}
setup.ino
// Setup
void setup()
{

  // Serial
  Serial.begin(SERIAL_BAUD);

  // Give display time to power on
  delay(100);

  // Set up I2C bus
  Wire.begin();

  // Setup Micro OLED
  isSetupMicroOLED();

  // LED
  pinMode( iLED , OUTPUT);

  // RFM12B Radio
  isSetupRFM12BRadio();

}
——
Moteino R2 (Send)
TR0 – Digital 2
LED – Digital 9
TR1 – Digital 10
TR2 – Digital 11
TR3 – Digital 12
TR4 – Digital 13
SDA – Analog A4
SCL – Analog A5
VIN – +3.3V
GND – GND
——
DL2211Mk09ps.ino
/* ***** Don Luc Electronics © *****
Software Version Information
Project #26 - Radio Frequency - Display - Mk05
26-05
Send
DL2211Mk09ps.ino
2 x Moteino R2 (RFM12B)
1 x SparkFun Micro OLED Breakout (Qwiic)
1 x SparkFun 9 Degrees of Freedom - Sensor Stick
2 x Lithium Ion Battery - 1Ah
1 x SparkFun Cerberus USB Cable
*/

// Include the Library Code
// RFM12B Radio
#include <RFM12B.h>
// Sleep
#include <avr/sleep.h>
// Two Wire Interface (TWI/I2C)
#include <Wire.h>
// Includes and variables for IMU integration
// Accelerometer
#include <ADXL345.h>
// Magnetometer
#include <HMC58X3.h>
// MEMS Gyroscope
#include <ITG3200.h>
// Debug
#include "DebugUtils.h"
// FreeIMU
#include <CommunicationUtils.h>
#include <FreeIMU.h>

// You will need to initialize the radio by telling it what ID
// it has and what network it's on
// The NodeID takes values from 1-127, 0 is reserved for sending
// broadcast messages (send to all nodes)
// The Network ID takes values from 0-255
// By default the SPI-SS line used is D10 on Atmega328.
// You can change it by calling .SetCS(pin) where pin can be {8,9,10}
// Network ID used for this unit
#define NODEID        2
// The network ID we are on
#define NETWORKID    99
// The node ID we're sending to
#define GATEWAYID     1
// # of ms to wait for an ack
#define ACK_TIME     50
// Serial
#define SERIAL_BAUD  115200

// Encryption is OPTIONAL
// to enable encryption you will need to:
// - provide a 16-byte encryption KEY (same on all nodes that talk encrypted)
// - to call .Encrypt(KEY) to start encrypting
// - to stop encrypting call .Encrypt(NULL)
uint8_t KEY[] = "ABCDABCDABCDABCD";

// Wait this many ms between sending packets
int interPacketDelay = 1000;
// Input
char input = 0;

// Need an instance of the RFM12B Radio Module
RFM12B radio;
// Send Size
byte sendSize = 0;
// Payload
char payload[100];
// Request ACK
bool requestACK = false;

// LED
int iLED = 9;

// Set the FreeIMU object
FreeIMU my3IMU = FreeIMU();

// Yaw Pitch Roll
String zzzzzz = "";
String sYaw = "";
String sPitch = "";
String sRoll = "";
float ypr[3];
float Yaw = 0;
float Pitch = 0;
float Roll = 0;

// Software Version Information
String sver = "26-05";

void loop()
{

  // isFreeIMU
  isFreeIMU();

  // is RFM12B Radio
  isRFM12BRadio();

  // Inter Packet Delay
  delay(interPacketDelay);

}
getFreeIMU.ino
// FreeIMU
// isFreeIMU
void isFreeIMU(){

  // FreeIMU
  // Yaw Pitch Roll
  my3IMU.getYawPitchRoll(ypr);
  // Yaw
  Yaw = ypr[0];
  // Pitch
  Pitch = ypr[1];
  // Roll
  Roll = ypr[2];

}
getRFM12BRadio.ino
// RFM12B Radio
void isSetupRFM12BRadio(){

  // RFM12B Radio
  radio.Initialize(NODEID, RF12_433MHZ, NETWORKID);
  // Encryption
  radio.Encrypt(KEY);
  // Sleep right away to save power
  radio.Sleep();
  // Transmitting
  Serial.println("Transmitting...\n\n");

}
// is RFM12 BRadio
void isRFM12BRadio(){

  // sYaw, sPitch, sRoll ""
  sYaw = "";
  sPitch = "";
  sRoll = "";

  // sYaw, sPitch, sRoll concat
  sYaw.concat(Yaw);
  sPitch.concat(Pitch);
  sRoll.concat(Roll);

  // zzzzzz ""
  zzzzzz = "";

  // zzzzzz = "<IMU|1000|1000|1000|*";
  // zzzzzz = "<IMU|" + sYaw + "|" + sPitch + "|" + sRoll + "|*"
  zzzzzz = "<IMU|" + sYaw + "|" + sPitch + "|" + sRoll + "|*";

  // sendSize Length
  sendSize = zzzzzz.length();

  // sendSize
  payload[sendSize];

  // sendSize, charAt
  for(byte i = 0; i < sendSize+1; i++){

    payload[i] = zzzzzz.charAt(i);

  }

  // payload
  Serial.print(payload);

  // Request ACK
  requestACK = sendSize;

  // Wakeup
  radio.Wakeup();

  // Turn the LED on HIGH
  digitalWrite( iLED , HIGH);

  // Send
  radio.Send(GATEWAYID, payload, sendSize, requestACK);

  // Request ACK
  if (requestACK)
  {

    Serial.print(" - waiting for ACK...");
    if (waitForAck()){

      Serial.print("Ok!");

    }
    else Serial.print("nothing...");

  }

  // Turn the LED on LOW
  digitalWrite( iLED , LOW);

  // Sleep
  radio.Sleep();

  // Serial
  Serial.println();

}
// Wait a few milliseconds for proper ACK, return true if received
static bool waitForAck(){

  // Now
  long now = millis();

  // ACK
  while (millis() - now <= ACK_TIME){


    if (radio.ACKReceived(GATEWAYID)){

      return true;

    }

  }

  return false;

}
setup.ino
// Setup
void setup(){

  // Serial
  Serial.begin(SERIAL_BAUD);

  // LED
  pinMode( iLED , OUTPUT);

  // Set up I2C bus
  Wire.begin();

  // RFM12B Radio
  isSetupRFM12BRadio();

  // Pause
  delay(5);
  // Initialize IMU
  my3IMU.init();
  // Pause
  delay(5);

}
——
People can contact us: https://www.donluc.com/?page_id=1927
Technology Experience
- Single-Board Microcontrollers (PIC, Arduino, Raspberry Pi,Espressif, etc…)
- IoT
- Wireless (Radio Frequency, Bluetooth, WiFi, Etc…)
- Robotics
- Camera and Video Capture Receiver Stationary, Wheel/Tank and Underwater Vehicle
- Unmanned Vehicles Terrestrial and Marine
- Machine Learning
- RTOS
- Research & Development (R & D)
Instructor, E-Mentor, STEAM, and Arts-Based Training
- IoT
- PIC Microcontrollers
- Arduino
- Raspberry Pi
- Espressif
- Robotics
Follow Us
Luc Paquin – Curriculum Vitae – 2023
https://www.donluc.com/luc/
Web: https://www.donluc.com/
Facebook: https://www.facebook.com/neosteam.labs.9/
YouTube: https://www.youtube.com/channel/UC5eRjrGn1CqkkGfZy0jxEdA
Twitter: https://twitter.com/labs_steam
Pinterest: https://www.pinterest.com/NeoSteamLabs/
Instagram: https://www.instagram.com/neosteamlabs/
Don Luc
Project #26 – Radio Frequency – FreeIMU – Mk04
——
#DonLucElectronics #DonLuc #RadioFrequency #Moteino #Send #Receive #FreeIMU #Magnetometer #Accelerometer #Gyroscope #Arduino #Project #Fritzing #Programming #Electronics #Microcontrollers #Consultant
——
——
——
——
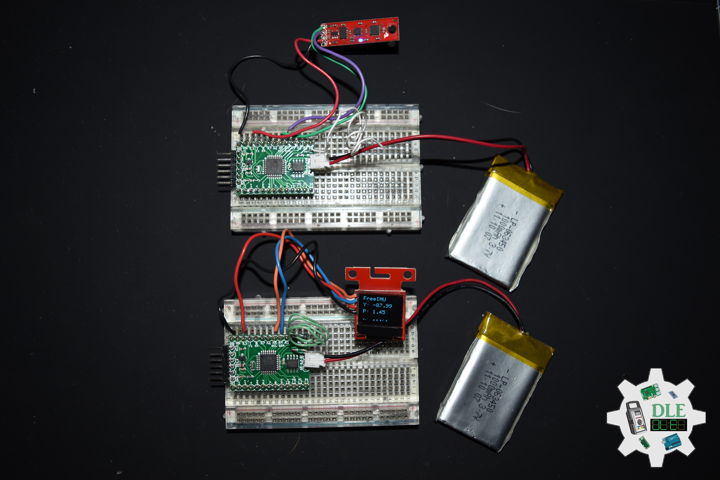
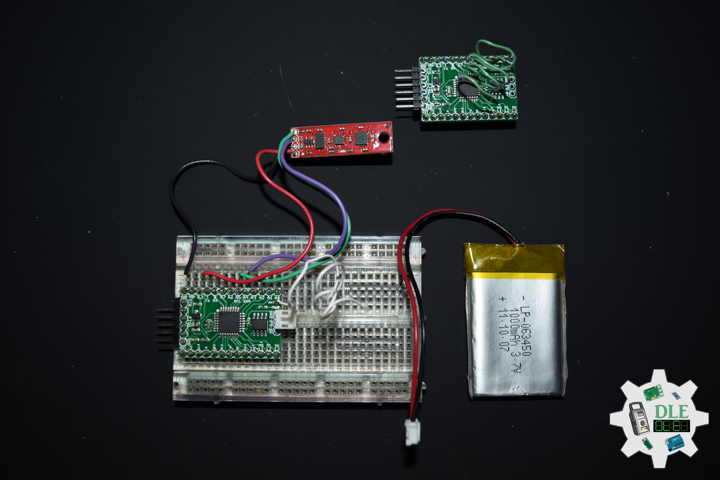
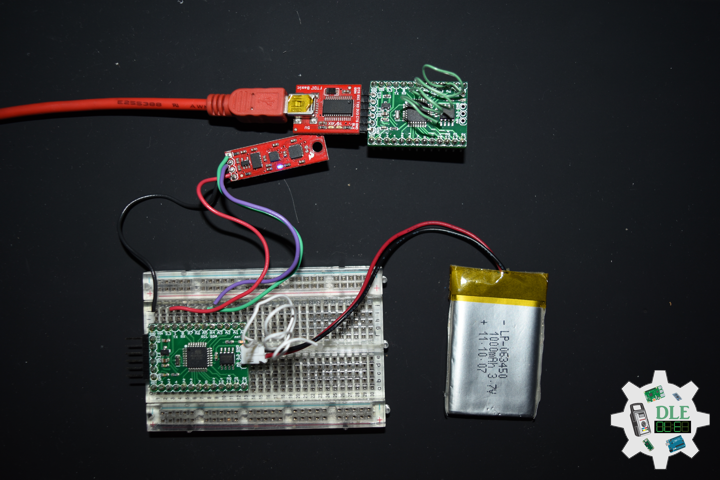
FreeIMU
Orientation and Motion Sensing are widely implemented on various consumer products, such as mobile phones, tablets and cameras as they enable immediate interaction with virtual information. The prototyping phase of any orientation and motion sensing capable device is however a quite difficult process as it may involve complex hardware designing, math algorithms and programming. FreeIMU, an Open Hardware Framework for prototyping orientation and motion sensing capable devices. The framework consists in a small circuit board containing various sensors and a software library, built on top of the Arduino platform. Both the hardware and library are released under open licences and supported by an active community allowing to be implemented into research and commercial projects.
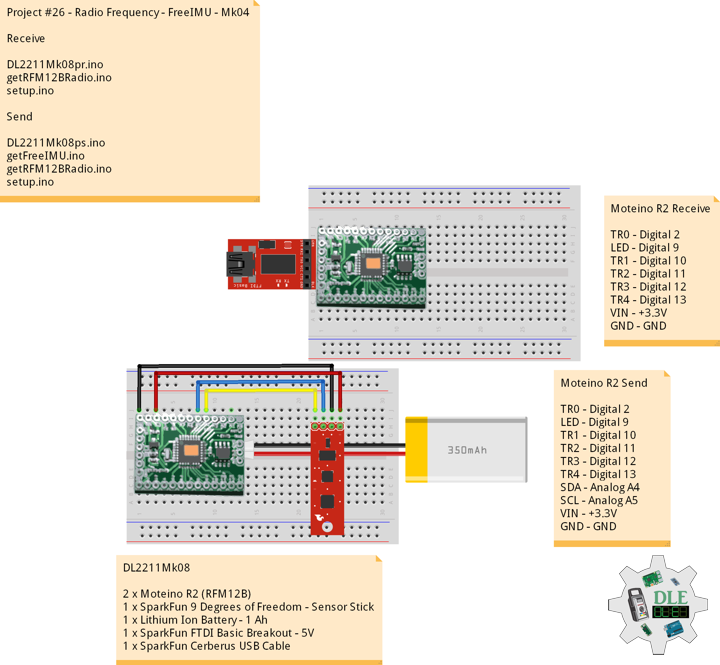
DL2211Mk08
2 x Moteino R2 (RFM12B)
1 x SparkFun 9 Degrees of Freedom – Sensor Stick
1 x Lithium Ion Battery – 1 Ah
1 x SparkFun FTDI Basic Breakout – 5V
1 x SparkFun Cerberus USB Cable
Moteino R2 (Receive)
TR0 – Digital 2
LED – Digital 9
TR1 – Digital 10
TR2 – Digital 11
TR3 – Digital 12
TR4 – Digital 13
VIN – +3.3V
GND – GND
——
DL2211Mk08pr.ino
/* ***** Don Luc Electronics © *****
Software Version Information
Project #26 - Radio Frequency - FreeIMU - Mk04
26-04
Receive
DL2211Mk08pr.ino
2 x Moteino R2 (RFM12B)
1 x SparkFun 9 Degrees of Freedom - Sensor Stick
1 x Lithium Ion Battery - 1Ah
1 x SparkFun FTDI Basic Breakout - 5V
1 x SparkFun Cerberus USB Cable
*/

// Include the Library Code
// RFM12B Radio
#include <RFM12B.h>

// You will need to initialize the radio by telling it what ID
// it has and what network it's on
// The NodeID takes values from 1-127, 0 is reserved for sending
// broadcast messages (send to all nodes)
// The Network ID takes values from 0-255
// By default the SPI-SS line used is D10 on Atmega328.
// You can change it by calling .SetCS(pin) where pin can be {8,9,10}
// Network ID used for this unit
#define NODEID        1
// The network ID we are on
#define NETWORKID    99
// Serial
#define SERIAL_BAUD  115200

// Encryption is OPTIONAL
// to enable encryption you will need to:
// - provide a 16-byte encryption KEY (same on all nodes that talk encrypted)
// - to call .Encrypt(KEY) to start encrypting
// - to stop encrypting call .Encrypt(NULL)
uint8_t KEY[] = "ABCDABCDABCDABCD";

// Need an instance of the RFM12B Radio Module
RFM12B radio;

// LED
int iLED = 9;

// Software Version Information
String sver = "26-04";

void loop() {

  // is RFM12B Radio
  isRFM12BRadio();

}
getRFM12BRadio.ino
// RFM12B Radio
void isSetupRFM12BRadio()
{

  // RFM12B Radio
  radio.Initialize(NODEID, RF12_433MHZ, NETWORKID);
  // Encryption
  radio.Encrypt(KEY);
  // Transmitting
  Serial.println("Listening...");

}
// is RFM12 BRadio
void isRFM12BRadio()
{

  // Receive
  if (radio.ReceiveComplete())
  {

    // CRC Pass
    if (radio.CRCPass())
    {

      // Serial
      Serial.print('[');
      Serial.print(radio.GetSender());
      Serial.print("] ");
      // Can also use radio.GetDataLen() if you don't like pointers
      for (byte i = 0; i < *radio.DataLen; i++)
      {

        Serial.print((char)radio.Data[i]);

      }

      // Turn the LED on HIGH
      digitalWrite( iLED , HIGH);

      // ACK Requested
      if (radio.ACKRequested())
      {

        // Send ACK
        radio.SendACK();
        Serial.print(" - ACK Sent");

      }

      // Turn the LED on LOW
      digitalWrite( iLED , LOW);

    }
    else
    {

      // BAD-CRC
      Serial.print("BAD-CRC");

    }

    // Serial
    Serial.println();

  }

}
setup.ino
// Setup
void setup()
{

  // Serial
  Serial.begin(SERIAL_BAUD);

  // LED
  pinMode( iLED , OUTPUT);

  // RFM12B Radio
  isSetupRFM12BRadio();

}
Moteino R2 (Send)
TR0 – Digital 2
LED – Digital 9
TR1 – Digital 10
TR2 – Digital 11
TR3 – Digital 12
TR4 – Digital 13
SDA – Analog A4
SCL – Analog A5
VIN – +3.3V
GND – GND
——
DL2211Mk08ps.ino
/* ***** Don Luc Electronics © *****
Software Version Information
Project #26 - Radio Frequency - FreeIMU - Mk04
26-04
Send
DL2211Mk08ps.ino
2 x Moteino R2 (RFM12B)
1 x SparkFun 9 Degrees of Freedom - Sensor Stick
1 x Lithium Ion Battery - 1Ah
1 x SparkFun FTDI Basic Breakout - 5V
1 x SparkFun Cerberus USB Cable
*/

// Include the Library Code
// RFM12B Radio
#include <RFM12B.h>
// Sleep
#include <avr/sleep.h>
// Two Wire Interface (TWI/I2C)
#include <Wire.h>
// Includes and variables for IMU integration
// Accelerometer
#include <ADXL345.h>
// Magnetometer
#include <HMC58X3.h>
// MEMS Gyroscope
#include <ITG3200.h>
// Debug
#include "DebugUtils.h"
// FreeIMU
#include <CommunicationUtils.h>
#include <FreeIMU.h>

// You will need to initialize the radio by telling it what ID
// it has and what network it's on
// The NodeID takes values from 1-127, 0 is reserved for sending
// broadcast messages (send to all nodes)
// The Network ID takes values from 0-255
// By default the SPI-SS line used is D10 on Atmega328.
// You can change it by calling .SetCS(pin) where pin can be {8,9,10}
// Network ID used for this unit
#define NODEID        2
// The network ID we are on
#define NETWORKID    99
// The node ID we're sending to
#define GATEWAYID     1
// # of ms to wait for an ack
#define ACK_TIME     50
// Serial
#define SERIAL_BAUD  115200

// Encryption is OPTIONAL
// to enable encryption you will need to:
// - provide a 16-byte encryption KEY (same on all nodes that talk encrypted)
// - to call .Encrypt(KEY) to start encrypting
// - to stop encrypting call .Encrypt(NULL)
uint8_t KEY[] = "ABCDABCDABCDABCD";

// Wait this many ms between sending packets
int interPacketDelay = 1000;
// Input
char input = 0;

// Need an instance of the RFM12B Radio Module
RFM12B radio;
// Send Size
byte sendSize = 0;
// Payload
char payload[100];
// Request ACK
bool requestACK = false;

// LED
int iLED = 9;

// Set the FreeIMU object
FreeIMU my3IMU = FreeIMU();

// Yaw Pitch Roll
String zzzzzz = "";
String sYaw = "";
String sPitch = "";
String sRoll = "";
float ypr[3];
float Yaw = 0;
float Pitch = 0;
float Roll = 0;

// Software Version Information
String sver = "26-04";

void loop()
{

  // isFreeIMU
  isFreeIMU();

  // is RFM12B Radio
  isRFM12BRadio();

  // Inter Packet Delay
  delay(interPacketDelay);

}
getFreeIMU.ino
// FreeIMU
// isFreeIMU
void isFreeIMU(){

  // FreeIMU
  // Yaw Pitch Roll
  my3IMU.getYawPitchRoll(ypr);
  // Yaw
  Yaw = ypr[0];
  // Pitch
  Pitch = ypr[1];
  // Roll
  Roll = ypr[2];

}
getRFM12BRadio.ino
// RFM12B Radio
void isSetupRFM12BRadio(){

  // RFM12B Radio
  radio.Initialize(NODEID, RF12_433MHZ, NETWORKID);
  // Encryption
  radio.Encrypt(KEY);
  // Sleep right away to save power
  radio.Sleep();
  // Transmitting
  Serial.println("Transmitting...\n\n");

}
// is RFM12 BRadio
void isRFM12BRadio(){

  // sYaw, sPitch, sRoll ""
  sYaw = "";
  sPitch = "";
  sRoll = "";

  // sYaw, sPitch, sRoll concat
  sYaw.concat(Yaw);
  sPitch.concat(Pitch);
  sRoll.concat(Roll);

  // zzzzzz ""
  zzzzzz = "";

  // zzzzzz = "<IMU|" + sYaw + "|" + sPitch + "|" + sRoll + "|*"
  zzzzzz = "<IMU|" + sYaw + "|" + sPitch + "|" + sRoll + "|*";

  // sendSize Length
  sendSize = zzzzzz.length();

  // sendSize
  payload[sendSize];

  // sendSize, charAt
  for(byte i = 0; i < sendSize+1; i++){

    payload[i] = zzzzzz.charAt(i);

  }

  // payload
  Serial.print(payload);

  // Request ACK
  requestACK = sendSize;

  // Wakeup
  radio.Wakeup();

  // Turn the LED on HIGH
  digitalWrite( iLED , HIGH);

  // Send
  radio.Send(GATEWAYID, payload, sendSize, requestACK);

  // Request ACK
  if (requestACK)
  {

    Serial.print(" - waiting for ACK...");
    if (waitForAck()){

      Serial.print("Ok!");

    }
    else Serial.print("nothing...");

  }

  // Turn the LED on LOW
  digitalWrite( iLED , LOW);

  // Sleep
  radio.Sleep();

  // Serial
  Serial.println();

}
// Wait a few milliseconds for proper ACK, return true if received
static bool waitForAck(){

  // Now
  long now = millis();

  // ACK
  while (millis() - now <= ACK_TIME){


    if (radio.ACKReceived(GATEWAYID)){

      return true;

    }

  }

  return false;

}
setup.ino
// Setup
void setup(){

  // Serial
  Serial.begin(SERIAL_BAUD);

  // LED
  pinMode( iLED , OUTPUT);

  // Set up I2C bus
  Wire.begin();

  // RFM12B Radio
  isSetupRFM12BRadio();

  // Pause
  delay(5);
  // Initialize IMU
  my3IMU.init();
  // Pause
  delay(5);

}
——
People can contact us: https://www.donluc.com/?page_id=1927
Technology Experience
- Single-Board Microcontrollers (PIC, Arduino, Raspberry Pi,Espressif, etc…)
- IoT
- Wireless (Radio Frequency, Bluetooth, WiFi, Etc…)
- Robotics
- Camera and Video Capture Receiver Stationary, Wheel/Tank and Underwater Vehicle
- Unmanned Vehicles Terrestrial and Marine
- Machine Learning
- RTOS
- Research & Development (R & D)
Instructor, E-Mentor, STEAM, and Arts-Based Training
- IoT
- PIC Microcontrollers
- Arduino
- Raspberry Pi
- Espressif
- Robotics
Follow Us
Luc Paquin – Curriculum Vitae – 2023
https://www.donluc.com/luc/
Web: https://www.donluc.com/
Facebook: https://www.facebook.com/neosteam.labs.9/
YouTube: https://www.youtube.com/channel/UC5eRjrGn1CqkkGfZy0jxEdA
Twitter: https://twitter.com/labs_steam
Pinterest: https://www.pinterest.com/NeoSteamLabs/
Instagram: https://www.instagram.com/neosteamlabs/
Don Luc
Project #26 – Radio Frequency – Moteino ASK – Mk03
——
#DonLucElectronics #DonLuc #RadioFrequency #Moteino #Send #Receive #ASK #Arduino #Project #Fritzing #Programming #Electronics #Microcontrollers #Consultant
——
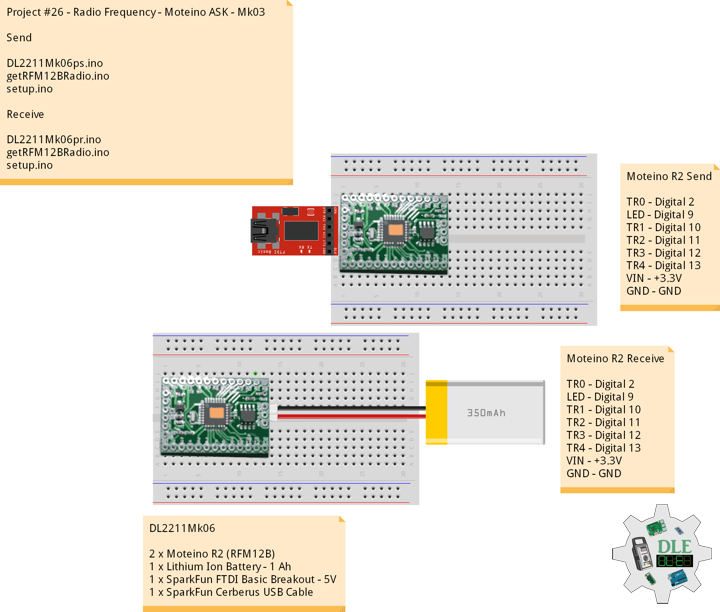
——
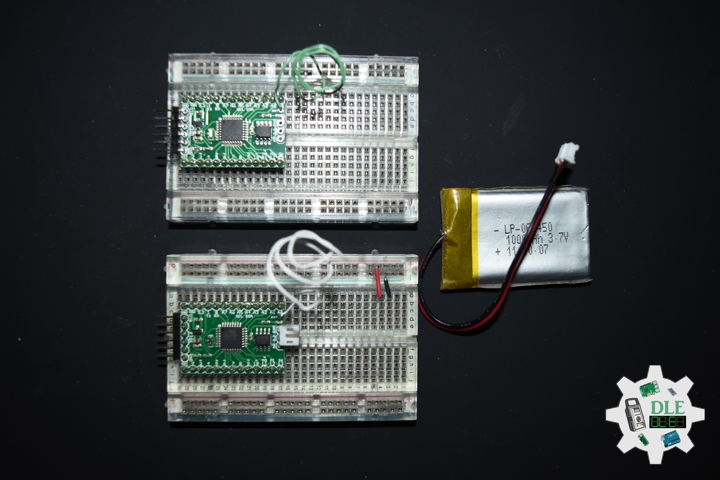
——
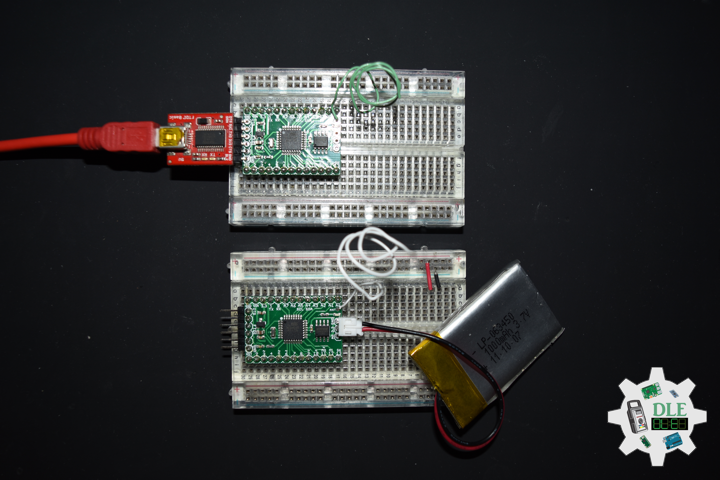
——
Send and Receive
These RF Transmitter Modules are very small in dimension and have a wide operating voltage range. The low cost RF Transmitter can be used to transmit signal up to 100 meters. It is good for short distance, battery power device development. These wireless transmitters work with 433 MHz receivers. They are breadboard friendly and also work great with microcontrollers to create a very simple wireless data link.
Amplitude-Shift Keying
Amplitude-Shift Keying, or ASK, is a form of amplitude modulation that represents digital data as variations in the amplitude of a carrier wave. In an ASK system, a symbol, representing one or more bits, is sent by transmitting a fixed-amplitude carrier wave at a fixed frequency for a specific time duration. For example, if each symbol represents a single bit, then the carrier signal could be transmitted at nominal amplitude when the input value is 1, but transmitted at reduced amplitude or not at all when the input value is 0.
These modules use a technique known as Amplitude Shift Keying to transmit digital data over the radio. In amplitude shift keying, the amplitude of the carrier wave, 433 MHz signal in our case, is modified in response to an incoming data signal.
DL2211Mk06
2 x Moteino R2 (RFM12B)
1 x Lithium Ion Battery – 1 Ah
1 x SparkFun FTDI Basic Breakout – 5V
1 x SparkFun Cerberus USB Cable
Moteino R2 (Send)
TR0 – Digital 2
LED – Digital 9
TR1 – Digital 10
TR2 – Digital 11
TR3 – Digital 12
TR4 – Digital 13
VIN – +3.3V
GND – GND
DL2211Mk06ps.ino
/* ***** Don Luc Electronics © *****
Software Version Information
Project #26 - Radio Frequency - Moteino ASK - Mk03
26-03
Send
DL2211Mk06ps.ino
2 x Moteino R2 (RFM12B)
1 x Lithium Ion Battery - 1Ah
1 x SparkFun FTDI Basic Breakout - 5V
1 x SparkFun Cerberus USB Cable
*/

// Include the Library Code
// RFM12B Radio
#include <RFM12B.h>
// Sleep
#include <avr/sleep.h>

// You will need to initialize the radio by telling it what ID
// it has and what network it's on
// The NodeID takes values from 1-127, 0 is reserved for sending
// broadcast messages (send to all nodes)
// The Network ID takes values from 0-255
// By default the SPI-SS line used is D10 on Atmega328.
// You can change it by calling .SetCS(pin) where pin can be {8,9,10}
// Network ID used for this unit
#define NODEID        2
// The network ID we are on
#define NETWORKID    99
// The node ID we're sending to
#define GATEWAYID     1
// # of ms to wait for an ack
#define ACK_TIME     50
// Serial
#define SERIAL_BAUD  115200

// Encryption is OPTIONAL
// to enable encryption you will need to:
// - provide a 16-byte encryption KEY (same on all nodes that talk encrypted)
// - to call .Encrypt(KEY) to start encrypting
// - to stop encrypting call .Encrypt(NULL)
uint8_t KEY[] = "ABCDABCDABCDABCD";

// Wait this many ms between sending packets
int interPacketDelay = 1000;
// Input
char input = 0;

// Need an instance of the RFM12B Radio Module
RFM12B radio;
// Send Size
byte sendSize = 0;
// Payload
char payload[] = "abcdefghijklmnopqrstuvwxyzABCDEFGHIJKLMNOPQRSTUVWXYZ1234567890~!@#$%^&*(){}[]`|<>?+=:;,.";
// Request ACK
bool requestACK = false;

// LED
int iLED = 9;

// Software Version Information
String sver = "26-03";

void loop()
{

  // is RFM12B Radio
  isRFM12BRadio();

  // Inter Packet Delay
  delay(interPacketDelay);

}
getRFM12BRadio.ino
// RFM12B Radio
void isSetupRFM12BRadio(){

  // RFM12B Radio
  radio.Initialize(NODEID, RF12_433MHZ, NETWORKID);
  // Encryption
  radio.Encrypt(KEY);
  // Sleep right away to save power
  radio.Sleep();
  // Transmitting
  Serial.println("Transmitting...\n\n");

}
// is RFM12 BRadio
void isRFM12BRadio(){

  // Serial input of [0-9] will change the transmit delay between 100-1000ms
  if (Serial.available() > 0)
  {

    // Input
    input = Serial.read();
    // [1..9] = {100..900}ms; [0]=1000ms
    if (input >= 48 && input <= 57)
    {

      // Inter Packet Delay
      interPacketDelay = 100 * (input-48);

      if (interPacketDelay == 0) interPacketDelay = 1000;

      Serial.print("\nChanging delay to ");
      Serial.print(interPacketDelay);
      Serial.println("ms\n");

    }

  }

  // Serial
  Serial.print("Sending[");
  Serial.print(sendSize+1);
  Serial.print("]:");

  for(byte i = 0; i < sendSize+1; i++)
    Serial.print((char)payload[i]);

  // Request ACK every 3rd xmission
  requestACK = !(sendSize % 3);

  // Wakeup
  radio.Wakeup();

  // Turn the LED on HIGH
  digitalWrite( iLED , HIGH);

  // Send
  radio.Send(GATEWAYID, payload, sendSize+1, requestACK);

  // Request ACK
  if (requestACK)
  {

    Serial.print(" - waiting for ACK...");
    if (waitForAck()) Serial.print("ok!");
    else Serial.print("nothing...");

  }

  // Turn the LED on LOW
  digitalWrite( iLED , LOW);

  // Sleep
  radio.Sleep();

  // Send Size
  sendSize = (sendSize + 1) % 88;

  // Serial
  Serial.println();

}
// Wait a few milliseconds for proper ACK, return true if received
static bool waitForAck(){

  // Now
  long now = millis();

  // ACK
  while (millis() - now <= ACK_TIME){


    if (radio.ACKReceived(GATEWAYID)){

      return true;

    }

  }

  return false;

}
setup.ino
// Setup
void setup(){

  // Serial
  Serial.begin(SERIAL_BAUD);

  // LED
  pinMode( iLED , OUTPUT);

  // RFM12B Radio
  isSetupRFM12BRadio();

}
——
Moteino R2 (Receive)
TR0 – Digital 2
LED – Digital 9
TR1 – Digital 10
TR2 – Digital 11
TR3 – Digital 12
TR4 – Digital 13
VIN – +3.3V
GND – GND
DL2211Mk06pr.ino
/* ***** Don Luc Electronics © *****
Software Version Information
Project #26 - Radio Frequency - Moteino ASK - Mk03
26-03
Receive
DL2211Mk06pr.ino
2 x Moteino R2 (RFM12B)
1 x Lithium Ion Battery - 1Ah
1 x SparkFun FTDI Basic Breakout - 5V
1 x SparkFun Cerberus USB Cable
*/

// Include the Library Code
// RFM12B Radio
#include <RFM12B.h>

// You will need to initialize the radio by telling it what ID
// it has and what network it's on
// The NodeID takes values from 1-127, 0 is reserved for sending
// broadcast messages (send to all nodes)
// The Network ID takes values from 0-255
// By default the SPI-SS line used is D10 on Atmega328.
// You can change it by calling .SetCS(pin) where pin can be {8,9,10}
// Network ID used for this unit
#define NODEID        1
// The network ID we are on
#define NETWORKID    99
// Serial
#define SERIAL_BAUD  115200

// Encryption is OPTIONAL
// to enable encryption you will need to:
// - provide a 16-byte encryption KEY (same on all nodes that talk encrypted)
// - to call .Encrypt(KEY) to start encrypting
// - to stop encrypting call .Encrypt(NULL)
uint8_t KEY[] = "ABCDABCDABCDABCD";

// Need an instance of the RFM12B Radio Module
RFM12B radio;

// LED
int iLED = 9;

// Software Version Information
String sver = "26-03";

void loop() {

  // is RFM12B Radio
  isRFM12BRadio();

}
getRFM12BRadio.ino
// RFM12B Radio
void isSetupRFM12BRadio()
{

  // RFM12B Radio
  radio.Initialize(NODEID, RF12_433MHZ, NETWORKID);
  // Encryption
  radio.Encrypt(KEY);
  // Transmitting
  Serial.println("Listening...");

}
// is RFM12 BRadio
void isRFM12BRadio()
{

  // Receive
  if (radio.ReceiveComplete())
  {

    // CRC Pass
    if (radio.CRCPass())
    {

      // Serial
      Serial.print('[');
      Serial.print(radio.GetSender());
      Serial.print("] ");
      // Can also use radio.GetDataLen() if you don't like pointers
      for (byte i = 0; i < *radio.DataLen; i++)
      {

        Serial.print((char)radio.Data[i]);

      }

      // Turn the LED on HIGH
      digitalWrite( iLED , HIGH);

      // ACK Requested
      if (radio.ACKRequested())
      {

        // Send ACK
        radio.SendACK();
        Serial.print(" - ACK Sent");

      }

      // Turn the LED on LOW
      digitalWrite( iLED , LOW);

    }
    else
    {

      // BAD-CRC
      Serial.print("BAD-CRC");

    }

    // Serial
    Serial.println();

  }

}
setup.ino
// Setup
void setup()
{

  // Serial
  Serial.begin(SERIAL_BAUD);

  // LED
  pinMode( iLED , OUTPUT);

  // RFM12B Radio
  isSetupRFM12BRadio();

}
——
People can contact us: https://www.donluc.com/?page_id=1927
Technology Experience
- Single-Board Microcontrollers (PIC, Arduino, Raspberry Pi,Espressif, etc…)
- IoT
- Wireless (Radio Frequency, Bluetooth, WiFi, Etc…)
- Robotics
- Camera and Video Capture Receiver Stationary, Wheel/Tank and Underwater Vehicle
- Unmanned Vehicles Terrestrial and Marine
- Machine Learning
- RTOS
- Research & Development (R & D)
Instructor, E-Mentor, STEAM, and Arts-Based Training
- IoT
- PIC Microcontrollers
- Arduino
- Raspberry Pi
- Espressif
- Robotics
Follow Us
Luc Paquin – Curriculum Vitae – 2023
https://www.donluc.com/luc/
Web: https://www.donluc.com/
Facebook: https://www.facebook.com/neosteam.labs.9/
YouTube: https://www.youtube.com/channel/UC5eRjrGn1CqkkGfZy0jxEdA
Twitter: https://twitter.com/labs_steam
Pinterest: https://www.pinterest.com/NeoSteamLabs/
Instagram: https://www.instagram.com/neosteamlabs/
Don Luc
Project #26 – Radio Frequency – Moteino Receive – Mk02
——
#DonLucElectronics #DonLuc #RadioFrequency #Moteino #Receive #Arduino #Project #Fritzing #Programming #Electronics #Microcontrollers #Consultant
——
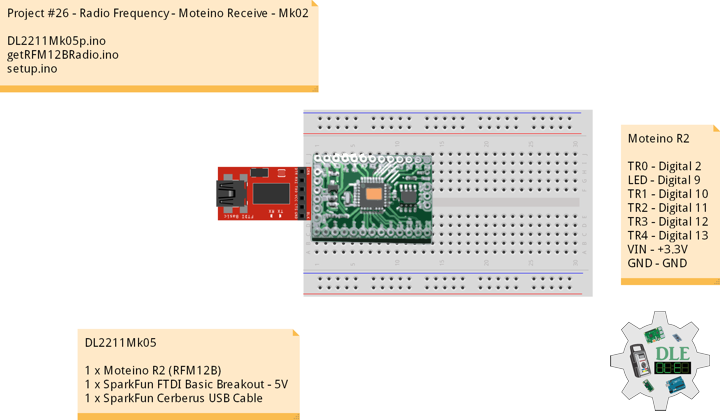
——
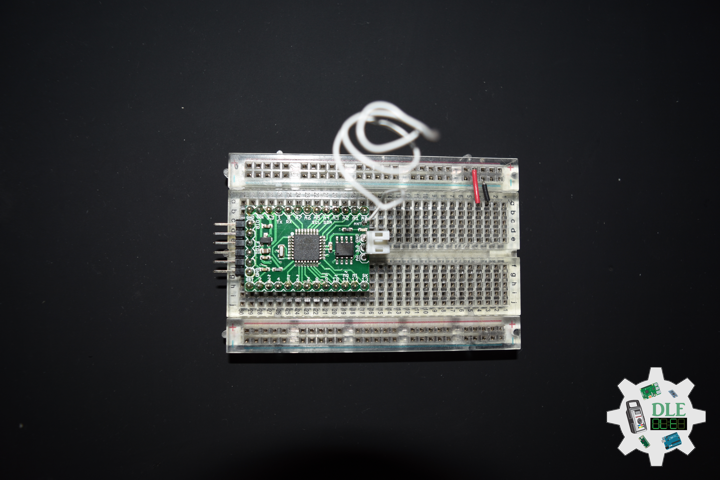
——
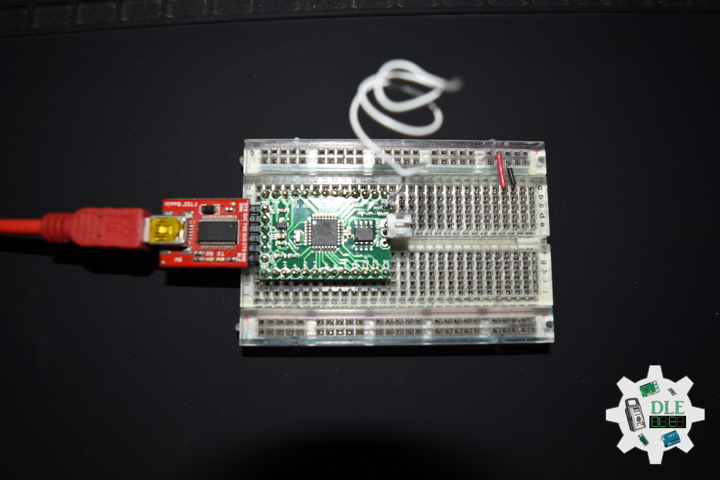
——
Radio Receiver
In radio communications, a radio receiver, also known as a receiver, a wireless, or simply a radio, is an electronic device that receives radio waves and converts the information carried by them to a usable form. It is used with an antenna. The antenna intercepts radio waves and converts them to tiny alternating currents which are applied to the receiver, and the receiver extracts the desired information. The receiver uses electronic filters to separate the desired radio frequency signal from all the other signals picked up by the antenna, an electronic amplifier to increase the power of the signal for further processing, and finally recovers the desired information through demodulation.
Full Duplex
A simple illustration of a full-duplex communication system. Full-duplex is not common in handheld radios as shown here due to the cost and complexity of common duplexing methods, but is used in telephones, cellphones and cordless phones. A full-duplex (FDX) system allows communication in both directions, and, unlike half-duplex, allows this to happen simultaneously.
Land-line telephone networks are full-duplex since they allow both callers to speak and be heard at the same time. Full-duplex operation is achieved on a two-wire circuit through the use of a hybrid coil in a telephone hybrid. Modern cell phones are also full-duplex.
There is a technical distinction between full-duplex communication, which uses a single physical communication channel for both directions simultaneously, and dual-simplex communication which uses two distinct channels, one for each direction. From the user perspective, the technical difference doesn’t matter and both variants are commonly referred to as full duplex.
DL2211Mk05
1 x Moteino R2 (RFM12B)
1 x SparkFun FTDI Basic Breakout – 5V
1 x SparkFun Cerberus USB Cable
Moteino R2
TR0 – Digital 2
LED – Digital 9
TR1 – Digital 10
TR2 – Digital 11
TR3 – Digital 12
TR4 – Digital 13
VIN – +3.3V
GND – GND
——
DL2211Mk05p.ino
/* ***** Don Luc Electronics © *****
Software Version Information
Project #26 - Radio Frequency - Moteino Receive - Mk02
26-02
DL2211Mk05p.ino
1 x Moteino R2 (RFM12B)
1 x SparkFun FTDI Basic Breakout - 5V
1 x SparkFun Cerberus USB Cable
*/

// Include the Library Code
// RFM12B Radio
#include <RFM12B.h>

// You will need to initialize the radio by telling it what ID
// it has and what network it's on
// The NodeID takes values from 1-127, 0 is reserved for sending
// broadcast messages (send to all nodes)
// The Network ID takes values from 0-255
// By default the SPI-SS line used is D10 on Atmega328.
// You can change it by calling .SetCS(pin) where pin can be {8,9,10}
// Network ID used for this unit
#define NODEID        1
// The network ID we are on
#define NETWORKID    99
// Serial
#define SERIAL_BAUD  115200

// Encryption is OPTIONAL
// to enable encryption you will need to:
// - provide a 16-byte encryption KEY (same on all nodes that talk encrypted)
// - to call .Encrypt(KEY) to start encrypting
// - to stop encrypting call .Encrypt(NULL)
uint8_t KEY[] = "ABCDABCDABCDABCD";

// Need an instance of the RFM12B Radio Module
RFM12B radio;

// LED
int iLED = 9;

// Software Version Information
String sver = "26-02";

void loop() {

  // is RFM12B Radio
  isRFM12BRadio();

}
getRFM12BRadio.ino
// RFM12B Radio
void isSetupRFM12BRadio()
{

  // RFM12B Radio
  radio.Initialize(NODEID, RF12_433MHZ, NETWORKID);
  // Encryption
  radio.Encrypt(KEY);
  // Transmitting
  Serial.println("Listening...");

}
// is RFM12 BRadio
void isRFM12BRadio()
{

  // Receive
  if (radio.ReceiveComplete())
  {

    // CRC Pass
    if (radio.CRCPass())
    {

      // Serial
      Serial.print('[');
      Serial.print(radio.GetSender());
      Serial.print("] ");
      // Can also use radio.GetDataLen() if you don't like pointers
      for (byte i = 0; i < *radio.DataLen; i++)
      {

        Serial.print((char)radio.Data[i]);

      }

      // Turn the LED on HIGH
      digitalWrite( iLED , HIGH);

      // ACK Requested
      if (radio.ACKRequested())
      {

        // Send ACK
        radio.SendACK();
        Serial.print(" - ACK Sent");

      }

      // Turn the LED on LOW
      digitalWrite( iLED , LOW);

    }
    else
    {

      // BAD-CRC
      Serial.print("BAD-CRC");

    }

    // Serial
    Serial.println();

  }

}
setup.ino
// Setup
void setup()
{

  // Serial
  Serial.begin(SERIAL_BAUD);

  // LED
  pinMode( iLED , OUTPUT);

  // RFM12B Radio
  isSetupRFM12BRadio();

}
——
People can contact us: https://www.donluc.com/?page_id=1927
Technology Experience
- Single-Board Microcontrollers (PIC, Arduino, Raspberry Pi,Espressif, etc…)
- IoT
- Wireless (Radio Frequency, Bluetooth, WiFi, Etc…)
- Robotics
- Camera and Video Capture Receiver Stationary, Wheel/Tank and Underwater Vehicle
- Unmanned Vehicles Terrestrial and Marine
- Machine Learning
- RTOS
- Research & Development (R & D)
Instructor, E-Mentor, STEAM, and Arts-Based Training
- IoT
- PIC Microcontrollers
- Arduino
- Raspberry Pi
- Espressif
- Robotics
Follow Us
Luc Paquin – Curriculum Vitae – 2023
https://www.donluc.com/luc/
Web: https://www.donluc.com/
Facebook: https://www.facebook.com/neosteam.labs.9/
YouTube: https://www.youtube.com/channel/UC5eRjrGn1CqkkGfZy0jxEdA
Twitter: https://twitter.com/labs_steam
Pinterest: https://www.pinterest.com/NeoSteamLabs/
Instagram: https://www.instagram.com/neosteamlabs/
Don Luc