Program ESP8266
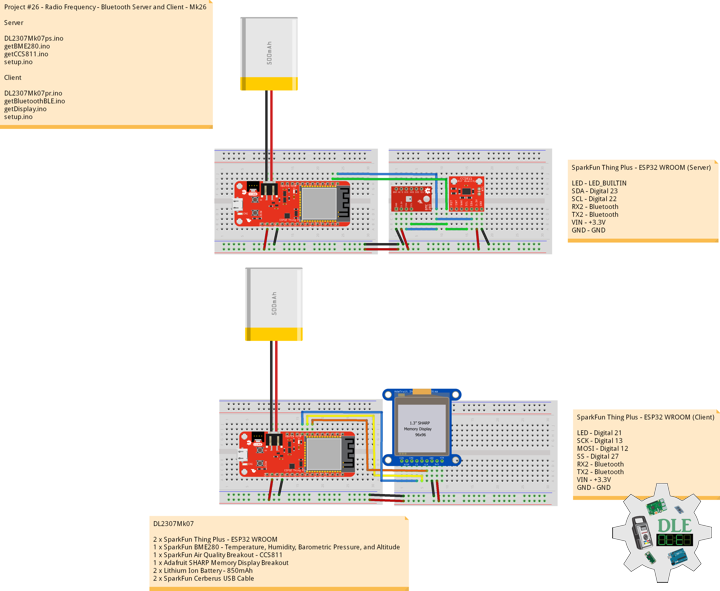
Project #26 – Radio Frequency – Bluetooth Server and Client – Mk26
——
#DonLucElectronics #DonLuc #RadioFrequency #Bluetooth #Display #SparkFun #BME280 #CCS811 #Arduino #Project #Fritzing #Programming #Electronics #Microcontrollers #Consultant
——
——
——
——-
Bluetooth Server and Client
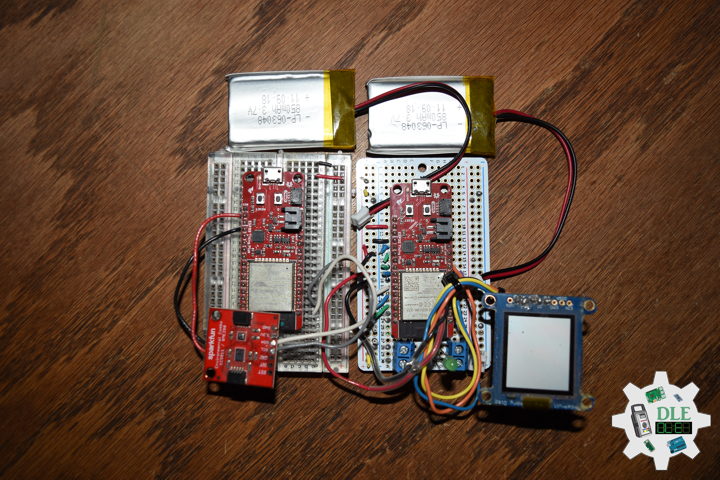
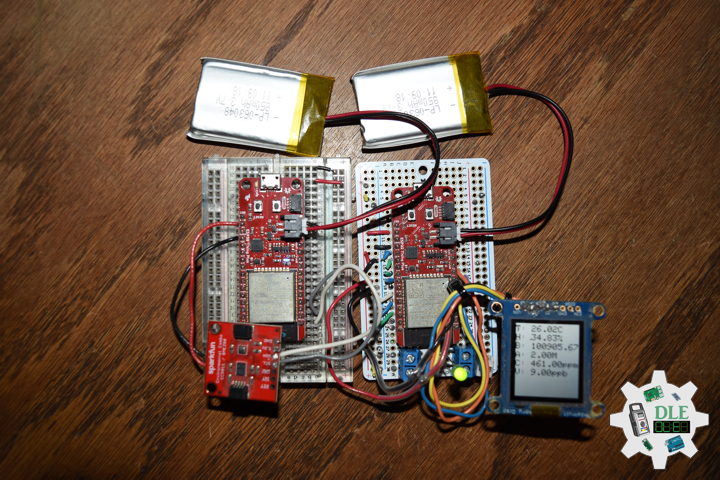
Connect the SparkFun BME280 and CCS811 this is the “Server” board. Upload SparkFun Thing Plus the Server code to the board using the USB cable. When uploading is complete, disconnect this board from the computer. Now, connect the Lithium Ion battery to the “Server”. Next, connect the second SparkFun Thing Plus to your computer and upload the Client code to the board. We have two Arduino sketches to upload to the SparkFun Thing Plus boards. Upload the first sketch to the Server SparkFun Thing Plus and the second sketch to the Client SparkFun Thing Plus.
DL2307Mk07
2 x SparkFun Thing Plus – ESP32 WROOM
1 x SparkFun BME280 – Temperature, Humidity, Barometric Pressure, and Altitude
1 x SparkFun Air Quality Breakout – CCS811
1 x Adafruit SHARP Memory Display Breakout
2 x Lithium Ion Battery – 850mAh
2 x SparkFun Cerberus USB Cable
SparkFun Thing Plus – ESP32 WROOM (Server)
LED – LED_BUILTIN
SDA – Digital 23
SCL – Digital 22
RX2 – Bluetooth
TX2 – Bluetooth
VIN – +3.3V
GND – GND
——
DL2307Mk07ps.ino
/* ***** Don Luc Electronics © *****
Software Version Information
Project #26 - Radio Frequency - Bluetooth Server and Client - Mk26
26-26
DL2307Mk07ps.ino
2 x SparkFun Thing Plus - ESP32 WROOM
1 x SparkFun BME280 - Temperature, Humidity, Barometric Pressure, and Altitude
1 x SparkFun Air Quality Breakout - CCS811
1 x Adafruit SHARP Memory Display Breakout
2 x Lithium Ion Battery - 850mAh
2 x SparkFun Cerberus USB Cable
*/

// Include the Library Code
// BLE Device
#include <BLEDevice.h>
// BLE Utils
#include <BLEUtils.h>
// BLE Serve
#include <BLEServer.h>
// Two Wire Interface (TWI/I2C)
#include <Wire.h>
// SparkFun BME280 - Temperature, Humidity, Barometric Pressure, and Altitude
#include <SparkFunBME280.h>
// SparkFun CCS811 - eCO2 & tVOC
#include <SparkFunCCS811.h>

// See the following for generating UUIDs:
// https://www.uuidgenerator.net/
#define SERVICE_UUID            "7c394dc4-49a8-4c22-8a5b-b1612d8c13c1"
#define CHARACTERISTIC_UUID     "a4c4cec2-f394-4f7a-b9de-89047feca74b"
#define CHARACTERISTIC_TEM_UUID "74bd92c6-89d0-4387-823e-97e7e0fb7a2b"
#define CHARACTERISTIC_HUM_UUID "1b63f246-b97f-4d2e-b8eb-f69e20a23a34"
#define CHARACTERISTIC_BAR_UUID "43788175-37a7-4280-93c6-c690324d088e"
#define CHARACTERISTIC_ALT_UUID "609deed9-a72d-45c3-aaba-14a73b0d8fda"
#define CHARACTERISTIC_ECO_UUID "ab17aace-c0b9-4bd3-bb93-7715d9afaeea"
#define CHARACTERISTIC_VOC_UUID "6a8bf86a-9d40-457c-9f7f-f13a3d6803f1"
// Makes the chracteristic globlal
static BLECharacteristic *pCharacteristicTEM;
static BLECharacteristic *pCharacteristicHUM;
static BLECharacteristic *pCharacteristicBAR;
static BLECharacteristic *pCharacteristicALT;
static BLECharacteristic *pCharacteristicECO;
static BLECharacteristic *pCharacteristicVOC;

// SparkFun BME280 - Temperature, Humidity, Barometric Pressure, and Altitude
BME280 myBME280;
float BMEtempC = 0;
float BMEhumid = 0;
float BMEpressure = 0;
float BMEaltitudeM = 0;
String FullString = "";

// SparkFun CCS811 - eCO2 & tVOC
// Default I2C Address
#define CCS811_ADDR 0x5B
CCS811 myCCS811(CCS811_ADDR);
float CCS811CO2 = 0;
float CCS811TVOC = 0;
String FullStringA = "";

// Software Version Information
String sver = "26-26";

void loop() {

  // SparkFun BME280 - Temperature, Humidity, Barometric Pressure, and Altitude
  isBME280();

  // SparkFun CCS811 - eCO2 & tVOC
  isCCS811();

  // Delay 1 sec
  delay(1000);

}
getBME280.ino
// SparkFun BME280 - Temperature, Humidity, Barometric Pressure, and Altitude
// isBME280 - Temperature, Humidity, Barometric Pressure, and Altitude
void isBME280(){

  // Temperature Celsius
  BMEtempC = myBME280.readTempC();
  // Humidity
  BMEhumid = myBME280.readFloatHumidity();
  // Barometric Pressure
  BMEpressure = myBME280.readFloatPressure();
  // Altitude Meters
  BMEaltitudeM = (myBME280.readFloatAltitudeMeters(), 2);

  // setValue takes uint8_t, uint16_t, uint32_t, int, float, double and string
  pCharacteristicTEM->setValue(BMEtempC);
  pCharacteristicHUM->setValue(BMEhumid);
  pCharacteristicBAR->setValue(BMEpressure);
  pCharacteristicALT->setValue(BMEaltitudeM);

  // FullString
  FullString = "Temperature = " + String(BMEtempC,2) + " Humidity = "
  + String(BMEhumid,2) + " Barometric = " + String(BMEpressure,2)
  + " Altitude Meters = " + String(BMEaltitudeM,2) + "\r\n";

  // FullString Bluetooth Serial + Serial
  for(int i = 0; i < FullString.length(); i++)
  {

    // Serial
    Serial.write(FullString.c_str()[i]);

  }

}
getCCS811.ino
// CCS811 - eCO2 & tVOC
// isCCS811 - eCO2 & tVOC
void isCCS811(){

  // This sends the temperature & humidity data to the CCS811
  myCCS811.setEnvironmentalData(BMEhumid, BMEtempC);

  // Calling this function updates the global tVOC and eCO2 variables
  myCCS811.readAlgorithmResults();

  // eCO2 Concentration
  CCS811CO2 = myCCS811.getCO2();

  // tVOC Concentration
  CCS811TVOC = myCCS811.getTVOC();

  // setValue takes uint8_t, uint16_t, uint32_t, int, float, double and string
  pCharacteristicECO->setValue(CCS811CO2);
  pCharacteristicVOC->setValue(CCS811TVOC);

  // FullStringA
  FullStringA = "TVOCs = " + String(CCS811TVOC,2) + " eCO2 = "
  + String(CCS811CO2,2) + "\r\n";

  // FullStringA Bluetooth Serial + Serial
  for(int i = 0; i < FullStringA.length(); i++)
  {

    // Serial
    Serial.write(FullStringA.c_str()[i]);

  }


}
setup.ino
// Setup
void setup()
{

  // Serial Begin
  Serial.begin(115200);
  Serial.println("Starting BLE work!");

  // Give display time to power on
  delay(100);

  // Wire - Inialize I2C Hardware
  Wire.begin();

  // Give display time to power on
  delay(100);

  // SparkFun BME280 - Temperature, Humidity, Barometric Pressure, and Altitude
  myBME280.begin();

  // CCS811 - eCO2 & tVOC
  myCCS811.begin();

  // Initialize digital pin LED_BUILTIN as an output
  pinMode(LED_BUILTIN, OUTPUT);
  // Turn the LED on HIGH
  digitalWrite(LED_BUILTIN, HIGH);

  // BLE Device Init
  BLEDevice::init("Don Luc Electronics Server");
  BLEServer *pServer = BLEDevice::createServer();
  BLEService *pService = pServer->createService(SERVICE_UUID);
  BLECharacteristic *pCharacteristic = pService->createCharacteristic(
                                         CHARACTERISTIC_UUID,
                                         BLECharacteristic::PROPERTY_READ |
                                         BLECharacteristic::PROPERTY_WRITE
                                       );

  pCharacteristicTEM = pService->createCharacteristic(
                                         CHARACTERISTIC_TEM_UUID,
                                         BLECharacteristic::PROPERTY_READ |
                                         BLECharacteristic::PROPERTY_WRITE
                                       );

  pCharacteristicHUM = pService->createCharacteristic(
                                         CHARACTERISTIC_HUM_UUID,
                                         BLECharacteristic::PROPERTY_READ |
                                         BLECharacteristic::PROPERTY_WRITE
                                       );

  pCharacteristicBAR = pService->createCharacteristic(
                                         CHARACTERISTIC_BAR_UUID,
                                         BLECharacteristic::PROPERTY_READ |
                                         BLECharacteristic::PROPERTY_WRITE
                                       );

  pCharacteristicALT = pService->createCharacteristic(
                                         CHARACTERISTIC_ALT_UUID,
                                         BLECharacteristic::PROPERTY_READ |
                                         BLECharacteristic::PROPERTY_WRITE
                                       );

  pCharacteristicVOC = pService->createCharacteristic(
                                         CHARACTERISTIC_VOC_UUID,
                                         BLECharacteristic::PROPERTY_READ |
                                         BLECharacteristic::PROPERTY_WRITE
                                       );

  pCharacteristicECO = pService->createCharacteristic(
                                         CHARACTERISTIC_ECO_UUID,
                                         BLECharacteristic::PROPERTY_READ |
                                         BLECharacteristic::PROPERTY_WRITE
                                       );

  pCharacteristic->setValue("Luc Paquin");
  pService->start();

  // This still is working for backward compatibility
  // BLEAdvertising *pAdvertising = pServer->getAdvertising();
  // BLE Advertising
  BLEAdvertising *pAdvertising = BLEDevice::getAdvertising();
  pAdvertising->addServiceUUID(SERVICE_UUID);
  pAdvertising->setScanResponse(true);
  // Functions that help with iPhone connections issue
  pAdvertising->setMinPreferred(0x06);
  pAdvertising->setMinPreferred(0x12);
  BLEDevice::startAdvertising();

}
——
SparkFun Thing Plus – ESP32 WROOM (Client)
LED – Digital 21
SCK – Digital 13
MOSI – Digital 12
SS – Digital 27
RX2 – Bluetooth
TX2 – Bluetooth
VIN – +3.3V
GND – GND
——
DL2307Mk07pr.ino
/* ***** Don Luc Electronics © *****
Software Version Information
Project #26 - Radio Frequency - Bluetooth Server and Client - Mk26
26-26
DL2307Mk07pr.ino
2 x SparkFun Thing Plus - ESP32 WROOM
1 x SparkFun BME280 - Temperature, Humidity, Barometric Pressure, and Altitude
1 x SparkFun Air Quality Breakout - CCS811
1 x Adafruit SHARP Memory Display Breakout
2 x Lithium Ion Battery - 850mAh
2 x SparkFun Cerberus USB Cable
*/

// Include the Library Code
// Bluetooth BLE Device
#include "BLEDevice.h"
// SHARP Memory Display
#include <Adafruit_SharpMem.h>
// Adafruit GFX Library
#include <Adafruit_GFX.h>

// SHARP Memory Display
// any pins can be used
#define SHARP_SCK  13
#define SHARP_MOSI 12
#define SHARP_SS   27
// Set the size of the display here, e.g. 144x168!
Adafruit_SharpMem display(SHARP_SCK, SHARP_MOSI, SHARP_SS, 144, 168);
// The currently-available SHARP Memory Display (144x168 pixels)
// requires > 4K of microcontroller RAM; it WILL NOT WORK on Arduino Uno
// or other <4K "classic" devices.
#define BLACK 0
#define WHITE 1
// 1/2 of lesser of display width or height
int minorHalfSize;

// The remote service we wish to connect to.
static BLEUUID serviceUUID("7c394dc4-49a8-4c22-8a5b-b1612d8c13c1");
// The characteristic of the remote service we are interested in.
static BLEUUID    charUUID("a4c4cec2-f394-4f7a-b9de-89047feca74b");
// Use the same UUID as on the server
static BLEUUID    charTEMUUID("74bd92c6-89d0-4387-823e-97e7e0fb7a2b");
static BLEUUID    charHUMUUID("1b63f246-b97f-4d2e-b8eb-f69e20a23a34");
static BLEUUID    charBARUUID("43788175-37a7-4280-93c6-c690324d088e");
static BLEUUID    charALTUUID("609deed9-a72d-45c3-aaba-14a73b0d8fda");
static BLEUUID    charECOUUID("ab17aace-c0b9-4bd3-bb93-7715d9afaeea");
static BLEUUID    charVOCUUID("6a8bf86a-9d40-457c-9f7f-f13a3d6803f1");
static boolean doConnect = false;
static boolean connected = false;
static boolean doScan = false;
static BLERemoteCharacteristic* pRemoteCharacteristic;
static BLERemoteCharacteristic* pRemoteCharacteristicTEM;
static BLERemoteCharacteristic* pRemoteCharacteristicHUM;
static BLERemoteCharacteristic* pRemoteCharacteristicBAR;
static BLERemoteCharacteristic* pRemoteCharacteristicALT;
static BLERemoteCharacteristic* pRemoteCharacteristicECO;
static BLERemoteCharacteristic* pRemoteCharacteristicVOC;

static BLEAdvertisedDevice* myDevice;
float TEMValue;
float HUMValue;
float BARValue;
float ALTValue;
float ECOValue;
float VOCValue;

int iLED = 21;

// Software Version Information
String sver = "26-26";

void loop() {

  isBluetoothBLE();

  isDisplayEnvironmental();

}
getBluetoothBLE.ino
// Bluetooth BLE
void isBluetoothBLE(){

  // If the flag "doConnect" is true then we have scanned for
  // and found the desired
  // BLE Server with which we wish to connect.  Now we connect to it.
  // Once we are connected we set the connected flag to be true.
  if (doConnect == true) {
    if (connectToServer()) {
      Serial.println("We are now connected to the BLE Server.");
    } else {
      Serial.println("We have failed to connect to the server; there is nothin more we will do.");
    }
    doConnect = false;
  }

  // If we are connected to a peer BLE Server, update the characteristic each time we are reached
  // with the current time since boot.
  if (connected) {
    String newValue = "Time since boot: " + String(millis()/1000);
    //Serial.println("Setting new characteristic value to \"" + newValue + "\"");

    // Set the characteristic's value to be the array of bytes that is actually a string.
   // pRemoteCharacteristic->writeValue(newValue.c_str(), newValue.length());//***********JKO
  }else if(doScan){
    BLEDevice::getScan()->start(0);  // this is just example to start scan after disconnect, most likely there is better way to do it in arduino
  }

  // read the Characteristics and store them in a variable
  // This also makes the print command do float handling
  TEMValue = pRemoteCharacteristicTEM->readFloat();
  HUMValue = pRemoteCharacteristicHUM->readFloat();
  BARValue = pRemoteCharacteristicBAR->readFloat();
  ALTValue = pRemoteCharacteristicALT->readFloat();
  ECOValue = pRemoteCharacteristicECO->readFloat();
  VOCValue = pRemoteCharacteristicVOC->readFloat();

}
// Notify Callback
static void notifyCallback(
  BLERemoteCharacteristic* pBLERemoteCharacteristic,
  uint8_t* pData,
  size_t length,
  bool isNotify) {
    Serial.print("Notify callback for characteristic ");
    Serial.print(pBLERemoteCharacteristic->getUUID().toString().c_str());
    Serial.print(" of data length ");
    Serial.println(length);
    Serial.print("data: ");
    Serial.println((char*)pData);
}
// My Client Callback
class MyClientCallback : public BLEClientCallbacks {
  void onConnect(BLEClient* pclient) {
  }

  void onDisconnect(BLEClient* pclient) {
    connected = false;
    Serial.println("onDisconnect");
  }
};
// Connect To Server
bool connectToServer() {
    Serial.print("Forming a connection to ");
    Serial.println(myDevice->getAddress().toString().c_str());

    BLEClient*  pClient  = BLEDevice::createClient();
    Serial.println(" - Created client");

    pClient->setClientCallbacks(new MyClientCallback());

    // Connect to the remove BLE Server.
    // if you pass BLEAdvertisedDevice instead of address,
    //it will be recognized type of peer device address (public or private)
    pClient->connect(myDevice);
    Serial.println(" - Connected to server");
    //set client to request maximum MTU from server (default is 23 otherwise)
    pClient->setMTU(517);

    // Obtain a reference to the service we are after in the remote BLE server.
    BLERemoteService* pRemoteService = pClient->getService(serviceUUID);
    if (pRemoteService == nullptr) {
      Serial.print("Failed to find our service UUID: ");
      Serial.println(serviceUUID.toString().c_str());
      pClient->disconnect();
      return false;
    }
    Serial.println(" - Found our service");

    // Obtain a reference to the characteristic in the service of the remote BLE server.
    pRemoteCharacteristic = pRemoteService->getCharacteristic(charUUID);
    if (pRemoteCharacteristic == nullptr) {
      Serial.print("Failed to find our characteristic UUID: ");
      Serial.println(charUUID.toString().c_str());
      pClient->disconnect();
      return false;
    }
    Serial.println(" - Found our characteristic");
    // Temperature Obtain a reference to the characteristic in the service
    // of the remote BLE server.
    pRemoteCharacteristicTEM = pRemoteService->getCharacteristic(charTEMUUID);
    if (pRemoteCharacteristicTEM == nullptr) {
      Serial.print("Failed to find our characteristic UUID Temperature: ");
      Serial.println(charTEMUUID.toString().c_str());
      pClient->disconnect();
      return false;
    }
    // Humidity Obtain a reference to the characteristic in the service
    // of the remote BLE server.
    pRemoteCharacteristicHUM = pRemoteService->getCharacteristic(charHUMUUID);
    if (pRemoteCharacteristicHUM == nullptr) {
      Serial.print("Failed to find our characteristic UUID Temperature: ");
      Serial.println(charHUMUUID.toString().c_str());
      pClient->disconnect();
      return false;
    }

    Serial.println(" - Found our characteristic");

    // Barometric Obtain a reference to the characteristic in the service
    // of the remote BLE server.
    pRemoteCharacteristicBAR = pRemoteService->getCharacteristic(charBARUUID);
    if (pRemoteCharacteristicBAR == nullptr) {
      Serial.print("Failed to find our characteristic UUID Barometric: ");
      Serial.println(charBARUUID.toString().c_str());
      pClient->disconnect();
      return false;
    }

    Serial.println(" - Found our characteristic");

    // Altitude Obtain a reference to the characteristic in the service
    // of the remote BLE server.
    pRemoteCharacteristicALT = pRemoteService->getCharacteristic(charALTUUID);
    if (pRemoteCharacteristicALT == nullptr) {
      Serial.print("Failed to find our characteristic UUID Altitude: ");
      Serial.println(charALTUUID.toString().c_str());
      pClient->disconnect();
      return false;
    }

    // eCO2 Concentration Obtain a reference to the characteristic in the service
    // of the remote BLE server.
    pRemoteCharacteristicECO = pRemoteService->getCharacteristic(charECOUUID);
    if (pRemoteCharacteristicECO == nullptr) {
      Serial.print("Failed to find our characteristic UUID eCO2 Concentration: ");
      Serial.println(charECOUUID.toString().c_str());
      pClient->disconnect();
      return false;
    }

    Serial.println(" - Found our characteristic");

    // tVOC Concentration Obtain a reference to the characteristic in the service
    // of the remote BLE server.
    pRemoteCharacteristicVOC = pRemoteService->getCharacteristic(charVOCUUID);
    if (pRemoteCharacteristicVOC == nullptr) {
      Serial.print("Failed to find our characteristic UUID tVOC Concentration: ");
      Serial.println(charVOCUUID.toString().c_str());
      pClient->disconnect();
      return false;
    }


    Serial.println(" - Found our characteristic");
    // Read the value of the characteristic.
    if(pRemoteCharacteristic->canRead()) {
      std::string value = pRemoteCharacteristic->readValue();
      Serial.print("The characteristic value was: ");
      Serial.println(value.c_str());
    }

    if(pRemoteCharacteristic->canNotify())
      pRemoteCharacteristic->registerForNotify(notifyCallback);

    connected = true;
    return true;

}
/**
 * Scan for BLE servers and find the first one that advertises the service we are looking for.
 */
class MyAdvertisedDeviceCallbacks: public BLEAdvertisedDeviceCallbacks {
 /**
   * Called for each advertising BLE server.
   */
  void onResult(BLEAdvertisedDevice advertisedDevice) {
    Serial.print("BLE Advertised Device found: ");
    Serial.println(advertisedDevice.toString().c_str());

    // We have found a device, let us now see if it contains the service we are looking for.
    if (advertisedDevice.haveServiceUUID() && advertisedDevice.isAdvertisingService(serviceUUID)) {

      BLEDevice::getScan()->stop();
      myDevice = new BLEAdvertisedDevice(advertisedDevice);
      doConnect = true;
      doScan = true;

    } // Found our server
  } // onResult
}; // MyAdvertisedDeviceCallbacks
getDisplay.ino
// Display
// SHARP Memory Display - UID
void isDisplayUID() {

    // Text Display
    // Clear Display
    display.clearDisplay();
    display.setRotation(2);
    display.setTextSize(3);
    display.setTextColor(BLACK);
    // Don Luc Electronics
    display.setCursor(0,10);
    display.println( "Don Luc" );
    display.setTextSize(2);
    display.setCursor(0,40);
    display.println( "Electronics" );
    // Version
    display.setTextSize(3);
    display.setCursor(0,70);
    display.println( "Version" );
    display.setTextSize(2);
    display.setCursor(0,100);
    display.println( sver );
    // Refresh
    display.refresh();
    delay( 5000 );

}
// Display Environmental
void isDisplayEnvironmental(){

    // Text Display Environmental
    // Clear Display
    display.clearDisplay();
    display.setRotation(2);
    display.setTextSize(2);
    display.setTextColor(BLACK);
    // Temperature Celsius
    display.setCursor(0,5);
    display.print( "T: " );
    display.print( TEMValue );
    display.println( "C" );
    // Humidity
    display.setCursor(0,25);
    display.print( "H: " );
    display.print( HUMValue );
    display.println( "%" );
    // Pressure
    display.setCursor(0,45);
    display.print( "B: " );
    display.print( BARValue );
    display.println( "" );
    // Altitude Meters
    display.setCursor(0,65);
    display.print( "A: " );
    display.print( ALTValue );
    display.println( "M" );
    // eCO2 Concentration
    display.setCursor(0,85);
    display.print( "C: " );
    display.print( ECOValue );
    display.println( "ppm" );
    // tVOC Concentration
    display.setCursor(0,105);
    display.print( "V: " );
    display.print( VOCValue );
    display.println( "ppb" );
    // Refresh
    display.refresh();
    delay( 100 );

}
setup.ino
// Setup
void setup()
{

  // Serial
  Serial.begin(115200);
  Serial.println("Starting Arduino BLE Client application...");

  // Initialize digital pin iLED as an output
  pinMode(iLED, OUTPUT);
  // Turn the LED on HIGH
  digitalWrite(iLED, HIGH);

  // SHARP Display start & clear the display
  display.begin();
  display.clearDisplay();

  // Display UID
  isDisplayUID();

  // Bluetooth BLE
  BLEDevice::init("");

  // Give display time to power on
  delay(100);

  BLEScan* pBLEScan = BLEDevice::getScan();
  pBLEScan->setAdvertisedDeviceCallbacks(new MyAdvertisedDeviceCallbacks());
  pBLEScan->setInterval(1349);
  pBLEScan->setWindow(449);
  pBLEScan->setActiveScan(true);
  pBLEScan->start(5, false);

}
——
People can contact us: https://www.donluc.com/?page_id=1927
Technology Experience
- Programming Language
- Single-Board Microcontrollers (PIC, Arduino, Raspberry Pi,Espressif, etc…)
- IoT
- Wireless (Radio Frequency, Bluetooth, WiFi, Etc…)
- Robotics
- Camera and Video Capture Receiver Stationary, Wheel/Tank and Underwater Vehicle
- Unmanned Vehicles Terrestrial and Marine
- Machine Learning
- RTOS
- Research & Development (R & D)
Instructor, E-Mentor, STEAM, and Arts-Based Training
- Programming Language
- IoT
- PIC Microcontrollers
- Arduino
- Raspberry Pi
- Espressif
- Robotics
Follow Us
Luc Paquin – Curriculum Vitae – 2023
https://www.donluc.com/luc/
Web: https://www.donluc.com/
Facebook: https://www.facebook.com/neosteam.labs.9/
YouTube: https://www.youtube.com/@thesass2063
Twitter: https://twitter.com/labs_steam
Pinterest: https://www.pinterest.com/NeoSteamLabs/
Instagram: https://www.instagram.com/neosteamlabs/
Don Luc
Instructor, E-Mentor, STEAM, and Arts-Based Training
——
#DonLucElectronics #DonLuc #Instructor #E-Mentor #STEAM #ArtsBasedTraining #Arduino #Project #Fritzing #Programming #Electronics #Microcontrollers #Consultant
——
——
——

——
——
What do remote controllers, routers, and robots all have in common? These beginner-friendly microcontrollers are easy to use and program with just a computers or laptop, a USB cable, and some open-source software. All the projects, here we come. Whether you are looking to build some cool electronic projects, learn programming, or wanting to teach others about electronics, this a teaching session will help you figure out what microcontroller is right for your needs, goals, and budgets. Here is some helpful content to start you on your electronics journey. There are different microcontrollers and it can be daunting to get started, especially if you’re just getting into electronics.
- Arduino Uno – R3, SparkFun RedBoard, Arduino Fio, LilyPad Arduino, FLORA, Adafruit METRO 328, Arduino Pro Mini 328, Adafruit Metro Mini 328, Adafruit Pro Trinket, Adafruit Feather 328P, Moteino, etcetera, is a microcontroller board based on the ATmega328 (5V/16MHz, 3.3V/8MHz).
- SparkFun Pro Micro, SparkFun Fio V3, Adafruit ItsyBitsy 32u4, Adafruit Feather 32u4, Circuit Playground Classic, etcetera, is a microcontroller board based on the ATmega32U4 (5V/16MHz, 3.3V/8MHz).
- Arduino Mega 2560 R3 is a microcontroller board based on the ATmega2560 (5V/16MHz).
- Arduino Nano Every is a microcontroller board based on the ATMega 4809 (5V/20MHz).
- Arduino Due is a microcontroller board based on the AT91SAM3X8E (3.3V/84MHz).
- SparkFun RedBoard Turbo, SparkFun SAMD21 Mini Breakout, Adafruit METRO M0 Express, LilyPad Simblee BLE, etcetera, is a microcontroller board based on the ATSAMD21G18 ARM Cortex M0+ (3.3V/48MHz).
- SparkFun Thing Plus – SAMD51, Adafruit Metro M4 Express, Adafruit Feather M4 Express, etcetera, is a microcontroller board based on the ATSAMD51 Cortex M4 (3.3V/120MHz).
- SparkFun Thing Plus – ESP32 WROOM, Adafruit HUZZAH32 – ESP32 Feather Board, etcetera, is a microcontroller board based on the Espressif Xtensa® dual-core 32-bit LX6 (3.3V/240MHz).
- Raspberry Pi 4 Model B is a microcontroller board based on the Broadcom BCM2711, quad-core Cortex-A72 (ARM v8) 64-bit SoC (5.1V/1.5GHz).
- Raspberry Pi Zero W is a microcontroller board based on the Broadcom BCM2837B0 64-bit ARM Cortex-A53 Quad Core Processor SoC (5.1V/1GHz). Etcetera…
At Don Luc Electronics I believe that an understanding of electronics is a core literacy that opens up a world of opportunities in the fields of robotics, Internet of Things (IoT), machine learning, engineering, fashion, medical industries, environmental sciences, performing arts and more. This guide is designed to explore the connection between software and hardware, introducing code and parts as they are used in the context of building engaging projects. The circuits in this guide progress in difficulty as new concepts and components are introduced. Completing each circuit means much more than just experimenting you will walk away with a fun project you can use and a sense of accomplishment that is just the beginning of your electronics journey. At the end of each circuit, you’ll find coding challenges that extend your learning and fuel ongoing innovation.
People can contact us: https://www.donluc.com/?page_id=1927
Technology Experience
- Single-Board Microcontrollers (PIC, Arduino, Raspberry Pi,Espressif, etc…)
- IoT
- Wireless (Radio Frequency, Bluetooth, WiFi, Etc…)
- Robotics
- Camera and Video Capture Receiver Stationary, Wheel/Tank and Underwater Vehicle
- Unmanned Vehicles Terrestrial and Marine
- Machine Learning
- RTOS
- Research & Development (R & D)
Instructor and E-Mentor
- IoT
- PIC Microcontrollers
- Arduino
- Raspberry Pi
- Espressif
- Robotics
Follow Us
Luc Paquin – Curriculum Vitae – 2023
https://www.donluc.com/luc/
Web: https://www.donluc.com/
Facebook: https://www.facebook.com/neosteam.labs.9/
YouTube: https://www.youtube.com/channel/UC5eRjrGn1CqkkGfZy0jxEdA
Twitter: https://twitter.com/labs_steam
Pinterest: https://www.pinterest.com/NeoSteamLabs/
Instagram: https://www.instagram.com/neosteamlabs/
Don Luc
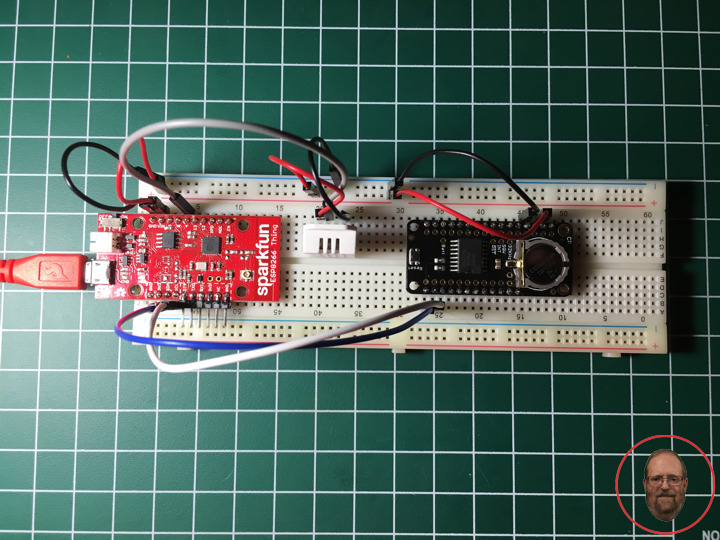
Project #10: ESP8266 Thing – Precision RTC – Mk04
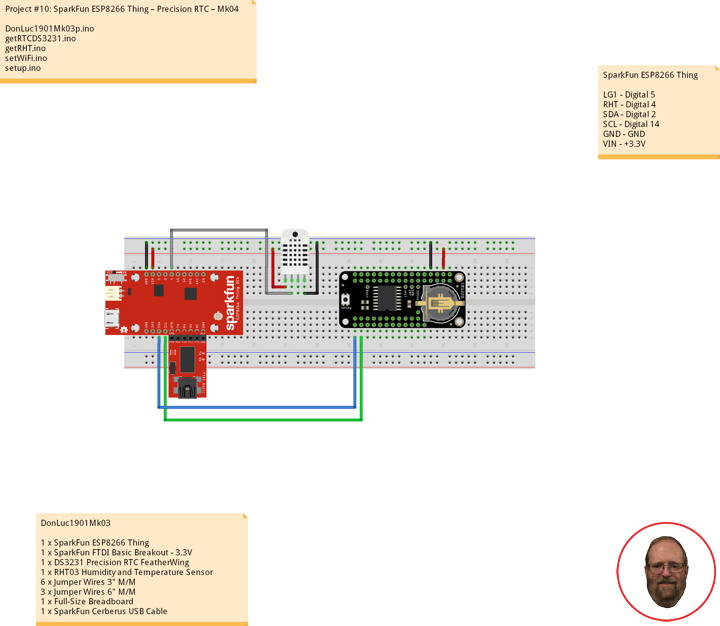
DS3231 Precision RTC FeatherWing
A Feather board without ambition is a Feather board without FeatherWings! This is the DS3231 Precision RTC FeatherWing: it adds an extremely accurate I2C-integrated Real Time Clock (RTC) with a Temperature Compensated Crystal Oscillator to any Feather main board. This RTC is the most precise you can get in a small, low power package. Most RTCs use an external 32kHz timing crystal that is used to keep time with low current draw.
With a CR1220 12mm lithium battery plugged into the top of the FeatherWing, you can get years of precision timekeeping, even when main power is lost. Great for datalogging and clocks, or anything where you need to really know the time.
DonLuc1901Mk03
1 x SparkFun ESP8266 Thing
1 x SparkFun FTDI Basic Breakout – 3.3V
1 x DS3231 Precision RTC FeatherWing
1 x RHT03 Humidity and Temperature Sensor
6 x Jumper Wires 3″ M/M
3 x Jumper Wires 6″ M/M
1 x Full-Size Breadboard
1 x SparkFun Cerberus USB Cable
SparkFun ESP8266 Thing
LG1 – Digital 5
RHT – Digital 4
SDA – Digital 2
SCL – Digital 14
GND – GND
VIN – +3.3V
DonLuc1901Mk03p.ino
// ***** Don Luc Electronics *****
// Software Version Information
// Project #10: SparkFun ESP8266 Thing – DS3231 Precision RTC  - Mk04
// 01-03
// DonLuc1901Mk03p.ino 01-03
// SparkFun ESP8266 Thing
// DS3231 Precision RTC
// RHT03 Humidity and Temperature Sensor

// Include Library Code
// WiFi
#include <ESP8266WiFi.h>
// RHT Humidity and Temperature Sensor
#include <SparkFun_RHT03.h>
// DS3231 Precision RTC
#include <RTClib.h>
#include <Wire.h>

// WiFi Definitions
const char WiFiAPPSK[] = "donlucmk01";

// Pin Definitions
const int LED_PIN = 5;                  // Thing's onboard, green LED
const int ANALOG_PIN = A0;              // The only analog pin on the Thing
const int DIGITAL_PIN = 12;             // Digital pin to be read

// WiFi
WiFiServer server(80);

// RHT Humidity and Temperature Sensor
const int RHT03_DATA_PIN = 4;           // RHT03 data pin Digital 4
RHT03 rht;                              // This creates a RTH03 object, which we'll use to interact with the sensor
float latestHumidity;
float latestTempC;
float latestTempF;

// DS3231 Precision RTC
RTC_DS3231 RTC;
String sDate;
String sTime;

void loop()
{

  // RHT03 Humidity and Temperature Sensor
  isRHT03();

  // DS3231 Precision RTC
  timeRTC();

  // Check if a client has connected
  WiFiClient client = server.available();
  if (!client) {
    return;
  }

  // Read the first line of the request
  String req = client.readStringUntil('\r');
  Serial.println(req);
  client.flush();

  // Match the request
  int val = -1; // We'll use 'val' to keep track of both the request type (read/set) and value if set.
  if (req.indexOf("/led/0") != -1)
    val = 0; // Will write LED low
  else if (req.indexOf("/led/1") != -1)
    val = 1; // Will write LED high
  else if (req.indexOf("/read") != -1)
    val = -2; // Will print pin reads
  // Otherwise request will be invalid. We'll say as much in HTML
  // Set GPIO5 according to the request
  if (val >= 0)
    digitalWrite(LED_PIN, val);

  client.flush();

  // Prepare the response. Start with the common header:
  String s = "HTTP/1.1 200 OK\r\n";
  s += "Content-Type: text/html\r\n\r\n";
  s += "<!DOCTYPE HTML>\r\n<html>\r\n";
  // If we're setting the LED, print out a message saying we did
  if (val >= 0)
  {
    s += "LED is now ";
    s += (val)?"on":"off";
  }
  else if (val == -2)
  { // If we're reading pins, print out those values:
    s += "Date = ";
    s += sDate;
    s += "<br>";
    s += "Time = ";
    s += sTime;
    s += "<br>";
    s += "Analog Pin = ";
    s += String(analogRead(ANALOG_PIN));
    s += "<br>";                                       // Go to the next line.
    s += "Digital Pin 12 = ";
    s += String(digitalRead(DIGITAL_PIN));
    s += "<br>";                                       // Go to the next line.
    s += "Humidity and Temperature";
    s += "<br>";                                       // Go to the next line.
    s += "Humidity : ";
    s += String(latestHumidity);                       // Humidity
    s += "%";
    s += "<br>"; // Go to the next line.
    s += "Celsius: ";
    s += String(latestTempC);                          //  Temperature *C
    s += "*C";
    s += "<br>"; // Go to the next line.
    s += "Fahrenheit: ";
    s += String(latestTempF);                          // Temperature *F
    s += "*F";
  }
  else
  {
    s += "Invalid Request.<br> Try /led/1, /led/0, or /read.";
  }
  s += "</html>\n";

  // Send the response to the client
  client.print(s);
  delay(1);
  Serial.println("Client disonnected");

  // The client will actually be disconnected when the function returns and 'client' object is detroyed

}
getRHT.ino
// RHT03 Humidity and Temperature Sensor
void isRHT03(){

  // Call rht.update() to get new humidity and temperature values from the sensor.
  int updateRet = rht.update();

  // The humidity(), tempC(), and tempF() functions can be called -- after
  // a successful update() -- to get the last humidity and temperature value
  latestHumidity = rht.humidity();
  latestTempC = rht.tempC();
  latestTempF = rht.tempF();

}
getRTCDS3231.ino
// DS3231 Precision RTC
void setupRTC() {

  // DS3231 Precision RTC
  RTC.begin();
  if (! RTC.begin()) {
    while (1);
  }

  DateTime now = RTC.now();

  if (RTC.lostPower()) {
    // Following line sets the RTC to the date & time this sketch was compiled
    RTC.adjust(DateTime(F(__DATE__), F(__TIME__)));
  }

}
// timeRTC
void timeRTC() {

    // DS3231 Precision RTC
    sDate = "";
    sTime = "";

    DateTime now = RTC.now();

    // sData
    sDate += String(now.year(), DEC);
    sDate += "/";
    sDate += String(now.month(), DEC);
    sDate += "/";
    sDate += String(now.day(), DEC);

    // sTime
    sTime += String(now.hour(), DEC);
    sTime += ":";
    sTime += String(now.minute(), DEC);
    sTime += ":";
    sTime += String(now.second(), DEC);

}
setWiFi.ino
// WiFi
void setupWiFi()
{

  // WiFi mode WIFI_AP
  WiFi.mode(WIFI_AP);

  // Append the last two bytes of the MAC (HEX'd) to "Thing-":
  uint8_t mac[WL_MAC_ADDR_LENGTH];
  WiFi.softAPmacAddress(mac);
  String macID = String(mac[WL_MAC_ADDR_LENGTH - 2], HEX) +
                 String(mac[WL_MAC_ADDR_LENGTH - 1], HEX);
  macID.toUpperCase();
  String AP_NameString = "ESP8266 Thing " + macID;

  char AP_NameChar[AP_NameString.length() + 1];
  memset(AP_NameChar, 0, AP_NameString.length() + 1);

  for (int i=0; i<AP_NameString.length(); i++)
    AP_NameChar[i] = AP_NameString.charAt(i);

  WiFi.softAP(AP_NameChar, WiFiAPPSK);

}
// init Hardware
void initHardware()
{

  // Serial
  Serial.begin(115200);
  // LED Green
  pinMode(DIGITAL_PIN, INPUT_PULLUP);
  pinMode(LED_PIN, OUTPUT);
  digitalWrite(LED_PIN, LOW);
  // RHT03 Humidity and Temperature Sensor
  // Call rht.begin() to initialize the sensor and our data pin
  rht.begin(RHT03_DATA_PIN);
  // DS3231 Precision RTC
  setupRTC();

}
setup.ino
// Setup
void setup()
{

  // Hardware
  initHardware();
  // WiFi
  setupWiFi();
  server.begin();

}
Don Luc
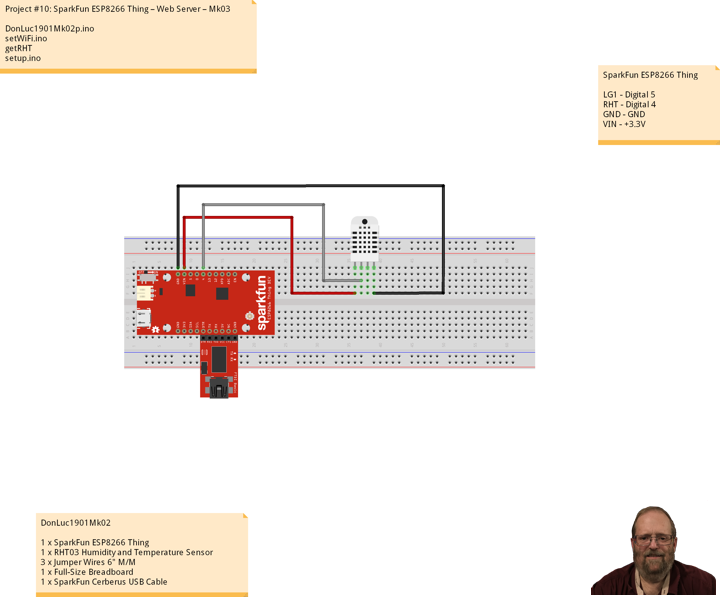
Project #10: ESP8266 Thing – Web Server – Mk03

AP Web Server
Not only can the ESP8266 connect to a WiFi network and interact with the Internet, but it can also set up a network of its own, allowing other devices to connect directly to it. This example demonstrates how to turn the ESP8266 into an access point (AP), and serve up web pages to any connected client.
After uploading this sketch, find another device that you can connect to a WiFi network – phone, laptop, etc. Look for a network called “Thing-XXXX”, where XXXX is the last 2 bytes of the Thing’s MAC address.
WiFi => Yes
ESP8266 Thing XXXX
He sketch sets the network’s password to “donlucmk01”.
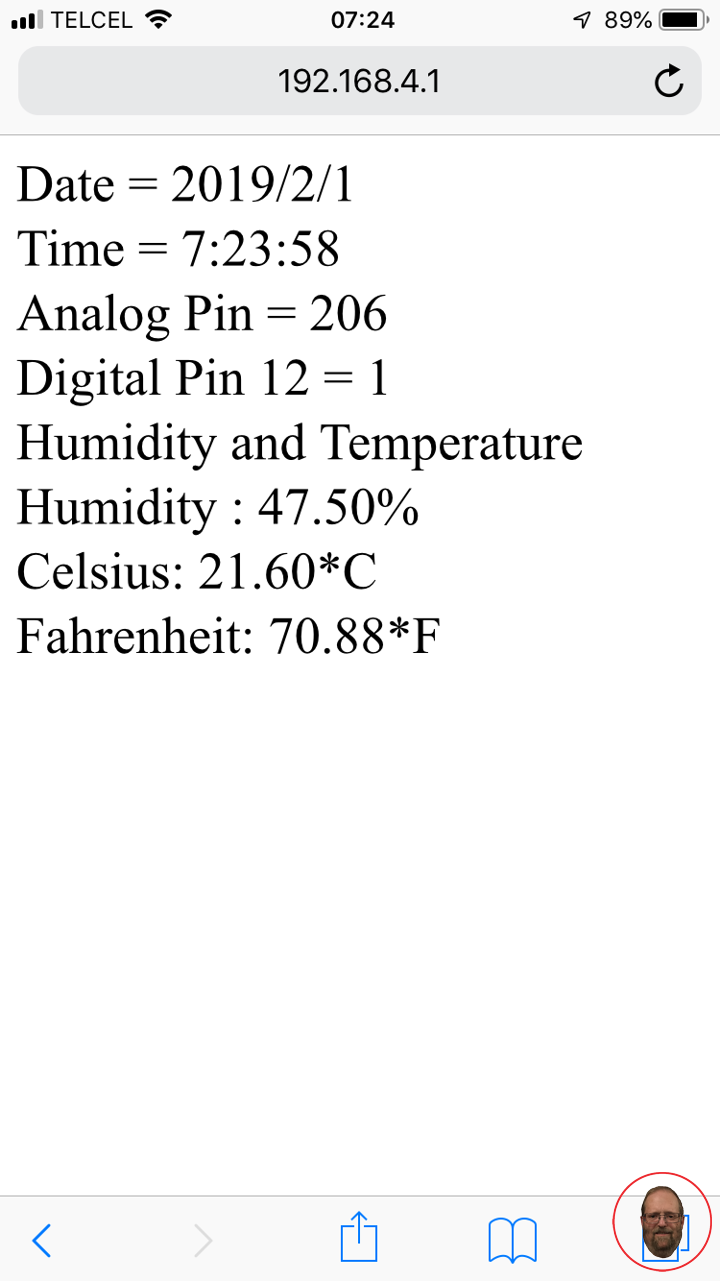
After connecting to your Thing’s AP network, load up a browser and point it to 192.168.4.1/read. The Thing should serve up a web page showing you its ADC and digital pin 12 readings:
Analog Pin = XXX
Digital Pin: XXX
Humidity and Temperature
Humidity: XX.XX%
Celsius: XX.XX*C
Fahrenheit: XX.XX*F
LED Green
After that, give 192.168.4.1/led/0 (No) and 192.168.4.1/led/1 (Yes) a try, and keep an eye on the Thing’s green LED while you do.
RHT03 Humidity and Temperature Sensor
The RHT03 is a low cost humidity and temperature sensor with a single wire digital interface. The sensor is calibrated and doesn’t require extra components so you can get right to measuring relative humidity and temperature.
DonLuc1901Mk02
1 x SparkFun ESP8266 Thing
1 x SparkFun FTDI Basic Breakout – 3.3V
1 x RHT03 Humidity and Temperature Sensor
3 x Jumper Wires 6″ M/M
1 x Full-Size Breadboard
1 x SparkFun Cerberus USB Cable
SparkFun ESP8266 Thing
LG1 – Digital 5
RHT – Digital 4
GND – GND
VIN – +3.3V
DonLuc1901Mk02p.ino
// ***** Don Luc Electronics *****
// Software Version Information
// Project #10: SparkFun ESP8266 Thing – AP Web Server - Mk02
// 01-02
// DonLuc1901Mk01p.ino 01-02
// SparkFun ESP8266 Thing
// AP Web Server
// RHT03 Humidity and Temperature Sensor

// Include Library Code
#include <ESP8266WiFi.h>
#include <SparkFun_RHT03.h>

// WiFi Definitions
const char WiFiAPPSK[] = "donlucmk01";

// Pin Definitions
const int LED_PIN = 5;                  // Thing's onboard, green LED
const int ANALOG_PIN = A0;              // The only analog pin on the Thing
const int DIGITAL_PIN = 12;             // Digital pin to be read

// WiFi
WiFiServer server(80);

// RHT Humidity and Temperature Sensor
const int RHT03_DATA_PIN = 4;           // RHT03 data pin Digital 4
RHT03 rht;                              // This creates a RTH03 object, which we'll use to interact with the sensor
float latestHumidity;
float latestTempC;
float latestTempF;

void loop()
{

  // RHT03 Humidity and Temperature Sensor
  isRHT03();

  // Check if a client has connected
  WiFiClient client = server.available();
  if (!client) {
    return;
  }

  // Read the first line of the request
  String req = client.readStringUntil('\r');
  Serial.println(req);
  client.flush();

  // Match the request
  int val = -1; // We'll use 'val' to keep track of both the request type (read/set) and value if set.
  if (req.indexOf("/led/0") != -1)
    val = 0; // Will write LED low
  else if (req.indexOf("/led/1") != -1)
    val = 1; // Will write LED high
  else if (req.indexOf("/read") != -1)
    val = -2; // Will print pin reads
  // Otherwise request will be invalid. We'll say as much in HTML
  // Set GPIO5 according to the request
  if (val >= 0)
    digitalWrite(LED_PIN, val);

  client.flush();

  // Prepare the response. Start with the common header:
  String s = "HTTP/1.1 200 OK\r\n";
  s += "Content-Type: text/html\r\n\r\n";
  s += "<!DOCTYPE HTML>\r\n<html>\r\n";
  // If we're setting the LED, print out a message saying we did
  if (val >= 0)
  {
    s += "LED is now ";
    s += (val)?"on":"off";
  }
  else if (val == -2)
  { // If we're reading pins, print out those values:
    s += "Analog Pin = ";
    s += String(analogRead(ANALOG_PIN));
    s += "<br>";                                       // Go to the next line.
    s += "Digital Pin 12 = ";
    s += String(digitalRead(DIGITAL_PIN));
    s += "<br>";                                       // Go to the next line.
    s += "Humidity and Temperature";
    s += "<br>";                                       // Go to the next line.
    s += "Humidity : ";
    s += String(latestHumidity);                       // Humidity
    s += "%";
    s += "<br>"; // Go to the next line.
    s += "Celsius: ";
    s += String(latestTempC);                          //  Temperature *C
    s += "*C";
    s += "<br>"; // Go to the next line.
    s += "Fahrenheit: ";
    s += String(latestTempF);                          // Temperature *F
    s += "*F";
  }
  else
  {
    s += "Invalid Request.<br> Try /led/1, /led/0, or /read.";
  }
  s += "</html>\n";

  // Send the response to the client
  client.print(s);
  delay(1);
  Serial.println("Client disonnected");

  // The client will actually be disconnected when the function returns and 'client' object is detroyed

}
getRHT.ino
// RHT03 Humidity and Temperature Sensor
void isRHT03(){

  // Call rht.update() to get new humidity and temperature values from the sensor.
  int updateRet = rht.update();

  // The humidity(), tempC(), and tempF() functions can be called -- after
  // a successful update() -- to get the last humidity and temperature value
  latestHumidity = rht.humidity();
  latestTempC = rht.tempC();
  latestTempF = rht.tempF();

}
setWiFi.ino
// WiFi
void setupWiFi()
{

  // WiFi mode WIFI_AP
  WiFi.mode(WIFI_AP);

  // Append the last two bytes of the MAC (HEX'd) to "Thing-":
  uint8_t mac[WL_MAC_ADDR_LENGTH];
  WiFi.softAPmacAddress(mac);
  String macID = String(mac[WL_MAC_ADDR_LENGTH - 2], HEX) +
                 String(mac[WL_MAC_ADDR_LENGTH - 1], HEX);
  macID.toUpperCase();
  String AP_NameString = "ESP8266 Thing " + macID;

  char AP_NameChar[AP_NameString.length() + 1];
  memset(AP_NameChar, 0, AP_NameString.length() + 1);

  for (int i=0; i<AP_NameString.length(); i++)
    AP_NameChar[i] = AP_NameString.charAt(i);

  WiFi.softAP(AP_NameChar, WiFiAPPSK);

}
// init Hardware
void initHardware()
{

  // Serial
  Serial.begin(115200);
  // LED Green
  pinMode(DIGITAL_PIN, INPUT_PULLUP);
  pinMode(LED_PIN, OUTPUT);
  digitalWrite(LED_PIN, LOW);
  // RHT03 Humidity and Temperature Sensor
  // Call rht.begin() to initialize the sensor and our data pin
  rht.begin(RHT03_DATA_PIN);

}
setup.ino
// Setup
void setup()
{

  // Hardware
  initHardware();
  // WiFi
  setupWiFi();
  server.begin();

}
Don Luc
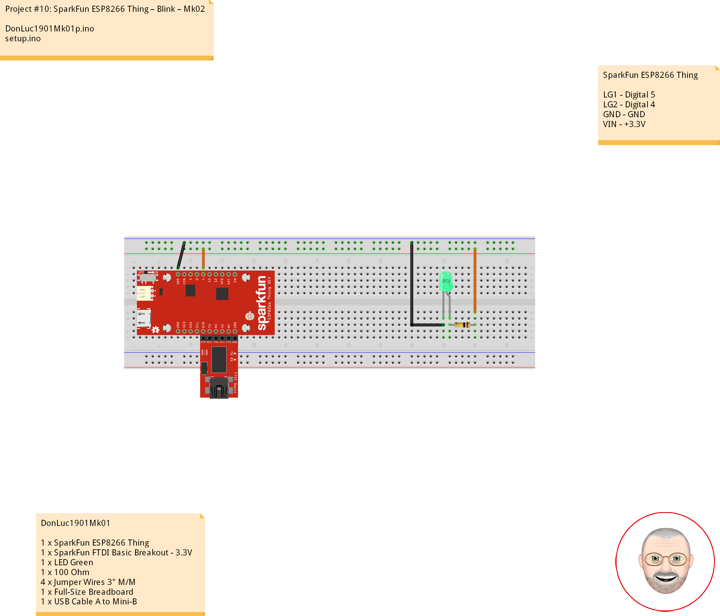
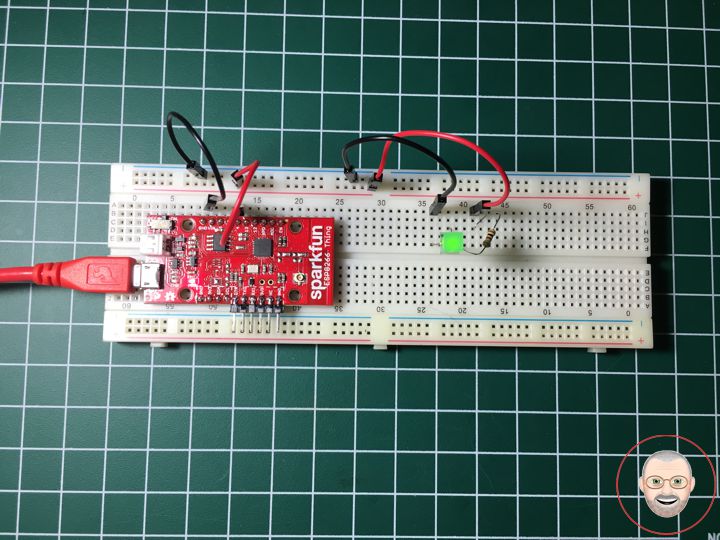
Project #10: ESP8266 Thing – Blink – Mk02
Soldering
Plated through-hole soldering (PTH), flux-core solder alloys commonly used for electrical soldering are 60/40 Sn-Pb used principally in electrical/electronic work and TENMA soldering station temperature controlled digital.
Hardware Assembly
We’re getting ahead of ourselves. To connect the FTDI programmer to your Thing you’ll need to solder something to the Thing. What, exactly, you solder to the board depends both on how you’ll use it in your project, and how you’ll interface it with the programmer. When it comes to selecting a header (or wire) to solder, there are a variety of options. We’ve tried a lot of them with the Thing:
Or you can mix and match headers to best fit your needs. Right-angle male headers may help to interface between the FTDI and the Thing. Straight male headers are a good choice for low-profile connections. Straight female headers may help with connecting to I2C sensors. And, of course, wire can be soldered to any of the pins that have a long way to connect to something.
10 pin – Break Away Headers – Straight
4 pin – Break Away Headers – Straight
6 pin – Break Away Male Headers – Right Angle
Once you’ve soldered up at least the programming port, you’re ready to load some code onto the Thing.
Programming the Thing
The ESP8266 has a built-in serial bootloader, which allows for easy programming and re-programming. You don’t need a specialized, expensive programmer – just a simple, USB-to-Serial converter. The FTDI Basic’s 6-pin header matches up exactly to the Thing’s 6-pin serial port header. To set up for programming, simply connect the FTDI directly to this port – take care to match up the DTR and GND pins.
Blink
Let’s blink some LEDs and IoT (Internet our Thing). To verify that everything works Blink: toggle pin 5, which is attached to the onboard LED Green, toggle pin 4 which is LED Green.
DonLuc1901Mk01
1 x SparkFun ESP8266 Thing
1 x SparkFun FTDI Basic Breakout – 3.3V
1 x LED Green
1 x 100 Ohm
4 x Jumper Wires 3″ M/M
1 x Full-Size Breadboard
1 x USB Cable A to Mini-B
SparkFun ESP8266 Thing
LG1 – Digital 5
LG2 – Digital 4
GND – GND
VIN – +3.3V
DonLuc1901Mk01p.ino
// ***** Don Luc Electronics *****
// Software Version Information
// Project #10: SparkFun ESP8266 Thing – Blink - Mk02
// 01-01
// DonLuc1901Mk01p.ino 01-01
// SparkFun ESP8266 Thing
// Blink

// Include Library Code

#define ESP8266_LED 5      // LED Green
int iLEDGreen = 4;         // LED Green

void loop()
{

  // ESP8266_LED, iLEDGreen
  digitalWrite(ESP8266_LED, LOW);
  digitalWrite(iLEDGreen, LOW);
  delay(2000);
  digitalWrite(ESP8266_LED, HIGH);
  delay(2000);
  digitalWrite(ESP8266_LED, LOW);
  delay(2000);
  digitalWrite(iLEDGreen, HIGH);
  delay(2000);

}
setup.ino
// Setup
void setup()
{

  // LED
  pinMode(ESP8266_LED, OUTPUT);                 // ESP8266_LED Green
  pinMode(iLEDGreen, OUTPUT);                   // LED Green

}
Don Luc